How to repair iPhone screen?
Similar to any smartphone, iPhone is susceptible to be smashed and shattered. If you get it broken, you have to repair iPhone screen as soon as possible. According to Apple official service, issues caused by accidental damage aren't covered under the Apple limited Warranty. That means that you have to pay extra fees to repair iPhone screen. Actually, there are three ways to repair a broken iPhone screen. If you have purchased AppleCare+, you can enjoy the iPhone screen replacement service, which costs much less. And even though your phone is out of warranty, you can also repair it in any Apple Store. Of course, the cost is rather high, at $299 currently. Another option is to DIY repair iPhone screen. In this post, we are going to show you how to repair a cracking screen through AppleCare+ or by your own.

Generally speaking, iPhone users could enjoy a one-year limited warranty and 90 days of technical support by telephone calls for free. But as I said before, the limited warranty does not include broken screen replacement. If you want to get extended warranty, you have to purchase AppleCare+ plan, which is Apple's extended warranty and technical support plans for iPhones. The cost of iPhone screen replacement will reduce to $29 under AppleCare+ plans from $169. Moreover, AppleCare+ plans include accidental damage coverage.
Step 1 Look at your AppleCare+ plan
Visit Apple website and log into My Support with your Apple ID and password. Then you can view your iPhone's AppleCare+ plan in product details page.
Step 2 Print the proof of coverage
Press View Proof of Coverage and view the proof of coverage through two-factor authentication. Then you can print it for repair iPhone screen. Or you can send the proof of coverage to your email.
Step 3 Decide a way to ship your iPhone
AppleCare+ has six ways to initiate screen replacement service.

If you do not have AppleCare+ plans, Apple promises to replace iPhone screen too. But the cost will increase to $299, which include the new screen, local tax and shipping fee. Why don't you try repairing iPhone screen by your own? Of course, this is risky, but it can save you a lot of money.
Step 1 Prepare toolkits
Buy a new screen and iPhone tool kit from a vendor specialized in iPhone parts based on your iPhone model. And you also need a razor blade. Before start repairing, press the Sleep/Wake button until you see the power off screen. Move the slider to power down your iPhone.

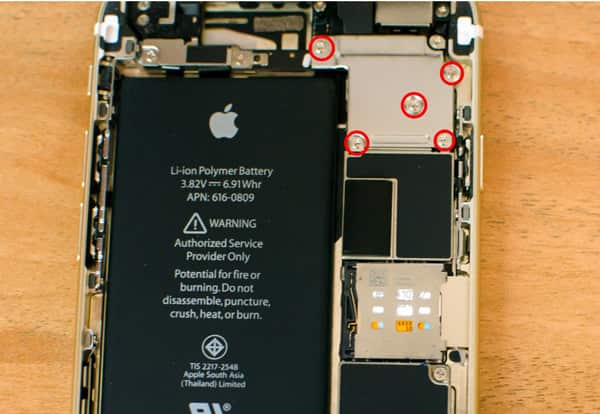
Step 2 Dismantle the broken screen
Dismantle two screws on both sides of the Lightning Dock with the 5-point screwdriver. Put the screws aside to avoid mixing them up. Use the suction cup to detach the screen from bottom carefully. Remove the five screws in the picture and detach the display shield. Then you can see four cables connected to iPhone screen. Remove them one by one gently.
Tip: If your iPhone screen is extremely shattered, you will need the razor blade to pry it from bottom carefully.
Step 3 Transfer Touch ID
After remove the broken screen from the smartphone, you have to dismantle the Touch ID shield from the back of the old screen. And then place the Touch ID and Home button assembly to the new screen.
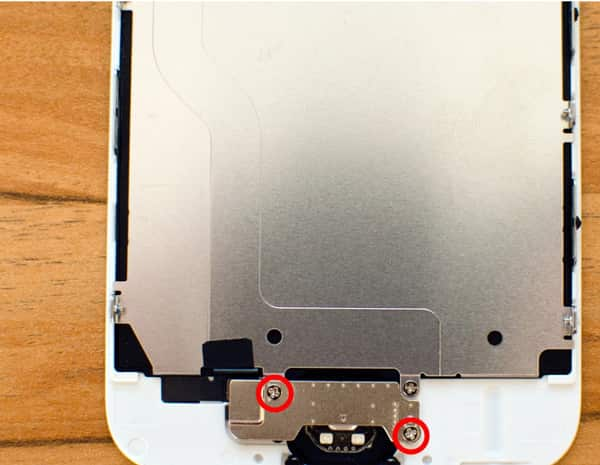
Step 4 Fix replacement screen
The last step to repair iPhone screen is to install the new screen to your phone. Connect the four cables to the replacement screen in reverse order when removed them. Fix the display shield with the five screws. Place the new screen align with the border. And then push it down gently. Finally, install the two screws on either side of the Lightning Dock to complete the process. Then you can power on your iPhone and check whether the new screen works well.
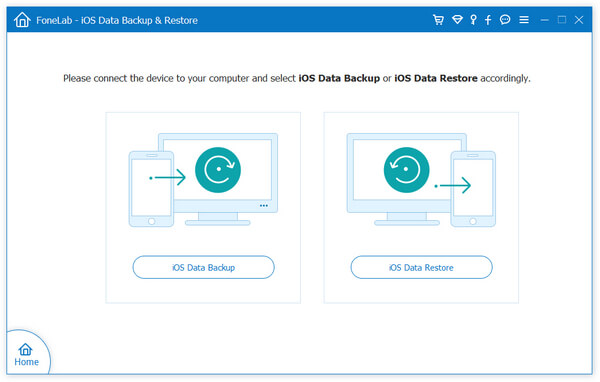
That DIY repair iPhone screen is risky. One mistake could lead to iPhone dead, so we suggest you backing up your iPhone with iPhone Data Recovery before repair it. iOS Data Backup & Restore is a desktop application. You can back up your phone quickly if you get it one your computer.
Step 1 Open iOS data backup tool
Connect your iPhone with broken screen to your PC via USB cable and launch iOS Data Backup & Restore. The backup tool will detect your iPhone automatically.
Step 2 Start backup
Once click on iOS Data Backup on main interface, it will start back up iPhone data to your computer.
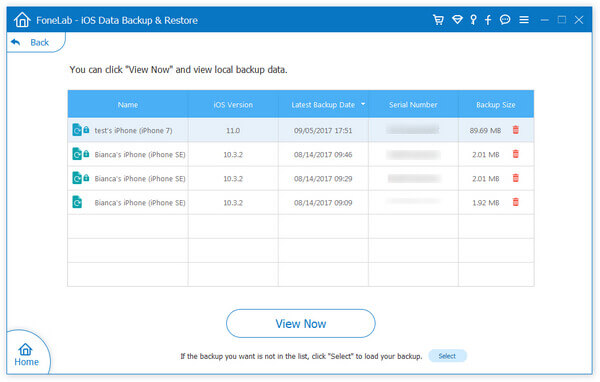
Step 3 View backup
After backup, iPhone Data Recovery will take you to the backup preview screen. Here you can view the data in any backup file by clicking on View Now.
Based on the guides above, you might grasp how to repair iPhone screen through AppleCare+ or by your own. The iPhone screen is made of glass, which is easy to break. Many users said that the first thing is to check the iPhone screens rather than themselves when they fell down. It makes sense, when you consider that the cost to replace a new screen is expensive. But if you have purchased AppleCare+, you can get the iPhone screen replacement service with much lower price. On the other hand, you can DIY repair iPhone screen following our guides. But before that, you should back up your phone with FoneLab iOS Data Backup & Restore.

June 26, 2018 14:30 / Updated by Louisa White to Fix iOS Problems
 How to Fix iPhone Screen Not Working
Check out our guides on how to repair iPhone not showing up in iTunes issue. This issue has been annoying many users, and you are not alone.
 Effective Ways to View iPhone Screen on PC
How to view iPhone Screen on PC? This article shows you several iOS screen recorder/viewer for you.
 How to Fix iPhone White Screen of Death
iPhone white screen? Run into iPhone white screen of death? This article is prepared for you to fix iPhone white screen.
