Have too many high-quality photos on your iPhone as iPhone become a great photo capture assistant due to its built-in iSight camera? Then you may want to copy and move multiple or all photos from iPhone to Windows PC. How to transfer photos from iPhone to PC? How can you easily export iPhone photos and save them on your computer? This article is going to show you several effective methods on how to transfer photos from iPhone to PC for Windows 7/8/10/Vista/XP.

The FoneTrans we use here is an efficient iPhone Photos Transfer software which can save you a lot of time when you want to transfer your iPhone photos to PC. It is highly compatible with Windows operating systems like Windows 7, Windows 8, Windows 10, Windows XP and Windows Vista and all iPhone models including iPhone X, iPhone 8/8 Plus, iPhone 7/7Plus, iPhone 6/6s/5/5s/5c/4s/4/SE. FoneTrans can help you import iPhone photos to PC with ease, no matter you want to sync all iPhone photos or just some specific photos to your PC. First, download and install the program and see how it works for iPhone photos transfer.
1. Install FoneTrans and connect your iPhone
Launch FoneTrans and use a USB cable to connect the iPhone with your PC. Soon, your device is detected. The application interface will show you your iPhone type, capacity, iOS version, serial number and more as following:

2. Select photos you want to import to PC
Click on Photos on the left menu. Then all your photos like Camera Roll, Photo Stream (photos synced to iCloud server), Panoramas, Videos, Photo Library (photos synced from computer) and pictures on other apps, etc. on iPhone will display in the main interface. Select specific photos you want to import to PC or you can transfer all photos from your iPhone to computer by selecting all photos.

3. Start to transfer iPhone photos to PC
After selecting photos, click Export to > Export to PC button from the top menu. Choose the destination folder on your computer and click OK. Quickly all selected iPhone photos will be synced from iPhone to your PC in the specified folder.
Besides transferring photos from iPhone to Windows 10/8/7, FoneTrans offers lots of other functions such as syncing your iPhone, iPod or iPad files (SMS, contacts, notes, multimedia) to your PC or Mac, exporting them to PC or iTunes as backup and also exchanging data between iOS devices. It is fully supported iOS 12/11/10/9/8/7.
File Explorer is a built-in function of Windows PC with which you can view and manage files in your devices and drives. With it, you can view all the photos on your iPhone and extract individual picture from your iPhone to computer. However, since it can only supports transferring photos in Camera Roll from iPhone to PC, you may need to use Method 1 to transfer all the photos (including Camera Roll photos, My Photo Stream, iCloud sharing photos, synced photos form computer, etc.) from your iPhone to computer.
1. Connect your iPhone with Windows PC.
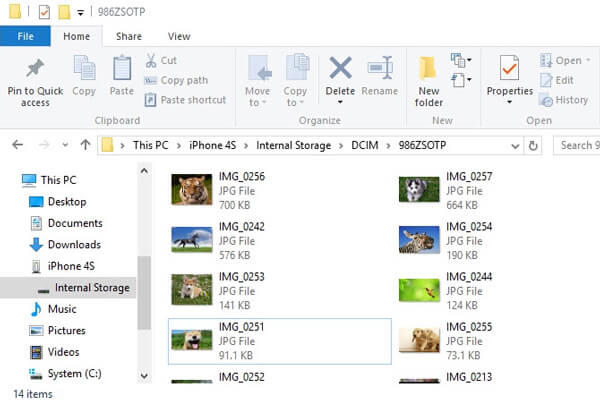
2. Under "Computer" for Windows 7 or "This PC" for Windows 8/10, you should see your iPhone as a drive. Double-click iPhone drive > "Internal Storage" > "DCIM", all photos and videos from your iPhone camera roll are here.
3. Within the picture folder you will be able to cycle through the iPhone's photos and videos (including iPhone screenshots). Then you can select the photos on your iPhone and transfer them to Windows 7/8/10 desired location on your computer by simply copying and pasting.
You can import photos from iPhone to your PC by connecting your device to your computer and using Windows Photo Gallery. Make sure you have the latest iTunes version on your PC. Importing photos to your PC requires iTunes 12.5.1 or later. Connect your iPhone to your PC with USB cable and unlock your iPhone using passcode. Tap Trust or Allow to continue if the iOS device asking you to Trust This Computer window pop-up.
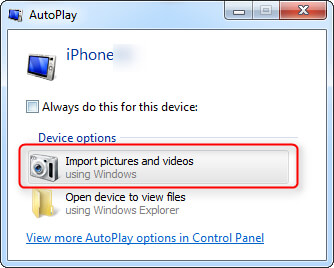
1. Plug your iPhone into computer with USB cable. Hit "Import Pictures and Video using Windows" when the AutoPlay window shows up in the desktop. If the AutoPlay window does not appear, got to "Computer" and right click on the iPhone device. Choose "Import pictures and videos".
2. Choose the link of "Import Settings" and click the "Browse" button next the "Import images to" to choose the destination.
3. Click "OK" to import photos from computer.
1. Connect iPhone with your Windows 8 PC.
2. Enter "The PC" and right-click on the iPhone device to choose "Import pictures and videos".
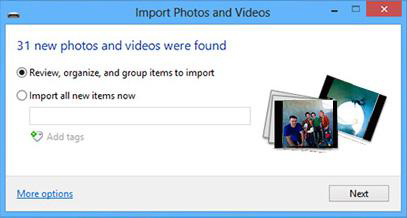
3. Select "Review, organize, and group items to import" when you import iPhone images for the first time. Or hit "Import all new items now" if you've imported photos from your iPhone. Click "Next" then.
4. "More Option" link can help you choose the folder where you want import pictures and videos from iPhone. Click "OK" and then "Next" button after choosing the folder.
5. Select the photos you want to transfer, and click the "Import" button.
Photos app added by Microsoft enables users to easily transfer photos from iPhone to Windows 10 computer.
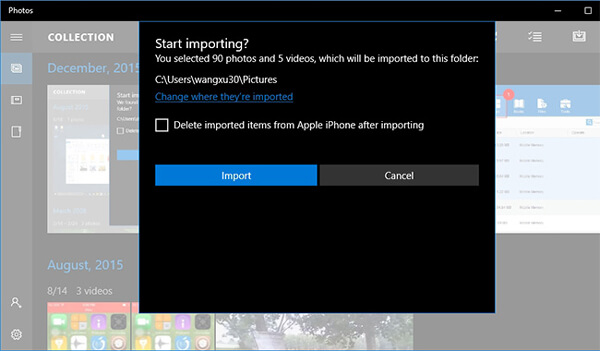
1. Connect iPhone to Windows 10 via a USB cable and launch Photos app on computer.

2. Hit the "Import" button at the top-right corner of the Photos interface. Select the pictures you want to import and click on "Import" to transfer photos from iPhone to Windows 10.
Perhaps you may be interested in: How to unsync photos from iPhone with ease
With iCloud Photo Library, you can access your photos from your iPhone and PC easily as your latest shot photos are automatically added to iCloud Photo Library and all changes and edits you make will be kept up to date across your iPhone and computer. In order to activate iCloud Photo Library, you need to set up iCloud for Windows on your PC and make sure your iPhone is connected to WiFi.
1. Turn on iCloud Photo Library. Download and install iCloud for Windows on your PC. Next to Photos, click Options > iCloud Photo Library > Done > Apply. (Photos may not syncing to iCloud)

2. As new photos you add to iCloud Photo Library from your iPhone will automatically download to your PC, you can also download photos manually. Just open File Explorer window, click iCloud Photos under Favorites. Click Download photos and videos, choose the photos and videos you want to download from iPhone to PC and click download.
Click here to learn more info about Transfer Android Photos to iPhone.
In this article, four effective ways are introduced for you to transfer photos from iPhone to PC. The most recommended way would be using FoneTrans as only FoneTrans can help you to transfer all kinds of photo albums and export all iPhone photos to PC at only one click. No matter you are using iPhone 4/5/6/7 or the latest iPhone X and iPhone 8, FoneTrans would still be your best partner to sync iPhone photos to computer. Hope this article can help you when you want to import iPhone photos to PC for Windows 7/8/10.

September 29, 2018 10:30 / Updated by Louisa White to Transfer iOS Data, Photo
 How to Transfer Photos from iPhone to Mac
How to transfer photos from iPhone to Mac? This article can give you some tips.
 How to Transfer Photos from iPhone to iPhone
Want to transfer photos between two iPhones? Then this post can help you.
 How to transfer contacts, music, pictures from dead iPhone to a new iPhone
This article descsribes how to transfer data from dead iPhone to a new iPhone.
