It can be disappointing if the photos you cherished a lot have been lost. Many users write to us and show that they feel it devastating that they did not backup photos when their iPhone or Android have been craked, stolen or lost, etc.
Many people, regrettably, don't realize the significance of photos backup. Making photos backup enables you to prevent from losing the photos. And if you want to restore them to another device, you can have a way. In case of any unfortunate things happening, or if you don't know how to backup photos from Android phone or iPhone, this article is prepared for you, which provides useful ways to help you back up Android or iPhone photos.

Backup Photos
How to backup photos from Android phone? To keep safe Android photo backup, there are various solutions to back up these images in a secondary storage device, in the mobile itself, in Dropbox or using Google backup.
Sending photos from Android to a secondary storage device is a useful way for Android photo backup. And computer can be such a storage device. You are able to copy photos from your Android phone and then paste them to PC.
Step 1Connect your Android phone with PC via USB cable.
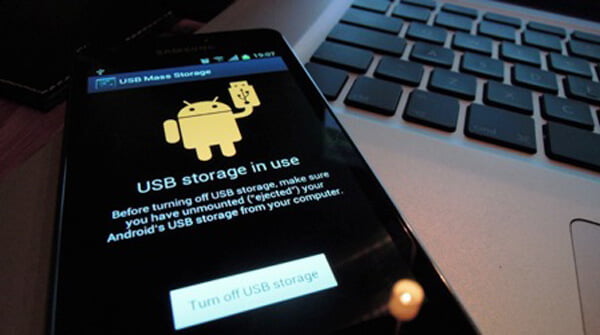
Step 2Unlock your phone and allow the USB authority.
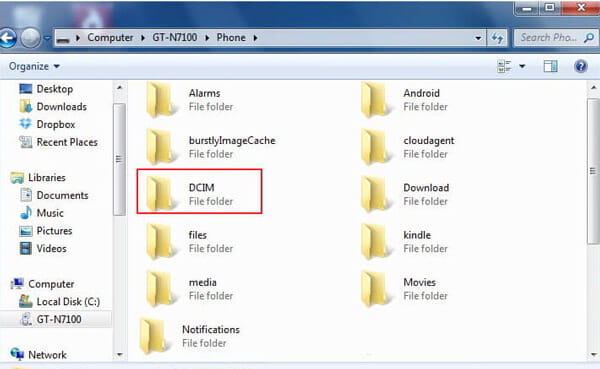
Step 3Navigate to "My Computer", "This Computer" or Windows File Explorer to find your device. Double click on internal storage or SD card and select the folder like "DCIM" (digital camera in memory) where you want to transfer Android photos to PC. Drag the images and paste them to a particular folder on computer.
Directly copying and then pasting photos from Android phone to PC may be time-consuming. Another efficient way to backup Android photos to PC is to use Android Backup & Restore.
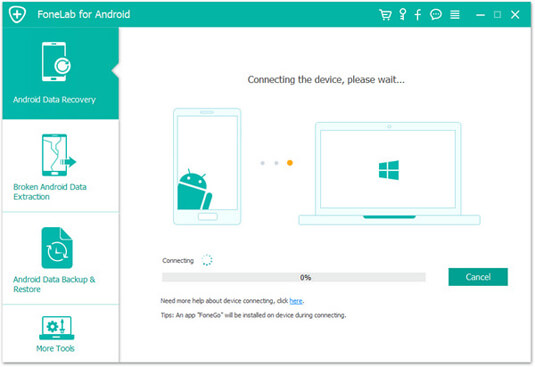
Step 1Connect Android phone to computer
Connect Android to PC with a USB cable. Wait for this program to detect your Android phone automatically.
Step 2Choose photos to scan
After succeeding in connecting your phone, tick "Gallery" and "Picture library" to scan. If you need, you could choose other files types to recover or backup.
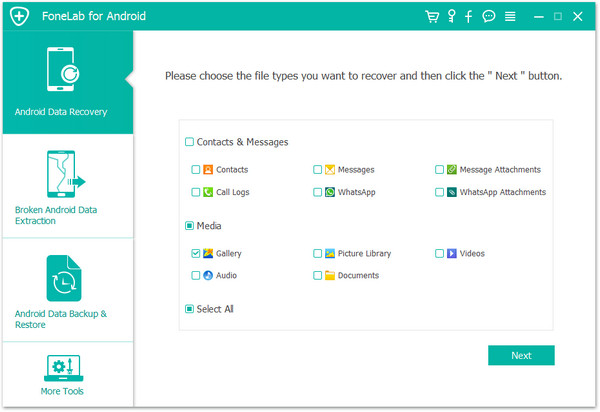
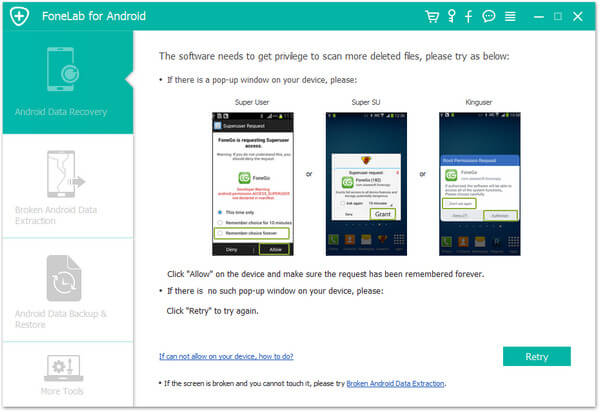
Root your Android phone to allow FoneLab for Androidto scan your phone photos.
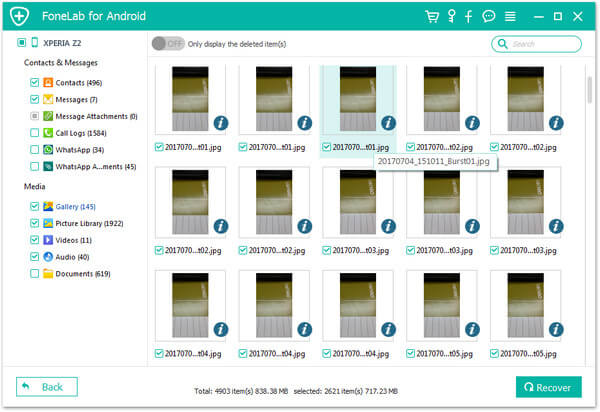
Step 3Preview recovered Android photos
Click "Gallery" or "Picture Library" after scanning, and you can view all the photos, including the deleted (photo name marked in red color) and existing photos (photo name marked in black color) and pictures on Android.
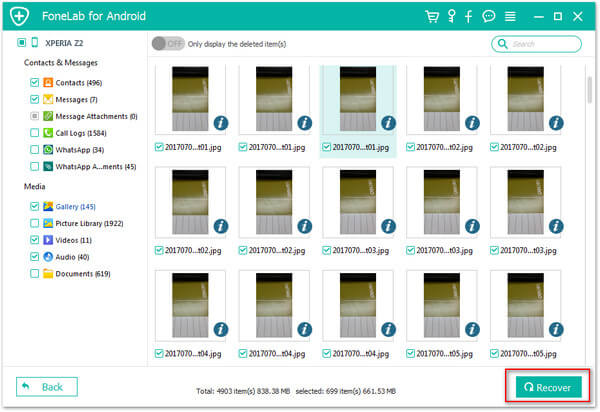
Step 4Backup Android photos
Select photos you want to backup, and click "Recover" to back up photos to your computer. For the downloaded photos, you can keep them on your PC for backup.
Another useful way is to use Dropbox for Android photos backup. Dropbox is a great Android application that has a powerful feature of camera photos uploading in its settings and then this app will directly backup and save your Android photos to the Dropbox folder. That means these photos will automatically be stored in the Dropbox cloud.
At first, download and install the latest version of Dropbox from Google Play Store to your phone. Set the settings of the Dropbox to make an account or click on "Sign Up". Sign into Dropbox to backup photos.
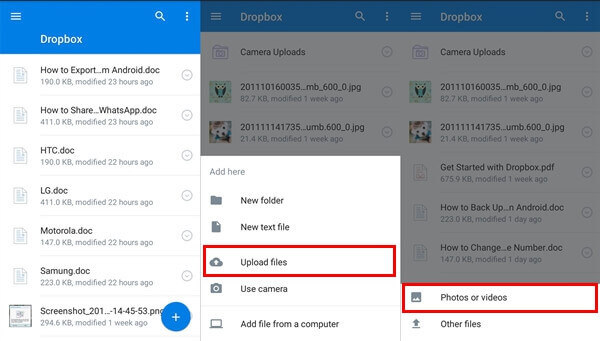
Then you should enable the camera uploads which will automatically save the images and videos of your device by making a New Folder by the name of Camera Uploads in Dropbox. Or when you are logged in, click on "Photos" icon, Select the "Turn On" button to enabling the backup for picture.
However, Dropbox only provides you with 2 GB space to keep our data in Dropbox. It won't delete any type of data without user permission.
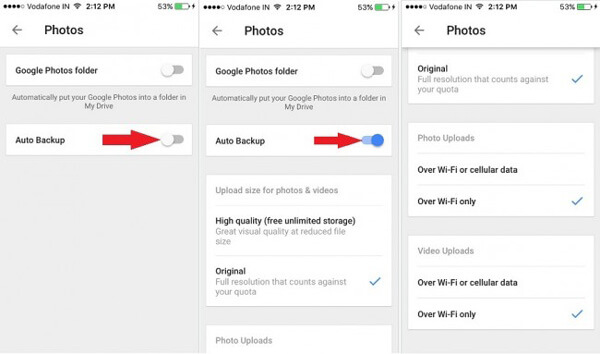
Google Photos makes it very easy for Android photos backup. And its auto backup feature makes your photos be automatically backed up to Google Drive.
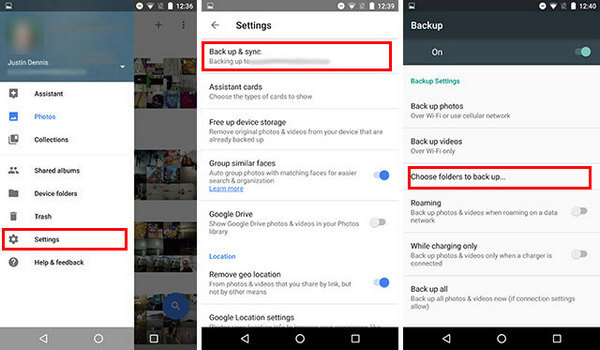
Step 1Download Google Photos app on Android.
Step 2Launch Google Photos in Android. Go to "Settings" and then toggle on "Back up & sync" option. Now Google photos auto backup feature has been turned on, and you can choose to only sync Google photos over Wi-Fi or when the device is charging.
Step 3Or you can click "Choose folder to backup" and choose the photos that you want to upload.
Step 4When you want view Google backup pictures, visit the Google Photos site to see the photos that you've backup.
The Google+ is an auto backup with full security as the pictures stored by any user are stored always in private space of each. If user enables the Auto Backup, photos and videos automatically gets stored in Google+.
First you need to download Google Photos app from Google Play Store and download it into your device.
Install the app and create account, click "Sign in" to log in. After that click on "Settings" and turn on the "Backup & Sync" option.
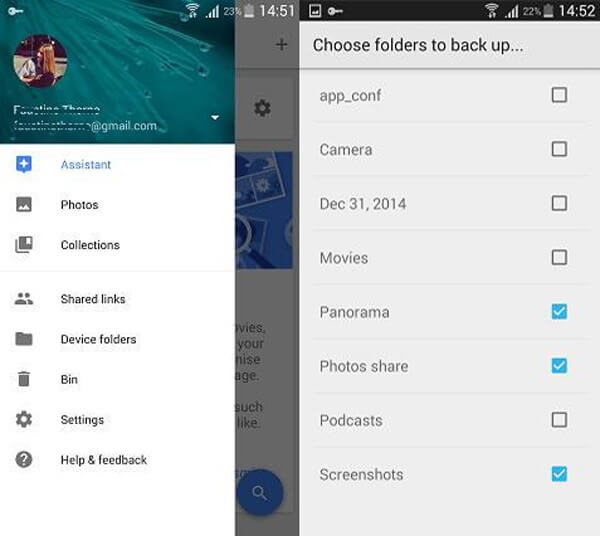
After 2nd step, click on "choose folder to backup", where all picture files that are stored in your phone will appear in a list and select these images to backup.
Soon you can see all your backup images from your device while login into Google Photos.
How to backup photos from iPhone? This part is going to show about five solutions for iPhone photos backup.
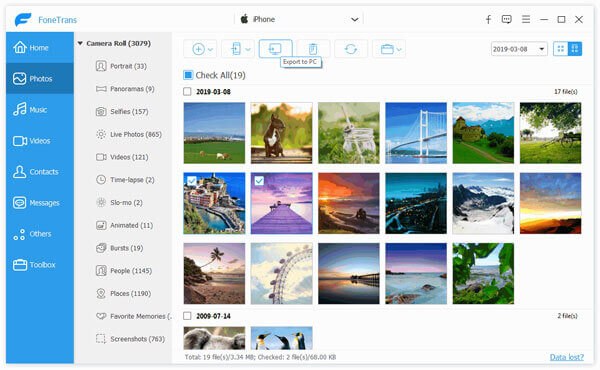
Step 1Download and install FoneTrans on your PC or Mac.Connect your iPhone to computer via USB cable.

Step 2Click "Photos" at the left side of interface.
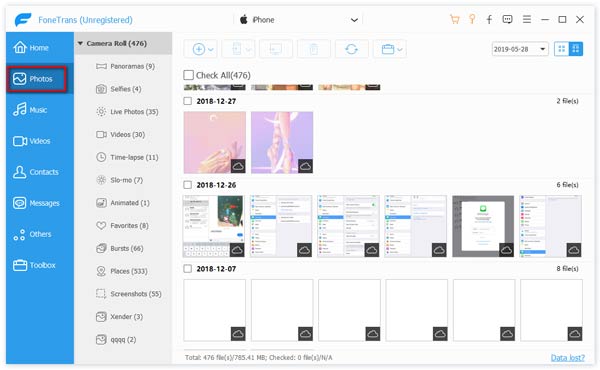
Step 3Click the photos album in the interface, choose the folders of photos you want to export and click the "Export to"button to move pictures from iPhone to computer.
Nowadays, iCloud storage space is another useful place for photos backup from iOS devices. It provides 5 GB free storage space to let you back up data. If you want more, you should purchase it.
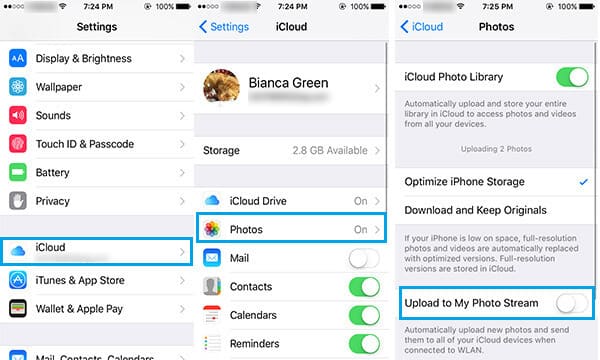
On your iOS 8 device or later: Tap "Settings" > "iCloud" > Turn on "Photos" > "Backup" > Turn on "iCloud Backup".
On your iOS 7 device or earlier: Tap "Settings" > "iCloud" > Turn on "Photo Stream" > "Storage & Backup" > Turn on "iCloud Backup".
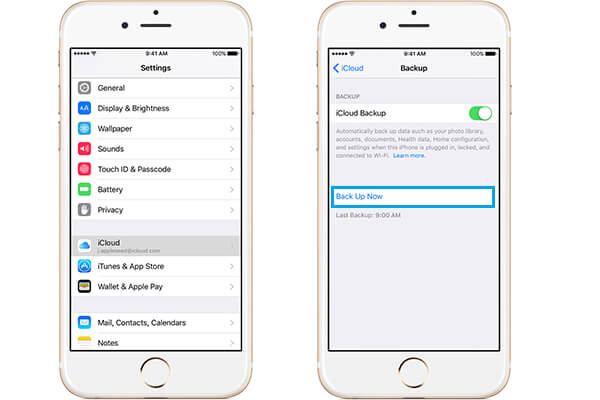
On your iOS 8 device or later: Tap "Settings" > "iCloud" > Turn on "Photos" > "Backup" > Tap "Back Up Now".
On your iOS 7 device or earlier: Tap "Settings" > "iCloud" > Turn on "Photo Stream" > "Storage & Backup" > Tap "Back Up Now".
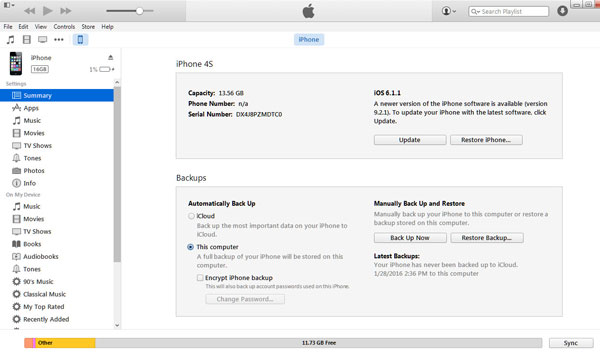
You can also choose to use iTunes to backup iPhone data, including your photos. Open iTunes > Connect your iPhone to computer > Click the iPhone icon in the upper left corner of the interface > Choose "This computer" under Automatically Back Up or choose "Back Up Now" to manually back up iPhone > Click the Apply button in the lower right corner of the interface.
With the 5 GB free space, Google Drive is a good choice for you to store backup iPhone photos. However, you need to purchase the more storage space beyond 5 GB. The Good Drive is good for iPhone photos backup.
Download and install Google Drive on your iPhone. Then sign in with your Gmail.
Go to your iPhones Google Drive settings and choose "Photos" tab.
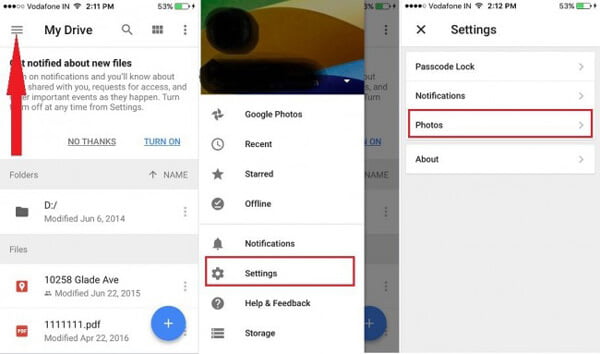
Go to "Auto backup" and turn it on. Give permission to Google Drive to automatically backup your photos. Go to settings, select "Drive" app then click "Photos" and turn it on. Your photos should be automatically made backup to Google Drive when you refresh the app.
Dropbox has basic free storage space in 2 GB, but you can purchase for more space. The following shows you how to backup your iPhone photos.
Download and install Dropbox app for iOS version and sign up a Dropbox account.
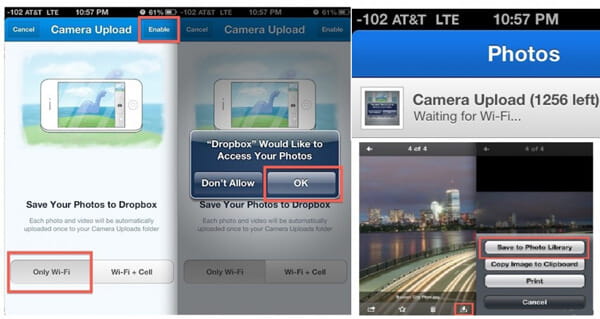
login to your account and then go to "Camera Upload" > select "Only Wi-Fi" > tap "Enable". This provides your Dropbox with access to your iPhone and it will start uploading photos for storage in your Dropbox. If you are using mobile data, select "Wi-Fi + Cell". The backup process is up to your internet speed and size of your photos.
In this article, we mainly show you how to backup photos from Android phone and iPhone. If you have any other solution for photos backup, welcome to tell us.

July 06, 2018 15:23 / Updated by Louisa White to Back up iOS Data, Back up Android Data
 How to Perform a Hard Reset on Android Phone
This article introduces to you what is a hard reset on Android, and how to hard reset Android phone.
 How to Recover Android Data after Factory Reset
Press the factory reset button? Want to recover the contacts from Android phone after factory reset?
 How to Backup/Restore iPhone from iTunes
How to restore iPhone with iTunes or without iTunes? This article gives you tutorial to restore iPhone from iTunes.
