Since the release of the first iPod generation, iPod Classic in 2001, Apple has developed many series like iPod Shuffle, iPod Nano, iPod Touch, etc. iPod Touch now can take photos, watch videos and play music. However, compared with iPhone, iPod still lacks many functions, and you can buy an iPhone to do all the things that an iPod can do.
It is easy to take a new iPhone, but the data in an old iPod may be gone when you give up the old iPod.
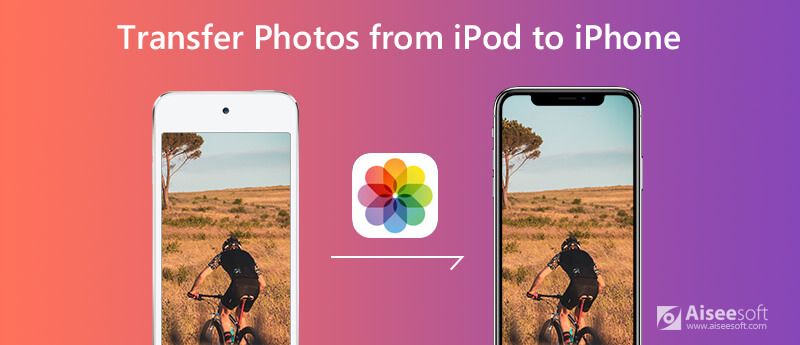
No worry, and this post shares 3 ways to help you transfer photos from iPod to iPhone, so that you will lose no impressive memories of photos.
Available for Windows 10/8/7 and Mac OS X 10.7 or above (macOS Sonoma included).
Tools you need: USB cable, Aiseesoft FoneTrans, computer.
To get pictures off an iPod and then import them into iPhone can be done via various ways. However, only this way can keep all the data on your iPhone and iPod Touch safely without loss. No special tech knowledge is required and you just need Aiseesoft FoneTrans.
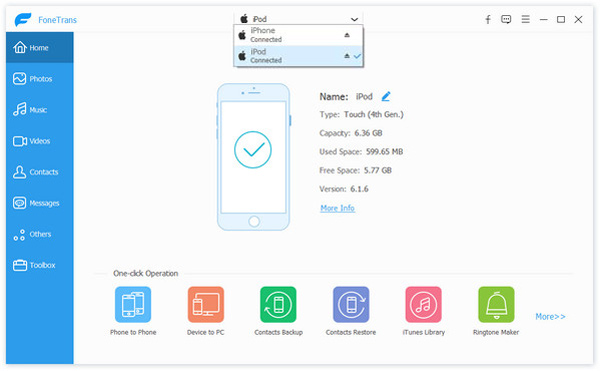
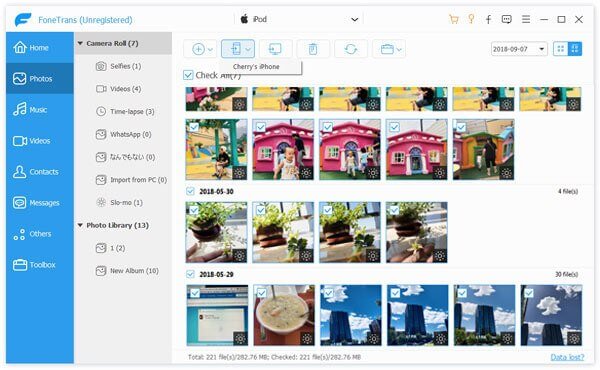
Aiseesoft FoneTrans is the professional data transfer software among iOS device, computer and iTunes. When it comes to syncing iPod photos to iPhone, it can make it easily via 2 steps. Besides, it is capable of managing the photos from iPod, iPhone and iPad on computer.

Downloads
FoneTrans – iPod to iPhone Transfer
![]() 100% Secure. No Ads.
100% Secure. No Ads.
![]() 100% Secure. No Ads.
100% Secure. No Ads.
Whether you're a tech pro or one of the not-so-tech-savvy types, you can backup iPod photos to iPhone in 2 steps.
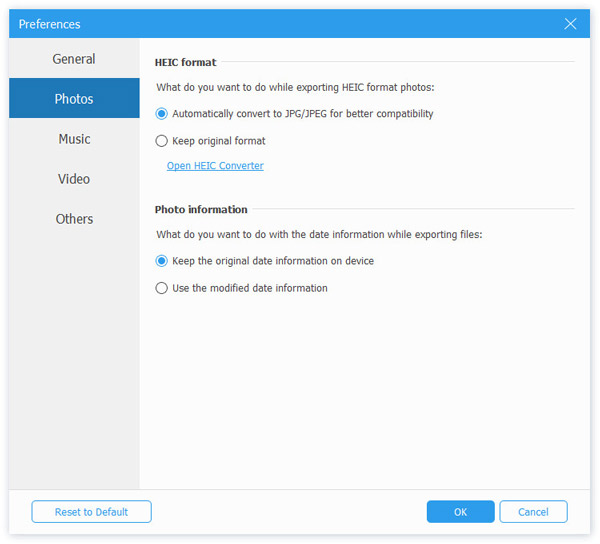
You can also copy the photo metadata information from iPod to iPhone by going to click the menu in three-dash in the top-right corner to select Preferences, and navigating the Photos tab, where you should tick the box before Keep the original date information on device under Photo Information.
Available for all iPhone and iPod with enough iCloud storage.
Tools you need: Wi-Fi connection
To spend money on making iPod pictures to iPhone backup may not be wanted for everyone. Apple also offers the free way to help you add photos from iPod to iPhone via iCloud. What you need to do is to backup photos from iPod to iCloud, and then restore photos from iCloud backup to iPhone.
In this way, you will replace the iPhone photos with the iPod pictures. Before that, you had better backup iPhone photos firstly.
Now, follow the simple steps mentioned below to know-how.
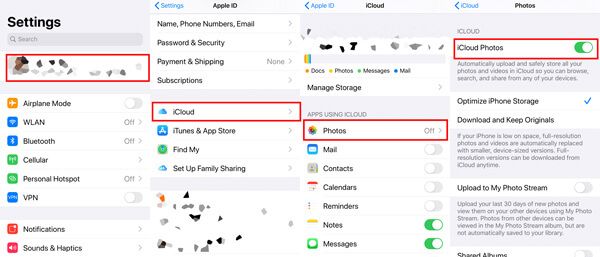
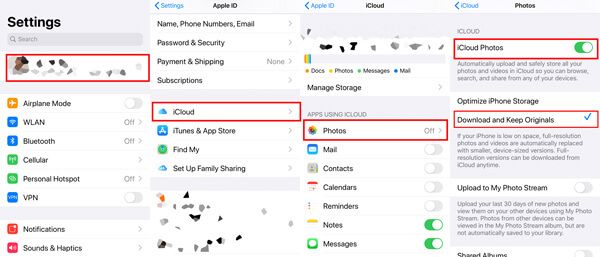
Then just keep your Wi-Fi connection stable to download the photos from iCloud to iPhone.
In this way, you have no control over the downloading process until it will be finished.
Available for Windows 10/8/7 with iTunes 12.5.1 or later, and Mac.
Tools you need: USB cable, computer.
Coincidentally, another free tool from Apple, iTunes, also allows you to import photos from iPod to iPhone. You just need to add the images from iPod Touch to computer with the USB cable, and then sync pictures from compute to iPhone with iTunes.
Here's how to get started:
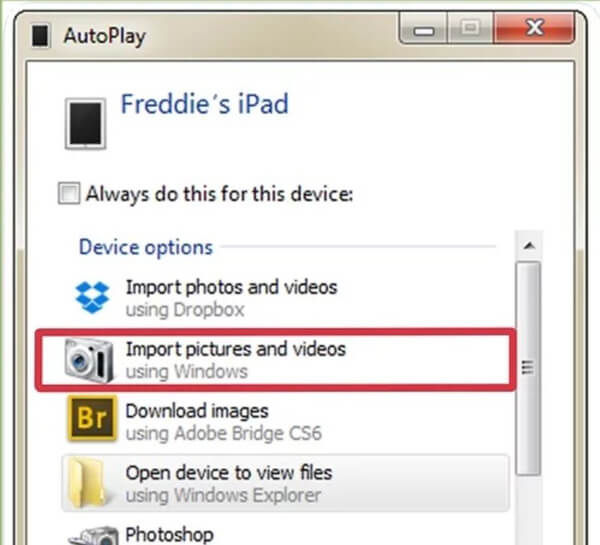
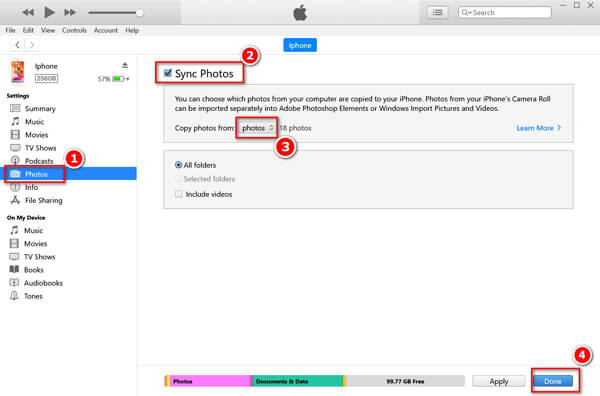
In this way, you can free transfer photos from iPod to iPhone, but all the pictures on iPhone currently will be replaced with the synced iPod photos.
iPod photos are missing on iPhone after iCloud backup?
The videos and photos you deleted on your iPod will be deleted everywhere you use iCloud Photos on iPhone. So, when you use iCloud Photos to sync photos from iPod to iPhone, do not make the changes, e.g. deleting photos, on iPod, before the process is done.
Can I transfer songs from iPod to iPhone?
Yes, you can. For copying music from iPod to iPhone, Aiseesoft FoneTrans can help you exactly. The details can be found here.
Cannot find iTunes on Mac after update?
iTunes media library is now available in the Apple Music app, Apple TV app, Apple Books app, and Apple Podcasts app on macOS Catalina and later. For using iTunes to sync photos from iPod to iPhone, you just need to open Finder, and you can see the familiar interface as iTunes on Mac.
Conclusion
When you want to get photos off an old iPod Touch, there are various ways to achieve that. This page shares 3 ways to sync iPod pictures to iPhone via iCloud, iTunes and FoneTrans. Both iTunes and iCloud are free to use, but they will erase all the existing data on iPhone and replace with the iPod photos. FoneTrans is the easy tool that can complete the transferring task without erasing any data. In addition, it offers other functionalities to help you transfer and manage your iPhone, iPad and iPod data with ease.
Which way do you pick up?
Do you have any other recommended ways?
Let me know by leaving your comments below.
 [Solved] How to Fix iCloud Photo Sharing Not Working on iPhone
Why is my iCloud link not working? How do I accept iCloud photo sharing invite? This post shows 7 effective solutions to fix iCloud photo sharing not working issue.
 5 Best iPhone Photo Recovery Software to Retrieve Deleted or Lost Images
In this iPhone photo recovery software review, we list the top 5 best iPhone photo recovery applications available to Windows 10/8.1/8/7 and Mac OS X.
 Useful Ways to Download Photos from iPhone to PC
How to download photos from iPhone to PC? This article shows you some useful ways to help you download photos from iPhone to PC.
Transfer from iPod
Video from iPod to Computer Transfer Music from iPod to Computer Transfer Music from iPod to Mac Transfer Music from iPad/iPod to iPhone Copy Songs from iPod to Mac Transfer Photos from iPod to iPhone Transfer Notes from iPod to Computer Transfer Notes from iPod to iPhone Transfer Contacts from iPod Touch to iPhone
The best iOS Transfer software to manage and transfer iOS files from iPhone/iPad/iPod to your computer or reversely without running iTunes.
![]() 100% Secure. No Ads.
100% Secure. No Ads.
![]() 100% Secure. No Ads.
100% Secure. No Ads.
