Summary
When you try to use such third-party apps as Mac Data Recovery on your Mac OS X El Capitan or later, and get the rejection, you should disable System Integrity Protection firstly. This page will list the details for you.
Summary
When you try to use such third-party apps as Mac Data Recovery on your Mac OS X El Capitan or later, and get the rejection, you should disable System Integrity Protection firstly. This page will list the details for you.
The first time you installed such third-party apps as Mac Data Recovery on Mac, you will find it set aside, pops up the message that "Startup disk is protected by 'System Integrity Protection' on your Mac. Please disable if for data recovery completely."
What is System Integrity Protection? How to disable System Integrity Protection on your Mac? Does it matter when you remove System Integrity Protection?
In the following description, we will present the detailed information about System Integrity Protection and how to disable/enable System Integrity Protection.

Disable System Integrity Protection
System Integrity Protection (SIP) is a security technology in Mac OS X El Capitan and later, to protect your Mac from malicious software.
Before System Integrity Protection, the root user had restrictions to access/modify/overwrite any system folder or app as below.
► /System
► /usr
► /bin
► /sbin
► Apps that are pre-installed with OS X
When the feature was introduced, some apps outside your home directory, like backup and restoration tools that rely on modifying certain protected system folders or files no longer worked, because it prevents such kind of software from being installed or operated. For using the apps, you need to disable System Integrity Protection on your Mac.
However, disabling System Integrity Protection will do harm to your Mac?
Actually not.
If you disable System Integrity Protection, you' will get the same level of protection as you had with OS X versions before El Capitan. SIP is the high level of security.
In addition, you can enable System Integrity Protection again after you exit Mac Data Recovery, or other similar third-party apps.
After getting a basic knowledge of System Integrity Protection, let us move the next part to check and disable/enable System Integrity Protection for using third-party apps freely.
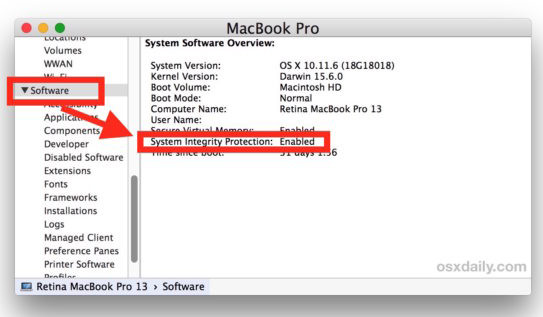
For those who are not sure System Integrity Protection is enabled or not, you can first check its status.
1Open the "/Applications/" folder and then go to "Utilities/".
2 Open the "System Information" and scroll down the left side list to choose "Software".
3Navigate "System Integrity Protection" on the right side, and see its status is "Enabled" or "Disabled".
"Enabled" means System Integrity Protection is turned on.
"Disabled" indicates that System Integrity Protection is turned off.
If System Integrity Protection is enabled, just follow the next part to disable it.
For using such the third-party apps as Data Recovery, you just need to follow the steps below to disable System Integrity Protection.
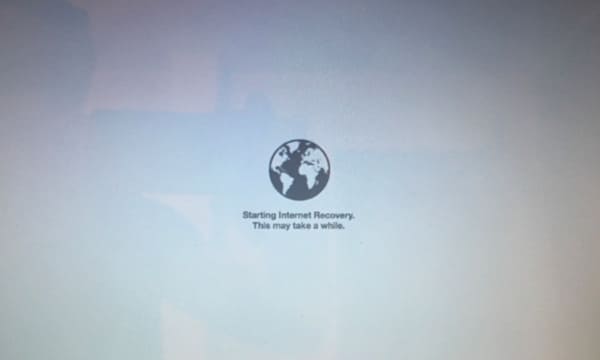
Turn on your Mac of restart your Mac when it is powered on. When you see the Apple logo or spinning globe on your screen, just hold and press "Command" + "R" keys at the same time. You can see that your Mac tries to connect to Internet connection.
2Disable System Integrity Protection
In the pop-up window, select "Disk Utility" > "Utilities" > "Terminal" > Type the command line in the recovery environment, "csrutil disable" and Enter.
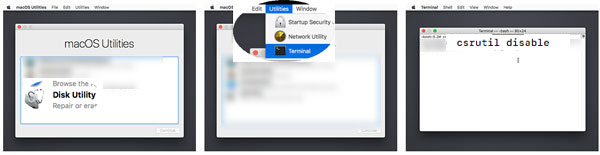
Then turn off Data Recovery, and restart your Mac, and new System Integrity Protection setting will take effect.
3Similarly, after you have finished the app application, you need to turn on System Integrity Protection by inputting the command, "csrutil enable" in the recovery environment.

Then you can check your Mac status to see of the settings work.
Don't miss: How to boot Mac from USB drive.
Though Aiseesoft Mac Data Recovery requires you to turn off System Integrity Protection for using, it is 100% safe to use with no harm to your Mac.
It only needs the authorization to read and scan the data on your Mac for your data recovery. It will not change, add or delete any part of your Mac on the disk. You can feel safely to install and use Aiseesoft Mac Data Recovery freely.
Warm reminder: After you use Mac Data Recovery to restore your lost data, you had better follow the steps mentioned above to enable System Integrity Protection again to prevent your Mac from modifications.

August 27, 2018 17:00 / Posted by Andrew Miller to Recover Mac Data
 Top 7 Mac Undelete Software to Retrieve Deleted Files
Don't know how to choose suitable Mac undelete software to restore your deleted files? Just read and follow this article to get these good applications.
 Fixed] 3 Easy Ways to Recover Overwritten Files as a Pro Quickly
There are 3 proven ways to recover overwritten files. You can do as it tells to get back the overwritten or replaced files quickly. Just read and check.
 10 Solutions to Fix Missing DLL Files and Recover Data
When you fail to run some apps on your Windows 10/8/7 computer and receive the DLL missing error message, you should seek for the best 10 ways here to fix the missing DLL files and recover data quickly.
