To start with, there are two questions you need to know. Just read and check if you really know about Mac recovery mode.
Question 1: What is the recovery mode?
Answer 1: By using recovery mode, you can load the built-in macOS recovery tools from a special disk partition. There are 4 different options including "Restore from Time Machine backup", "Reinstall macOS", "Get Help Online" and "Disk Utility". As a result, you can boot into recovery mode Mac to bypass difficulties.
Question 2: What are Mac startup key combinations for Mac recovery mode?
Answer 2: Well, you need to hold certain key combinations after pressing the power button. In another word, just hold and press startup key combinations when you are restarting. If you want to boot into Mac safe mode, just press "Shift" key. Moreover, you can press "Command" and "R" together to put Mac into recovery mode.

Recommendation: Your Best Choice to Clean Up Mac and Monitor Mac Performance
You can do as the following steps show to reinstall Mac OS Internet recovery or normal recovery mode. Be aware that you need to keep your Mac charged with power. Because it may take several hours to reinstall macOS X with recovery mode. (What if Mac not charging?)
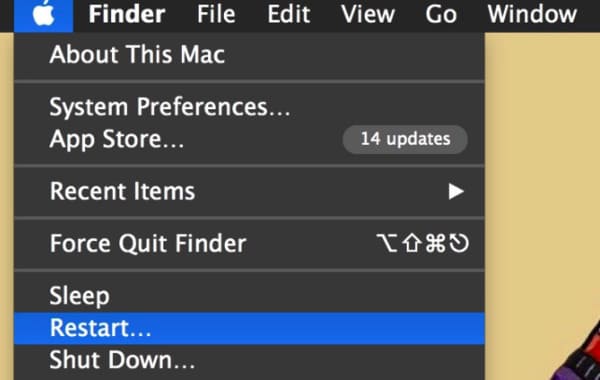
Step 1 Reboot your MacBook Pro
Turn on your Mac if it is powered off. Otherwise, you can choose "Restart" option on the Apple drop-down menu on the top left corner of the screen.
Step 2Boot into recovery mode
When you see the Apple logo or spinning globe on your screen, just hold and press "Command" and "R" keys on your keyboard at the same time. You can see that your Mac tries to connect to Internet connection.

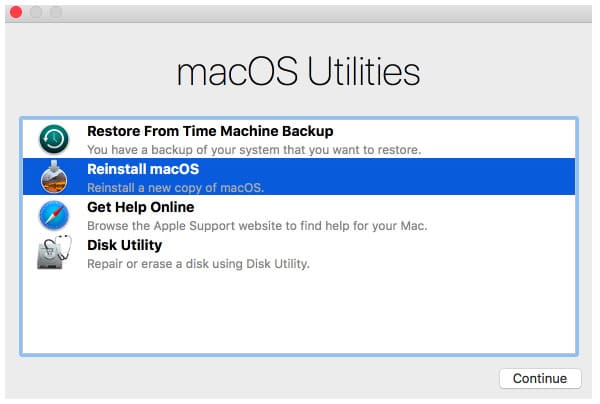
Step 3Get Mac recovery mode disk utility window
Finally, a new window pops up with the name of "OS X Utilities". You can get 4 different options for related operations. For instance, if you want to start up Mac in recovery mode, you can choose "Reinstall macOS" option. Consequently, you can choose "Restore from Time Machine Backup" to restore mac to an earlier state.
As a result, you can restore, reinstall, repair or seek help from Apple support successfully. Just wait and do not turn off your Mac suddenly during the process.
Many people complain that Mac won't boot into recovery mode. The startup screen stuck at spinning globe all day long. If you fail to boot Mac in recovery mode, then here are some solutions you can take.
If you connect Time Machine to the backup external storage drive, then you can boot Mac with other available disks.
Step 1Restart your Mac and press Mac startup key combinations.
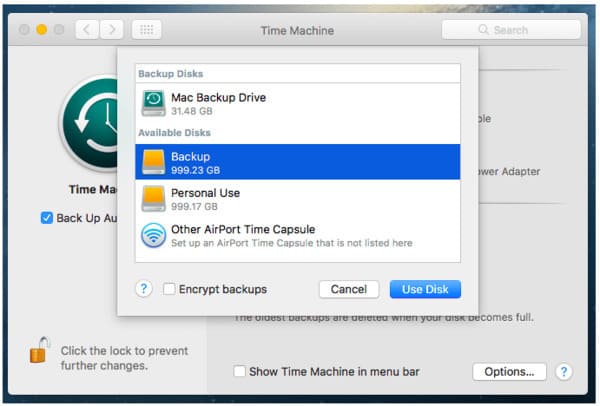
Step 2Choose "Restore from Time Machine Backup" in the "macOS Utilities" window.
Step 3Plug the Time Machine into your Mac computer.
Step 4Wait until your Mac detect the connected Time Machine.
Step 5Select the specific recovery disk to boot into recovery mode Mac.
Well, you can also insert a dedicated USB flash drive with a bootable mac OS X installer contained to fix Mac recovery mode not working issue.
Step 1Press "Command" and "R" keys while restarting Mac.
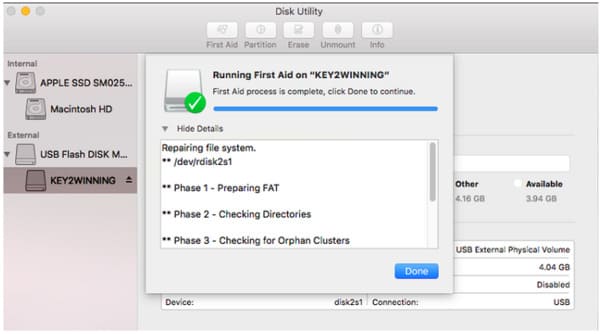
Step 2Choose "Disk Utility" to access Mac recovery mode disk utility.
Step 3Insert your bootable USB to Mac and choose it in the left panel.
Step 4Choose the certain drive from the popping-up list.
Step 5Wait for the auto Mac-repairing process.
Make sure you are running a strong Wi-Fi network. Otherwise, you may spend a lot of time on reinstalling macOS X with Internet recovery.
Step 1Reboot Mac and press "Command", "Option" and "R" keys when you hear the chime sound.
Step 2 Select one available Internet connection in the Wi-Fi list.
Step 3Type the password if you are prompted and then press "Enter" key.
Step 4Follow the on-screen instruction to restore Mac in Internet recovery mode.

Actually, your previous files and documents can still be recovered after the recovery mode Mac OS X. If you want to delete the files on Mac permanently, then you can head to Aiseesoft Mac Cleaner. What's more, you can keep your Mac in the healthy state effortlessly here.
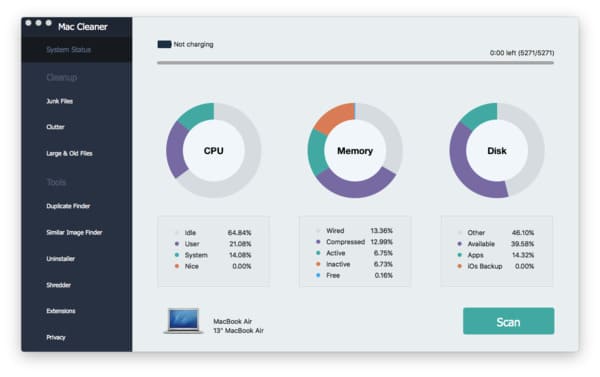
Step 2 Run Mac Cleaner
Free download and install Mac Cleaner software. Well, it supports all macOS X operating systems. When you launch Mac Cleaner, you will be in the "System Status". Click "Scan" to check the current condition of your Mac if necessary.
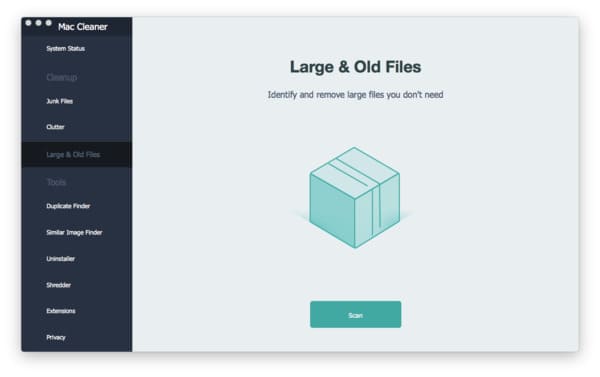
Step 2 Choose a Mac cleanup tool
If you want to free up more space, you can choose tools (junk files, clutter, large & old files) under "Cleanup" category in the left panel. This section will take "Large & Old Files" as an example. Choose this option and then click "Scan" at the bottom.
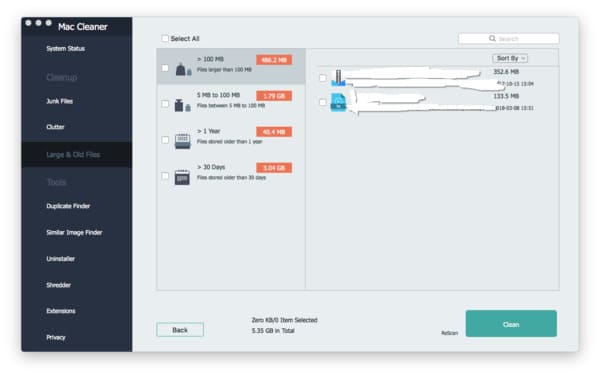
Step 3Delete large and old files manually
Later, you can get those useless files classified with different titles. For instance, choose "> 100 MB" to see old files larger than 100 MB. Just mark before the specific file you want to remove. At last, click "Clean" to the lower right corner to finish the process.
By using above solutions and tools, things will be much easier than before. So whether you are a newbie or encounter recovery mode Mac not working, you can get the perfect solution here.
Well, please don't hesitate to contact us if you have other difficulties.

June 25, 2018 07:28 / Posted by Amanda Brown to Fix Mac Problems, Recover Mac Data
 10 Solutions to Fix Missing DLL Files and Recover Data
When you fail to run some apps on your Windows 10/8/7 computer and receive the DLL missing error message, you should seek for the best 10 ways here to fix the missing DLL files and recover data quickly.
 How to Convert AVCHD Video to WMV
Convert AVCHD video to WMV – Guide about how to convert AVCHD video to WMV format with AVCHD to WMV Converter. Free download AVCHD Video Converter to convert AVCHD to WMV.
 How to Open/Recover ASD File on Word
What is ASD file? How to open an ASD file? How to recover the ASD document? This post show you the full guide of the ASD file.
