Best for : Beginners and users who need automatic 4K/AI restoration.
Best AI Video Converter Ultimate
![]() 100% Secure. No Ads.
100% Secure. No Ads.
![]() 100% Secure. No Ads.
100% Secure. No Ads.
Contents
Technology has made recording video easier than ever, but even with the best smartphones or cameras, we still encounter problems like out-of-focus shots, motion blur, or low-light grain. Before you upload that footage to YouTube or Instagram, it needs to be crisp and clear. So, how do you sharpen a video effectively without ruining the quality? Do you need expensive Hollywood software, or is there a one-click AI solution?
In this ultimate guide, we have tested and rounded up the best video sharpening tools for 2026. Whether you are a professional editor or a beginner, you will find the right solution here.

To find the best solutions for 2026, we put these 10 tools through rigorous testing. We used a 1080p blurry drone shot to test high-definition edge recovery and an old 480p family video to evaluate how each AI model reconstructs lost details versus simply adding digital noise. Our goal was to identify the perfect balance between professional-grade edge clarity and beginner-friendly processing speed. Based on these benchmarks, the following four video sharpeners emerged as the industry pioneers for 2026.
| Tool | Best For | Difficulty | Price |
| Aiseesoft Video Converter Ultimate | AI Auto-Sharpening & Beginners | ⭐ | $14.50/Month |
| Adobe Premiere Pro | Professional Desktop Editing | ⭐⭐⭐⭐ | US$22.99/month (annual, billed monthly) |
| DaVinci Resolve | High-End Color & Free Users | ⭐⭐⭐⭐ | Free / $295 |
| Topaz Video AI | Extreme AI Restoration | ⭐⭐⭐ | $299 |
Aiseesoft Video Converter Ultimate is the most efficient solution for users who want to skip the learning curve of pro editors. Its "Video Enhancer" uses deep-learning AI to rebuild missing pixels rather than just adding digital contrast. In 2026, it remains the top choice for restoring old or blurry clips with a single click.
Best for : Beginners and users who need automatic 4K/AI restoration.
Score:5/5
Key Features:
• AI Enhancement: Upscales resolution and sharpens edges automatically.
• Noise Removal: Eliminates "salt-and-pepper" noise from low-light footage.
• Video Stabilization: Fixes blur caused by shaky camera movements.
• Batch Processing: Sharpen multiple videos simultaneously.
![]() 100% Secure. No Ads.
100% Secure. No Ads.
![]() 100% Secure. No Ads.
100% Secure. No Ads.
Here’s how to sharpen video in Aiseesoft Video Converter Ultimate:
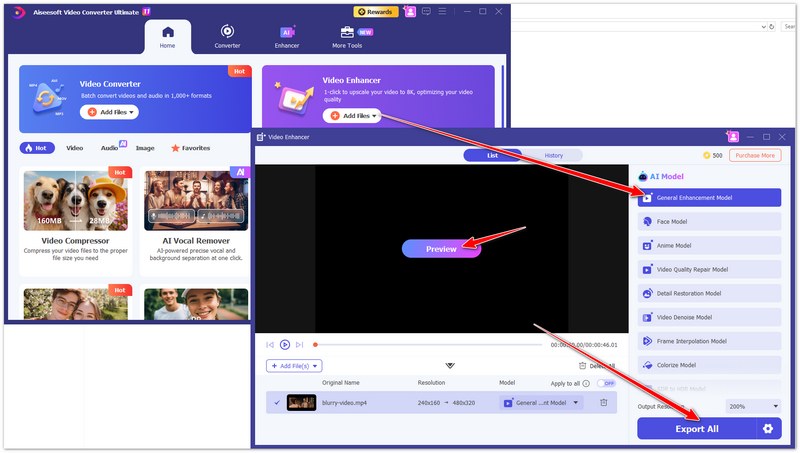
In addition to the AI enhancer, it also supports many other AI tools and has a basic conversion function, covering your diverse needs.
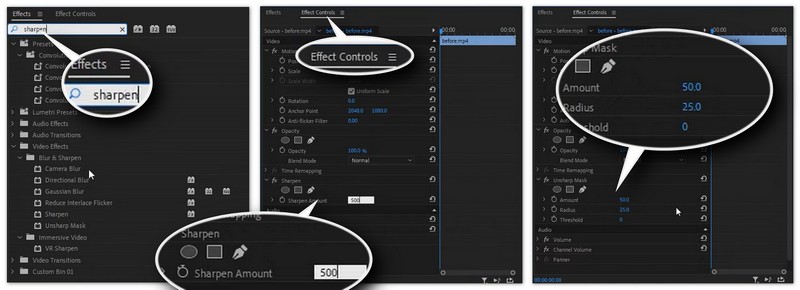
Premiere Pro is the versatile powerhouse used by YouTubers and filmmakers alike. Its sharpening tools are highly customizable, allowing you to mask specific areas so you don't over-sharpen the background. It is ideal for those already in the Creative Cloud ecosystem.
Best for : Professional editors who need granular control.
Score:4.5/5
Key Features:
• Lumetri Color Panel: Built-in "Creative" slider for instant sharpening.
• Unsharp Mask: Fine-tunes edge contrast without halos.
• Masking Support: Sharpen only the subject’s eyes or face.
Here is how to make footage sharper in Adobe Premiere Pro:
This professional-grade editor offers industry-leading precision through its Lumetri panel, but it can be extremely resource-heavy and requires an expensive monthly subscription.
Famous for its Hollywood-grade color grading, DaVinci Resolve offers a professional sharpening engine for free. Unlike most editors, its sharpening is "edge-aware," meaning it focuses on details rather than boosting global noise.
Best for : Advanced users looking for pro tools without a subscription.
Score:4.5/5
Key Features:
• Node-Based Sharpening: Allows for complex, layered enhancements.
• Radius Control: Adjusts the width of the sharpened edge.
• High-End Noise Reduction: Cleans grain before sharpening.
Steps to fix blurry video in DaVince Resolve:

It delivers cinema-quality results with its "edge-aware" sharpening for free, though the steep learning curve and high hardware requirements make it challenging for casual users.
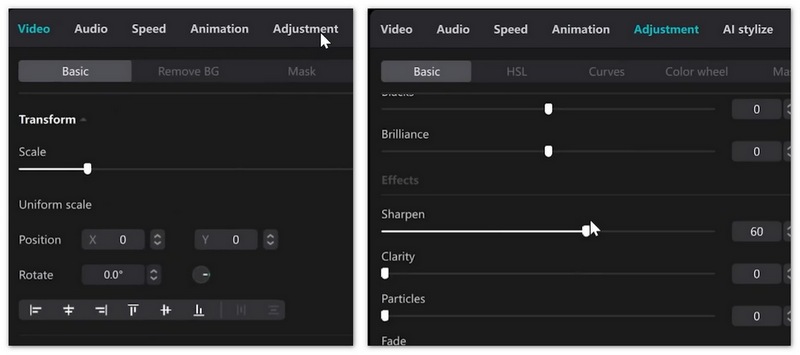
CapCut has become the definitive tool for vertical video creators. The desktop version brings a "Smart Sharpen" feature that mimics the 4K look often seen on viral TikToks and Reels, optimized for mobile-shot footage.
Best for : TikTok/Reels creators and quick social media edits.
Score:4.5/5
Key Features:
• Smart Sharpen: Specifically tuned for social media compression.
• 4K Presets: One-tap adjustment for higher perceived resolution.
• Image Adjustment: Simple sliders for brightness and clarity.
Learn how to use CapCut to sharpen a blurry video:
It is the fastest way to get a "crispy" viral look for social media, although the sharpening can sometimes appear artificial and several advanced features are locked behind a Pro paywall.
Intro: For Mac users, FCP is the fastest way to sharpen 4K or 8K video. It is natively optimized for Apple Silicon (M1/M2/M3), meaning you can preview sharpening effects in real-time without your computer lagging.
Best for : Mac users who prioritize speed and performance.
Score:4.5/5
Key Features:
• Real-Time Rendering: Instant feedback on sharpening adjustments.
• Built-in Sharpen Filter: Simple, high-quality edge detection.
• ProRes Optimization: Maintains clarity during export.
Follow the steps to enhance video quality by sharpening it in Final Cut Pro:

On a Mac, the performance is buttery smooth with instant rendering, but the tool is strictly limited to Apple hardware and offers less granular control than its rivals.
This isn't just an editor; it's a dedicated restoration suite. Topaz uses "Generative AI" to actually recreate missing textures in eyes, hair, and backgrounds. It is the best tool on earth for fixing "unusable" blurry footage.
Best for : Extreme restoration and upscaling of low-res clips.
Score:4.5/5
Key Features:
• Proteus/Iris AI Models: Intelligently restores faces and details.
• Motion Deblur: Fixes blur caused by fast-moving subjects.
• De-Compression: Removes digital artifacts from old web videos.
Here’s how to make your video clearer in Topaz with AI:
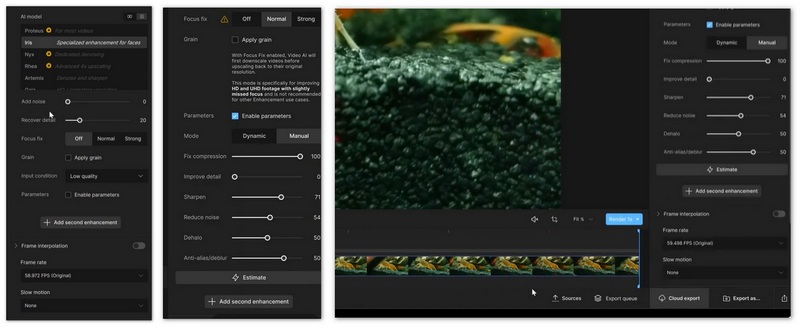
This is a "magic wand" for restoring hopeless or low-res footage, yet it suffers from extremely slow rendering speeds and requires top-of-the-line PC components to function.
When a simple slider isn't enough, After Effects is the tool you use. It is primarily for "fixing" specific shots rather than editing a whole movie, offering surgical tools to sharpen shaky or out-of-focus footage using advanced masking.
Best for : Complex visual effects and high-end focus correction.
Score:4.5/5
Key Features:
• Unsharp Mask: Industry-standard for defining edge detail.
• Motion Tracking: Sharpen a moving subject while leaving the background soft.
• Adjustment Layers: Apply sharpening across multiple video clips.
Learn how to sharpen video in After Effects:
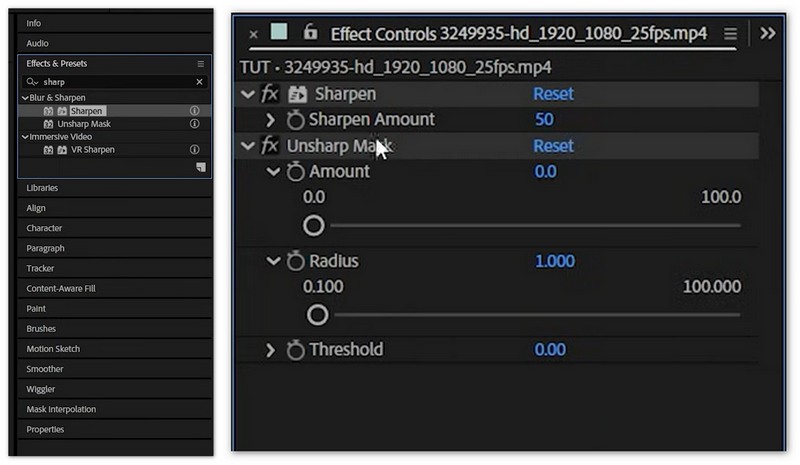
It offers surgical precision for fixing shaky or out-of-focus shots using advanced tracking, but it is notoriously difficult to learn and highly inefficient for editing long-form videos.
Famous for its mobile app, the Remini web platform is a "viral" favorite for its "Face Enhance" technology. It excels at making people look sharper, though it can sometimes look a bit "cartoonish" if overused.
Best for : Social media influencers and quick mobile/web fixes.
Score:4.5/5
Key Features:
• Face Enhancement: Rebuilds facial features for maximum clarity.
• Cloud Processing: No heavy computer hardware required.
• One-Tap Fixing: Simplest interface on the list.
How to use Remini Video AI to sharpen video:
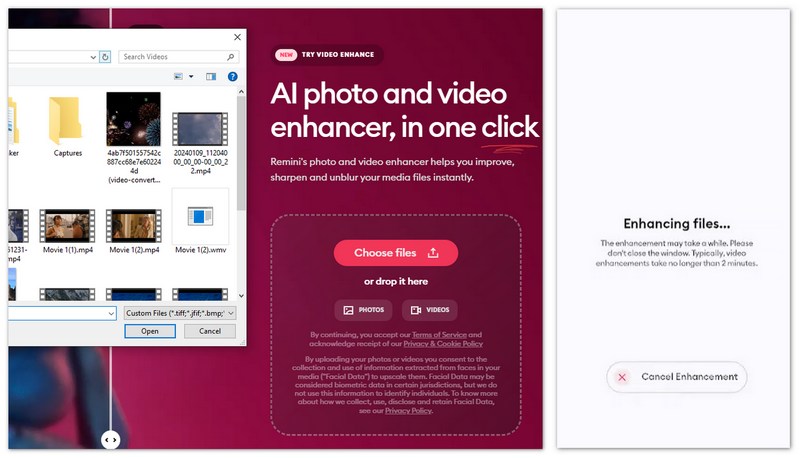
This tool works wonders on human faces in low-resolution clips via the cloud, but it often relies on a stable internet connection and can produce a "waxy" or cartoonish look.
Handbrake is the most popular free video transcoder. While primarily for changing formats, its "Unsharp Mask" filters are legendary for cleaning up grainy files during the conversion process without spending a dime.
Best for : Users who need to batch-process files for free.
Score:4.0/5
Key Features:
• Users who need to batch-process files for free.
• Unsharp Filter: Efficient, low-level sharpening.
• Denoise Integration: Cleans grain while it sharpens.
How to make your video clearer in HandBrake:
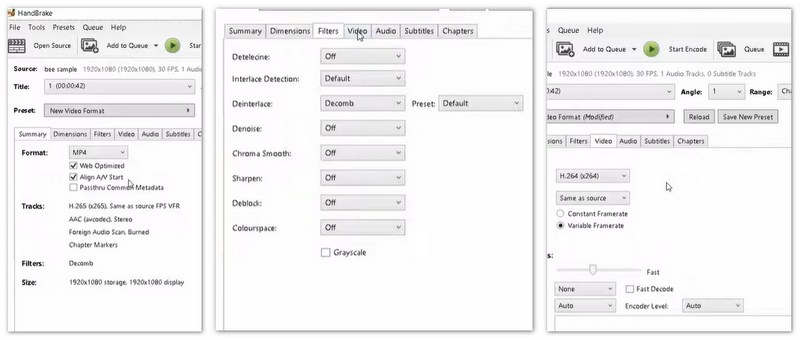
It is a reliable, totally free workhorse for batch-processing large video libraries, though the outdated interface and lack of visual previews make finding the right settings difficult.
Most people don't realize the player they already have installed can sharpen videos. While this only affects playback (it doesn't save the file), it is perfect for watching a low-quality download with better clarity instantly.
Best for : Quick, live viewing of blurry videos.
Score:4.0/5
Key Features:
• Real-Time Playback: No rendering time required.
• Zero Cost: You likely already own it.
• Simple Interface: Just a single checkbox.
Here are the steps to sharpen your footage in VLC:
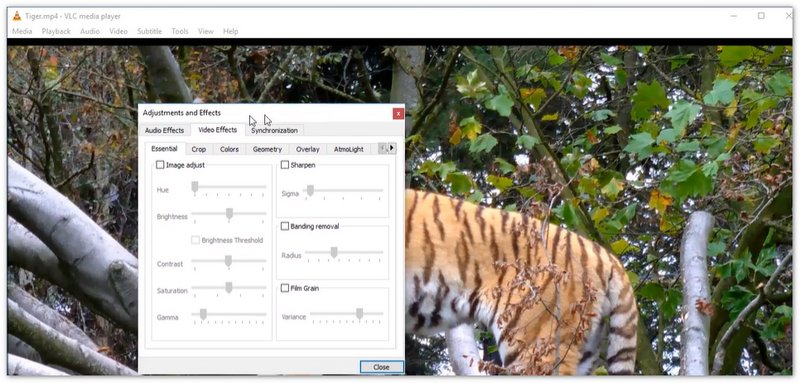
It provides an instant clarity boost for viewing poor-quality downloads at no cost, but keep in mind that these filters are live-only and cannot save a sharpened version of the file.
Conclusion
Choosing the right video sharpener in 2026 depends entirely on balancing your technical expertise with the specific needs of your footage. If you want an immediate, professional-grade fix without the steep learning curve, Aiseesoft Video Converter Ultimate is the premier choice for its efficient AI-driven automation.
![]() 100% Secure. No Ads.
100% Secure. No Ads.
![]() 100% Secure. No Ads.
100% Secure. No Ads.
However, for those requiring surgical precision or cinematic color grading, industry giants like Adobe Premiere Pro and DaVinci Resolve offer unmatched manual control, while Topaz Video AI remains the specialist for heavy-duty restoration of old or severely damaged clips. Ultimately, whether you are a social media creator using CapCut or a pro editor, selecting the tool that matches your workflow will ensure your blurry or out-of-focus shots are transformed into crisp, high-definition content ready for any audience.
 9 Apps to Add Text/Captions to Video Easily Within 3 Steps
How to add text to videos? Here are the top 9 step-by-step guides to add text to videos on Windows, Mac, iPhone, Android devices even online with the best apps.
 How to Make a Video Loop
Want to loop a popular video but don't know how? Or like to make a video loop on computer or mobile device? You can find specific solutions to loop a popular video or other videos from this page.
 7 Popular Video Denoiser to Use to Remove Video Noises [Newly]
Video denoiser is a popular feature that you can use on most video editors. But not all have the most effective way to denoise video. That is why we created this article.

Video Converter Ultimate is excellent video converter, editor and enhancer to convert, enhance and edit videos and music in 1000 formats and more.
![]() 100% Secure. No Ads.
100% Secure. No Ads.
![]() 100% Secure. No Ads.
100% Secure. No Ads.
*Required field
*Please enter a valid email
