We are surrounded by digital products in our daily life. Among them, smart phones and computers are playing the most important role.
People have been consciously saving their memories, by writing a diary or making a recording via a recorder.
No matter what kind of the memories are, they are precious for us. With the developing of smartphones and cameras, we are able to save the memories as pictures or videos. And now we also like to share them to others, making a DVD slideshow could be a good choice. With the DVD slideshow, you can directly share the photos to others, just lend the DVD to them, without accessing the internet.
When it comes to sharing, "how could it be more attractive" is the most concerned issue for most people. Here we'll show you how to create a DVD photo slideshow on a Windows PC or Mac.
We will divide our article to 2 parts, one for Windows users, the other for Mac users. In both parts we'll show you how to make a DVD slideshow with detailed steps.

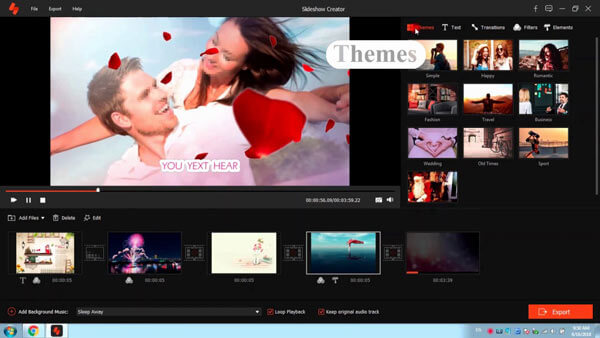
Aiseesoft Slideshow Creator is free and easy-to-use software. It enables you to create a photo slideshow. It supports almost all image formats like JPG, JPEG, PNG, etc. It provides various themes for you. You can choose one of them to create your photo slideshow.
Step 1 Launch Aiseesoft Slideshow Creator on your computer.
Step 2 Click on "Add Photo(s) and vodeo(s) here" to add the local media files, or just drag them to this window.
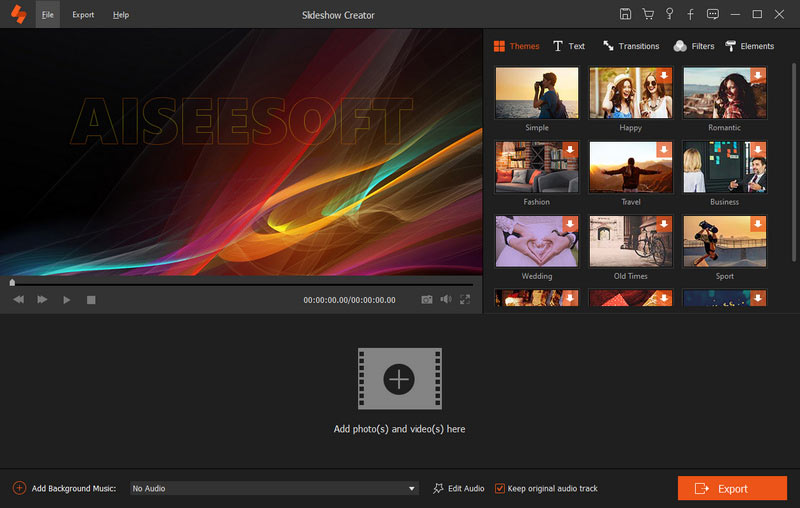
Step 3 Choose the theme
In this window, you will see the ready-made themes, like Fashion, Happy, Sport, etc. You can choose one of them. Alternatively, you can customize the theme by addign the text, transition, filters and elements.

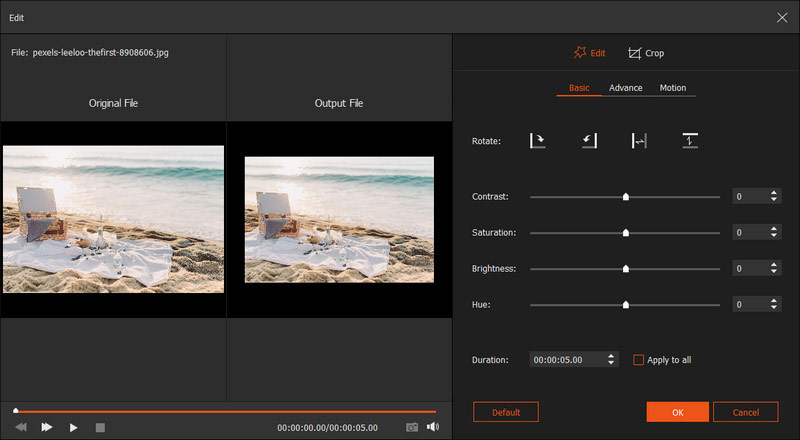
Step 4 Choose a video or photo, and click the edit icon to rotate, crop, adjust the effects for hue, saturation, hue and brightness, and more.
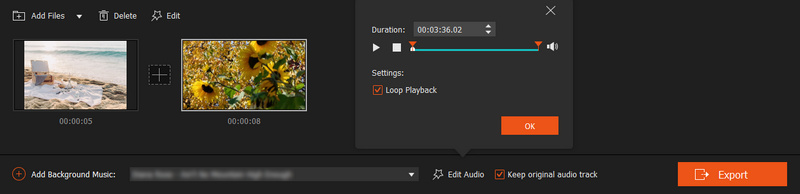
Step 5 Now we're at the "Add Background Music" window. You can click on the dropdown option to load your own music.
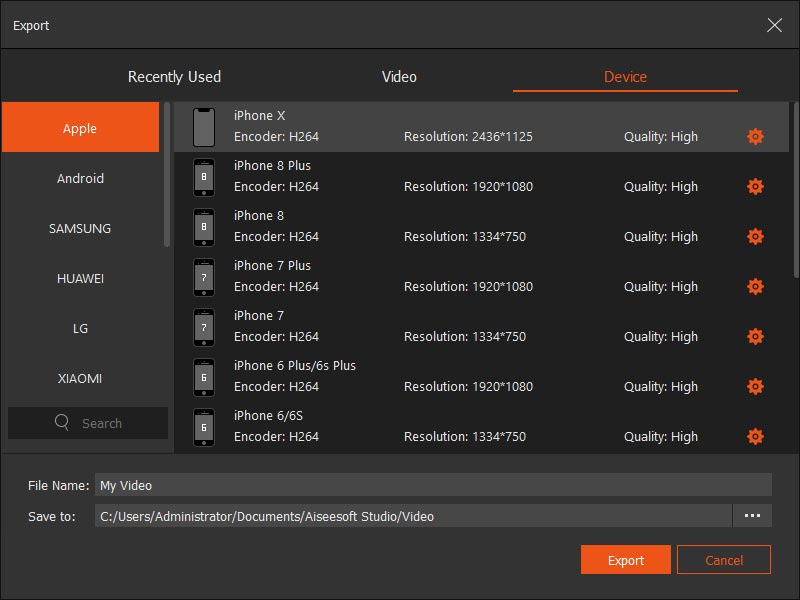
Step 6 Click on "Export" button, you can choose the output format of the slideshow. There are many popular video formats here, among MP4, AVI, MKV, MOV, etc.
You can rename your slideshow's name and choose a location to save it.
It also allows you to change the resolution and quality of your slideshow, just click on the gear-alike icon.
After everything is set, click on "Convert" to create your slideshow.
Here's the video about making slideshows for you. Click it to check.

Now we are going to show you how to burn it to a DVD disc. Here we recommend a useful DVD creating tool – Aiseesoft DVD Creator.
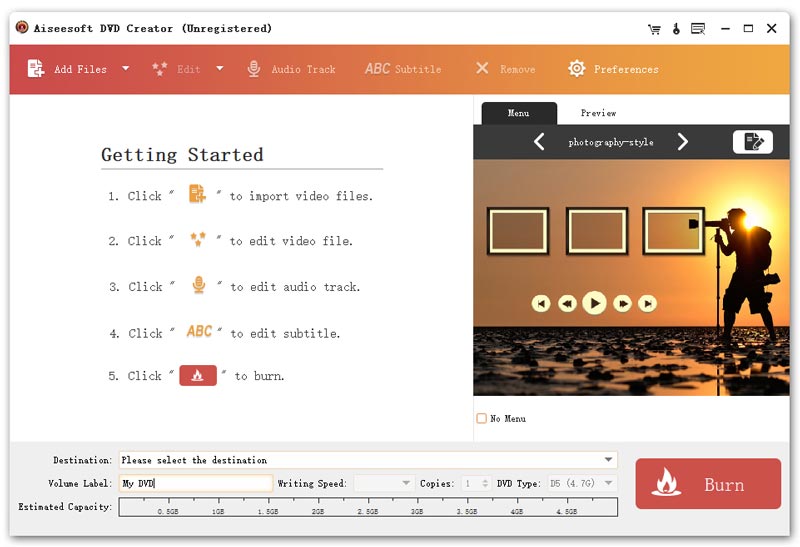
Aiseesoft DVD Creator is professional software which enables you to burn videos, and audios to DVD discs. It also provides powerful editing features for you. With DVD Creator, you can burn your slideshow to a DVD disc in high quality.
Step 1 Launch Aiseesoft DVD Creator on your computer.
If you have purchased it before, just register it with your email address and the registration code you received.
Step 2 Connect your DVD drive to computer, and insert a blank DVD disc to the drive.
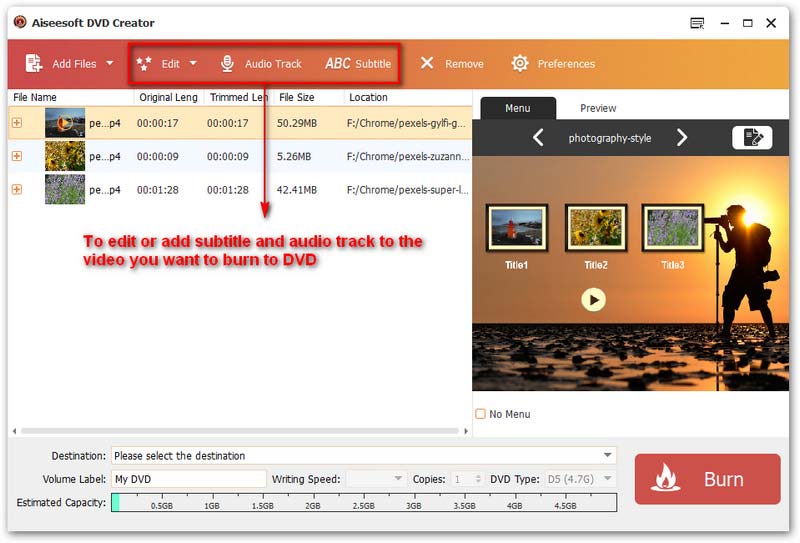
Step 3 Click "Add Files" to load your slideshow.
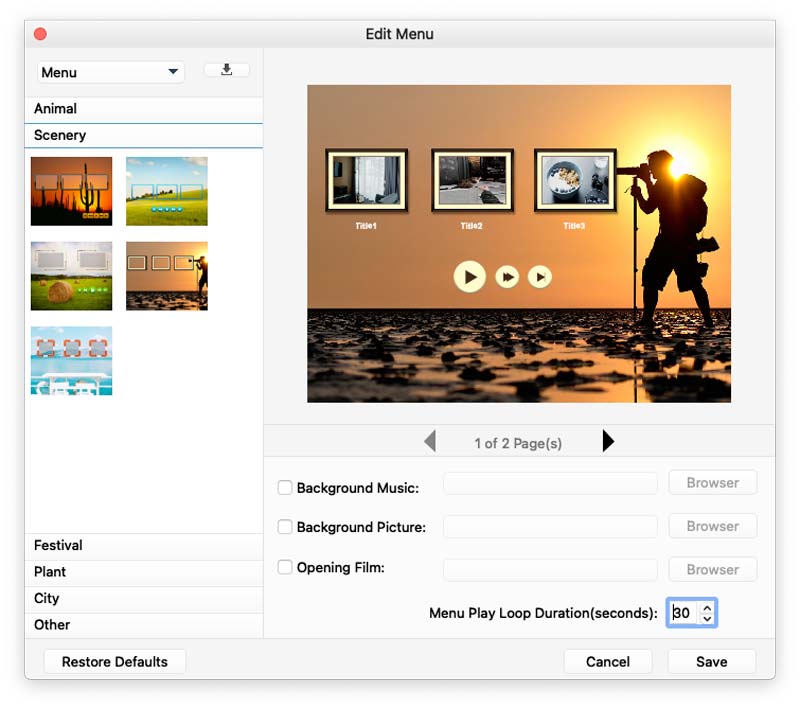
In this window, you can preview your slideshow by clicking the "Preview" on the right. You can click on the "Menu" along with "Preview", then click on the "Edit menu" to adds background music, background picture, and select the opening film you want.
To get the further edit feature, you can select the slideshow, then click "Edit" next to "Add Flies". In this Edit window, you can change the effect of your slideshow, and trim, crop your slideshow, you can also add watermark to your slideshow.
Clicking on "Audio Track" or "ABC Subtitle", you are allowed to add audio track and subtitle to your slideshow.
Click "Preferences", you can change your output settings.
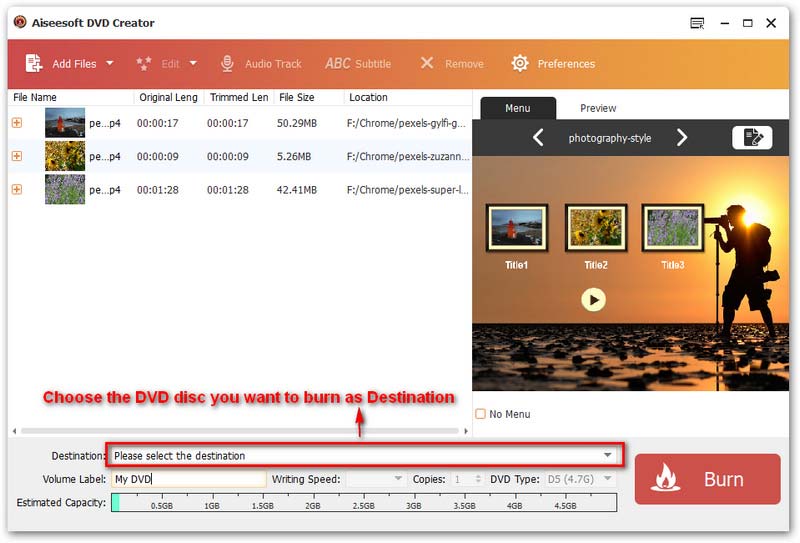
Step 4 Click the allow icon at the end of the "Destination" box, choose the blank disc you have inserted. Then click "Burn", and wait for minutes until it finishes.
Not everyone uses a Windows computer, so we also provide a way for the Mac users. Just go to Part 2, and you will know how to make a DVD photo slideshow on a Mac.
You may be interested in: How to Make a Professional PDF Slideshow
Apple Photos app allows you to create a slideshow on your Mac.
With this built-in feature, you can add text, choose a theme, add music, etc.
After finishing creating, you can export the slideshow to your Mac and burn it to the DVD disc.
Step 1 Open Photos app on your Mac.
Step 2 Select the photos you want, click the Plus icon in the toolbar, and then select the Slideshow in the drop-down list.

Step 3 There will be a popup allows you to name your slideshow. After typing in your slideshow's name, click "OK". The slideshow will automatically be created.
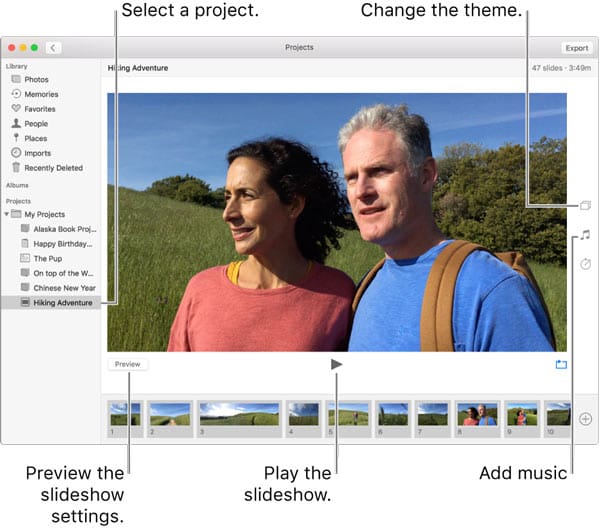
In this window, you can change the theme, add music, play the slideshow and preview the slideshow settings. You can also open another project.
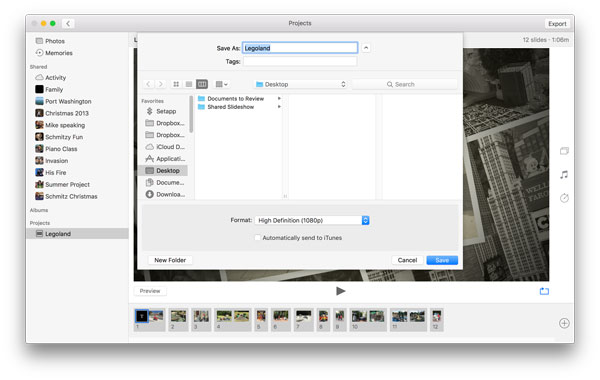
Step 4 After finishing editing your slideshow, click "Export" icon on the right upper corner. You will be allowed to select the location you want to save your slideshow.
You can also select the appropriate output format of your slideshow. Then click "Save".
The next step is to burn the slideshow to a blank DVD disc. Let's do it.
Step 1 Launch Aiseesoft DVD Creator on your Mac.
Step 2 Plug your DVD drive into your Mac, then insert a blank DVD disc to the drive.
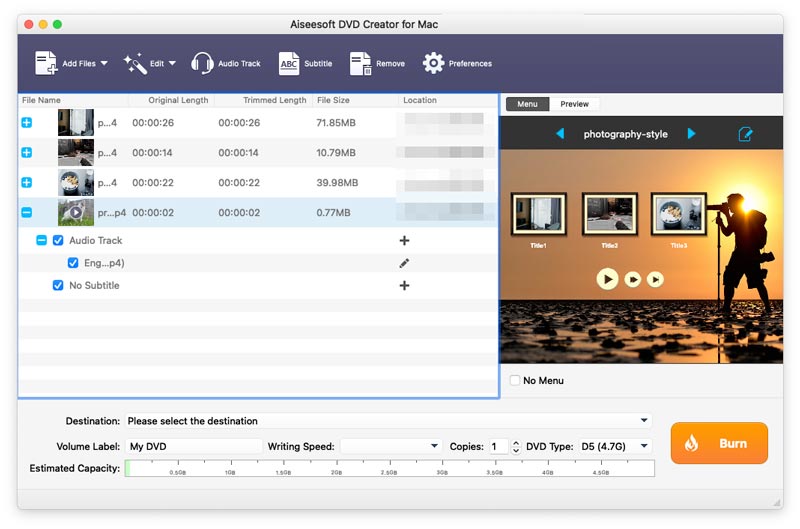
Step 3 Click "Add Files" to add your slideshow.
You can preview your slideshow by clicking "Preview" on the right window.
You can edit your slideshow like adding background music, adding background picture, etc by clicking "Menu" > "Edit menu".
After selecting your slideshow, you can click on the "Edit" icon next to the "Add Files" to trim, crop your slideshow.
Clicking "Audio Track" or "Subtitle", you can add an audio or subtitle to your slideshow.
Step 4 After finishing setting, select your DVD disc as the destination at the bottom of the window. Click "Burn", and wait for minutes.
Now you have reached the bottom of our article. Do you know how to make a photo slideshow on a Mac or Windows PC? I hope you are enjoying making an attractive slideshow via those methods above.

December 11, 2020 18:00 / Posted by Andrew Miller to Edit Video
 Best Slideshow Software – Make Photos/Videos into Movie
This page shows you how to use the best slideshow software to make pictures, music and videos into dynamic movies.
 Top Slideshow Songs for Wedding/Family/Graduation
This page shares you the top slideshow songs for wedding, graduation, funeral, baby, etc. more to download as the background music easily.
 How to Make a Photo/Video Slideshow with Music
How to create a slideshow with music? Two ways in this post will show you to make a picture/video slideshow with music on Windows/Mac and PowerPoint.
