Aiseesoft Screen Recorder
 100% Secure. No Ads.
100% Secure. No Ads.
GUIDE LIST
Recording sound on Android is probably the kind of thing people do without really thinking about it. But if I were to make a guess, recording a quick voice note, capturing a meeting or call, or even recording audio that's playing on your phone are the scenarios most people can imagine for recording. But the tricky part is that the best method varies with the sound you need to record. In this tutorial, I'm going to show you how to record sound on Android through several different means by using your phone's built-in tools, third-party apps, the internal audio option, and also one more method for advanced and complex recording work, which is a PC-based alternative.

If you are a Pixel phone user, you do not need to install any other app. Just use Google Recorder. Google Recorder can record audio and generate a live text transcription of the conversation at the same time, and this feature is handy for taking meeting, interview, and classroom notes. Available on Pixel 3 and above handsets as well as Pixel Tablet.
Here is an easy way to record sound on an Android phone:
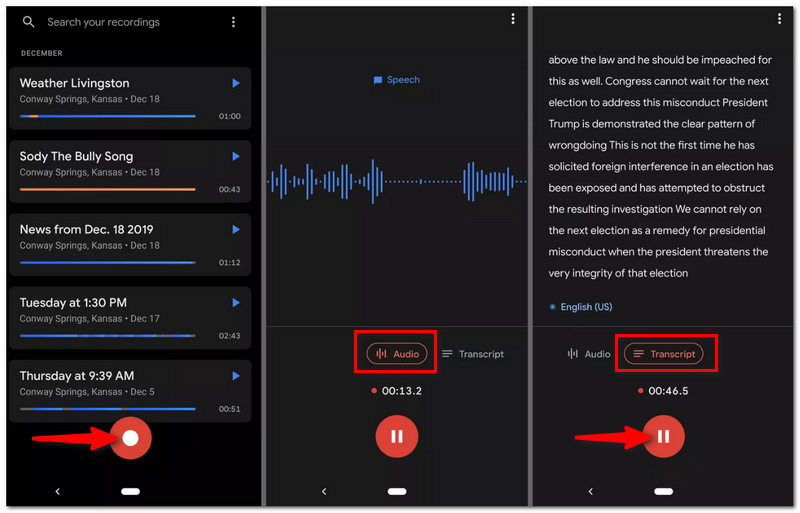
Tip: You can change the transcription language in Recorder > your profile icon > Recorder settings > Transcription language on Pixel 6 and newer.
Samsung Galaxy phones feature a Voice Recorder app that helps you take voice memos, record meetings, interviews, and other everyday things. It also lets you choose from various recording modes, adjust the quality, control playback, and combine it with Samsung Notes on devices where it's supported.
Recording internal sounds on Android is quite easy. Let's just walk through the steps:
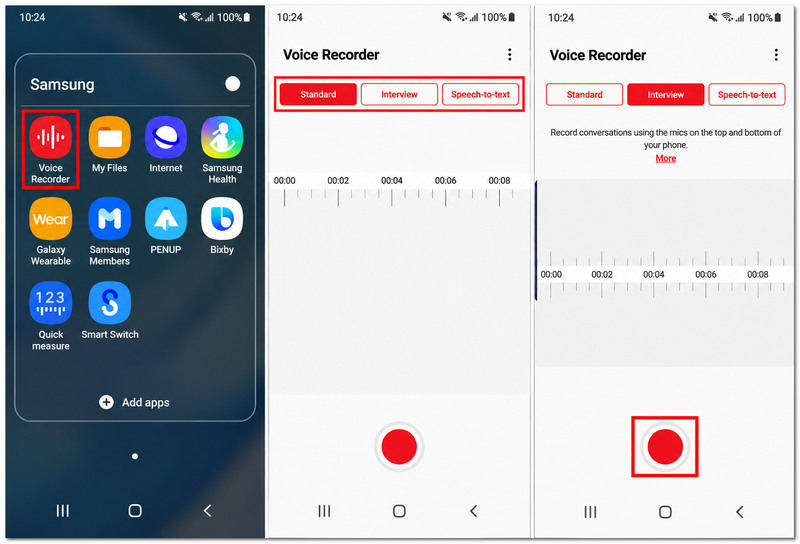
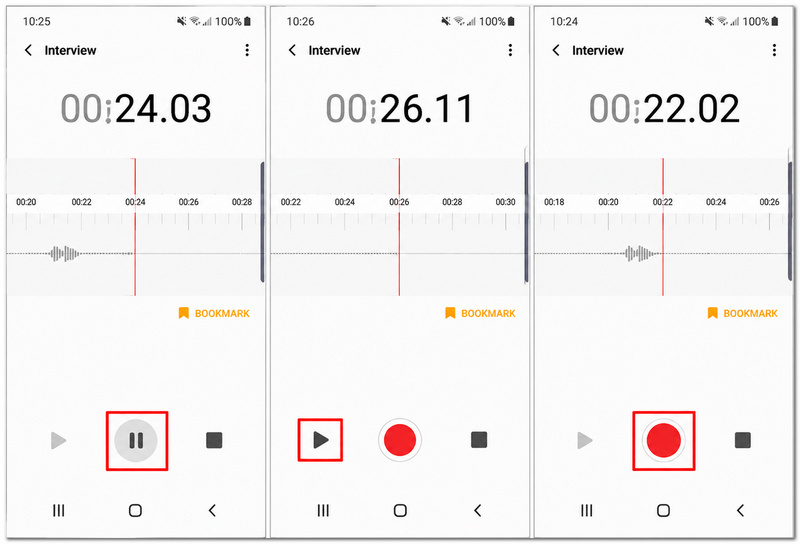
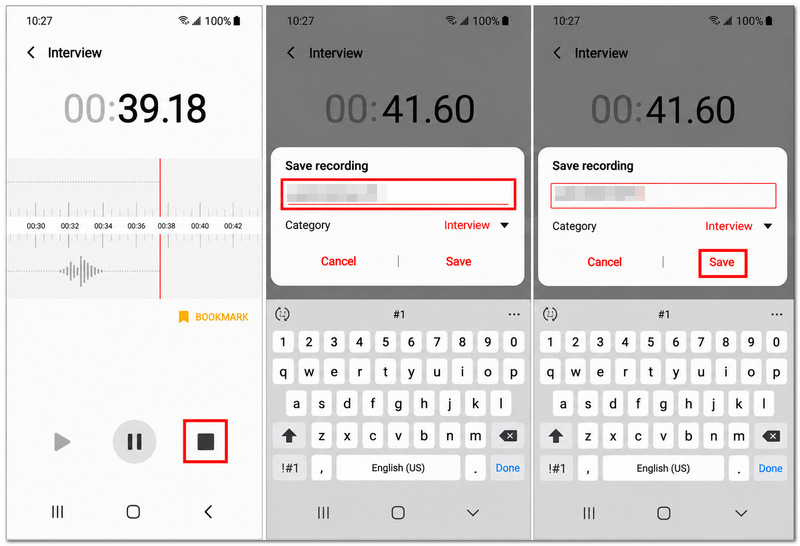
If you own a Galaxy phone with Voice Recorder support, you can add recorded sounds into Samsung Notes and link them to your notes.
Note: Samsung Voice Recorder is a mic recorder. To capture screen audio, you can use an Android Screen Recorder and choose which sound mode you want.
Dolby On features voice recording, music, podcasts, and other sound recording features, with the ability to automatically apply noise reduction, EQ, compression, and other audio processing.
If you want to do screen recording with sound on Android in a simple way, follow the directions below:
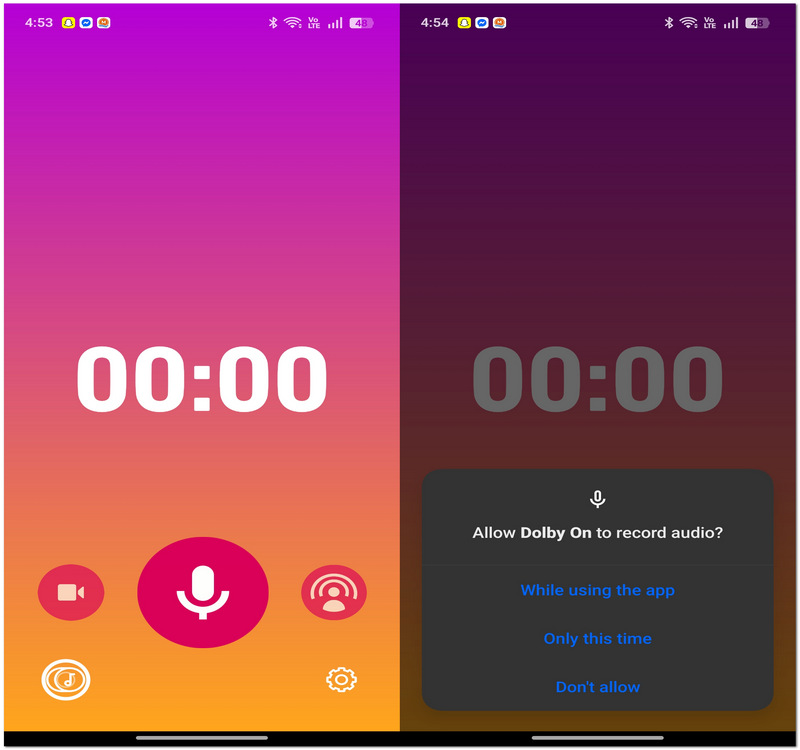
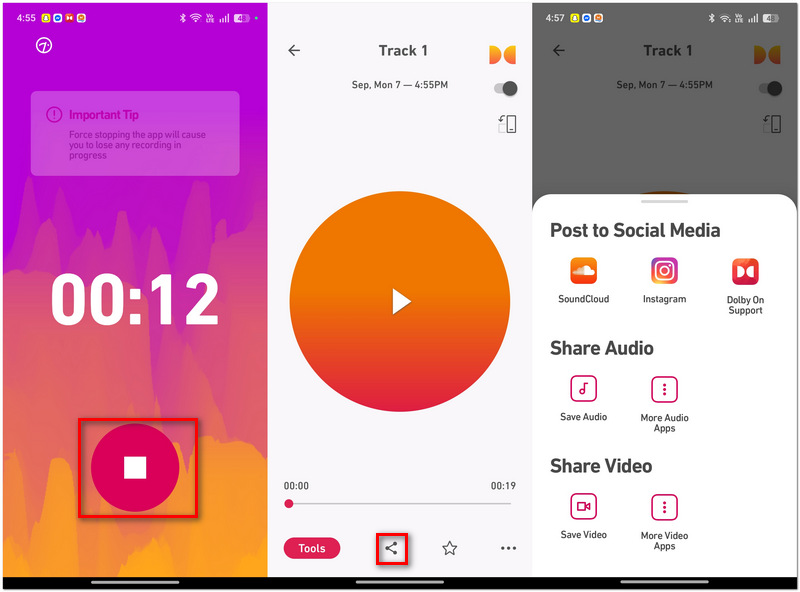
Dolby On processes the audio automatically. This means you can start recording directly, while the setting is already done internally, saving time.
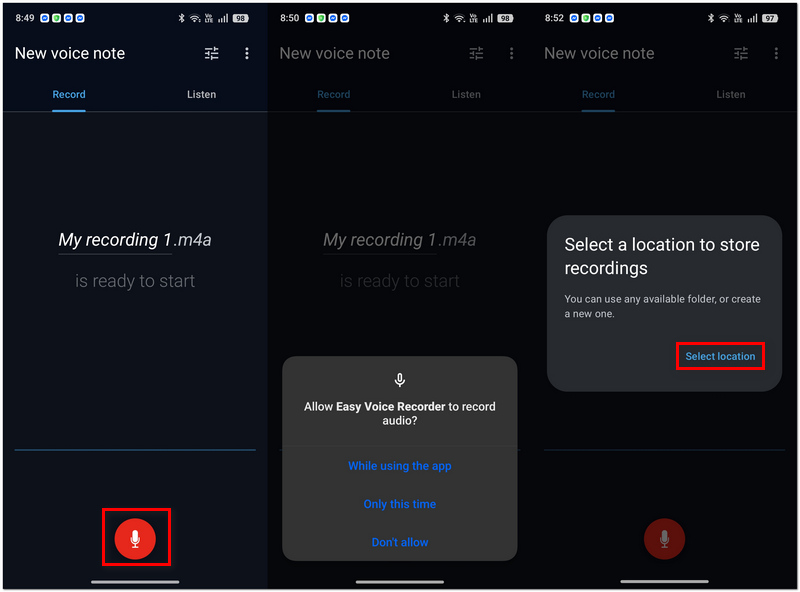
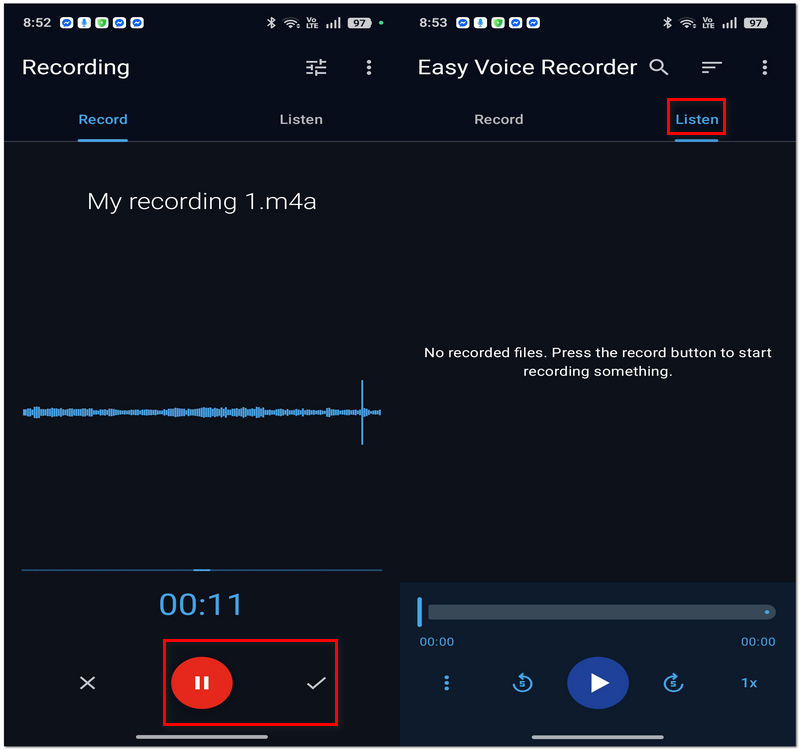
Easy Voice Recorder is user-friendly and a great option if you want to record your meetings, lectures, classes, or personal notes. You get support in this app for high-quality PCM and AAC recording, background recording as well as easy sharing.
For easy Android phone audio recording, just do what comes next:
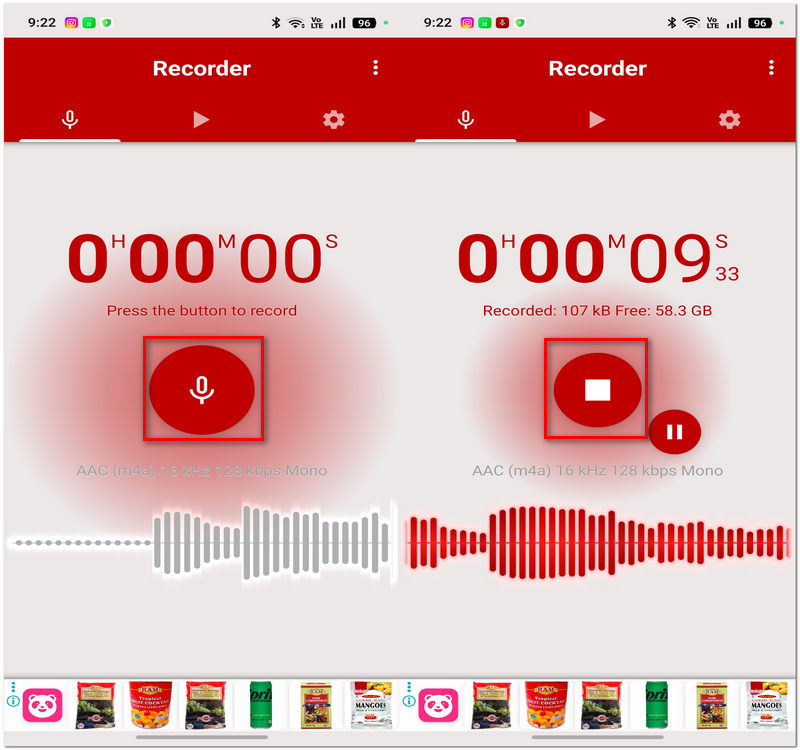
Designed by Splend Apps, Voice Recorder Pro keeps things simple and lets you record at ease without any distractions, while at the same time providing other essential functions like various audio formats, background mode recording, and adjustable quality levels. Also, with a stored recording, you are able to make it a ringtone, alarm sound, or notification sound.
To make a voice recording notification sound on Android, here are the basic instructions:
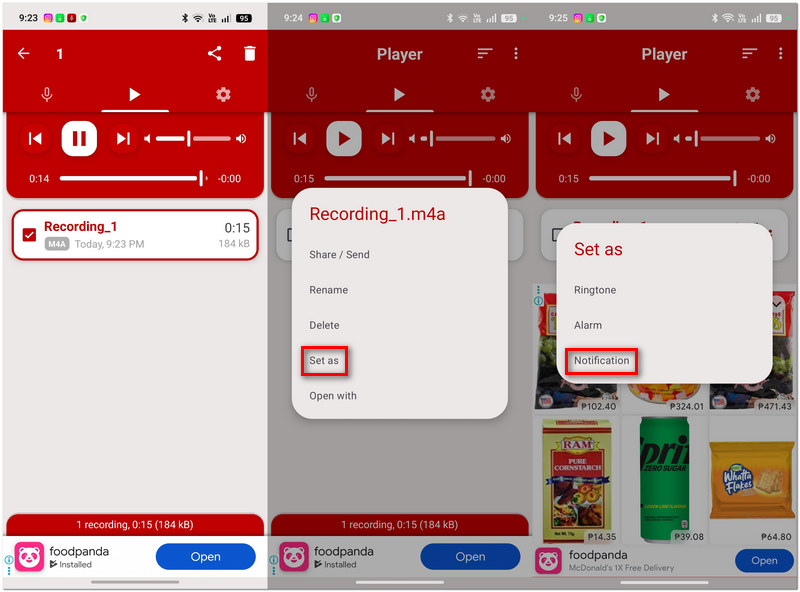
With that same Settings menu, you can also assign your recordings to be a ringtone or alarm sound if you wish.
If you're aiming to capture audio from a media file played on your Android phone, the default Screen Recorder app will likely be the simplest way for you. If your device is compatible, you'll have the option either to record the media sounds exclusively or to mix them with your microphone feed.
To do voice recording on Android, follow these steps:
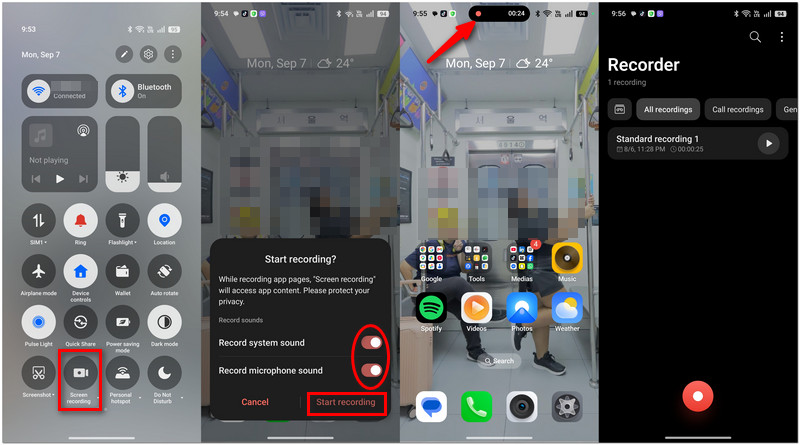
Note: Available features vary by Android device and software version, and in some cases, copyright protection could prevent recording of specific material.
Some Android smartphones have built-in call recording features, which means you may not need any separate apps for recording phone calls on Android. But what options you have will vary according to the phone carrier, Android version and region in general.
To record sound on Android devices, simply:
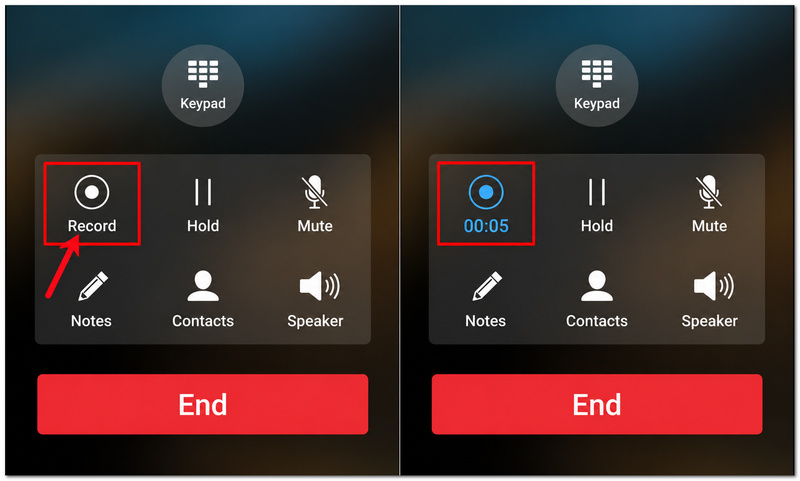
Note: Not all Android phones or regions support call recording. Recording laws differ, so make sure everyone is aware of recording when applicable.
For people who like to customise the audio recording, Aiseesoft Screen Recorder can be used to record system audio, microphone audio, or a combination of both. The app also features noise elimination, audio boosting, various audio export formats, and some editing tools that come in handy.
Downloads
100% Secure. No Ads.
100% Secure. No Ads.
How to Record Sound with Aiseesoft Screen Recorder
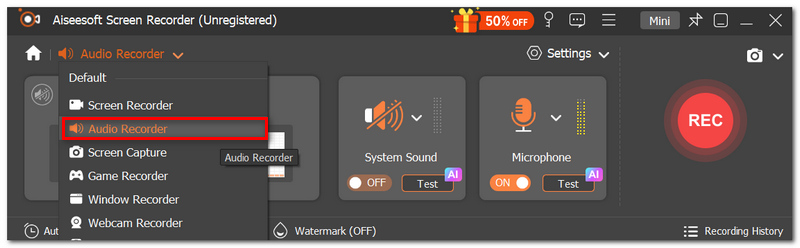
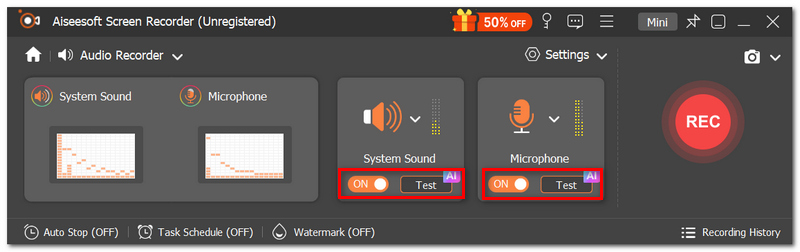
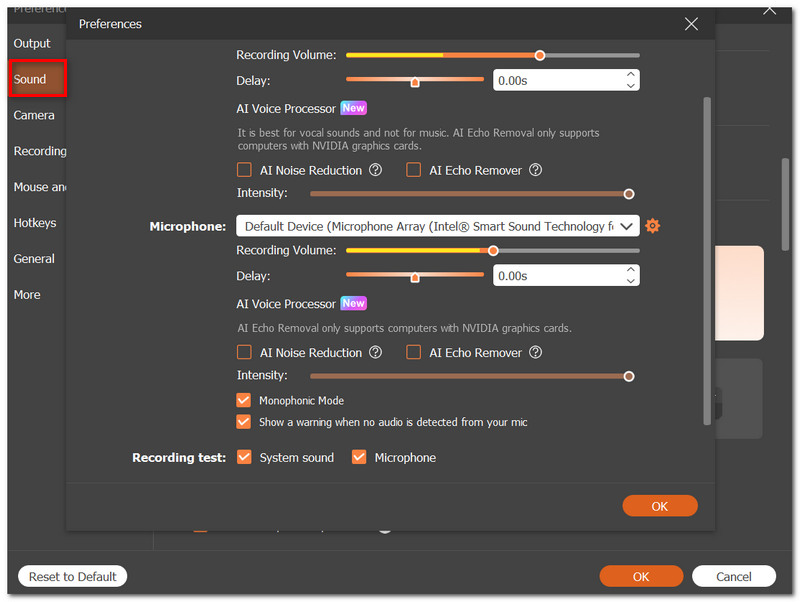
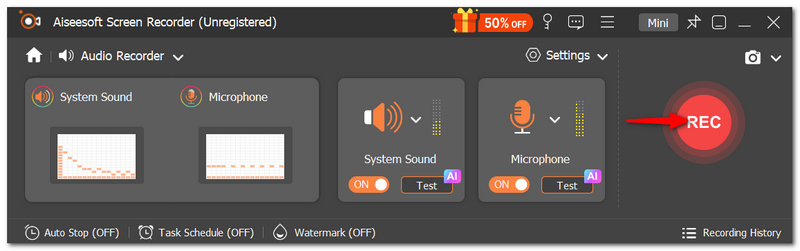
For Android audio: Choose Phone Recorder instead, then go to Android Recorder, and then connect your phone either via Wi-Fi or via USB. When the Phone screen is being mirrored, you can record directly on your computer.
Why does my Android recording sound distorted?
We usually experience distortion in our recordings when we talk too loudly into the source or when our devices are too close to a speaker where we hear the music. You might want to consider moving to another location and not pointing the microphone straight at a super loud source.
Can two apps record audio at the same time on Android?
Probably not. Android deals with competing audio-input requests in a certain way, and in the scenario where several apps want to capture audio, the results would be unpredictable. Some apps may not record anything at all or may end up getting no access to the microphone.
Why can't my recording app access the microphone?
Verify the app's microphone permission under Settings > Apps > [recording app] > Permissions. Android uses microphone permissions to determine if an app can record audio.
Conclusion
Recording sound on an Android phone opens up your device to many possible features, from jotting down some quick voice notes to taking a meeting, a call, or even recording the internal phone sound. All you have to do is decide which is the most convenient way that will work best for your needs, and you can be on your way.
 Android Locked Out? How to Unlock Your Android Phone Without a Passcode
Android locked out and forgot your PIN or pattern? This guide shows safe and effective ways to unlock your Android phone using official methods and tools.
 Android Note Recovery: Recover Deleted Notes on Android Easily
Learn Android note recovery with easy methods. Restore deleted notes from trash, Google backup, or without backup on any Android device.
 How to Transfer Data Between Android Phones: 7 Easy Ways (With or Without Cable)
Learn how to transfer data from Android to Android with 7 easy methods. Move contacts, photos, videos, messages, apps, and more from your old Android phone to a new one.
 Leave your comment and join our discussion
Aiseesoft Screen Recorder is the best screen recording software to capture any activity like online videos, webcam calls, game on Windows/Mac.
100% Secure. No Ads.
100% Secure. No Ads.

*Required field
*Please enter a valid email

