Have you had the habit to restore Mac mini to factory settings if you want to sell it? Or will you choose to restore your Mac when it runs very slow or when you meet some unknown problems? It is very recommended for you to restore Mac mini to factory settings and reinstall a new and clean operation system if you want to sell it or fix some system problems. Apple provides an application called Time Machine to help you backup and restore your Mac. But do you know how to restore Mac with Time Machine? Fortunately, in this article, we will introduce the ways of how to backup and restore your Mac with Time Machine.
If you want to restore Mac mini to factory settings to solve some problems and don't want to lost any data, you can choose to back up your Mac before you restoring it. Time Machine provides you the function to back up your Mac easily. So you don't download other backup software on your computer, and just use Time Machine on your Mac and an external hard drive to finish your Mac backup. And what follow are the detailed steps you can get to back up your Mac with Time Machine.
Step 1Connect external hard drive to computer
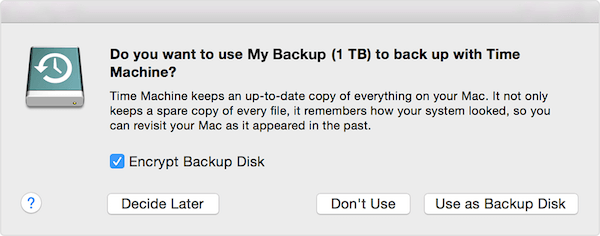
First of all, you need to connect an external hard drive to your Mac. And this hard drive will be your backup disk to save your Mac backup. When you connect an external hard drive directly to your Mac, you might be asked if you want to use the drive to back up with Time Machine. Select Encrypt Backup Disk (recommended), then click Use as Backup Disk.
Step 2Set up Time Machine
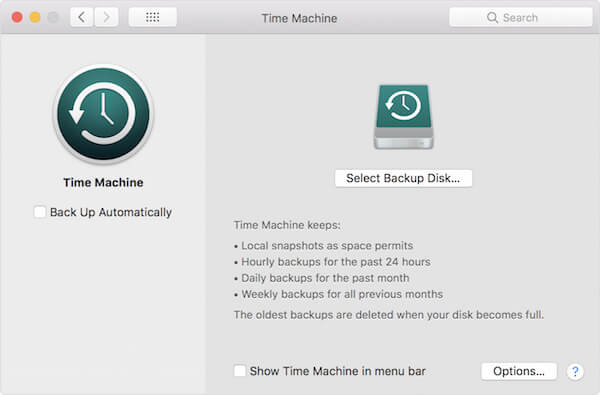
If Time Machine doesn't ask you to choose a backup disk when you connect the drive to your Mac, you need to set up Time Machine on your MacBook by yourself. Click on the Apple Menu, which is a black Apple logo in the right corner of your window. Then choose System Preference in the list it gives to you. When you see the System Preference window, you need to find and click Time Machine > Select Backup Disk, Select Disk, or Add or Remove Backup Disk. Then choose a backup disk from the list, next choose Use Disk.
If you want to set another disk, you can repeat the same process. For example, you might use one backup disk while at home, and another backup disk while at work. And both of the disks you set up can be used in your Mac.
Step 3Back up your Mac
After you set up Time Machine successfully on your Mac, it will automatically make hourly backups for the past 24 hours, daily backups for the past month, and weekly backups for all previous months. And when your backup disk is full, it will delete the oldest backups. If you want to backup now instead of waiting for the next automatic backup, you need to click on Back Up Now from the Time Machine menu.

If it is the first time you back up your Mac with Time Machine, it may take a long time, depending on how many files you have. Time Machine backs up only the files which changed since the previous, so your future backups will be faster than the first time. And you can use your Mac as normal during the backup process.
After you backed up your Mac, you can restore Mac mini to factory settings without data loss. Before you begin to restore Mac mini to factory settings, make sure your Mac is under a good network connection and the power supply is connected well. Because the process of restoring Mac to factory settings, as well as installing macOS needs uninterrupted network environment and may take a few hours. If you can't promise the enough power, the restoring process also can be interrupt by power failure. And you can follow the next detailed steps to finish the process of how to restore Mac.
Step 1Restart your Mac.
Click on Apple Menu which is the Apple logo in the left corner of window. Then click on Restart. And when your Mac is rebooting, continually press Commend + R at the same time on your keyboard. When you see the Apple logo shows on the center of your screen, release the two keys.

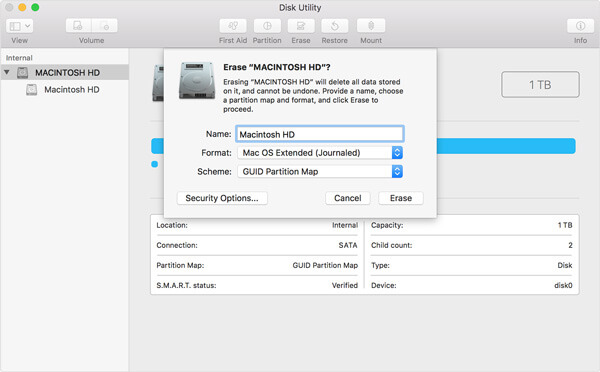
Step 2Select Disk Utility to Erase.
When you see the popping window of Mac OS X Utility, select Disk Utility and then click on Continue. Next select the MacBook's primary drive in the Disk Utility and click on Erase. When you done these steps, you can finish completing Name, Format and Scheme.
(1) Rename Disk Utilities as Macintosh HD.
(2) Choose Mac OS Extended from the drop down menu of Format.
(3) In Scheme drop-down menu, choose GUID Partition Map.
Step 3Restore Mac mini to factory settings.
Now you can confirm to erase all and continue operating according to the instructions it gives to you. The process of erasing your Mac will take a few minutes, just wait for it patiently and don't interrupt the process.
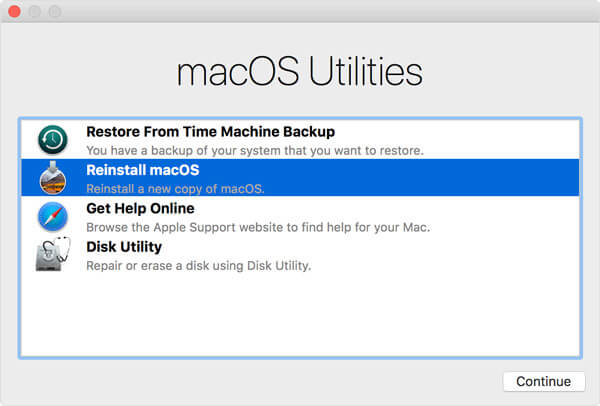
Step 4Install macOS.
NAfter finishing restoring Mac mini to factory settings, close the Disk Utilities and turn back to the utility window. Now you need to go to Mac Utilities menu and click on Reinstall macOS option to install macOS. Then confirm your operation according the instructions.
Then you could follow this page to restore your Mac data from Time Machine backup.
You need to reboot your Mac after the reinstallation finished, and confirm your Mac is normal to use. When you want to restore Mac mini to factory settings, you may be asked to enter Apple ID and password. If you just want to fix some problems or speed up system by restoring, it's OK to save your privacy and data. Otherwise, it is not recommended to enter the information if you want to sell your Mac or other.
Before you restore Mac mini to factory settings, it is advised to back up your Mac. And in this article, we list the ways of how to backup and restore your Mac with Time Machine in detailed. What you need to do is just reading this article and follow these guides. Hope you can gain something useful.

January 13, 2020 13:00 / Updated by Louisa White to Fix Mac Problems
 How to Backup iPhone Music to Computer
This article mainly describes how to backup iPhone music to computer.
 How to Transfer iPhone Video
This article descsribes how to transfer iPhone video.
 How to Transfer Video from iPhone to Your PC
The article shows ways to transfer video from iPhone to computer.
