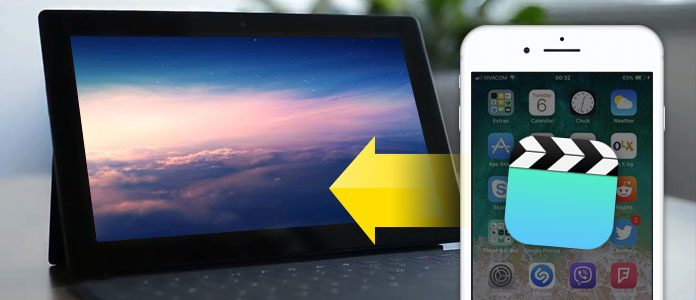
As Apple has launched the iPhone 16 series with advanced video recording features - including 4K recording, optical image stabilization, 6x digital zoom, slo-mo, and cinematic stabilization - it’s now easier than ever to capture professional-quality videos on your iPhone. However, even with larger storage options, those high-resolution clips and downloaded movies can quickly fill up your space. To free up storage and back up your precious videos, it’s wise to transfer videos from iPhone to PC. In this guide, we’ll show you easy and effective ways to move iPhone videos to your computer safely and quickly.
Before diving into the detailed steps, you can quickly choose the most effective way based on your specific situation:
Have massive 4K/HEVC videos or want complete control? Jump to FoneEase for the fastest bulk transfer with format optimization.
Prefer a free, no-software wired option? Use File Explorer or Windows AutoPlay to drag and drop files directly.
Want automatic, cable-free synchronization? Set up iCloud Photo Library or Google Photos for instant wireless access.
| Method | Best For | Internet Required | Keep Original Quality | Speed | Storage Limits | Ease of Use | Key Concerns |
| FoneEase | Large video transfers & full control | ❌ No | ✅ Yes | Fast | No cloud limits | Easy | Requires software installation & payments |
| Windows AutoPlay | Quick, simple imports | ❌ No | ✅ Yes | Medium | No limits | Easy | Limited file management |
| File Explorer | Direct file access & manual control | ❌ No | ✅ Yes | Fast | No limits | Medium | Folder structure can be confusing |
| iTunes | Syncing media & backups | ❌ No | ⚠️ Limited for video export | Slower | No cloud limits | Complex | Not ideal for exporting camera videos |
| iCloud Photo Library | Automatic syncing across devices | ✅ Yes | ✅ Yes | Depends on network | 5GB free limit | Easy | Requires sufficient iCloud storage |
| Google Photos | Cross-platform backup & sharing | ✅ Yes | ⚠️ May compress (if not original quality) | Depends on network | 15GB shared storage | Easy | Upload time & storage space |
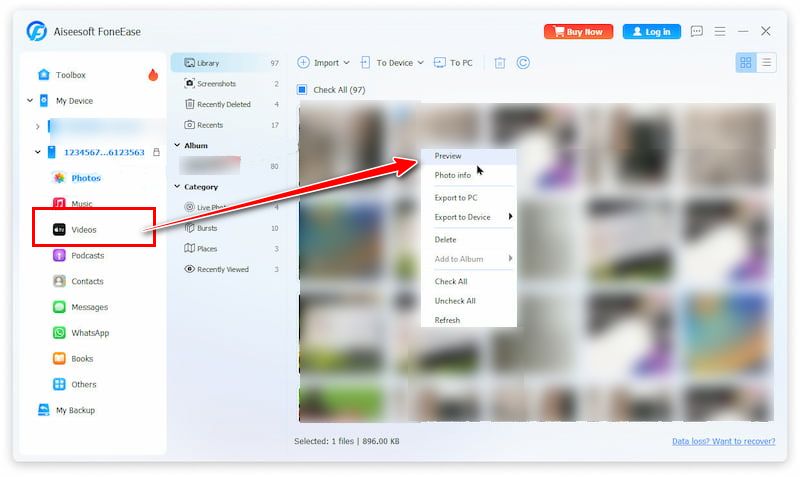
If you are holding a stack of 50GB+ high-resolution 4K vacation clips or cinematic videos that need to be cleared from your iPhone immediately, relying on native Windows tools often leads to freezing or crash errors. Aiseesoft FoneEase is an all-in-one data manager engineered to handle these heavy-duty data transfers across iOS, Android, and PC. It supports comprehensive batch transfers, smoothly reads specialized 4K/HEVC formats, and preserves all original data quality without compression. Unlike traditional transfer tools, FoneEase gives you the ultimate flexibility to connect your phone either via a USB cable or through a wireless network.
Step-by-step Tutorial to Transfer Videos using FoneEase:
![]() 100% Secure. No Ads.
100% Secure. No Ads.
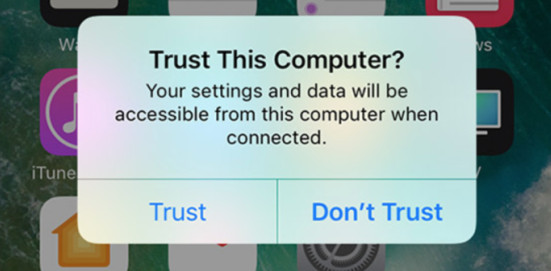
Alternatively, you can connect wirelessly by clicking “My Device” > “Wireless” on the software interface and following the on-screen guide to establish a Wi-Fi connection. Unlock your iPhone and tap “Trust” when the "Trust This Computer" prompt appears, then authorize the connection.
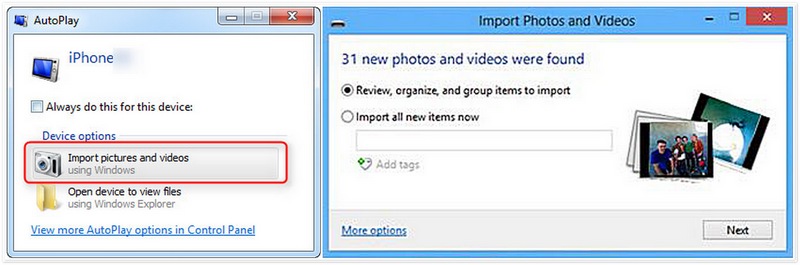
Windows AutoPlay allows you to quickly access your iPhone’s videos when you connect your device via USB. It’s a built-in and free method that doesn’t require extra software, making it convenient for occasional transfers. However, there are some downsides: AutoPlay only works when the feature is enabled, it can’t manage large batches efficiently, and it doesn’t support video previews or organization before transferring.
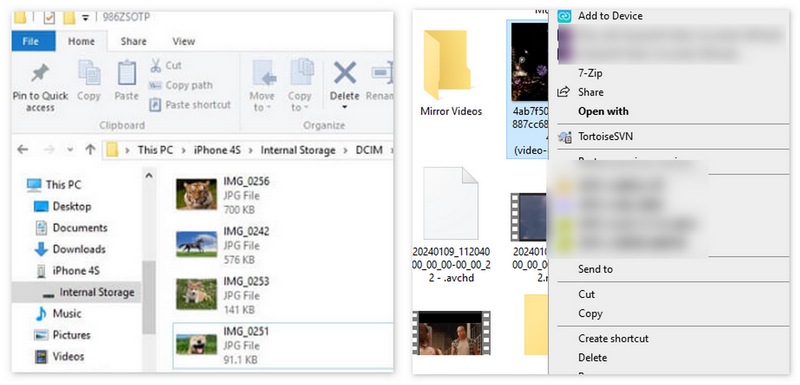
Transfer your videos from iPhone to PC with File Explorer is also an easy dragging and dropping videos way to put your iPhone videos to your computer. All you need is only an USB cable connecting iPhone and PC. This method works for all Windows PCs with a USB port and supports large files.
However, it has some limitations: you cannot preview videos inside the directory, manage playlists, or handle HEVC/4K videos efficiently if your PC lacks the necessary codecs. (If you are moving media files, you might also learn how to transfer photos from iPhone to PC to clear up your internal storage systematically.)
Important Notice Before Syncing: iTunes is primarily designed for syncing purchased iTunes store media and full device backups. It is not optimized for extracting individual camera roll videos. Furthermore, please note that Apple has discontinued iTunes on macOS Catalina and later versions (replaced by Finder). For Windows users, the iTunes desktop app remains laggy and complex for selective exports.

If you prefer a wireless method to move videos from iPhone to PC, you can also use iCloud for Windows, which works with the new iCloud Photo Library to download your iPhone videos to your PC. It automatically syncs your photos and videos to iCloud and is ideal for backing up high-resolution videos and slo-mo clips without connecting a USB cable. However, it relies on iCloud storage space and can be slower for large video libraries depending on your internet speed.
However, it heavily relies on your network bandwidth and consumes your cloud storage space rapidly (Apple only offers 5GB of free space, which easily fills up with a few 4K videos. If your cloud storage is full, you can see how to clear iCloud storage or try wired methods instead).

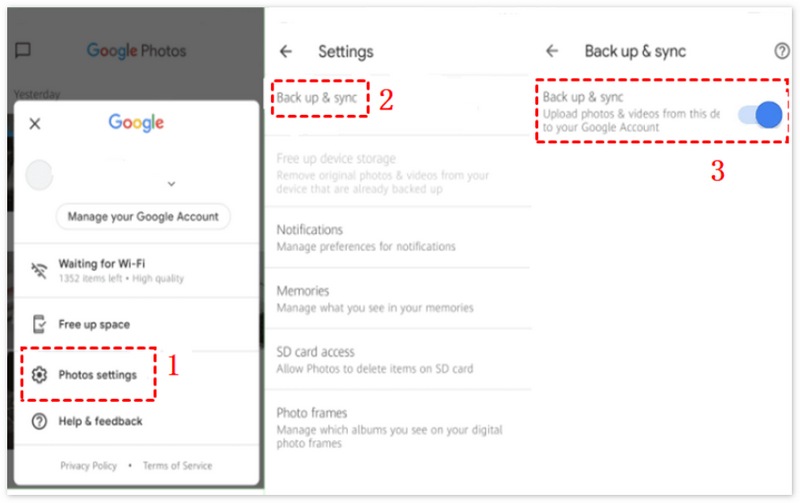
Google Photos is a wireless solution to transfer iPhone videos to your PC. By uploading your videos to Google Photos from your iPhone, you can access and download them on any PC with an internet connection. This method is especially useful for wireless backup, sharing, and managing large video libraries, but it requires a Google account and sufficient cloud storage for high-resolution videos.
How to transfer videos from iPhone to Windows 10 computer using the Photos app wirelessly?
For Windows 10 users, the Photos app is available to transfer videos from iPhone to a Windows 10 computer easily. Connect the iPhone to Windows 10 and launch the Photos app on the computer. Select the Import button on the top-right corner of the interface and follow the instructions. It will automatically select new photos and videos you have not yet imported to your PC.
Can I transfer videos from iPhone to PC wirelessly in bulk?
Yes, but wireless bulk transfer may be slower than wired options depending on network conditions. Dedicated desktop management utilities like Aiseesoft FoneEase support wireless bulk transfer via your local network, but large 4K video libraries are always completed faster and more stably via USB.
Can I transfer 4K or slo-mo videos without losing quality?
Yes. Tools like FoneEase, File Explorer, iCloud, and Google Photos maintain the original video quality and metadata. Avoid messaging apps that compress the video automatically if original quality is critical.
Why can't I play the transferred HEVC/4K videos on my Windows PC?
Apple uses the high-efficiency HEVC (H.265) format for 4K videos by default, which is not natively supported by older Windows Media Player builds. To fix this, you can either install the official "HEVC Video Extensions" from the Microsoft Store, use a third-party media player like VLC, or use FoneEase to manage and export your files effortlessly.
Conclusion
In this article, we introduce 6 ways to help you transfer iPhone videos to PC. Whether you prefer a fast cross-platform desktop manager like FoneEase that works with both USB and wireless connections, or standard native options like File Explorer, iCloud, and Google Photos, there's a solution for every need. Wired transfers are ideal for bulk, high-resolution videos, while wireless methods offer flexibility and cross-device access. Hope you can find the way suitable for you to transfer videos from iPhone to your computer.
 5 Best Free Video Quality Enhancers Online (Pros & Cons)
Want the best free video enhancers to improve the quality of your videos? Here are 5 trusted tools to improve video clarity, resolution, and colors online with no cost required.
 [Solved] Videos Won't Play on iPhone (16/16 Pro included)
Videos won't play on iPhone? This article provides some useful ways to help you fix the issue that iPhone won't play videos.
 100% Working Solutions to Fix Unable to Load Video on iPhones and iPad
Encounter the error saying unable to load video on your iPhone or iPad? You are lucky since this article tells you the verified solutions to fix this problem.

Aiseesoft FoneEase is a data transfer and management tool that lets you seamlessly move, back up, and manage various data between iOS, Android, and computers without resetting your phone or relying on iTunes.
![]() 100% Secure. No Ads.
100% Secure. No Ads.
*Required field
*Please enter a valid email
