Many people like to take photos. You may want to treasure the reunion moment, the delicious dinner and more. Taking photos with iPad will bring you another kind of experience. You can enjoy your photos about beautiful scenery, wild animals, cute children and other valuable moments with high image quality of your iPad. While, how to transfer these photos and pictures from your iPad to computer for backing up? That must be a big problem for all iPad users. Many people recommend iTunes and iCloud to finish this task, and sometimes these two tools really do a great job. However, both iTunes and iCloud can only support transferring all iPad photos at the same time, if you only want to transfer some of your total photos under a safe environment. You may need a safe and clean photo transfer tool to copy your iPad photos to computer.

Want to find the reliable software among all transfer apps on the web? You should try FoneTrans. It is the best iPad Photo Transfer program which is specially designed for Apple users to transfer photos and other files like music from iPad to computer. The good thing for all iOS users is that this wonderful software can also support the new released iPad Pro, so if you need to import your photos from iPad even iPad Pro to computer, this FoneTrans will do you a great favor.
Click here to learn more info about Recover Deleted or Lost Pictures or Photos from iPad.
In this guide, you will learn how to use FoneTrans to transfer iPad photos to computer.
You need to download and install FoneTrans on your PC as the first step. If this is the first time for you to run this software, it will start automatically.
You need to prepare: your iPad, an Apple USB cable.
Step 1 Connect iPad to computer with USB cable
After your iPad is connected, you will see the main interface of the program. (If the iTunes starts automatically, close it before using FoneTrans.) All the files will be scanned out and listed under separate categories. Click "Photos" on the left.
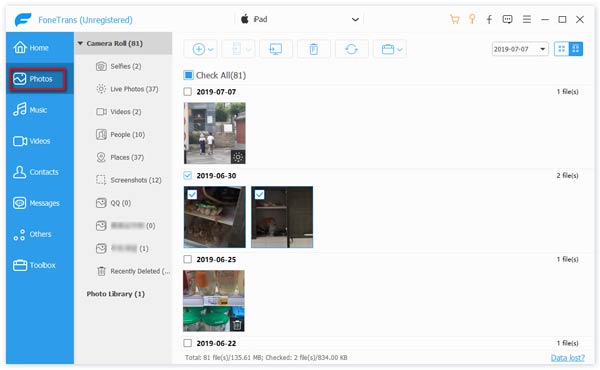
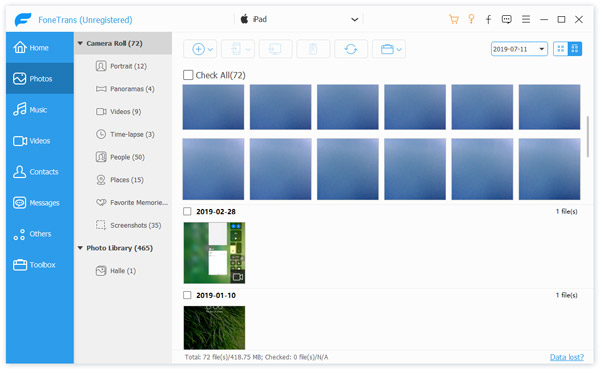
Step 2 Choose the photos you want to transfer
Choose photo(s) you want to export from Camera Roll, or Panaroma, or Photo Library, or other albums.
Step 3 Start to transfer iPad photos to computer
Check Photos and click Export to- Export to PC. Then choose the output folder where the transferred photos will be saved.
Wait for seconds, the photos you have checked will be exported to your computer very soon.
Tips:
1. Double click the photo before transfer, you can preview it in original size.
2. This software also lets you delete photos from iPad iPhone for storage free-up by clicking the "Delete" button.
3. FoneTrans is compatible with iOS 17 and all iOS devices like iPhone 15/14/13/12/11/X/8/7/6/5/4/3, iPad Pro/Air/mini, iPod, etc.
You can also learn more the product with the following video guide:


December 10, 2020 15:23 / Updated by Louisa White to Transfer iOS Data, Photo
 How to Transfer Music from iPad to Computer
In this article, we will show you how to get music from your iPad to PC or Mac.
 How to Sync iPad to iTunes
Follow this article to sync iPad to iTunes quickly and easily.
 How to Transfer iPad to Computer
Read this article to transfer iPad data to your computer.
