- "Can someone help me with Sony Vegas? How can I move a clip in Sony Vegas Pro 13 without moving all other clips after it? This problem is driving me insane!"
It is true that Sony Vegas Pro is one of the most popular video editors. You can get much video and audio editing filters. However, it is not friendly enough for beginners. So if you are new and have no idea how to use Sony Vegas Pro 13, then you can read this article to get useful editing tips.
1. Launch Sony Vegas Pro 13 on your Windows PC.
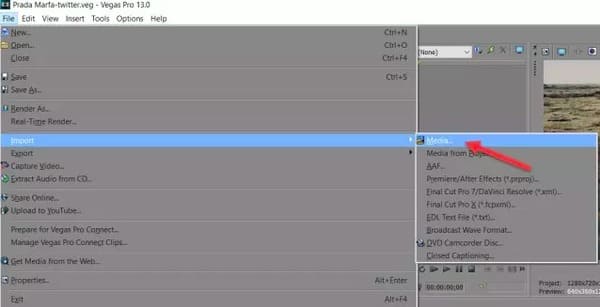
2. Choose "File" on the top left corner of the screen.
3. Then you can select "Import" from its drop-down list.
4. Click "Media…" from the side menu.
5. Sooner, you can choose which video clip you want to import with the file browser.
6. Later, click "OK" to confirm.
7. Few seconds later, you can see the video appear in the main interface.
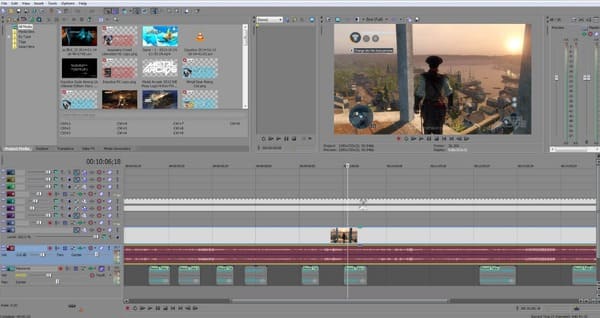
You can see all video and audio tracks in the timeline window. Well, audio clips contain all sound effects, while video tracks offer texts, videos, photos and others expect for audio tracks.
Actually, you can add or remove any video or audio clip through the timeline freely. Just right click on any empty space on the timeline and then choose "Add video track". Maybe that's why so many YouTubers and professionals prefer to use Sony Vegas Pro 13 for editing and gaming.
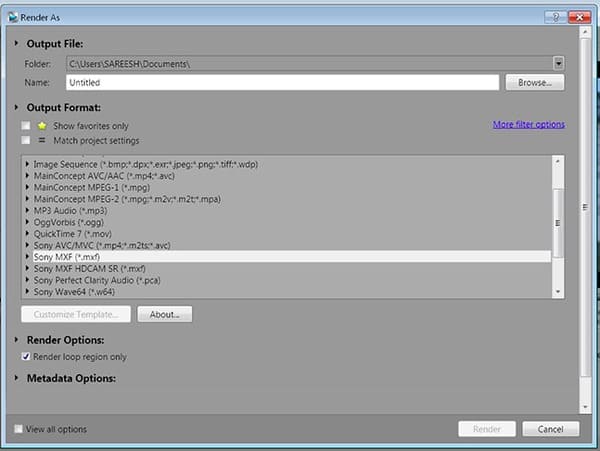
1. As for merging video clips, you can hold and press "Ctrl" and "A" keys together.
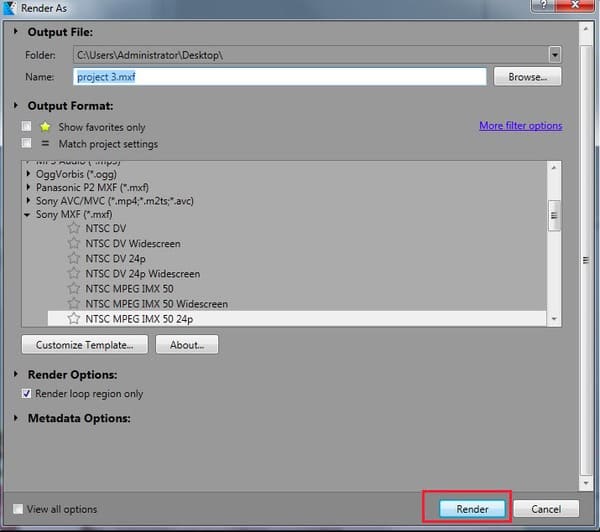
2. Click "File" to get a new popping-up window.
3. Choose "Render As…" from its list.
4. Later, you can set the output format, resolution and file name manually.
5. Choose "Render" to finish the process.
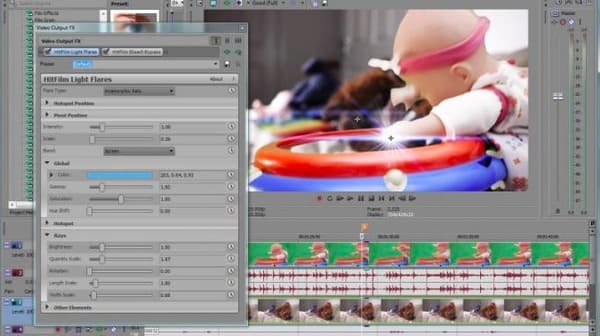
1. To add an effect to your media file, choose "Effects" in the left panel. As a result, you can see various types of effects in a menu.
2. Choose which one you like from the "Effects" menu.
3. Then drag and drop your selected effect over the video clip.
4. You will be requested to modify the ratios of that effect. So adjust it to the best situation, and then turn off the modifier.
5. You can find that the modified effect will come into action quickly.
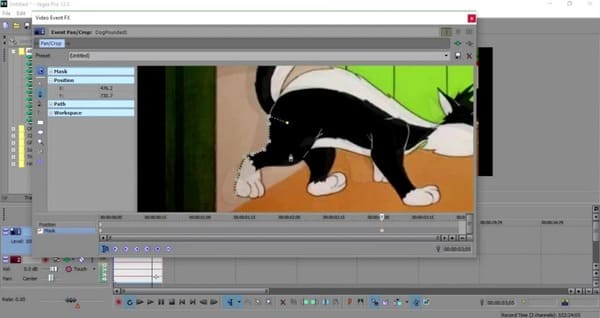
By using the masking feature, there is no need to use green screen Sony Vegas Pro 13 anymore.
1. Find the video you want to mask, and then right click on it.
2. Choose "Event Pan/Crop".
3. Click the box with the name of "Mask".
4. When you get a toolbar, click "Anchor Creation Tool" and draw the point to mask.
5. After you drew the entire object, Sony Vegas Pro 13 can detect it automatically.
6. Later, you can manipulate it and choose "Apply" to save your change. Moreover, there are many extra advanced features as well.
7. Finally, choose "Next" to export the video clip.
After the customization, you can export the edited video to your computer or any one website.
1. Just choose "Export" from the drop-down "File" menu on the top.
2. Select your desired output format from various choices, like .mp4, .mov, .avi, etc.
3. Wait for a while to render your video clip. Later, you can get this file on desktop.
Actually, you can achieve most features in Aiseesoft Video converter Ultimate as well. It is an easy-to-use but powerful video editor. You can convert, download, enhance and edit videos and music in high quality with a user-friendly interface. And all video editing activities can be completed effortlessly.
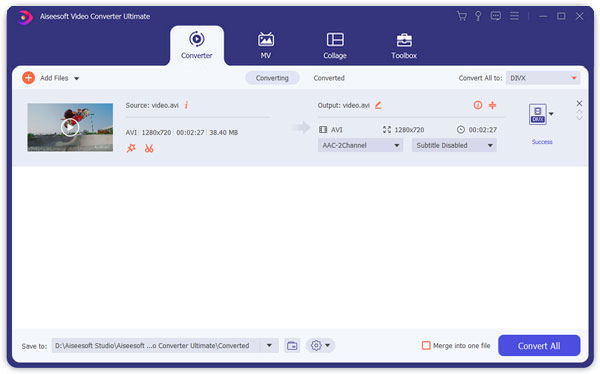
Step 1 Add video file
Free download and install Video Converter Ultimate. Launch this program to use Sony Vegas Pro 13 alternative for editing. Choose "Add File" on the top to import your video.
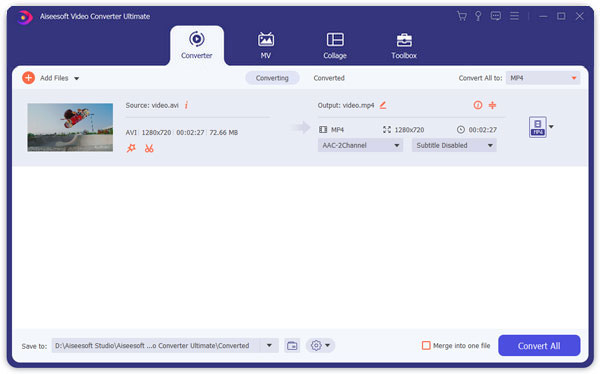
Step 2 Apply video effect
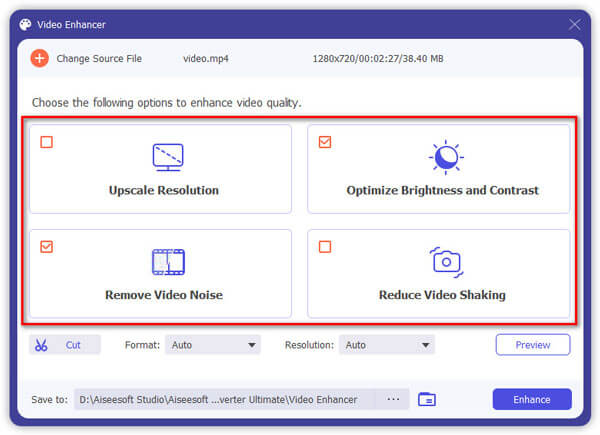
Click "Edit" to get a new window. You can rotate, crop, enable 3D settings, apply effects, add watermark and enhance video quality freely. Just choose the certain option to enter into its page. Then click "Apply" or "Apply to All" to save your change and exit the window.
Step 3 Store the edited video
Choose "Profile" and select the specific preset profile from its list. If you want to adjust the profile settings, you can choose "Settings" option besides. At last, click "Convert" to export your video in high quality.
That's all for how to use Sony Vegas Pro 13 and its alternative. Thus, both beginners and professionals can save time on editing videos. And feel free to leave messages below if you have any difficulty about Sony Vegas Pro.

May 31, 2018 11:00 / Updated by Jenny Ryan to Edit Video
 How to Convert FLV Video to MP3 Music
Want to convert FLV video to MP3 for audio file? Learn from this post to make it with FLV to MP3 Converter.
 The Best Way to Free Convert FLV to MP4
How do you convert FLV to MP4? This guide will tell you how to free convert FLV to MP4.
 How to Free Convert WAV to MP3
Want to convert WAV to MP3 easily on Windows or Mac? This article shows several free ways to convert WAV to MP3.
