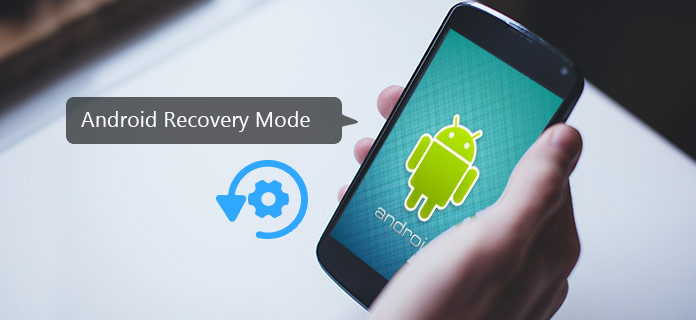
Speaking of Android phone, there are loads of technical issues that users are confused about and seeking for solutions on the Internet, like how to root Android, how to factory reset my Android, how to update system, how to deal with virus in my Android and more. While, all of these questions need to be solved under Recovery Mode for Android. What is Android Recovery Mode? What can we do in it? How can we access into Android Recovery Mode? Beyond all these questions, let's get to know it from the beginning.
Android Recovery Mode, a feature for Android, is a built-in environment that's independent from original operating system. You can consider it as a single "monitor room", where things can be fixed without getting on the stage. To be specific, you can boot into Android recovery mode to factory reset the device, clear the cache partition, apply software updates, etc. To access Android Recovery Mode, using hardware keys combinations may be the easiest way, but there'll be sight differences according to Android brands and versions. Continue to read and learn about the specific methods to boot Android into Recovery Mode.

To access Recovery Mode, Android provides a combination of buttons on your handsets. Press them together and you can get into Android Recovery Mode easily. However, the combinations might be different based on Android brands and versions. Here are some methods of the main stream Android devices to boot in Recovery Mode:
Step 1Hold down the Power key and turn off the phone.
Step 2Press and hold Power-Home-Volume Up.
Step 3Keep holding until you see Samsung logo. After that you have entered Recovery Mode successfully. You can use Volume keys to select options from the menu.
Step 1Follow the path "Settings" > "Battery" and disable "Fastboot".
Step 2Hold down the Power key and turn off the device.
Step 3Press and hold Power-Volume Down until a menu including Recovery Mode options shows, use Volume keys to select it and enter with Power key.
Step 1Turn off the phone.
Step 2ress and hold Power-Volume Up-Volume Down until you see a menu with Recovery Mode option.
Step 3Navigate to Recovery mode with Volume keys and access it with Power key.
Step 1Turn off the phone.
Step 2Press and hold Power-Volume Down key until you see LG logo, then let go of the Power key and press it again.
Step 3The menu appears and you can navigate to Recovery by Volume keys.
The Android Recovery Mode options may differ according to Android devices just like Recovery access methods. But there are some basic functions that you can always get:
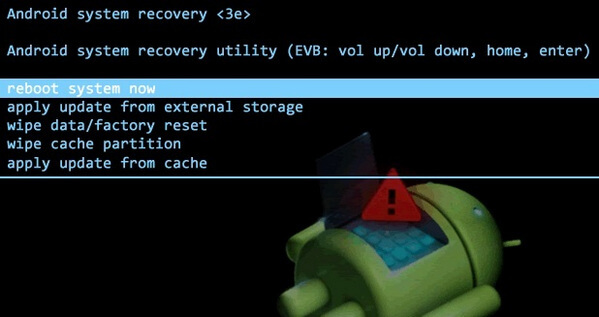
This is an option to restart your Android phone or tablet manually. If your Android phone is frozen, you can try to enter Android Recovery Mode and reboot the system again.
ADB, short for Android Debugging Bridge, is a tool that enables you to run and operate your Android devices through computer. It is widely used by Android application developer to fix bugs. You could also use ADB to send files from PC to your phone.
This is a very common way to reset your Android. It can be applied when you need to clear all data in your old phone. After this, all your Android data, including photos, videos, apps, text messages and more will be deleted.
Cache Partition is the temporary data that stores in your phone. Most users would ignore Android cache, and let it add up. But that would slow down your phone. Therefore, you should use this function regularly and make your Android boot up quicker and apps run faster.
Apart from these functions mentioned above, some Android devices also allow you to apply update from external storage, install custom ROM and more.
Even though Android Recovery Mode could be useful under many circumstances, nobody needs recovery all the time. For unknown reasons, some Android phones may be stuck in Android Recovery Mode no command and can't get out. Well, don't worry, here are a few tips for you to fix your phone:
1. To get out of Android Recovery Mode, the first thing you need to do is check the handset keys are in a proper position. As we have mentioned above, Recovery Mode can be accessed by pressing a few buttons together, but if they are stuck and pressed down all the time, of course you can't get out.
2. Power the device on once you have pressed down on the keys for a bit. See if it will boot up.
3. Remove the battery, and then put it back on. Check if it will work.
4. If none of these methods work, you can choose "Wipe data/Factory reset" from the Android Recovery Mode options and try to reset your phone. But this method might wipe out data you intend to keep.
5. Still doesn't work? I'm sorry, your phone has probably become a brick, you may need to replace it now.
Rescued your phone, but not your data?
There is a great possibility that data lose after you finally get your phone out of Android Recovery Mode somehow. Is there any way to save your data? Of course, an excellent Android data recovery tool would solve your problem easily. You can follow the steps below:
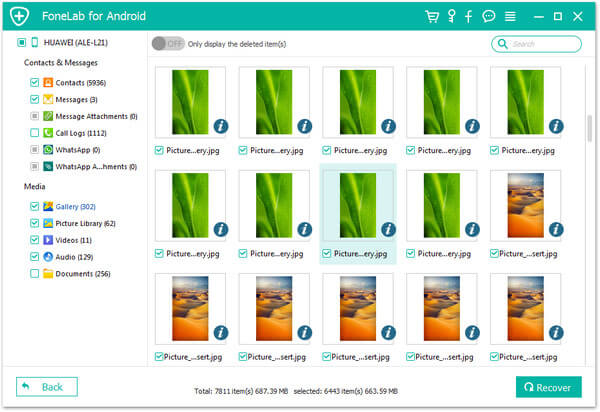
Step 1Download and run Android Data Recovery tool.
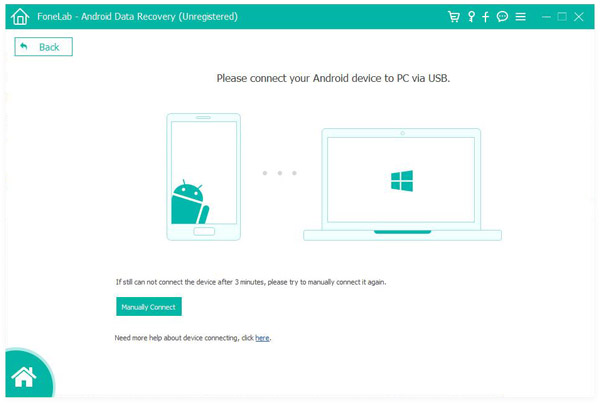
Step 2Connect your phone to PC via USB cable. Wait until your phone is recognized automatically.
Step 3You'll be told to choose file types you want to recovery from the right window, including "Contacts & Messages" ("Contacts", "Messages", "Messages Attachments", "Call Logs").
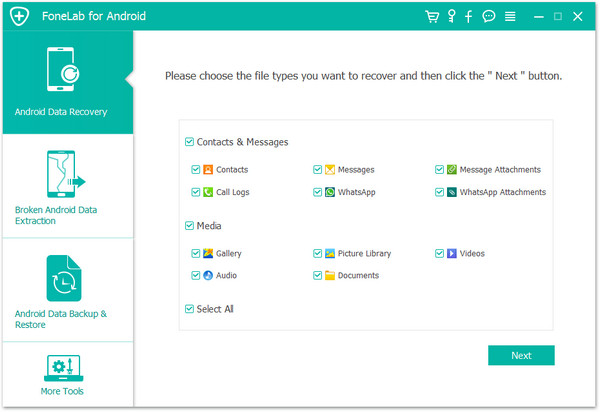
Note: Android Data Recovery also provides a pro version for you to recover media files like "Gallery", "Videos", "Audio", "Documents" and more.
Step 4Click "Next", and your device will be scanned. After the scanning process, click "Recovery" and choose the file destination. Now you have restored your Android file back to your PC successfully! In this way, you can recover deleted Android call log, contacts, messages, and more free.

May 02, 2018 08:51 / Updated by Iris Walker to Recover Android Data
 Locate the Stolen or Lost Android Device
If your Android phone is stolen or lost, this post may help you how to track them.
 How to Recover Data from Android with Broken Screen
Broke your Android screen accidently? Don't worry about your data, read this article and learn the easiest way to recover data from Android with broken screen.
 Jailbreak Android: Get the Best Out of Your Android Phone
This article gives you the simplest method to jailbreak your Android phone/tablet with great jailbreaking apps.
