Summary
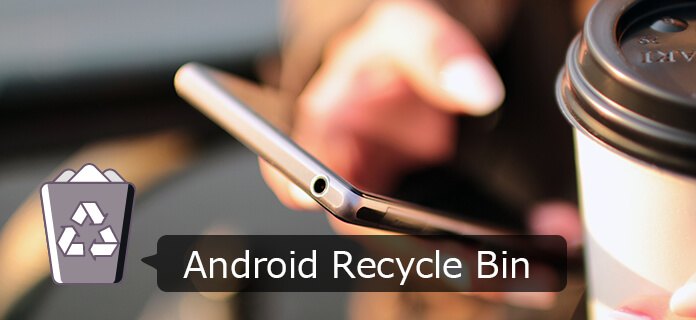
When you delete photos or text messages, where do the deleted files go? Maybe there is an Android Recycle Bin like Windows's, or maybe there is not. This post is helpful.
Summary
When you delete photos or text messages, where do the deleted files go? Maybe there is an Android Recycle Bin like Windows's, or maybe there is not. This post is helpful.
I have a question. Is there any Recycle Bin in Android phone?
You may confused that there's no Android Recycle bin like Windows computer. But when we delete files like photos or text messages, where are these trashes? We often delete files and we may remove files by mistake. That’s why we have the need of Recycle bin. No obvious Recycle bin in Android, you may miss the simple "right click and restore" function like Windows computer's recycle bin. One would think that it may be not possible to recover files deleted from your Android devices. Pay attention, you still have the chance to restore files from Android phone. And this post is prepared for you.
You may ask why there is no recycle bin on Android devices? There's no clear answer for the lack of recycle bin. In the earlier days, space was always so limited.
In a phone with 8GB storage, there was no free space for storing deleted data or files, as those deleted was not absolutely important, so the Android Recycle bin seems not necessary. Also, if GB-space is where the heart is, then consumers would always want to know the free-space available to them. A deleted file, had to stay deleted, so that new (and more exciting) file could take its place.
However, there is the system folder, the LOST.DIR, which is a place where the Android OS places files that were recovered during a system boot up.
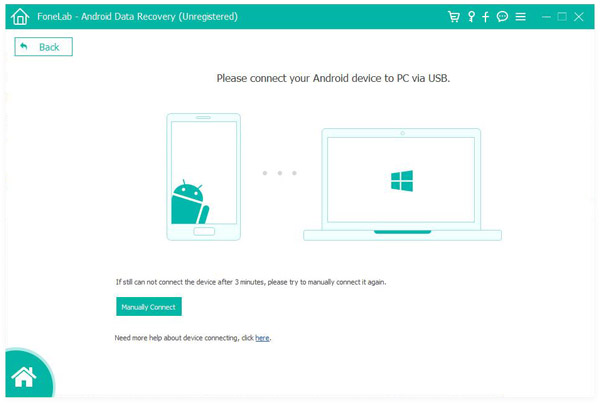
Step 1Connect Android phone to PC
To begin with, install and run Android Data Recovery. Then connect your Android device like Samsung Galaxy, HUAWEI, Sony, LG, etc. to PC with a USB cable.
Step 2Allow USB Debugging
There should be a notice for allowing USB debugging. You need to tap on "Allow". Then, the computer can have the privilege to access Android files of the connected portable device. If you see no notice of USB debugging, you can manually activate it.
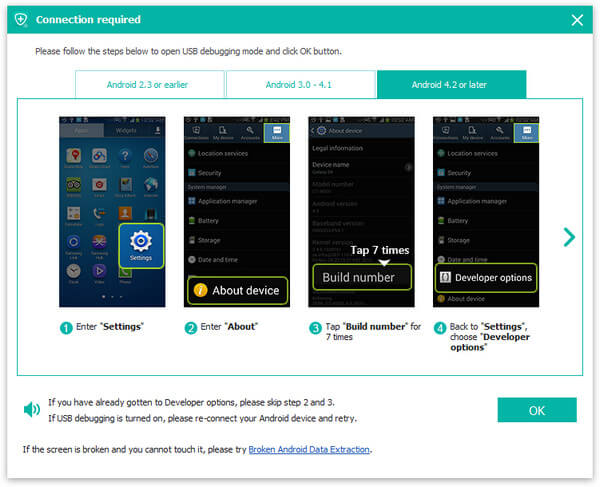
◆ For Android 2.3 or earlier version: Go to "Settings" > "Applications" > "Development" > "USB debugging".
◆ For Android 3.0 - 4.1 version: Navigate to "Settings" > "Developer options" > "USB debugging".
◆ For Android 4.2 or later version: Enter "Settings" > "About phone". Tap on "Build number" option for about 7 times until you see the dialogue box of "You are under developer mode" shows up. Then return to "Settings" > "Developer options" > "USB Debugging".
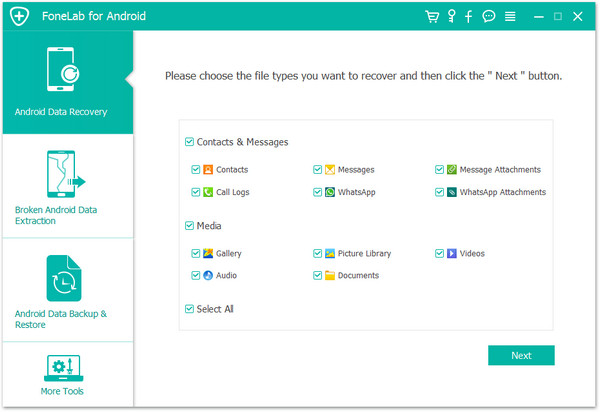
Step 3Choose Android file types to recover
When your Android device is successfully detected by the program, you will be asked to choose the Android files types that you are want to recover. Tick the ones that you prefer and then hit the "Next" button. Android Data Recovery will soon scan your data.
Step 4Get root permission and scan Android files
In this step, the Android Data Recovery will check your device information and then try to get root permission. When the window as below occurs, go to your phone and tap on "Allow/Grant/ Authorize" to ensure the root request is accepted.
Once the program gets root permission of your device, it will trigger a scanning process for your Android files. During this process, please wait patiently for Android file recovery. You'd better not use or disconnect the device.
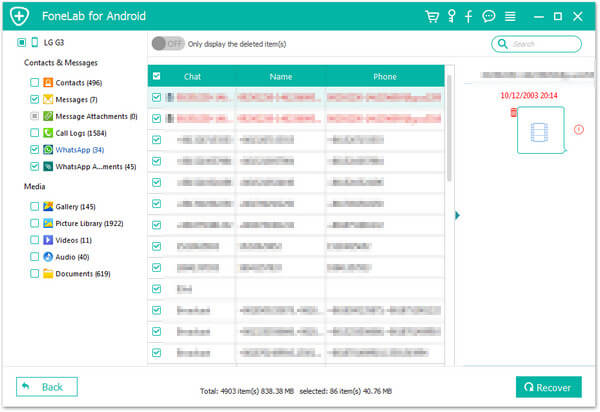
Step 5View and recover deleted files from Android
Scanning is over, and all your selected items are listed in order at the left module. Choose each specific file type, and you can find that detailed Android files will be exhaustively displayed in the interface. You can toggle on the option "Only display the deleted item (s)" to only recover deleted files from Android. After selection, click "Recover" button and all that deleted files will be recovered and saved on your computer immediately.
This video lets you learn more about FoneLab for Android:

You are looking for an Android Recycle Bin app for file recovery. And we are going to recommend three apps for you.
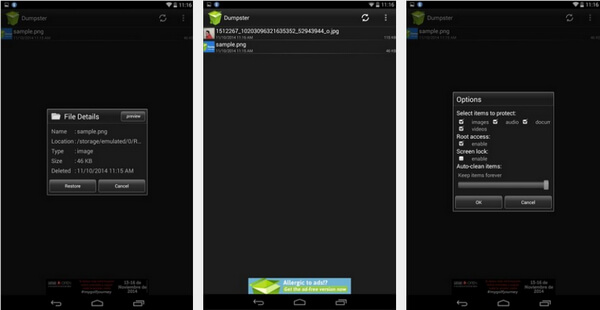
Dumpster is a recycle bin for Android where all deleted files are saved. Just like the recycle bin on Windows, if you delete a file, it will go straight to Dumpster, so that you can restore it if it is necessary. You can preview any file from Dumpster itself, so that you don’t have to restore it. The app can be compatible with images, audio, documents and video. Besides, it also recovered deleted APK files, VCF cards and HTML pages. Dumpster will keep files forever unless you manually and permanently remove them, or you can set them to be automatically cleaned after a particular period. Note that Dumpster will only restore files deleted after the installation of the app. The free version comes with ads, and you have to get rid of advertisement via an in-app purchase.
This app implements a Recycle Bin or Trash bin for Android. It works greatly with many third-party file explorers. Actually, the recycle bin app acts more like a transitional space in which you can restore the files that were removed to the Recycle Bin. Files that were permanently deleted, and not put into the recycle bin won't be rescued by this app. However, you can configure a list of folders and file types to be automatically moved to the recycle bin if one of these are deletes accidentally.
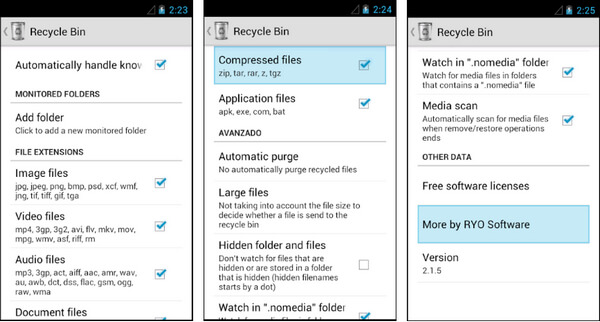
In order to put files to the Recycle Bin, choose the file you wish to remove, then select "Recycle Bin" in the "Open With", "Share it" or "Send To" menus. When you send a file to the Recycle Bin (via "Send To", "Share it" or "Open With"), it is automatically moved to the recycle bin app folder. If you need to permanently remove the file, you need to enter the Recycle Bin app and select "Permanently Delete the File". If you need to restore the file, enter the Recycle Bin, then select restore.
ES File Explorer is how you can safeguard your videos or photos. In addition, you can use the app as an Android recycle bin. Let's now have a look it works. Firstly, you will need to install a 3rd-party file manager named the ES File Explorer. The app is a full-fledged file manager and there's so much that you can do with it. Compared to the traditional file explorer, the ES File Explorer comes with various features and recycle bin is one of such options. The Recycle Bin option can be enabled from the left sidebar.
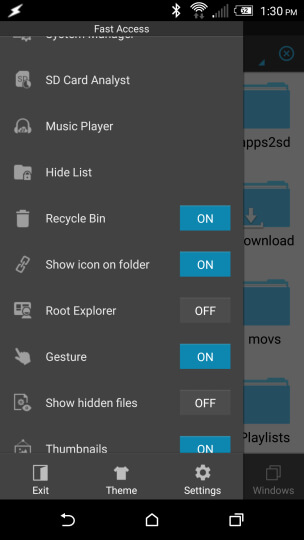
Any file you you delete will be sent to ES File Explorer’s Recycle Bin. But it will not keep for long time, just about a few days. If you have the need, you can tap on the recycle bin option and restore these deleted files to the previous location. The option works for any file type as long as you are using ES File Explorer. ES File Explorer is a great file manager but it may interrupt you with some hidden ads. Ad-free pro version of ES File Explorer costs $2.99.
Above all, FoneLab Android Data recovery may more suit you. It recovers more file-types and more files without overwriting your any data. Dumpster,Recycle Bin App or ES File Explorer all may contain ads. And these apps won't recover files that were deleted before their installation. FoneLab Android Data Recovery would recover files deleted permanently, and restore them as long as these files weren't overwritten.

December 17, 2020 07:51 / Updated by Iris Walker to Recover Android Data
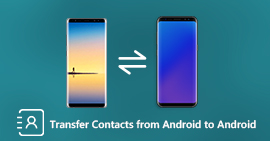 How to Transfer Contacts from Android to Android
Get a new Android phone? Then sync contacts from old Android to new Android phone for easy use.
 How to Backup Everything on Android? Useful Tip Here
How to backup everything on Android? This article introduces Android Data Backup & Restore tool you can use for Android backup.
 10 Best Boosters for Android to Optimize Android System
When you find the Android phone becomes slower and slower, you can choose the best booster for Android from the listed applications.
