
Aiseesoft Video Converter Ultimate
![]() 100% Secure. No Ads.
100% Secure. No Ads.
![]() 100% Secure. No Ads.
100% Secure. No Ads.
Contents
Many creators stumble upon this in Final Cut Pro: awesome clips all of a sudden look dull, dark, or of low quality after import. This is why it is essential to know Final Cut Pro Enhance video quality techniques. I am making this article to reach out to anyone, beginners, students, filmmakers, business owners, and content creators, who want to change their footage from being mediocre to becoming crisp, vibrant, and polished videos. We’ll walk you through the common reasons quality drops. Following this, you will be able to correct low-quality clips, color grade, sharpen image details, and generally elevate the quality of your videos in Final Cut Pro without a hint of discomfort or confusion. How about that? We’re talking about making your video footage shine.

Quite often, videos look lower quality in Final Cut Pro because the program displays and processes footage differently than the camera. The main reasons are the following:
1. Lower Playback Quality for Speed
To keep the editing process smooth, Final Cut Pro adjusts the preview quality, which makes the clips look softer.
2. Incorrect or Missing Color Profiles
For example, a video that was recorded in HDR, Log, or Rec.2020 and is played in a Rec.709 project might look dull or washed out because the color space is different.
3. Timeline Resolution Mismatch
A 4K clip on a 1080p timeline (or mixed resolutions) can look blurry due to automatic downscaling or upscaling.
4. Background or Unrendered Effects
Any clip that is being stabilized, sharpened, or color-corrected might look low-quality or choppy until the changes are rendered.
5. Very Compressed Mobile/Action Camera Footage
Files in HEVC/H.264 formats taken from a mobile device, GoPro, or drone usually have noise or blocky areas when edited.
6. Low-Light or Underexposed Footage
Dark or noisy recordings naturally look worse during editing because they contain less detail.
Final Cut Pro includes built-in tools that let you quickly upgrade the look of your footage even before diving into advanced effects. These basic adjustments help address common issues such as dull colors, washed-out whites, and soft details. These tools offer a quick way to enhance overall image quality, similar to using a Final Cut Pro auto-enhance video workflow.
1. Adjust Exposure and Contrast
Without proper exposure, it is impossible to have videos that look clean and professional.
2. Fix White Balance and Correct Colors
Your video might look heavily orange, blue, or green if the white balance is not set correctly.
3. Add the Sharpen Effect
A gentle sharpening of the image can fix soft or slightly out-of-focus videos.
4. Use Color Presets for Quick Enhancements
Final Cut Pro includes built-in color presets you can apply for instant improvement.
If your video material is to be visually sharp, of a cinematic standard, and professionally refined, Final Cut Pro offers powerful tools and settings that go far beyond simple changes. Such advanced methods will enable you to take full advantage of the resolution, enhance clarity, and achieve a finish of the kind you see in the studio. There are several professional-level approaches you can use, including suggestions on how to upscale video in Final Cut Pro to enhance the output quality.
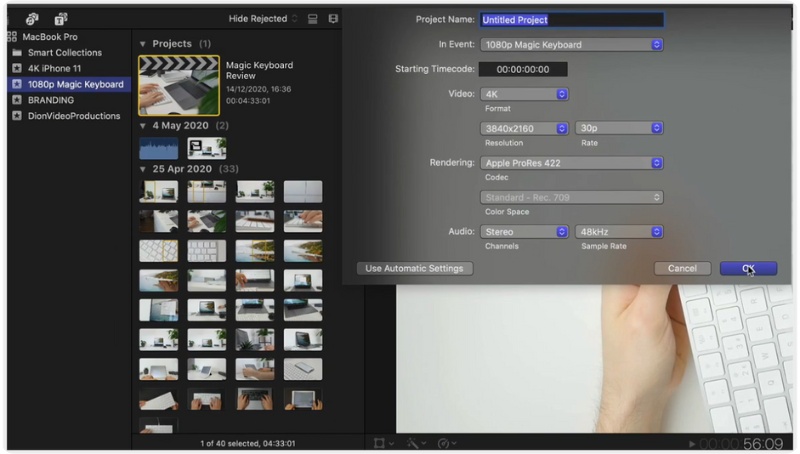
Firstly, confirm that your Final Cut Pro project is configured for the topmost resolution possible.
How to accomplish it
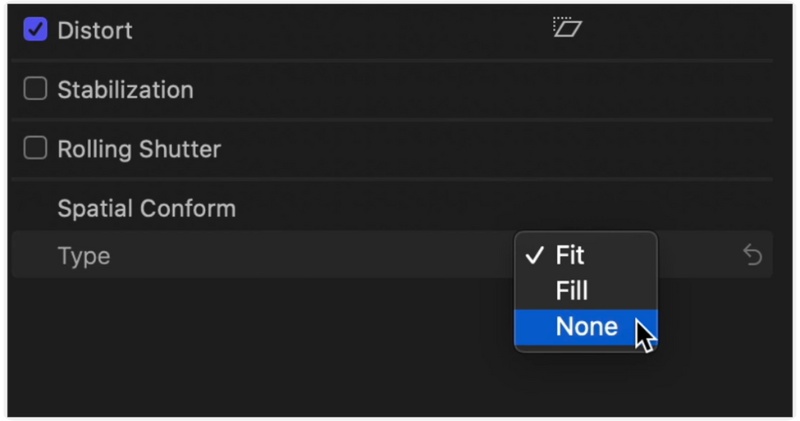
You can also upscale video to 4K by adjusting the spatial conform settings. It is useful for users searching for how to upscale a video in Final Cut Pro.
You can also by adjusting the spatial conform settings. It is useful for users searching for how to upscale a video in Final Cut Pro.
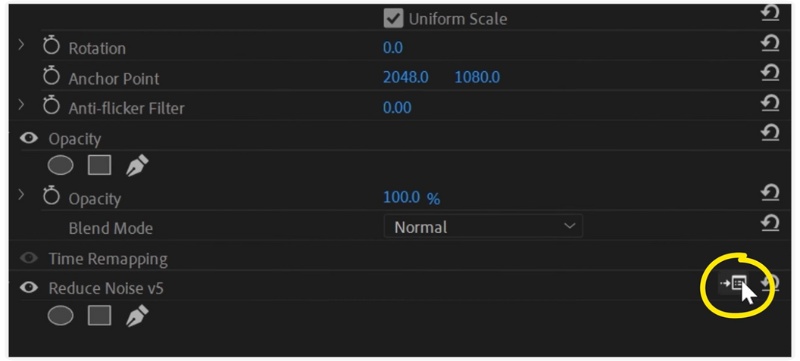
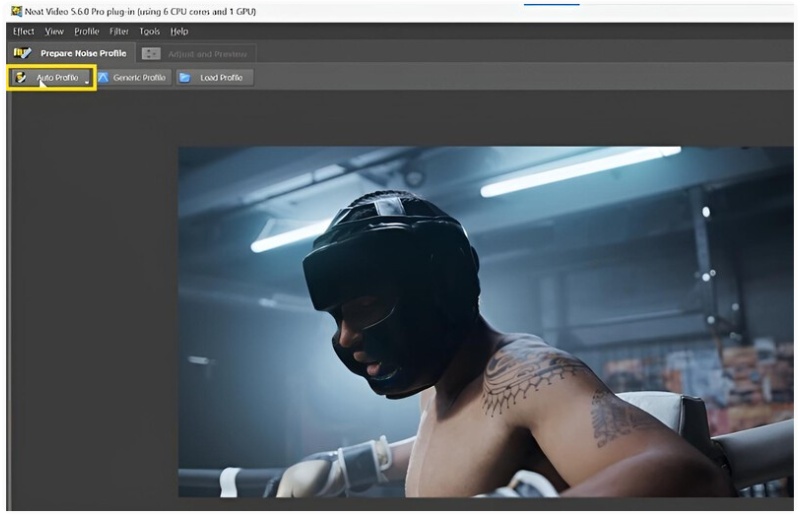
Suppose you want a dramatic improvement in clarity, especially for dark, grainy, or low-quality footage. Neat Video is one of the most powerful Final Cut Pro plugins you can use. It specializes in noise reduction and sharp detail recovery, making your videos look cleaner and more professional.
How to Use Neat Video in Final Cut Pro


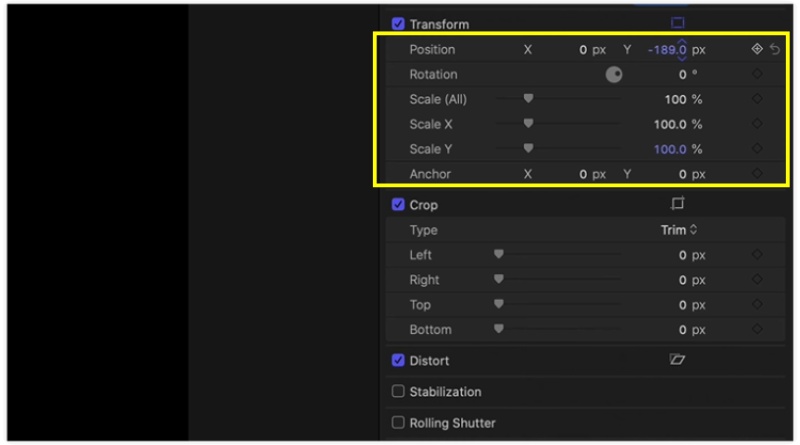
When you scale footage inside Final Cut Pro, the Spatial Conform setting controls how the clip fits the frame. To manually upscale for best results:
Wrong export settings can still mess up your final video and cause pixelation, color loss, or a general blur, even if your timeline is perfect. This is why it is necessary to select the right export settings if you want your recording to be high-quality and clean.
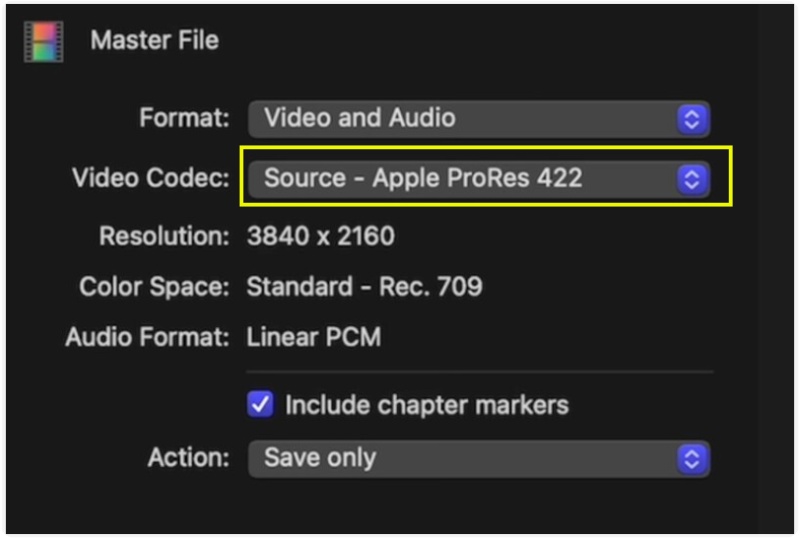
Here’s how to export with the best quality in Final Cut Pro
If exporting in H.264/H.265:
Higher bitrate = better detail retention.
Before exporting:
Keep exporting straightforward if you're not providing broadcast-level audio:
If broad color or HDR is used in your project:
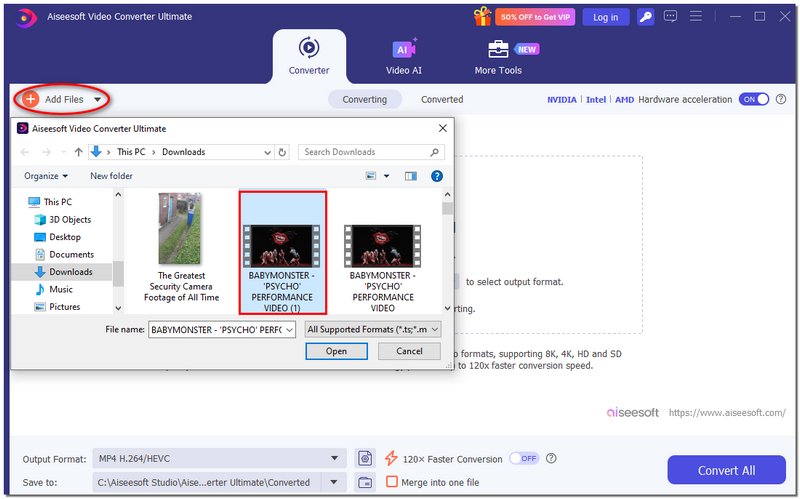
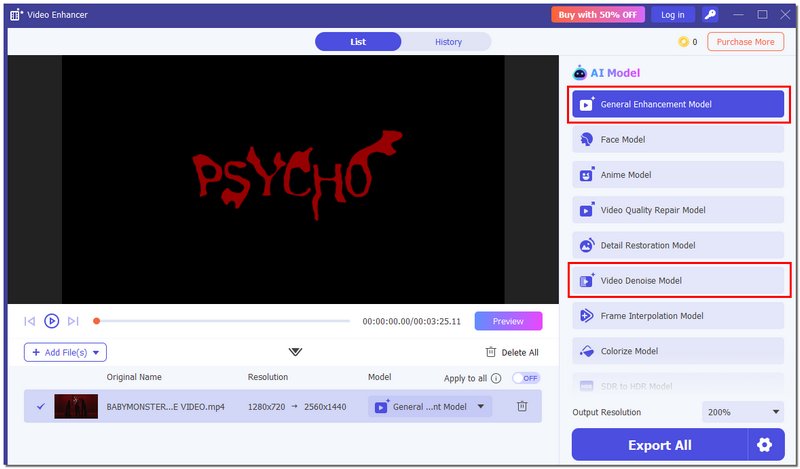
If you desire an easy method of enhancing your videos quality aside from delving into the deep settings of Final Cut Pro, then Aiseesoft Video Converter Ultimate is the next best option to consider. It is a tool that welcomes newcomers, works at a high speed, and is AI-powered. Therefore, it is very suitable for users who wish to have their videos sharpened, denoised, upscaled, and color-enhanced almost instantly, with all they have to do being a few clicks.

Downloads
Aiseesoft Video Converter Ultimate – The Best Video Speed Controller
![]() 100% Secure. No Ads.
100% Secure. No Ads.
![]() 100% Secure. No Ads.
100% Secure. No Ads.
How to Enhance Video Quality Using Aiseesoft Video Converter Ultimate


Why do my exported videos look different on YouTube or Facebook?
Sharpness and color accuracy may be compromised by social media services' recompression of uploaded content. The loss can be reduced by using high-bitrate export settings.
What’s the best way to preview high-quality playback without lag?
Use Optimized or Proxy media. Optimized media improves quality, while Proxy media keeps editing smooth without affecting the final export.
Is it better to enhance the video before or after editing in Final Cut Pro?
It’s best to apply major enhancements, such as exposure correction or noise reduction, early in your edit so your adjustments remain consistent across cuts.
Conclusion
So, you have a pretty good idea about the main steps of how to enhance video quality in Final Cut Pro, starting with fixing exposure and color, and also involving sharpening, upscaling, and exporting with the best settings. Having a clue about the reasons why the footage looks bad and the ways of fixing it will give you more control and confidence in your edits. With these tools and techniques, you can turn low-quality clips into clean, polished videos and create results that look professional every time.
 Final Cut Pro vs Davinci Resolve
Which is better, DaVinci Resolve or Final Cut Pro? Do YouTubers use DaVinci Resolve? This post compares Final Cut Pro with Davinci Resolve in different aspects.
 Final Cut Pro - How to Do a Color Correction
Can I make a color correction in Final Cut Pro? This post provides a detailed guide to let you know how to do a color correction in Final Cut Pro.
 Final Cut Pro Review & Best Alternative to Split a Clip Easily
This post shows in detail about how to split a clip in Final Cut Pro and introduces a best free video editor for video split.

Video Converter Ultimate is excellent video converter, editor and enhancer to convert, enhance and edit videos and music in 1000 formats and more.
![]() 100% Secure. No Ads.
100% Secure. No Ads.
![]() 100% Secure. No Ads.
100% Secure. No Ads.
*Required field
*Please enter a valid email
