As an Apple user, you may need to clear up your device storage or upgrade your iOS version from time to time. It's not always the case but it may be a great trouble when you lost your purchased music.
For whatever reason you lost your songs, now you have come to the right place because here we will give you the most comprehensive solutions to this problem.
If you haven't deleted your music from your iCloud account, you will get them back from your iCloud account to the place you want. For different Apple device users, we provide you 5 ways to download the iCloud music.

Download Music from iCloud
If you deleted the purchased music on your iPhone, iPod or iPad and want to get them back to the device, please sign in with the Apple ID with which you bought the music. Make sure your purchases are not hidden and you haven't changed your Apple ID from one country to another.
Apple ID forgot? Recover Apple ID now.
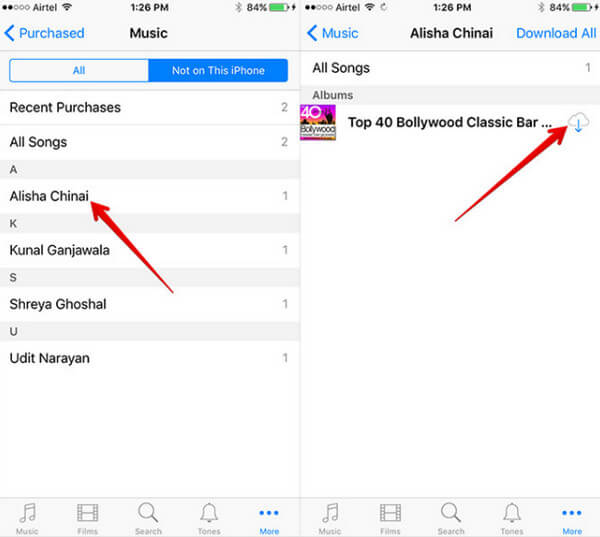
1Go to iTunes Store
Open iTunes Store on your iPhone, iPad or iPod touch. Tap Purchased, then tap Music.
2Find the songs you want to download
Tap Not on This iPhone/iPad/iPod and find the song(s) you want to download.
3Start downloading the music
Tap the Download icon to the right of the title to start downloading.
If you delete the songs from iTunes on your PC/Mac, you can also download them back again.
1Open iTunes on your computer and sign in with your Apple ID.
2Click your name and select Purchased. Then click Not in My Library.
3Find the music you want to download and click the download icon.

If you want to access the music in your iCloud on Apple TV, you can find and play them on your Apple TV, but you don't actually download them to the device. These are steps of how to access the iCloud music on your Apple TV.
1Enter the Home screen on your Apple TV, choose Music or My Music.
2Select the song and just listen.
1Pick the computer you want your canonical library to live on and run iTunes.
2Make sure iCloud Music Library is enabled in iTunes > Preferences > General > Select Music from the dropdown menu, and select the Library tab.
3Go to View > Show View Options > Click on the checkboxes next to iCloud Download.
4You can download tracks one-by-one by clicking on the cloud icon, or by selecting multiple songs and control-clicking on them, then selecting Download.

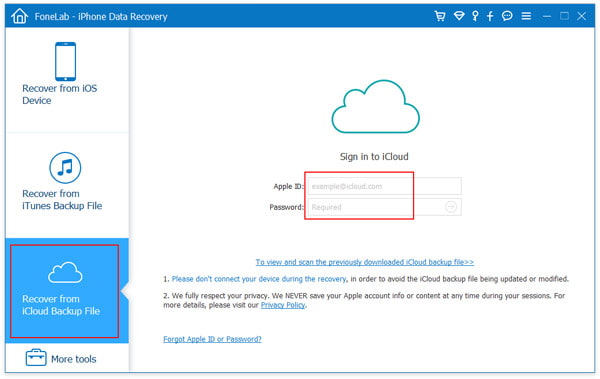
If you have make iPhone music backup to iCloud, then here you are able to access and download the music files from iCloud, you even do not need your iPhone.
What you need is Aiseesoft Data Recovery.
1Free download, install and run this software on your computer. Choose Recover from iCloud Backup File, and sign in your iCloud account and password. (iCloud password forgot? Recover or reset it quickly.)
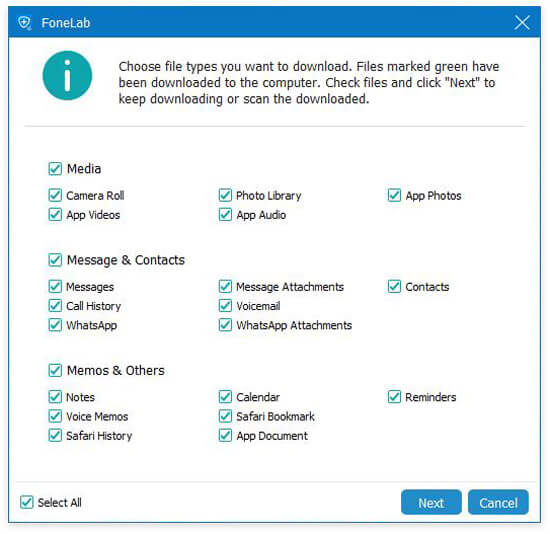
2Pick up one iCloud backup that contains your music, and click Download > Select App Audio to start to download iPhone music backup from iCloud to this computer.
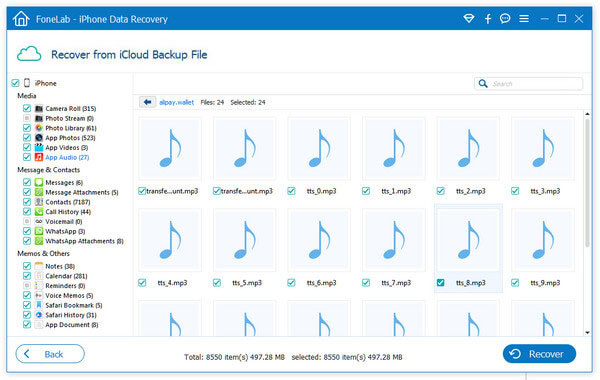
3After the scanning result is complete, you can click App Audio to view the detailed music files. Select the audio files that you want to download, and click Recover to start to save the music files from iCloud to computer.
This tutorial shows you 5 ways of downloading music from iCloud to your computer or iOS device. You can do it easily by yourself.

June 13, 2018 11:57 / Updated by Louisa White to iCloud Tips
 How to Retrieve Photos and Pictures from iCloud
"Wonder how to retrieve photos from iCloud? This article shows you the easiest way to get photos from iCloud.
 How to Restore iCloud Contacts
Wonder how to restore the deleted or lost contacts of iPhone/iPad/iPod from iCloud? This post will help you.
 How to Read Text Messages Online
How to read text messages through iCloud? Read this guide to access iCloud and check text messages.
