Note
Make sure you are using the built-in keyboard instead of other external keyboards.
Where is macOS Internet recovery stored?
Internet recovery mode fails to install macOS Sierra on a formatted 2016 MBP…
My Mac won't boot into recovery mode…
Many people complain about Internet recovery Mac stuck, such as the endless spinning globe. It does not matter if you have no idea how to reinstall Mac OS X with Internet recovery, because this article introduces every step in details.
What is more, you can also find reasons explaining why you encounter the Internet recovery error here.
So just be patient and spend few minutes on the following paragraphs. You can get the best solution to reinstall Mac in Internet recovery mode with ease.
Actually, Apple Mac offers two main recovery modes, which are regular/standard recovery mode and Internet recovery mode.
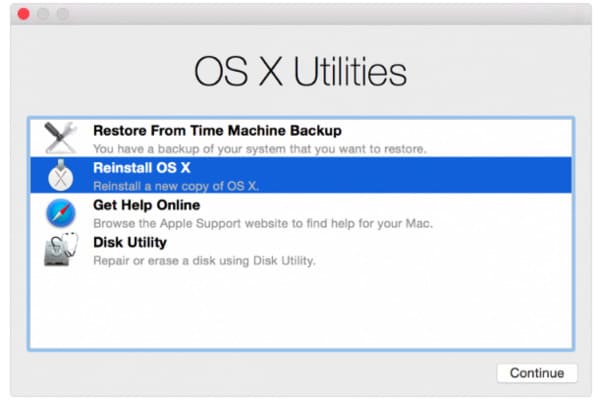
To be more specific, when your Mac runs into an emergency, you can get 4 choices to bypass difficulties, including "Restore from Time Machine Backup", "Reinstall macOS", "Get Help Online" and "Disk Utility".
When you decide to reinstall the Mac operating system, then you will be prompted whether to run the default recovery mode or Internet recovery mode. Choose the latter one if your startup disk is damaged, corrupted or erased.
In a word, Internet recovery Mac is an Internet-based version of recovery mode for Macs.
So why or when should you take the Internet recovery Mac command?
Well, if the recovery partition gets damaged or unreadable, you need to perform an Internet recovery on Mac over the air. So make sure you are using a strong Internet connection.
Moreover, it takes a long time to reinstall macOS X with Internet recovery. Thus, you should also keep your Mac charged or check if it has adequate power. Of course, there must be something wrong if Mac Internet recovery 24 hours later. (What if Mac not charging?)
Step 1Reboot your Mac
Choose your Apple menu on the top left corner of the screen. Then choose "Restart" or "Power" option to restart your Mac computer. During the Mac reboot process, when you hear the startup chime, hold and press "Command", "Option" and "R" together. Do not release them until you see the animated globe appear on the main screen.

Note
Make sure you are using the built-in keyboard instead of other external keyboards.
Step 2Connect Mac to Wi-Fi network
You can see "Starting Internet Recovery. This may take a while" under the globe icon. Later, you will be required to build an Internet connection. So choose the available Wi-Fi network from the only drop-down list. Sometimes you may be prompted to enter the password for connecting a Wi-Fi network. Just press "Enter" key on your keyboard to move on. (Check the post to find Wi-Fi password on Mac)

Step 3Download the recovery system image
The moment you connect to Wi-Fi network, your Mac will start to download the recovery system image from Apple's servers automatically. Well, it is hard to tell Internet recovery Mac how long take. Because the specific time depends on your Wi-Fi speed. It varies from several minutes to hours. Thus, connect Mac to the power adapter in case if it runs out of juice.

Step 4Start up with Internet recovery Mac
A new window pops up with the title of "OS X Utilities". Choose "Reinstall OS X" in the second place. After that, you can reinstall the macOS X operating system successfully.
What's more, you can also restore from Mac Time Machine backup, get online help from Apple support and repair disk using Disk Utilities here.
If you do not make backup to Time Machine, then you could learn here to undelete Mac.
The most common Internet recovery Mac error is the appearance of spinning globe instead of the Apple logo in the startup screen.
During this time, you can try to hold and press "Shift", "Option", "Command" and "R" keys at the same time during startup. Well, it is also supported to press "Command" and "R" keys simultaneously.
Moreover, you should also test the Wi-Fi connection. So check the cable connection or modem condition manually. If you still have the Internet recovery Mac not working issue, then you can try to create an external Mac startup to reinstall Mac OS X instead.
If you want to delete some private files permanently, then you can try Aiseesoft Mac Cleaner. It is an easy-to-use and powerful cleaner that can erase all files irrecoverable on Mac.
As a result, once you run Mac Cleaner to shred the selected files, then no Mac data recovery can get the deleted files back at present.
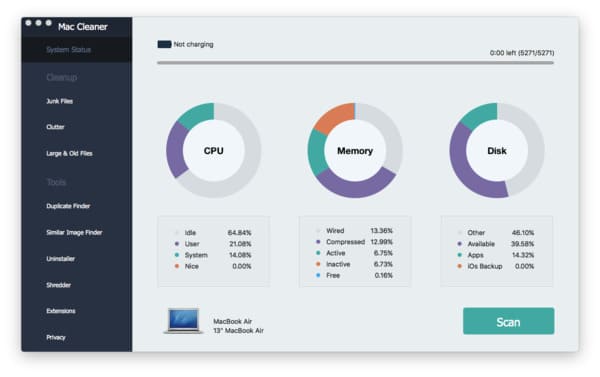
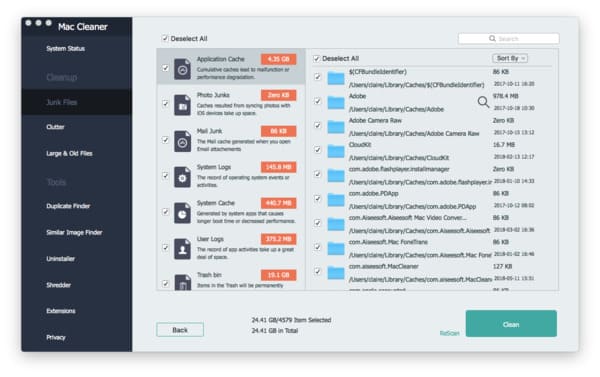
Step 1 Launch Mac Cleaner
Free download and install Mac Cleaner on your Mac computer. Launch this program and locate the default "System Status" page. You can choose "Scan" option on the lower right corner to monitor the current condition of your Mac.
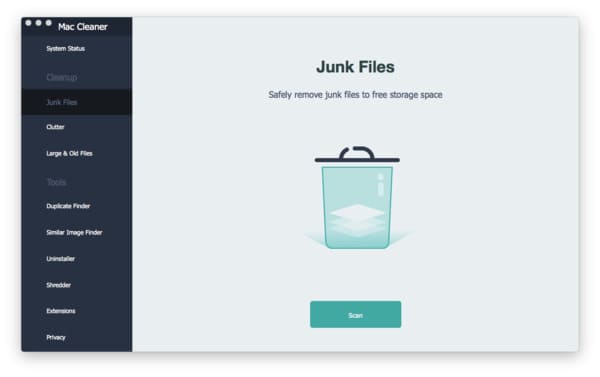
Step 2 Scan for Mac junk files
Choose "Junk Files" in the left panel. Well, you can get other tools to permanently delete the certain file types too. Then click "Scan" at the bottom to start to detect junk files stored on your Mac.
Step 3 Delete junk files and free up more space
Choose "Review" to see the scanned result. During this time, you can open the certain folder to choose which file you want to delete freely. At last, click "Clean" to safely delete junk files on Mac.
All in all, you can do an Internet recovery Mac and delete unwanted files safely and easily here.
Feel free to contact us if the Internet recovery error still occurs. We are glad to help you solve any problem whenever you need.

June 25, 2018 08:18 / Posted by Amanda Brown to Recover Mac Data
 How to Delete or Recover Gmail Messages (Permanently)
How to delete Gmail messages or recover permanently deleted emails from Gmail (deleted emails after 30 days)? Get the full guide with images in this post.
 Recovering Orphaned File - Recover CHKDSK Orphaned Files
What does recovering orphaned file mean? How to deal with it when you get the recovering orphaned file? Learn how to recover CHKDSK orphaned files and bring your computer to normal condition here.
 10 Solutions to Fix Missing DLL Files and Recover Data
When you fail to run some apps on your Windows 10/8/7 computer and receive the DLL missing error message, you should seek for the best 10 ways here to fix the missing DLL files and recover data quickly.
