Best for: Users who need to transfer multiple file types in bulk — especially if you're switching phones or clearing out an old iPhone.
Contents
Running out of iPhone storage — or just want a proper backup of your photos, music, and documents on your Windows PC? You're not alone. Whether you're upgrading devices, freeing up space, or simply organizing your digital life, moving files from iPhone to PC is a task almost every iOS user faces sooner or later. Depending on your file types, internet speed, and how much patience you have, different methods work better for different situations. We've tested each one to help you pick the right fit.
Below, you'll find four proven ways to transfer files from iPhone to PC — from quick USB transfers to hands-free wireless sync. Jump to the one that suits you best.
| Method | File Types | Speed | Need Internet? | Cost | Best For |
| FoneEase | All (photos, music, contacts, SMS, books, voice memos) | Fast (USB) | No | Paid (trial) | Bulk transfers, all file types |
| iTunes | App documents only | Fast (USB) | Optional | Free | App-specific file sharing |
| iCloud | Photos, documents, contacts, calendars | Moderate (depends on speed) | Yes | Free (5 GB) / Paid | Wireless auto-sync |
| Windows Explorer | Photos & videos only | Fast (USB) | No | Free | Quick photo/video dumps |
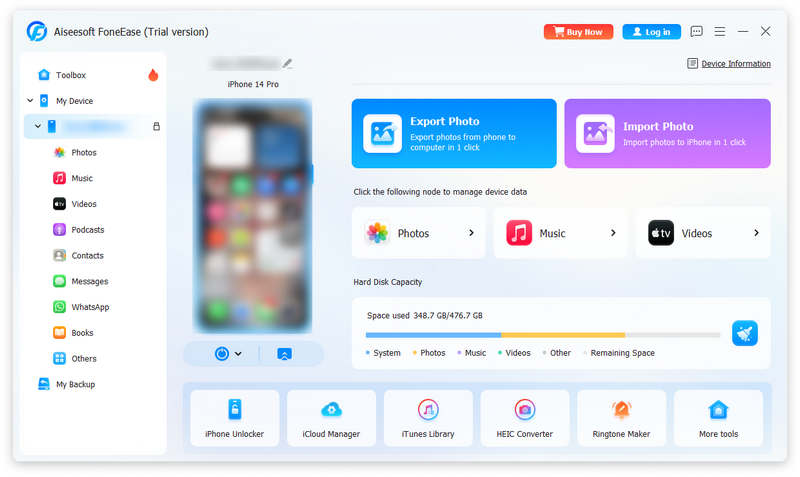
Best for: Users who need to transfer multiple file types in bulk — especially if you're switching phones or clearing out an old iPhone.
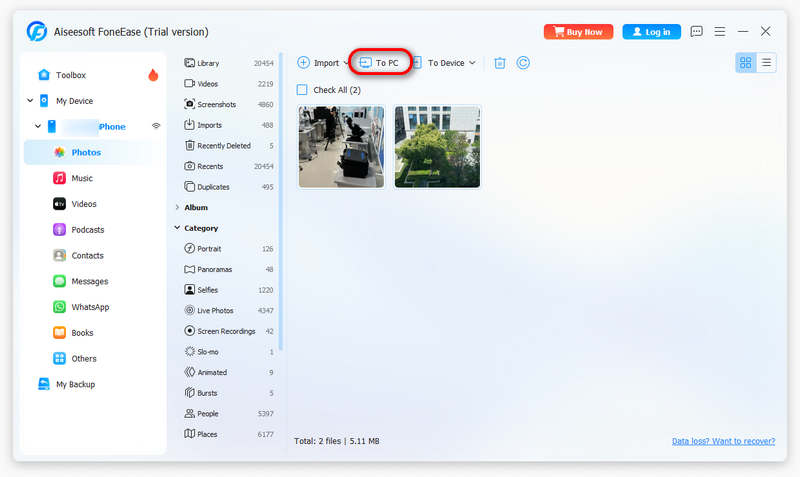
If you want a single tool that handles everything — photos, music, contacts, voice memos, movies, and even SMS — FoneEase is your best bet. It's a dedicated transfer tool that works over USB, giving you full control over what goes where without the limitations of iTunes or cloud storage caps. Best iOS-to-PC transfer, FoneEase also supports transferring files from PC back to iPhone, transferring between iPhone and Android, making it a two-way management tool. Moreover, its power toolbox allows you to recover lost data, repair broken system, unlock iPhone screen, remove iCloud activation lock and even change location.
Step-by-step:
![]() 100% Secure. No Ads.
100% Secure. No Ads.
PROS
CONS
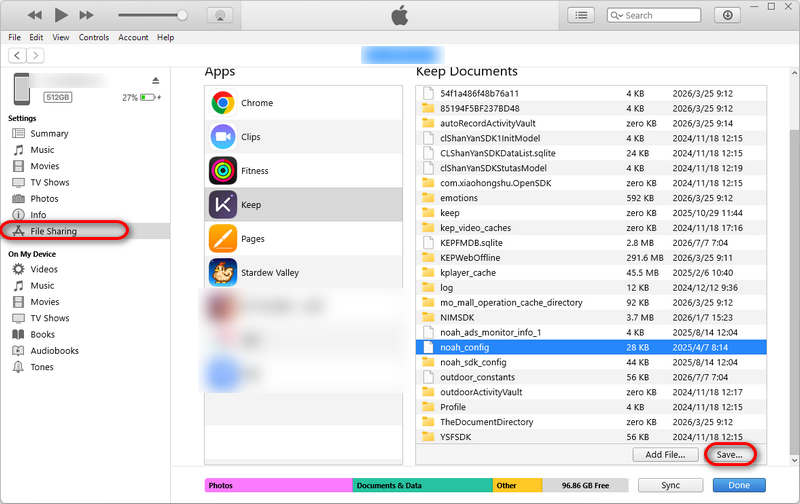
Best for: Transferring documents and data created inside specific iOS apps (e.g., Pages, Numbers, PDF editors)
On Windows, the classic iTunes still works. This official Apple sync tool — now split into Apple Music, Apple TV, and Apple Devices on Windows 11 — still lets you transfer app-specific documents and media files. It's not the flashiest method, but it's free, built-in, and reliable for file-sharing-supported apps. You can also download the Apple Devices app from the Microsoft Store.
Step-by-step:
PROS
CONS
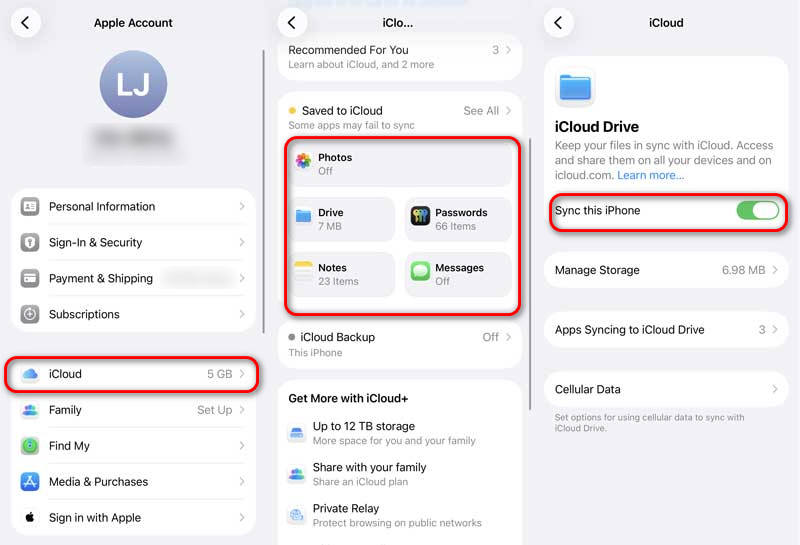
Best for: Users who want automatic, hands-free syncing and don't mind relying on an internet connection.
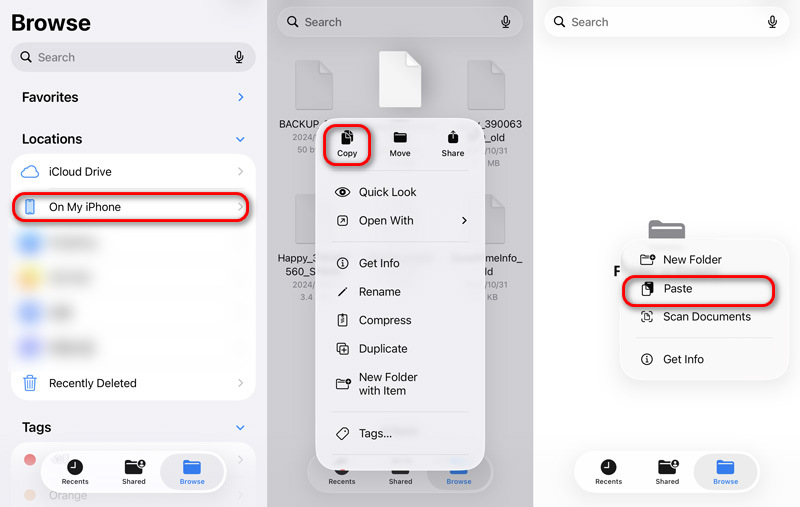
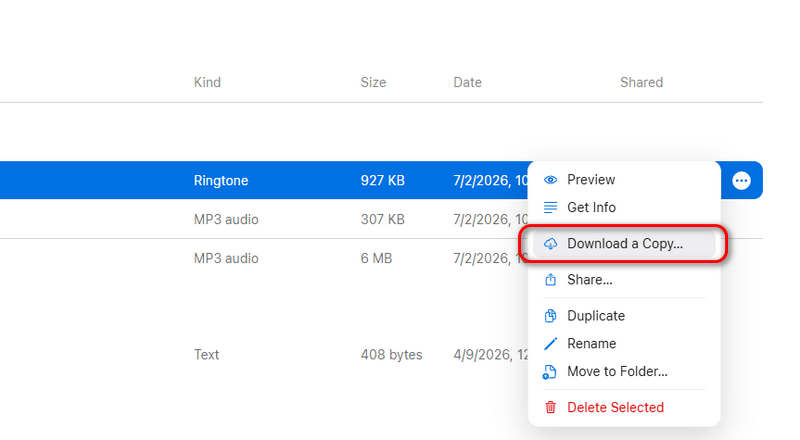
For a completely cable-free experience, iCloud backs up and syncs your photos, documents, and data across devices automatically. Once set up, files on your iPhone appear on your iCloud. In addition, for specific files, you can also upload them to iCloud Drive to sync automatically
Step-by-step:
PROS
CONS
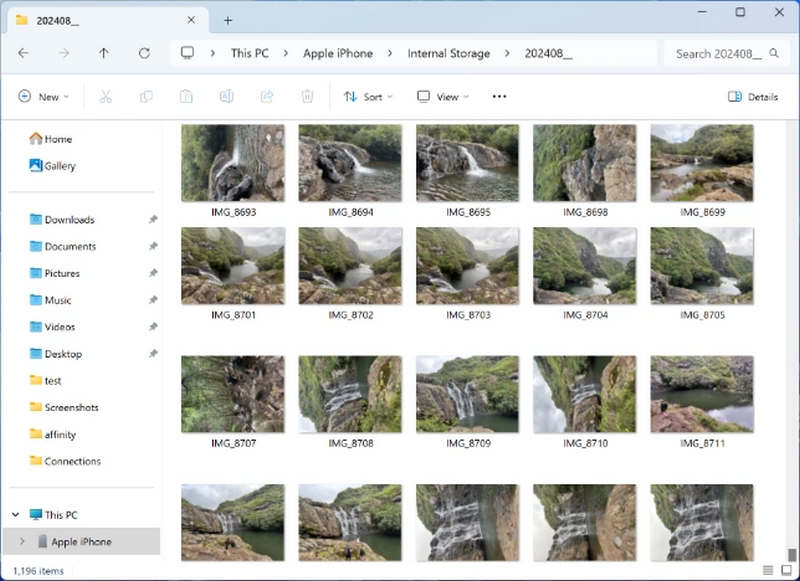
Best for: Quick photo or video dumps — perfect when you just want to clear your camera roll without installing anything.
The quickest no-app-required method to transfer photos and video: plug in your iPhone, open My Computer (or This PC in Windows 11), and drag your photos and videos straight out. No software, no cloud.
Step-by-step:
PROS
CONS
Can I transfer files from iPhone to PC without using iTunes?
Absolutely. FoneEase, iCloud, and Windows Explorer all work without iTunes. FoneEase is your best bet if you want full control over all file types.
How do I transfer photos from iPhone to PC wirelessly?
iCloud is the easiest wireless option. Enable iCloud Photos on your iPhone, install iCloud for Windows on your PC, and photos sync automatically. Alternatively, FoneEase supports Wi-Fi transfer on newer versions.
What's the fastest way to transfer large files from iPhone to PC?
USB-based methods — FoneEase typically transfers 1 GB of data in under 20 seconds over USB 3.0. Windows Explorer is similarly fast for photos and videos.
Why doesn't my iPhone show up in Windows Explorer?
Make sure you've tapped Trust This Computer on your iPhone when prompted. If it still doesn't show, try a different USB cable, restart both devices, or update your iPhone drivers. You can also use FoneEase, which bypasses this issue entirely.
Conclusion
Transferring files from iPhone to PC doesn't have to be a headache. The right method depends entirely on what you're moving and how often you do it.
For most people, we recommend a two-pronged approach: use FoneEase when you need a full, fast transfer of mixed file types, and keep iCloud syncing in the background for automatic photo and document backups. That way, you're covered whether you're at your desk or on the go.
Have a favorite method we didn't cover? Found a trick that works better for you? Drop a comment below — we update this guide regularly based on reader feedback.
 [Highly Recommended] How to Backup iPhone to PC with/without iTunes
How to backup iPhone to PC? Don't want to use iTunes to make iPhone backup? This post can help you learn how to backup iPhone to PC with or without iTunes.
 [Detailed Guide] How to Free up iPhone Storage Space Quickly
iPhone storage almost full? How to manage storage on iPhone? This article will give you some tips to manage iPhone storage.
 Simple Steps to Transfer Text Messages (SMS) from iPhone to Computer
How to transfer or download texts messages from iPhone to PC/Mac computer? This post introduces the easiest method to transfer & backup messages from iPhone to computer.
Aiseesoft FoneEase is a data transfer and management tool that lets you seamlessly move, back up, and manage various data between iOS, Android, and computers without resetting your phone or relying on iTunes.
![]() 100% Secure. No Ads.
100% Secure. No Ads.
*Required field
*Please enter a valid email
