
Best for: Quick audio notes transfers between iPhones, iPads, and Macs.
Want to move audio notes off your iPhone?
In certain cases, you need to transfer some voice memos or audio notes from your iPhone to a computer or another device. For instance, after you record a lecture, a meeting, or an important idea, you need to copy or share it from your iPhone. However, with these audio files sitting in the Voice Memos app, you may struggle to handle them.
We tested several available ways to transfer audio notes from iPhone, including AirDrop, iCloud, and a dedicated transfer tool. You can choose a reliable method for managing your iPhone voice notes.
Best for: Quick audio notes transfers between iPhones, iPads, and Macs.
Score:4.2/5
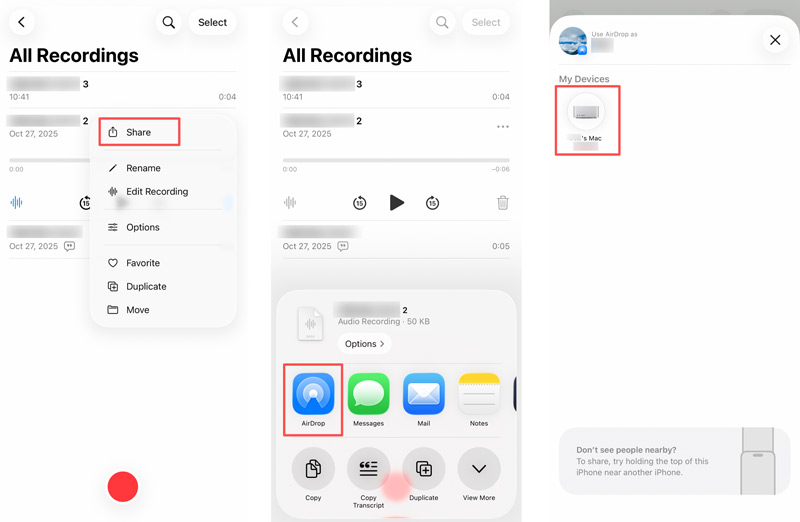
Apple does not provide a single export option for you to directly transfer voice notes from an iPhone. Instead, it gives you a convenient way to share them among Apple devices. If you need to quickly copy audio notes from your iPhone to another iOS device or Mac, you can rely on the built-in AirDrop feature.
If you only want to quickly share one or several audio notes from an iPhone to a nearby Apple device, such as an iPad, a Mac, or another iPhone, you can use AirDrop.
Best for: Users with multiple Apple devices or who want seamless access everywhere.
Score:4.3/5
If you prefer a cloud-sync method for transferring recorded voice notes, iCloud is an ideal choice. Like AirDrop, it only works for Apple devices. Once enabled, your voice memos will automatically sync across all devices.
To transfer voice notes from an iPhone to another Apple device, you should enable Voice Memos in iCloud on both devices.
Open Settings, tap your Apple Account name, choose iCloud, expand Save to iCloud, and then scroll down to ensure Voice Memos is toggled on.
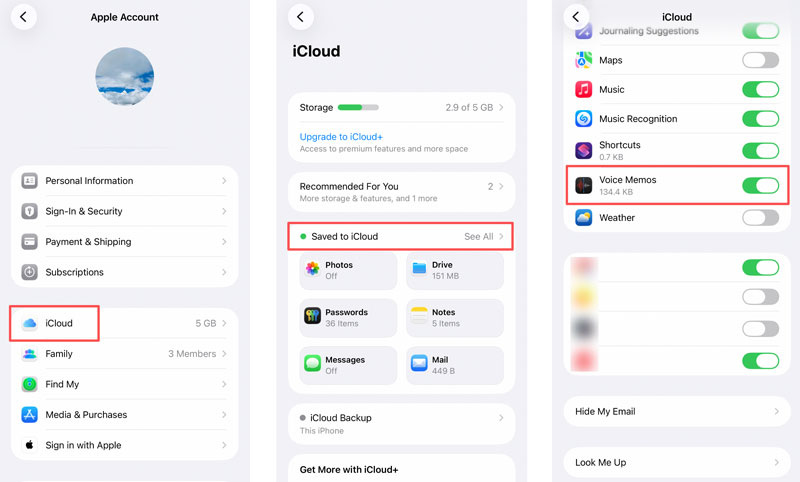
Once enabled on two or more linked Apple devices, every audio recording you make on your iPhone will automatically sync to any Mac, iPad, or iPhone that is signed in to the same Apple ID.
iCloud offers only 5GB of free storage, which can fill up quickly if you have backed up other iPhone files, especially photos and videos. This method may require you to upgrade your iCloud storage plan.
Best for: Users who need to transfer audio notes and other iOS files from iPhone or directly export to a Windows PC without iCloud.
Score:4.7/5
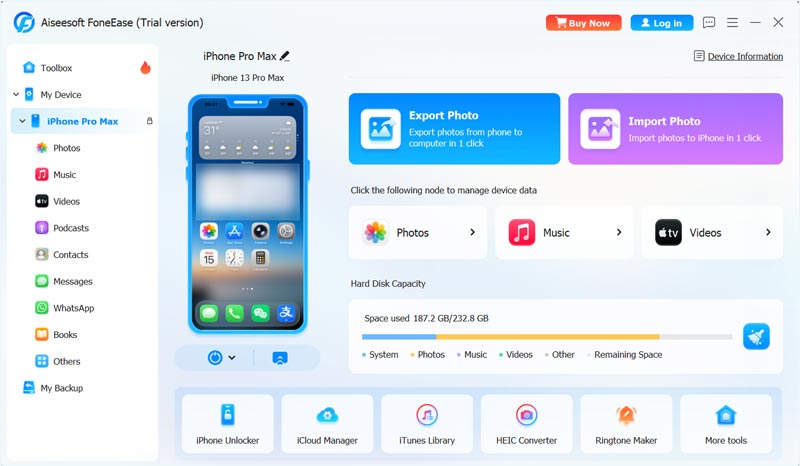
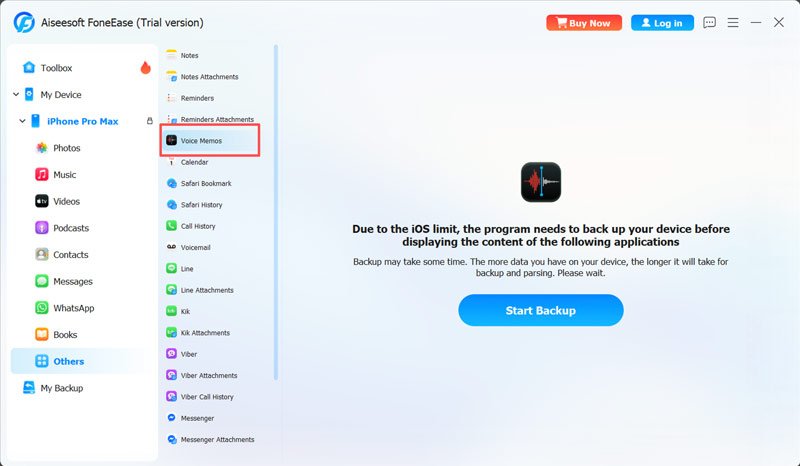
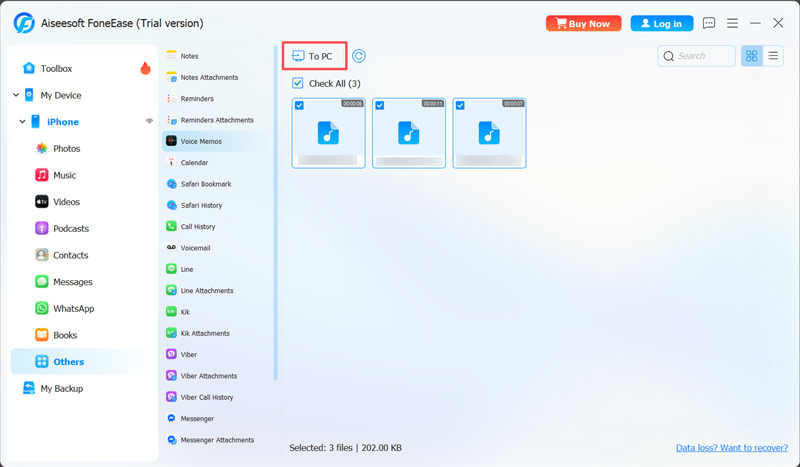
If you need to directly transfer your voice memos, audio recordings, and other iOS files, such as music, videos, photos, and app data, from your iPhone to a computer or another phone, a dedicated iPhone data transfer tool is often the best choice. Aiseesoft FoneEase is a reliable data transfer and management tool that can help you seamlessly move, back up, and manage various types of data. It supports transferring voice memos between iPhone/iPad/iPod and computer, and even between different iOS/Android devices.
 100% Secure. No Ads.
Question 1. Can I transfer voice notes from my iPhone to a computer?
Yes. You have several reliable options to transfer your iPhone voice notes to a computer. If you want to copy them to a Mac, AirDrop and iCloud sync are good choices. Besides, a dedicated tool like Aiseesoft FoneEase is ideal for moving audio notes from an iPhone to a computer (Windows and Mac), another iPhone, iPad, or Android phone.
Question 2. How to convert iPhone voice notes to MP3?
The Voice Memos app on your iPhone is set to save recording files as M4A by default. To convert to MP3, use Aiseesoft FoneEase (built-in MP3 export) or a free online audio converter like CloudConvert.
Question 3. How do you transfer audio notes from an iPhone using email?
Open the Voice Memos app on your iPhone and select the recording file you want to send. Tap the More (three dots) button and choose Share. Select Mail and enter the recipient’s email address. Your iPhone audio note will be automatically attached. You can send the email to another account and tap Send to confirm.
In this post, you can learn three helpful methods to transfer audio notes from an iPhone. If you want to move your voice memos to another Apple device, the built-in options, such as AirDrop or iCloud, are ideal. However, if you often need to manage various iOS files, a dedicated tool like FoneEase is the clear winner.
 How to Edit Voice Memos on iPhone Using Built-in & Third-party Apps
This article consists of guides on how to edit Voice Memos on iPhone. Carefully read the information that is added here to edit it effectively.
 How to Transfer Data from a Dead iPhone to a New iPhone: Easy & Fast
Need to transfer data from a dead iPhone? Learn simple ways to recover contacts, photos, and files from a dead iPhone and move them to a new iPhone quickly.
 Top 10 Meeting Recorder Apps to Take Notes (Audio and Screen)
What is the best meeting recorder app? This post is the 2020 collection list of top 10 meeting recorder apps for PC, iPhone and Android to take notes from audio and screen recording.
 Leave your comment and join our discussion
Aiseesoft FoneEase is a data transfer and management tool that lets you seamlessly move, back up, and manage various data between iOS, Android, and computers without resetting your phone or relying on iTunes.
100% Secure. No Ads.

*Required field
*Please enter a valid email
