NTFS (New Technology File System) is an NT file system equivalent of Windows 95 FAT and HFPS. NTFS is used on the Windows NT operating system. You can store and retrieve files on a hard disk using NTFS. Generally speaking, you can take full advantages of NTFS drives on Windows. However, NTFS is not compatible with Mac. You can read but not write to NTFS on Mac.
To be more specific, everything goes on well when you plug a disk into your Mac computer. You can read the NTFS drive on Mac. However, you cannot save, delete or make any change to your stored files. It is because the connected drive is formatted with NTFS before.
Though Apple has the support for reading NTFS and other Windows formats, the write support is disabled. It is still not available to write on NTFS on Mac. You cannot write to a Windows-formatted drive on Mac directly.
If you really want to write to an NTFS drive on Mac, you can format NTFS to Mac formats, or you can use an NTFS for Mac driver instead. By doing as the following paragraphs show, you can read and write drives across platforms with ease.
Your Windows NTFS drive is not formatted. But you can still enable NTFS writing on Mac. It is Aiseesoft Mac Cleaner that can work as your best NTFS driver for Mac. You can read and write Microsoft NTFS on Mac without changing anything. The program also allows users to hide files, clean up cookies, delete duplicate files, uninstall apps, shred files, analyze Wi-Fi, optimize Mac performance and more. You can keep your Mac computer in a good condition by using Mac Cleaner.

Downloads
![]() 100% Secure. No Ads.
100% Secure. No Ads.
Step 1.
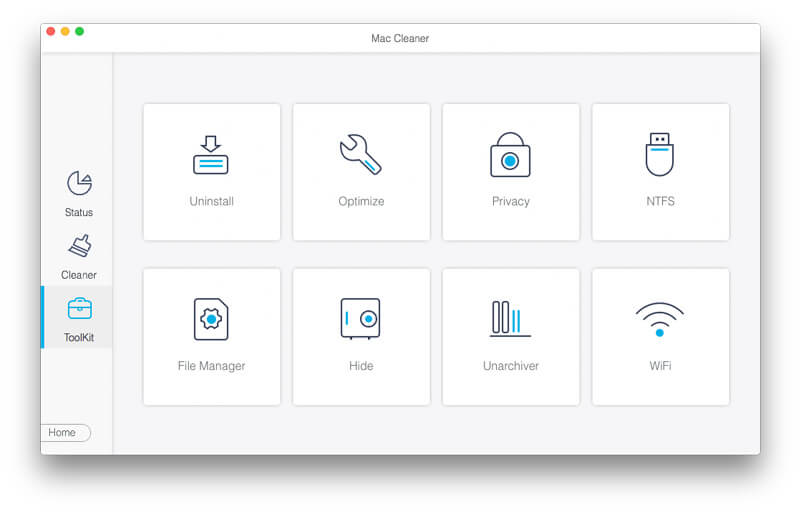
Free download, install and launch Aiseesoft Mac Cleaner. Click Toolkit in the main interface.
Step 2.
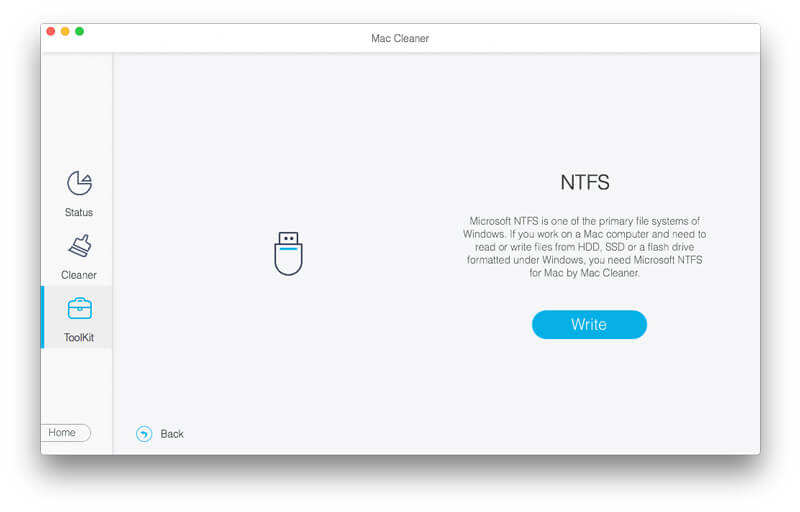
Click NTFS to access the NTFS for Mac driver. Plug your NTFS drive into the USB port. Click Write to get a popping-up window.
Step 3.
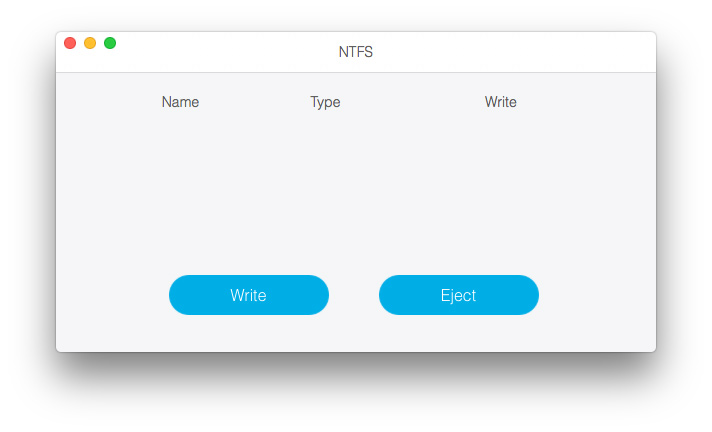
Here you can see your connected drive. The write status is Yes. Later, you can write to NTFS on Mac successfully. Then click Eject after writing NTFS drive on Mac.
FUSE for macOS is an open source and free NTFS driver that can help you write over a NTFS formatted drive on Mac. You can mount NTFS partition in read-write mode with FUSE NTFS driver on Mac for free. Sound pretty good, right? However, the FUSE setup process is quite complicated. There're also some security concerns you need to consider.
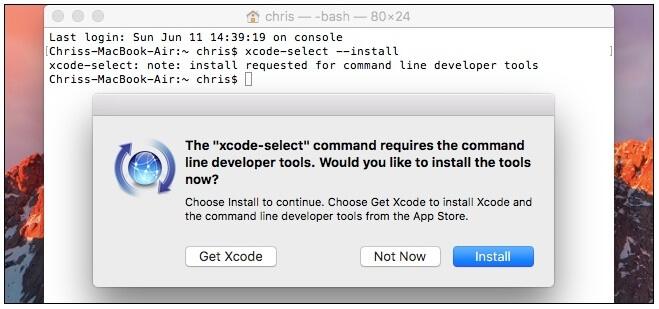
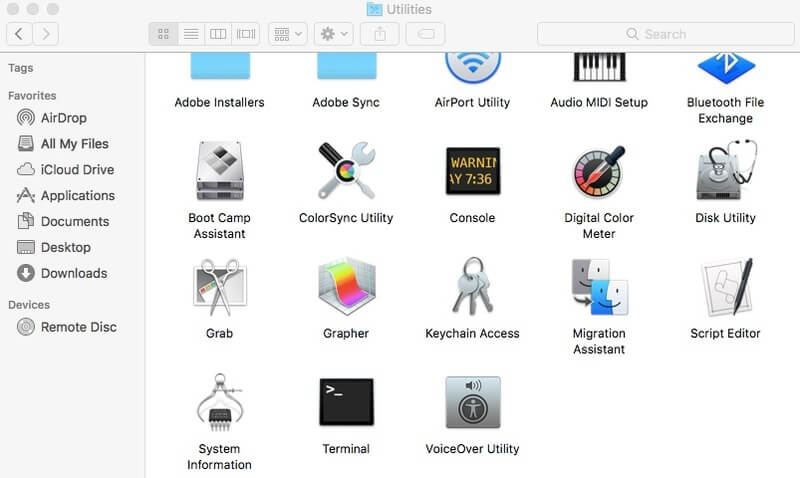
Step 1. Run Finder. Open the Applications folder. Choose Utilities. You need to open the Terminal window to paste xcode-select - - install. Click Install when you are prompted. Thus, you can install Xcode and the command line developer tools from the App Store on Mac successfully.
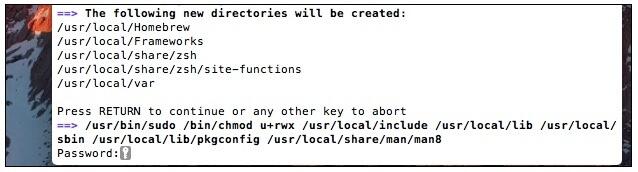
Step 2. Now you need to install Homebrew on Mac. Homebrew is an essential package manager for Mac OS X and macOS, especially when you make Mac write on NTFS drive with FUSE.
Step 3. After downloading Homebrew, copy and paste /usr/bin/ruby -e "$(curl -fsSLhttps://raw.githubusercontent.com/Homebrew/install/master/install)" in Terminal. Press the Enter key on your keyboard. Then enter the admin password to continue the process. As a result, the script will download and install Homebrew automatically.
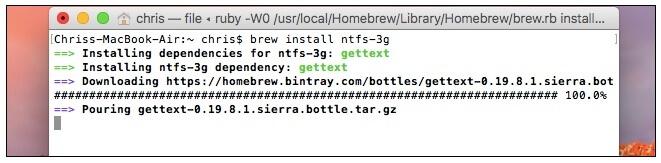
Step 4. Type brew install ntfs-3g in Terminal to install FUSE. Now you can get an NTFS for Mac drive. It is okay to read and write NTFS drive on Mac.
Step 5. Connect an external drive to your Mac computer. Copy and paste sudo mkdir /Volumes/NTFS into the Terminal window. You can paste diskutil list to list any NTFS for Mac disk partition.
You can also reformat NTFS drive to FAT32 to solve the incompatibility issue. As a result, your external drive and USB disk are readable and writeable on both Windows and Mac computers. Be aware that your existing files will be erased while reformatting NTFS to FAT32. You need to make a copy in advance. Another thing is that the FAT32 drive accepts the maximum file size ups to 4GB. (Find the best way to reformat your iPod)
Step 1. You can use Spotlight to search for Disk Utility quickly.
Step 2. Plug your NTFS drive into the Mac computer. You can see the detected NTFS drive in the left pane of the Disk Utility window.
Step 3. Navigate to the Erase section. Choose MS-DOS FAT under Format. You can change the name of your external drive if necessary.
Step 4. Click Erase again. The NTFS drive will be erased and formatted to the Mac format. After that, you can write to NTFS drive on Mac.

You may need: How to format SD card safely and quickly
You can try its NTFS-write support to write NTFS drive on Mac. However, this NTFS for Mac solution is not stable for macOS 10.12 Sierra. You may fail to use NTFS on Mac occasionally. To start with, you need to make sure your NTFS drive has a single word label only.
Step 1. Open Finder and find the Applications folder. Choose Utilities to get Terminal.
Step 2. Copy and paste the command line sudo nano /etc/fstab into the Terminal window.
Step 3. Enter LABEL=NAME none ntfs rw,auto,nobrowse to nano. Do not forget to replace NAME with the name of your NTFS drive.
Step 4. Press Control and O keys on the keyboard. Later, press Control and X keys to close nano.
Step 5. Connect the NTFS drive to Mac. Open Finder to find your NTFS drive under Volumes. Now you can get Microsoft NTFS for Mac drive to read and write files.
Conclusion
Mac can read NTFS formatted external hard drive. The NTFS drive is read only on Mac. If you want to read and write NTFS drives on Mac, you can use any method mentioned above. There are 4 different ways to enable NTFS read and write on Mac. You can use Aiseesoft Mac Cleaner as the third-party NTFS driver for Mac to read and write Windows drives. Do not be confused about its name. You can write to NTFS drives on Mac and keep your Mac computer clean within the program.
As for FUSE for macOS program, it is true that you can mount NTFS drive read and write on Mac. But you need to spend a lot of time on Terminal command lines. If you are unfamiliar with Terminal, it is not a recommended NTFS for Mac driver. The third method is using FAT32 file system to format your NTFS drive. If you don't backup NTFS drive before, you may encounter the second data loss problem. What's worse, you cannot save HD videos to your drive more than 4GB. The last method is to enable NTFS write support on Mac. This feature is not reliable yet. Honestly, these are still many problems you need to solve while using NTFS drives on Mac.
The safest and easiest approach is using a third-party NTFS driver application. You can free download the program to read and write NTFS drives on Mac with ease.
 Review of 3 NTFS Recovery Tools and Undelete Guide
How to undelete NTFS? This post lists three best NTFS recovery tools' review and the detailed guide to undelete NTFS on your computer. Moreover, you can get the basic knowledge of NTFS.
 How to Download and Install AMD Graphics Driver
If you want to downoad and install AMD Graphics Driver on your computer, you need to read this article to get the detailed steps.
 How to Solve Problems about Using Apple Mobile Device USB Driver
If iTunes doesn't recognize your iPhone, iPad, or iPod, follow this post to reinstall the Apple Mobile Device USB driver and fix it.
Mac Cleaner is a professional Mac management tool to remove junk files, clutter, large/old files, delete duplicate files and monitor your Mac performance.
![]() 100% Secure. No Ads.
100% Secure. No Ads.
*Required field
*Please enter a valid email
