
Aiseesoft Screen Recorder
![]() 100% Secure. No Ads.
100% Secure. No Ads.
![]() 100% Secure. No Ads.
100% Secure. No Ads.
Can’t find your Mac screenshots? Where to locate the captured screenshots on a Mac?
macOS offers a simple way to quickly take screenshots of the current screen content. However, after pressing Cmd + Shift + 3 and hearing the familiar camera shutter sound, nothing happens. You cannot find your screen captures in the Desktop, the Downloads folder, or other locations. This frustration is quite common, especially if you have just switched from Windows. This post will guide you to figure out where screenshots are saved on a Mac.

Whether you have just switched from Windows or are a long-time Mac user, you may face the situation where you fail to find your screenshots. Maybe you forgot you have changed the location, or don’t know the exact folder.
Understanding how macOS handles screen captures is necessary. The first section will talk about the default path for your Mac screenshots.
Depending on the specific macOS version you are using and the settings, your default save location might be in one of two places.
The default location or folder for Mac screenshots is the Desktop. Generally, when you use standard screenshot keyboard shortcuts, like Command + Shift + 3/4, the captured screen image will be automatically saved to your Desktop.
If “Desktop Sync” is enabled, Mac screenshots will be uploaded to the cloud. Go to your iCloud settings and check if the Desktop & Documents Folders synchronization feature is enabled. In that case, you can still locate your screenshots on the Desktop. At the same time, they are routed to your iCloud Drive.

If you want to change your Mac screenshots’ save location to a desired folder, follow the two methods below.
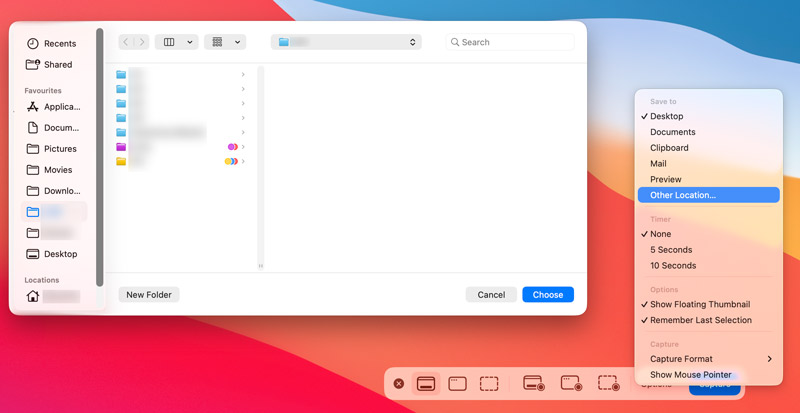
For most macOS users, the built-in Screenshot app is the easiest way to change the save location. If your Mac runs macOS Mojave 10.14 or later, you can open the app to change the location for your Mac screenshots. This is the most straightforward way.
Besides the standard solution above, you can use the Terminal to set a custom path where you want to save your Mac screenshots.

defaults write com.apple.screencapture location ~/Pictures/Screenshots
With the two methods above, you can handily change the save location for your Mac screen captures. However, changing the location is just the first step. To better manage or take control of your screenshots, you should consider using a more powerful tool like Aiseesoft Screen Recorder. It is a powerful, all-in-one software designed to capture, edit, and manage your screen activity. Besides screen capture on Mac, it offers video recording, audio capture, and other advanced functions.

Downloads
![]() 100% Secure. No Ads.
100% Secure. No Ads.
![]() 100% Secure. No Ads.
100% Secure. No Ads.
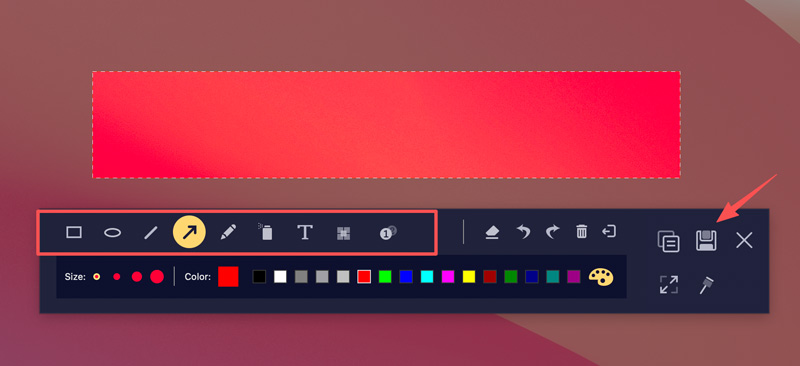
Steps to Take Screenshots on Mac Using Aiseesoft

Question 1. How can I copy a Mac screenshot directly to my clipboard instead of saving it as a file?
When you use the hotkeys like Command + Shift + 3/4 to take screenshots on your Mac, you can simply hold down the Control key to copy a screenshot straight to your clipboard. In that case, you can paste it into a document or message rather than saving it on the Desktop.
Question 2. How can I change the default image format of my Mac screenshots?
By default, your Mac will save screenshots as PNG files. If you want to change this to HEIC, you need to open the Screenshot app by pressing Command + Shift + 5, go to Options, choose Capture Format, and then switch from SDR to HDR. If you need to capture JPG screenshots, use Aiseesoft Screen Recorder or another screen capture tool instead.
Question 3. Can I directly edit my Mac screenshot?
Yes, you can directly edit your Mac screenshots without needing to download any third-party image editor software. Whenever you take a screenshot using Cmd + Shift + 3 or Cmd + Shift + 4, you can tap the small floating thumbnail in the bottom-right corner to open the picture. This quick-edit window contains a Markup toolbar. After capturing your Mac screen, you can also edit screenshots using the Preview app.
Conclusion
Where are screenshots saved on a Mac? It can be confusing to lose track of your Mac screen captures. By default, macOS saves them to the Desktop. If you cannot find them there or another possible folder, follow the guide above to locate and manage your Mac screenshots with ease.
 4 Best Ways to Record Audio from Browser (Online/Desktop/Extension)
How do I record audio from browsers, Chrome, IE, or Safari? What is the best browser audio recorder? Here are 4 great audio recorders to help you capture audio from a website.
 8 Best Free Online Mic Recorders for Unlimited Voice Recordings
CRead and get the top 8 online mic recorders. You can record your voice through a microphone on Windows and Mac for free with simple steps quickly.
 How to Clear Facebook Cache on iPhone, Android, PC, and Mac
Is your Facebook app lagging? Learn how to clear Facebook cache on iOS, Android, Windows, and Mac following our step-by-step tutorial.

Aiseesoft Screen Recorder is the best screen recording software to capture any activity like online videos, webcam calls, game on Windows/Mac.
![]() 100% Secure. No Ads.
100% Secure. No Ads.
![]() 100% Secure. No Ads.
100% Secure. No Ads.
*Required field
*Please enter a valid email
