Note
If you select a whole clip, instead of an edit point, transitions will be added at each end of the selected clip.
How to add transitions in Final Cut Pro?
When you edit videos and want to switch smoothly from one video scene to another, a transition is needed. Does Final Cut Pro support adding any transition for video editing? The answer is yes. If you are using Final Cut Pro to edit videos, you really need to read this post, which is going to show you how to add transitions in Final Cut Pro X with 3 ways.

You can use Meua Bar to apply transitions in Final Cut Pro, here is the tutorial.
Step 1 Choose the Select from the Tools pop-up menu from the top timeline, and then click on the clip edge (an edit point) in the timeline.
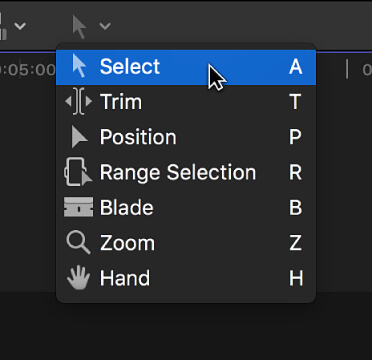
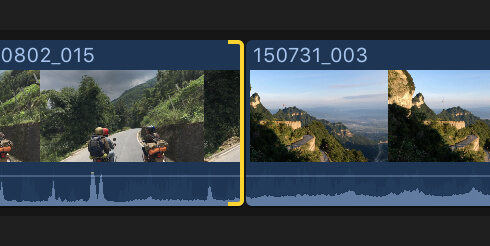
Then you should see one or both clip edges are highlighted in the timeline.
Note
If you select a whole clip, instead of an edit point, transitions will be added at each end of the selected clip.
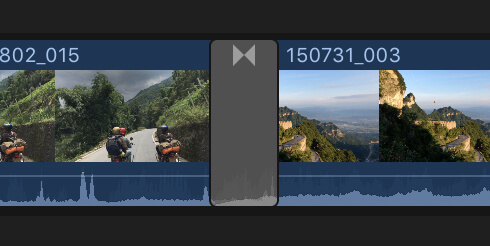
Step 2 Choose Edit > Add [transition name], or you can press Command-T instead.
Note
The name of the menu item depends on the default transition setting. The default transition is applied to the selected edit point.
Final Cut Pro use media handles to create a cross dissolve transition at an edit. If the video clip contains audio track, a crossfade transition will be added to the audio.
You are able to add transitions using shortcut. You can either blade a video clip into several scenes or add more than on scene to be joined in the timeline. It is much desired as transition effect can be applied only when you have two or more clips in the timeline.
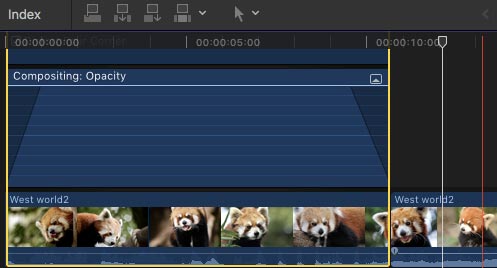
Step 1 Once you have obtained your two scenes in the timeline, then choose the very first scene.
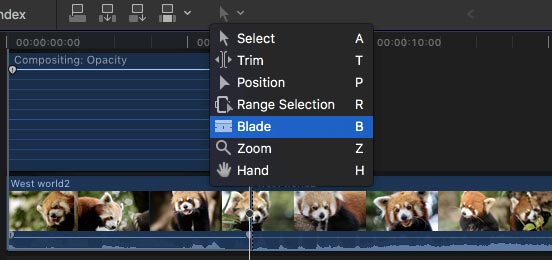
Step 2 Now open Video animation window; find the Compositing option and drag the timeline handle towards both sides of composite window to apply default transitions. In Final Cut Pro, Cross dissolve will be chosen as default transition.
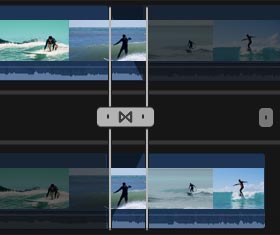
Another way to add transitions in Final Cut Pro is to use Transition browser.
Step 1 Click on the Transitions button in the timeline.

Step 2 Choose a transition from the Transition browser. Move the pointer over the transition thumbnails and you'll see a transition example. You can type text in the search field to filter the list of transition names.
Note
If you find the transition you prefer, adopt the Filter feature at the top of the Transitions browser and search for it in other locations.
With the methods above, you can handily add transition in Final Cut Pro. But for many new users, Final Cut Pro is not very simple to use. Here we sincerely recommend an easy-to-use free video editor in case you want to easily edit videos and adjust video effects.
Check how to use this Free Video Editor from the video below:


In this article, we mainly talk about Final Cut Pro transitions. We show you the detailed steps to add transitions in Final Cut Pro. Any idea or suggestion is welcome to leave below.

May 04, 2018 17:28 / Updated by Jenny Ryan to Edit Video
 How to Combine Merge Videos
Want to combine videos or merge videos? You can learn how to combine video clips with the best video merger in this article.
 How to Merge Multiple MP4 Video Files Online without Quality Loss
How can you merge several MP4 video files online without installing? This article provides the best answer and a concrete guide to help you get what you want.
 Final Cut Pro for Windows - Programs like Final Cut Pro
You can find Final Cut Pro for Windows 10/8/7/Visa/XP to download it and edit movie.
