
Best for: Quick transfers of a small number of photos when both Apple devices are closed.
It’s common that you need to edit some pictures on your Mac and then transfer them to your iPhone or iPad. Sometimes, you want to send downloaded Mac pictures or captured screenshots to your mobile device. Whatever the reason, you often need to transfer image files between your Apple devices daily.
Knowing how to transfer photos from Mac to iPhone is essential for all Apple users. Apple offers several built-in solutions; each method serves different needs. The challenge is which method you should use. This guide shares three reliable ways to get your photos from your Mac to your iPhone, plus a bonus transfer tool for more advanced data management.
Best for: Quick transfers of a small number of photos when both Apple devices are closed.
Score:4.2/5
AirDrop is the official wireless file-sharing feature that lets you send photos, videos, documents, and more between nearby devices. It can be the most straightforward method for transferring photos from a Mac to an iPhone without syncing.
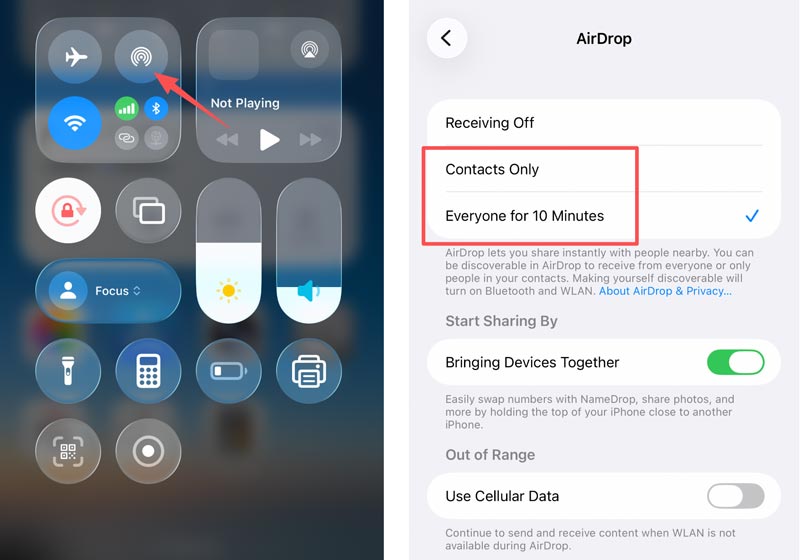
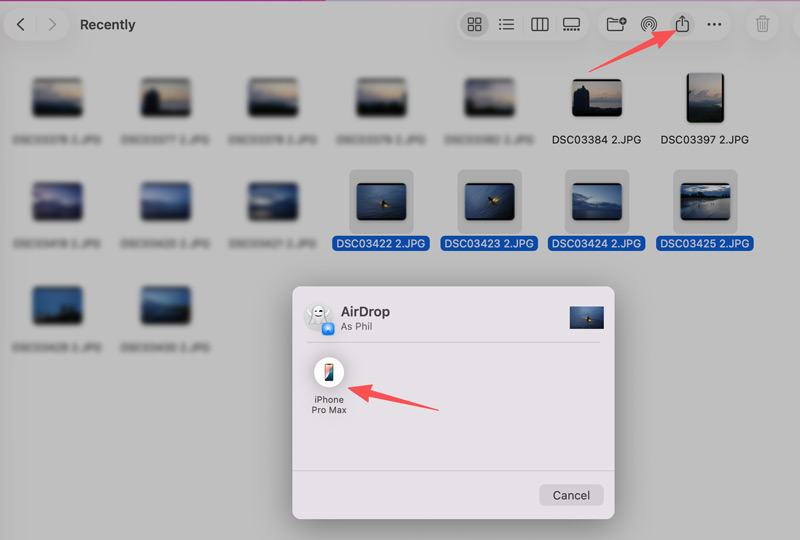
If you often transfer photos from Mac to iPhone or from iPhone to Mac, these selected images will be automatically shared. You don’t need to manually tap Accept.
Best for: Keeping your entire photo library automatically synced across all your linked devices.
Score:4.5/5
iCloud Photos is the built-in solution for continuously syncing photos from Mac to iPhone. Once enabled, every newly captured or saved photo on your Mac’s Photos app will automatically appear on your iPhone (and vice versa).
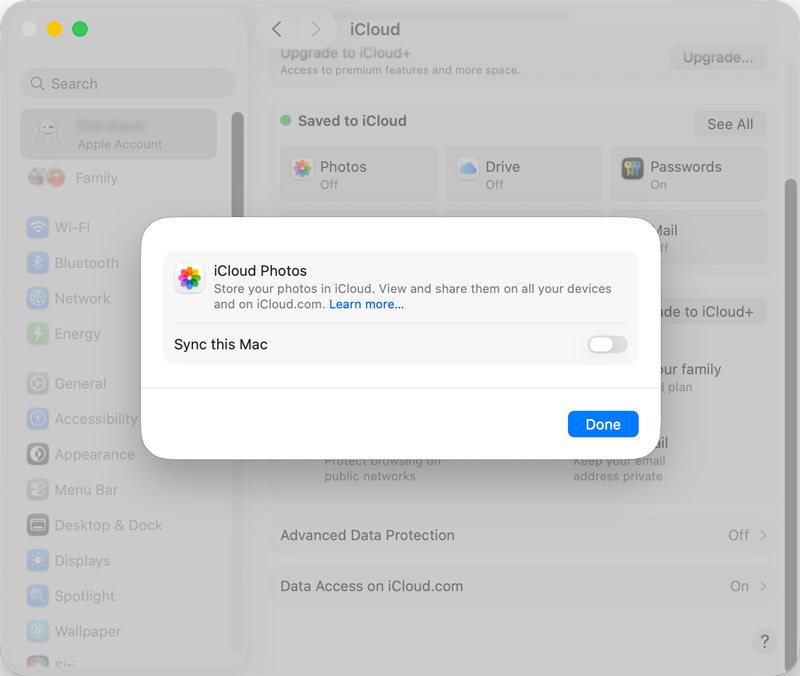
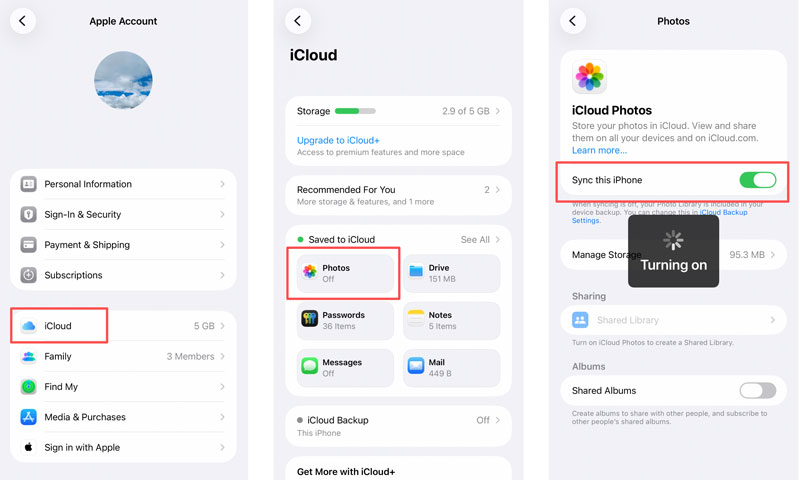
Once both devices are set up, any photos you add to your Mac’s Photos library will automatically sync to your iPhone via iCloud.
iCloud only gives 5 GB of free storage. If you have a large photo library, you may need to upgrade to a paid iCloud+ plan. What’s more, iCloud syncs your entire library. It does not allow you to selectively transfer certain pictures.
Related articles you may like:
Best for: Transferring large numbers of photos (thousands) without relying on cloud storage.
Score:4.4/5
When you need to move many photos from your Mac to your iPhone and prefer a physical connection for stability, Finder is the most reliable method. Finder (formerly iTunes for syncing) is Apple’s traditional method for transferring content between devices. It uses a USB cable connection, so transfers are fast and don’t consume data or cloud storage. If your Mac runs macOS Mojave or earlier, you will use iTunes instead of Finder.
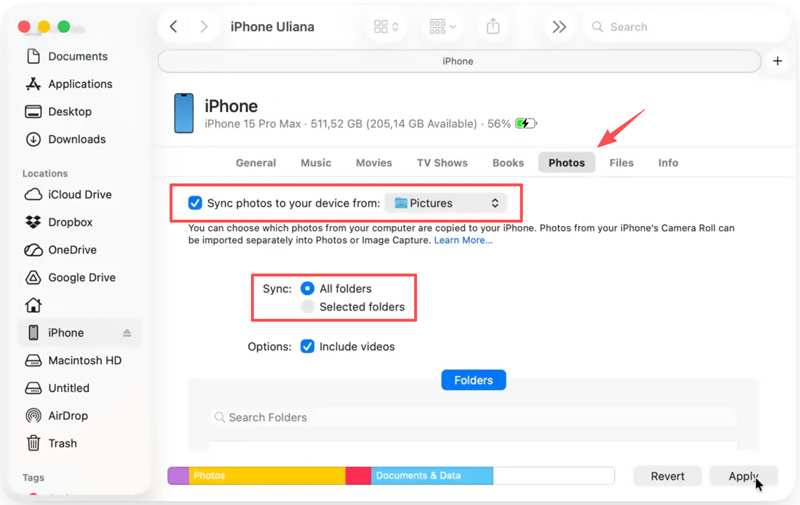
Best for: Users who need full control over photo transfers and data management.
Score:4.6/5
If you want to transfer photos from a Mac to an iPhone without syncing the entire library, a third-party data transfer tool like Aiseesoft FoneEase is an ideal choice. It handles all common data types, including photos, videos, music, contacts, and messages, in one interface. It lets you transfer large batches at high speeds.
 100% Secure. No Ads.
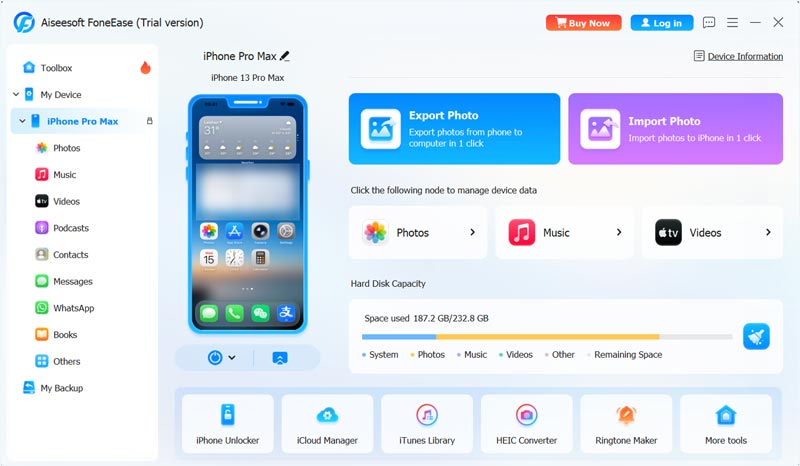
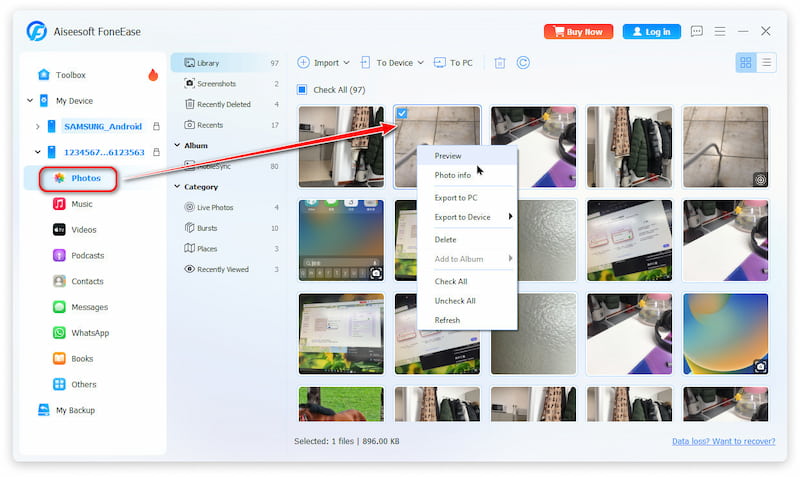
FoneEase is particularly useful if you frequently transfer all types of iOS files between different Apple/Android devices. It lets you safely back up and restore your phone data to a computer.
Question 1. Which method is fastest for transferring photos?
For a small number of photos, AirDrop is typically the fastest. The transfers happen wirelessly in seconds. For large libraries, FoneEase offers the fastest and most stable transfer.
Question 2. Will my photos lose quality during transfer through AirDrop?
No. Generally, AirDrop transfers photos in full quality with no compression. However, the final image quality depends on one critical setting on your iPhone. Go to your iPhone’s Settings app, tap Apps > Photos, and select “Keep Originals” under the “Transfer to Mac or PC” section.
Question 3. Will Finder sync delete photos already on my iPhone?
Yes. Finder sync replaces the photo content on your iPhone with what’s selected on your Mac. If you sync from a folder that does not contain your existing iPhone photos, they may be removed. If you want to keep existing photos, use AirDrop or FoneEase instead.
You can learn four methods to transfer photos from a Mac to an iPhone. Select the right method depending on your specific needs. For quick transfers, use AirDrop to transfer your data. If you prefer effortless cloud syncing across all your Apple devices, enable iCloud Photos. If you need a dedicated transfer to manage your phone’s data across devices, try Aiseesoft FoneEase.
 iCloud Photo Sharing User Guide for Beginners (Step by Step)
Still confused about iCloud photo sharing? Here is the complete tutorial about how to use iCloud photo sharing on iPhone. Just read and dig out more useful details.
 How to Transfer Data from a Dead iPhone to a New iPhone: Easy & Fast
Need to transfer data from a dead iPhone? Learn simple ways to recover contacts, photos, and files from a dead iPhone and move them to a new iPhone quickly.
 What You Need to Do When iPhone Storage is Almost Full [Easy Fix]
Are you having trouble now your iPhone Storage is full? You can still fix it by deleting apps and files. Start now by using the default ways here.
 Leave your comment and join our discussion
Aiseesoft FoneEase is a data transfer and management tool that lets you seamlessly move, back up, and manage various data between iOS, Android, and computers without resetting your phone or relying on iTunes.
100% Secure. No Ads.

*Required field
*Please enter a valid email
