How long should a picture show in a slideshow?
What is the best photo slideshow creator?
How do I set multiple pictures as my background in Windows 10?
Let's figure out above 3 questions one by one. Firstly, there is no such a standard duration between two pictures. It does not matter whether you change pictures every 5 seconds or 5 minutes. In a word, the speed of your slideshow wallpaper depends on you mainly.
Secondly, it is also hard to determine one slideshow creator as the best one in the market. Different people have different requirements of slideshow creations. Well, maybe you can find your best photo slideshow maker software here.

Slideshow Wallpaper
As for the third question, the following paragraphs can be your detailed tutorial. You can do as it tells to enable Windows 10 background slideshow pictures.
Getting tired of your static desktop background picture?
Actually, you can turn your favorite pictures into the slideshow wallpaper in Windows 10 and other operating systems.
Here are detailed steps of making a Windows 10 wallpaper slideshow. To start with, you need to set a new folder with target slideshow pictures first.
Step 1 Locate the Windows Settings window
Head to the "Notification Center". Choose "All Settings" on the lower right corner of your screen. In the "Settings" window, select "Personalization" in the first line.
Step 2 Add a slideshow folder
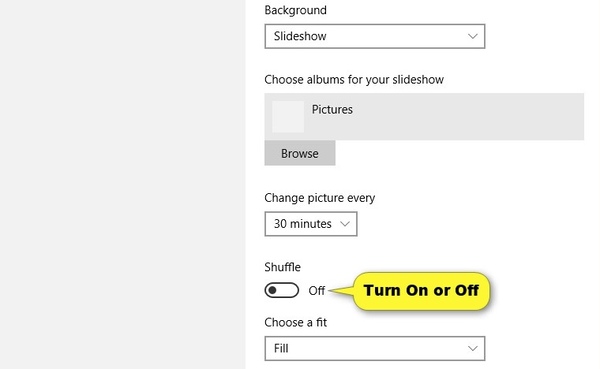
Choose "Background" in the left panel of the "Personalization" window. You need to select "Slideshow" from the "Background" drop-down menu. Click "Browse" to select the slideshow folder you created before. Then click "Choose this folder" to confirm.
Step 3 Specify the background slideshow wallpaper
Now you can set the specific duration between every two pictures. So choose from "1 minute", "10 minutes", "30 minutes", "1 hour", "6 hours" and "1 day". If you want to create a shuffle background slideshow in Windows 10, you need to enable the "Shuffle" option. Later, choose a fit as fill, tile or stretch.
When you unplug your laptop from the AC power, the desktop background slideshow feature will be disabled by default. If you want to preserve the slideshow wallpaper in the background, you need to change advanced power settings. Find the "On Battery" option under the expanded "Slideshow" category. Then switch the menu from "Paused" to "Available". That's all. Do not forget to click "OK" to save your change.
Note
If you want to create a wallpaper slideshow in Windows 7, you need to right click on your desktop and choose "Personalize" first. Click the "Desktop Background" link near the bottom. Later, you can do as above mentioned to complete the process.
In spite of creating desktop wallpaper slideshows on Windows 10, you can DIY other gorgeous photo slideshows by yourself. During this time, Aiseesoft Slideshow Creator can help you solve the problem perfectly.
It is true that you can create a free slideshow with music online. However, there are always limited slideshow editing filters and templates you can get. Fortunately, this program is mainly designed for beginners who want to create a stunning photo slideshow with music in a short time.
Step 1 Import pictures
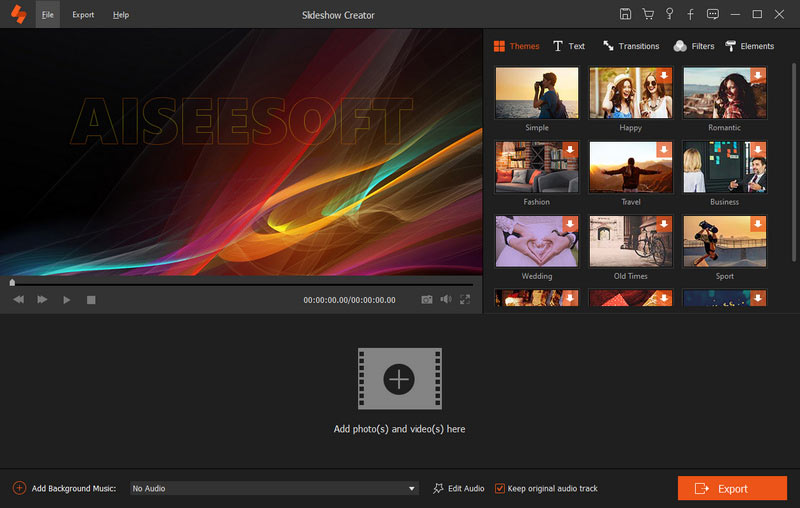
Free download and install Aiseesoft Slideshow Creator on your computer. Launch the photo slideshow creator software. Click the "Add photo(s) and video(s) here" option to add pictures. All your imported slideshow pictures display automatically. You can adjust the order manually.
Step 2 Edit your photos
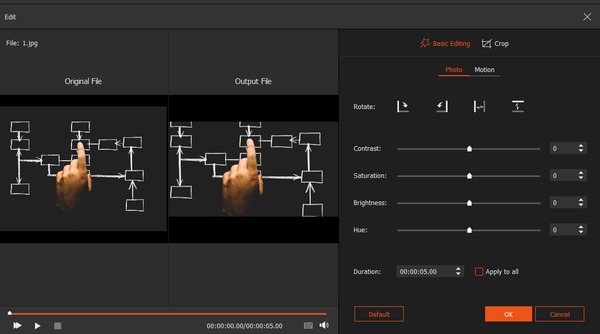
You can apply basic editing effects on your photos. Click "Edit" to get a popping up "Edit" window. You can crop, rotate, adjust contrast/saturation/brightness/hue and duration freely. There is also a real-time preview window you can use. Then choose "OK" to move on.
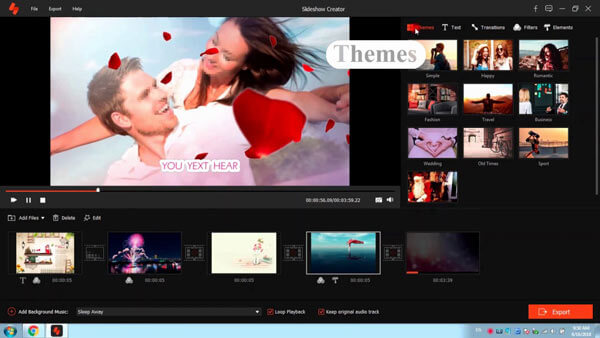
Step 3 Select the slideshow theme
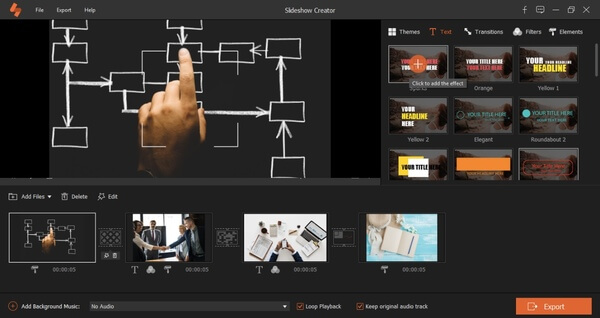
If you want to add special effects to your photo slideshow, you can head to the right panel in the main interface.
Hover your mouse above the template or effect you want to use. Later, click the "Add" icon to download it.
Once the process ends, you can see a "Check" icon on that file. Moreover, the timeline shows all your changes in detail. You can add or delete any effect quickly.
Step 4 Save your slideshow pictures
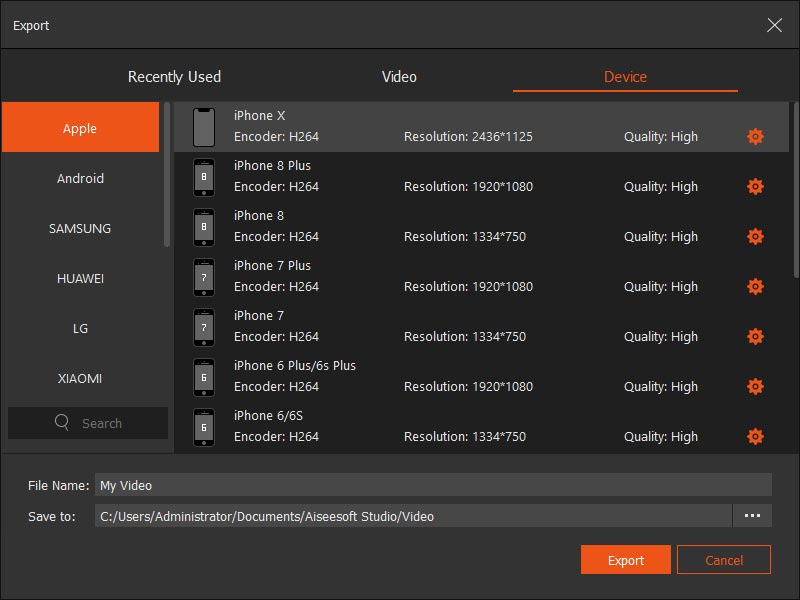
After all customizations, you can choose "Export" to save the photo slideshow video. Well, you can choose "Export to video" or "Export to device" from the top "Export" menu, too.
Set the output video format from various choices. You can adjust the output video quality and other settings too.
At last, click "Convert" to download the photo slideshow to your destination folder.
Here's the video about making slideshows for you. Click it to check.

Tips
1. The whole duration of slideshow depends on the timer tab effects you use.
2. What's more, you can click "Add Background Music" at the bottom to import slideshow songs. Furthermore, you can even extract original background music from your video.
If you are running Chrome OS, then you can try the slideshow wallpaper Chromebook plugin named Slideshow Wallpaper Gadget. Well, you can also turn the newly-taken pictures into slideshows with the slideshow wallpaper iPhone or Android app. But if you want to make a free slideshow with music, you should not miss Aiseesoft Slideshow Creator.

December 16, 2020 09:00 / Updated by Andrew Miller to Tips, Photo
 [Solved] 18 Solutions to Fix Blue Screen of Death on Windows 10/8/7/XP Fix
When your computer suffers from blue screen of death on Windows 10/8/7/XP, do not be afraid, and this comprehensive guide gives you 18 outlets to bring computer back to normal.
 5 Ultimate Solutions to Fix External Hard Drive Not Showing Up Errors
What should I do when my external hard driver is not showing up? Here are the 5 solutions you should know to fix these problems and retrieve the important data.
 10 Solutions to Fix WHEA_UNCORRECTABLE_ERROR on Windows 10/8.1/8/7
What is WHEA_UNCORRECTABLE_ERROR? How do I fix WHEA_UNCORRECTABLE_ERROR? Red this post and take the easy 10 solutions to remove the error.
