Minimizing the crescendos and decrescendos of the music, you can adjust it by using audio compression. This technique is essential for all music producers to help them make the soundtrack even more euphonious and make it simply sound better than the raw audio. With the music industry's growth from time to time, compressing the sound can be quickly done. You can automatically or manually override the maximum levels and maintain its loudness, whether you are using hardware or software versions of the compressor. This article will tackle additional details about compression everyone must know. Later, we will teach you how to use physical and non-physical compression techniques to produce a pleasing sound on the audio that you have effortlessly.

Suppose you are one of the users asking what audio compression is. In that case, the detailed next will provide more about the compression. With compression, you must focus on dynamics, level, and transient because these factors make the audio sound better, whether an instrument or vocals. After you compress the audio, you can now listen to the sound clarity of every instrument, vocal section, and part on the track. And it is more stable than the raw file that hasn't gone into compression. But before you compress the audio you have, you must at least know the basic compression setting that you will need to maneuver to get the best out of your audio. Compressing the audio will become hassle-free and work more conveniently with different audio compressors by getting familiar with these parameters and controls.
1. The Threshold is the point at which the compression will start to take effect. If the level of decibels you set passes, that part will compress, but if it didn't reach the level you set, it wouldn't compress the part.
2. The Knee is the main reason why the Threshold becomes smoother on the transition from compressed to non-compressed. Most audio compressors offer a selectable hard and soft knee, but some support one. So, suppose you want a natural sound. You must select the soft knee for it provides a higher compression, which works best if you want to make the transition less noticeable. But if you are dealing with a loud sound, you must go with the hard knee. However, it will not apply compression until it reaches the Threshold.
3. The Compression Ratio identifies the total compression that should apply to the signals. There are different compression ratios in audio, and the most commonly known is unity; its ratio is 1:1. But you can apply a ratio like 2:1 for the gentle compression and 10:1 for aggressive compression.
4. Attack time allows the compressor to know how fast the compression will start after it reaches the Threshold - often expressed as dB per second. There are two types of attacks: fast and slow. You can have a distorted sound with a fast attack time, especially on bass frequencies. But remember that you must not set the fast attack too high because you will get a bad result. On the other hand, the slow attack time emphasizes the details of the signal by making them sound bolder and more aggressive. However, slow attacks aren't that good on dynamics because they worsen.
5. Unlike Attack, Release does the opposite thing of what attack does. As the name states, after it reaches the compressed state after you release the non-compressed signal will start to go back to the origin. It is the recovery of the signal after it reaches the threshold. There are two examples, and these are the slow and fast releases.
6. Lastly, Output Gain or Make-up Gain applies the boost you need to bring back the original signal level to make it sound louder and make up for the loss after you compress it.
There are two types of compression; Physical and Non-Physical compression. The indicated information below will help you know what this is all about to determine these. Kindly read the information below to understand how to compress your audio.
With Physical Audio Compression, you can quickly even out the volume level of your track. Especially if you record the sound separately from one another, then later arrange them. But before you can do a physical compression, you will need to have Tube, FET, VCA, Optical, and PWM equipment with all of the parameters and controls mentioned above. So, if you want to know what audio compression does to the audio you have, you must follow the steps below and see it for yourself.
Unlike physical compression, you are changing the quality of the sound by changing the levels or parameters. Still, with Non-Physical Audio Compression, you interact with the digital sound size. Instead of adjusting these parameters, you can lower the audio file size with these, especially if you want to transfer them quickly or save some space on your storage. Although compression isn't a difficult task, choosing a suitable compressor is a bit challenging because there are a lot of compressors you can find on the web. But no need to feel gloomy because here is the list of the compressor you can use to compress the audio file you have.
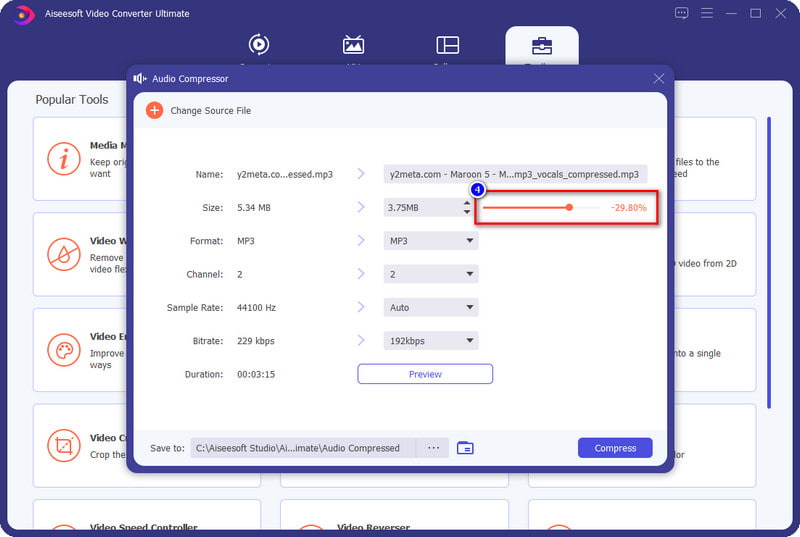
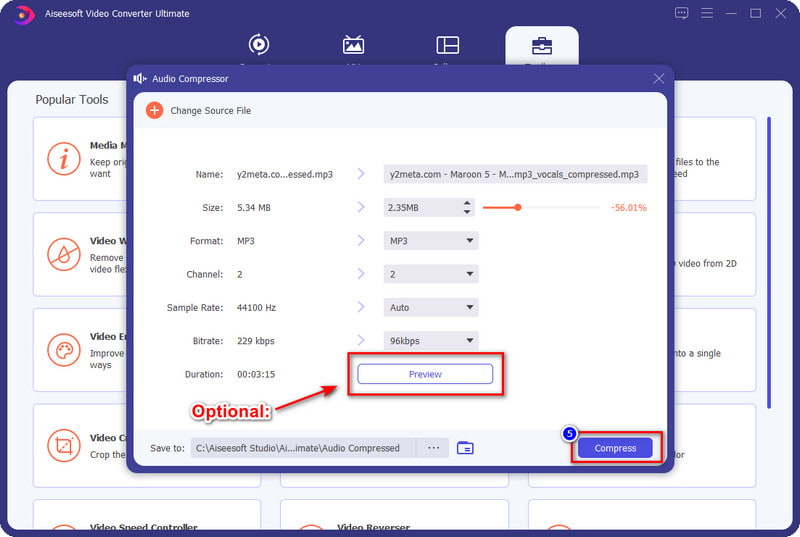
1. Aiseesoft Video Converter Ultimate – Best Non-Physical Compressor on Windows & Mac
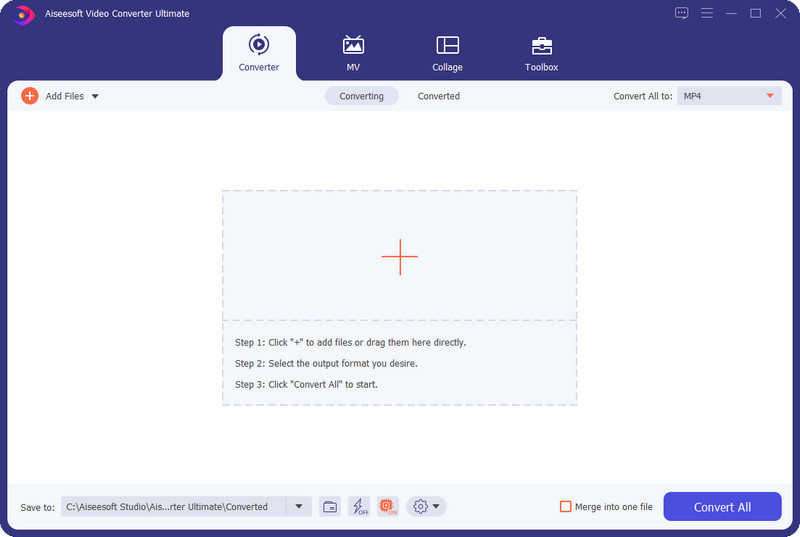
Aiseesoft Video Converter Ultimate is the top-notch video and audio compressor you must have on your desktop to downsize the file size of the file you have without degrading the quality. With software like this, you wouldn't need to be a professional before you can compress the audio you have because its easy-to-understand GUI skills aren't necessary. Also, you can select or change the sample rate, bitrate, format, and more before you export the compressed file. So, if you want to know how to use this compressor, you must read the following details in part three, as we have included all of them for you.
2. Online Audio Converter – 123 Apps
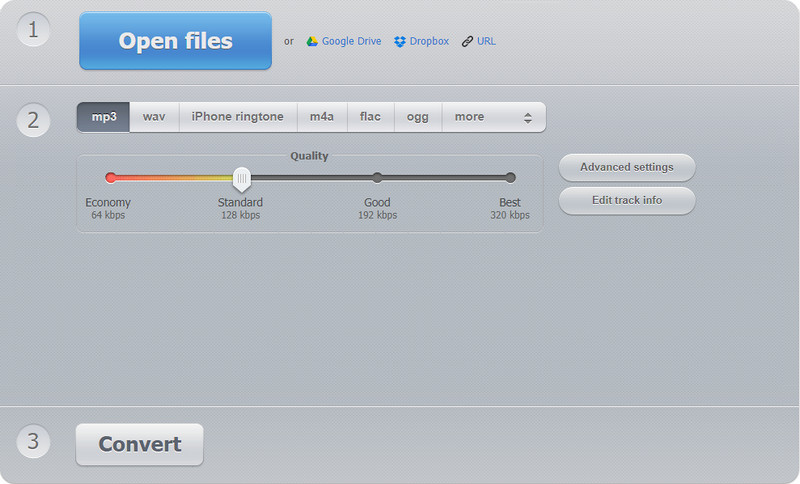
Suppose you want to experience online audio compression, then you must try the Online Audio Converter – 123 Apps, for it is available in all different web browsers to access. Unlike the software we mentioned above, this tool uses an internet connection to do the compression you will need on your audio. Despite being accessible on the web, you can still rely on this online compressor to support adjusting the audio quality. You can choose different formats such as MP3, WAV, M4A, FLAC, and others. If you want to try using this converter, you can access it by searching the name on the browser to use it.
![]() 100% Secure. No Ads.
100% Secure. No Ads.
![]() 100% Secure. No Ads.
100% Secure. No Ads.
That's all for compressing your audio files. You can also use this compressor to compress MP4 or other video files.
Below are a few suggestions you must keep in mind because these are essential tips. These aren't rules to follow, but the information below will help you work with the compressing more confidently than before.
1. Choose Your Target: Audio Normalization vs. Compression
Audio normalization vs. compression which is your target? Although these two manipulate the audio, their functions are far different from each other. Sometimes we think that we do an audio normalization but we are doing the compression, and sometimes, it is the other way. To help you determine the difference between the two, we will explain what makes them distinctive. If you are maximizing the low audio without altering the dynamics, you are on the audio normalization. With normalization, you can combine different tracks and then adjust the volume of each to make them equal to the others. On the other hand, if you are altering the dynamics, you are doing the compression.
2. Listen to the Audio after Adding Compression
After you add compression to the audio file, it is a must to test it out if that is the sound you want to have. It is alright to repeat it, but remember not to give up on adjusting the compression to get the perfect sound we want to achieve.
3. Carefully Adjust the Compression to the Audio
Adjust it a little, and don't abuse it. When you add compression to the audio, you must carefully change it bit by bit. No need to rush, you can take your time, and you will get the best result you want to achieve in no time.
4. Determine What Type of Compression You Have: Lossy or Lossless Compression
Two types of compression are used in different audio formats, lossy and lossless. Let's dig into it to understand the difference between lossy and lossless audio compression comparison. If your format supports a lossy compression, then expect that when you compress it, some data will remove permanently. But if the file you have uses lossless, then expect that when you compress the audio file, there will be no data loss even if you decompress it.
Does compressing the file size of the audio too much will have an effect?
Absolutely yes, it will affect the audio you have. So, don't overdo compressing the audio file you have even though it is lossless; there is a chance that it will destroy the audio if you overdo it.
Is uncompressed audio sounds better than compressed?
There are times that the uncompress sounds good, but if you compress the audio, you can be better by adjusting the parameters to achieve a much better sound than the raw file.
Is MP3 format compressible?
Yes, it is. But remember that you must not over-compress the file stored in this type of format to avoid problems that could lead to an unplayable file. Although MP3 has its compressor, compressing the file can be handy, especially if you want to transfer it quickly or if it didn't pass the standard file.
Conclusion
Physical and Non-physical audio compression can help us make the audio sound better than the original version. But which compression would you choose? If you want to change the audio thoroughly, you must have the equipment to do the physical compression and change the limiters and parameters. But if you are dealing with the file size, then without a doubt, the non-physical audio compressor we mentioned will help you, like the Aiseesoft Ultimate Converter. To learn how to use it, you can read part three and have it also by downloading it on your computer quickly.
 2 Free Ways to Compress A Video/Videos Losslessly
How to compress a video to Email or upload to YouTube? This page will show 2 free ways to make video compression from MP4, QuickTime, etc. online and on computer.
 2 Ways to Compress A Video Online and on Computer
Want to compress a video to reduce file size? We will show you 2 ways to compress a video file with online free video compressor and offline software to help you in this post.
 Compress Video for WhatsApp - How to Send Large Size Video on WhatsApp
How can I send large video on WhatsApp? What is the video size limit for WhatsApp? How do I compress a video for WhatsApp on Mac? This post shares 2 easy ways to compress video for WhatsApp.

Video Converter Ultimate is excellent video converter, editor and enhancer to convert, enhance and edit videos and music in 1000 formats and more.
![]() 100% Secure. No Ads.
100% Secure. No Ads.
![]() 100% Secure. No Ads.
100% Secure. No Ads.
*Required field
*Please enter a valid email
