This is a tutorial which explains the process of editing videos on a PC using Windows Movie Maker and editing videos on Mac using iMovie. This tutorial will be a concise explanation of how to editing videos for free. Then share your movie via the Web, e-mail, or CD. Using DVD burner you can even take movies you've made and turn movies into DVDs.

You can also save your movie back to the video tape in your camera to play back on a TV or on the camera itself.
This tutorial includes three parts, this is part two:
Part 1. Using Windows Movie Maker to edit videos on PC for free
Part 2. Using iMovie to edit videos on Mac for free
Part 3. A table that compares free video editors.
iMovie '08 makes viewing and working with video as intuitive as enjoying your photos. A built-in library automatically organizes your video, so all the clips you've captured and movies you've created are just a click away. With its revolutionary interface, iMovie makes it quick and easy to browse your library and create new movies. And iMovie is built for sharing. In just a few steps, you can add movies to your website, publish them on YouTube, and create versions for iPod, iPhone, and Apple TV.
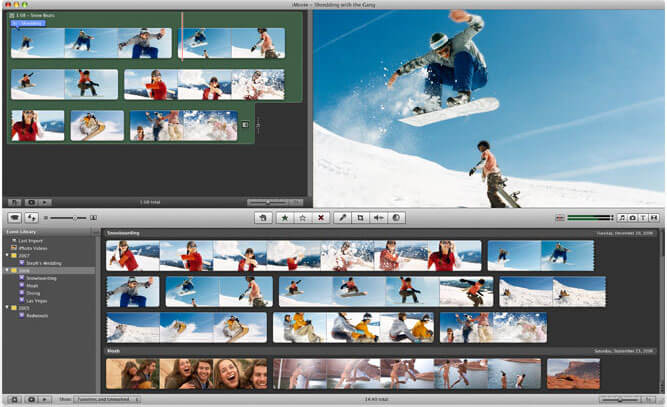
Step 1 Create an iMovie Project
Before doing anything in iMovie, you must create and title a new default folder as well as title and save our new project.
Step 2 Connect DV Camera
Make sure the camera is in PLAY (VCR) mode
Step 3 Add Video
Now that your movie is complete, you may wish to save the project in a different format.
When your viewer says "Camera Connected," click the "Import" button. iMovie will play and import your digital video. When you wish to stop importing, click the "Import" button once more. Drag your imported clip(s) from the clips pane to the editable timeline along the bottom of the iMovie interface. iMovie treats deleted files differently that most other programs. If you delete a clip you CANNOT get it back.
iMovie will also allow you to import the following file formats:
3gp, AVI, DAT, MOV, MP4,MPG
If your videos are not the format that is compatible with iMove such as FLV and M4A, AIFF, AAC, you can use the Video Converter for Mac to convert the video first.
Step 4 Edit Video
To Split a Clip: Place the cursor beneath the viewing window at the place in the movie where you want to split the clip into two. Go up to the "Edit" menu at the top, and select "Split Video Clip at Playhead."
To Crop a Clip: Drag the little triangles beneath the viewing window timeline to the desired in and out points. Go to the "Edit" menu at the top and select "Crop."
To add effect: Select "Effects" from the menu below the clips pane. Select a clip from the editing region to add an effect to it. Select an effect. Adjust the parameters of the effect beneath the preview window. The effect should automatically preview in the preview window. If you adjust the parameters of the effect, click "Preview" again to load the new effect settings. Click "Apply," and wait for the effect to render. You can monitor the effect rendering by the red progress bar that occurs within the clip the effect is being added to in the editing region. Save your work.
Step 5 Save Your Project
From the main menu, go to File > Save Project.
If you want to convert the movies made by iMovie to other video format, you can use this Video Converter for Mac. If you want to burn the movies made by iMovie to DVD, use DVD Creator for Mac.

July 05, 2018 18:17 / Updated by Jenny Ryan to Edit Video
 Alternative iMovie for PC - iMovie for Windows
The article shows you the most popular alternatives to iMovie for PC, you can find the best free iMovie for Windows as well as the paid iMovie alternatives.
 Top 5 GoPro Video Editing Software
Among the much GoPro video editing software on the market, which one is the best video editing software for GoPro? Here I will introduce the top 5 GoPro video editing software for Mac and Windows to you.
 Get Best Video Editing Software to Make Your Own "Hollywood" Video in 2017
This article shows you how to choose the best video editing software for Windows computer or Mac from numerous free and professional video editors for your needs.
