People use iPad for reading papers, taking notes in classes, watching movies, etc.
With the release of the new iPad which is compatible with Apple pencil, taking notes on iPad becomes smoother. This is favored by students.
Plus, with its big screen, watching movie and playing games also becomes more enjoyable. Most of our learning and entertainment activities are basically on iPad, think about one day your iPad get crashed, stolen, and you haven't back up it yet, you will be crazy, right? Now we realize back up iPad is also the important thing we should do.
But how do we back up those data on iPad to iTunes? Let's get that out of the way now.

iTunes is developed by Apple Inc., you can install it on your computer running the macOS or Windows operating systems. Known to us as a media player, media library, Internet radio broadcaster, and mobile device management application, iTunes allows people to play, download, and organize digital multimedia files.
People also use it to back up and restore files, or sync the iOS contents.
We're going to show you how to back up your iPad with iTunes.
Step 1 Connect your iPad to computer with USB cable. Generally speaking, iTunes will launch automatically. If not, launch it manually.
If your iPad is connected to your computer for the first time, there will be a popup with a message that ask you to enter your iPad's password and trust this computer, just follow it to get the permission.
Step 2 You will see an iPad icon in the left upper corner of iTunes' interface after it detect your iPad. Click this iPad icon.
Step 3 Click "Summary" in the left panel.
Step 4 Click "Back Up Now" under "Manually Back Up and Restore" in the left window.
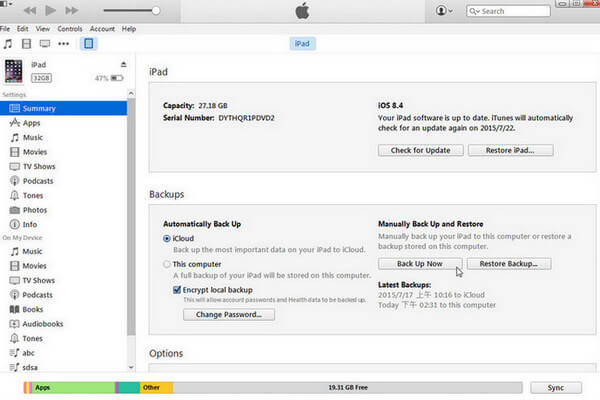
If you want to save your back up with password, just check the checkbox of "Encrypt local backup". Then keep your password in mind.
Wait for minutes until it backs up successfully.
When it comes to security and privacy, Apple Inc. is always at the top of the pack, it does support to encrypt your backup. But still, there are some flaws inevitably.
You probably know that iTunes would save your backup as a encrypt file. With iTunes, you cannot access the file unless you restore it.
But what if you want to access your files on computer as well as on your iPad?
For this situation, Aiseesoft FoneTrans can be a good choice for you to back up your files. No matter where you want to back up to, iTunes or your computer.
With FoneTrans, you can transfer photos, music, contacts, and voice memos from your iOS device to computer or iTunes directly. And after transferring those files to your computer, you can access them directly, just like view this files on your iPad.
We now show you how to do that in Part 2.
We now take iPhone for instance.
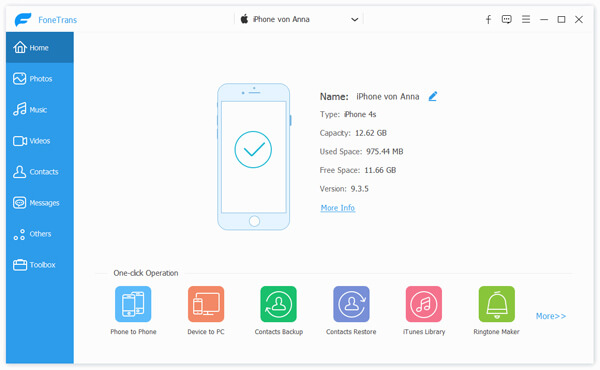
Step 1 Launch Aiseesoft FoneTrans and connect your iPad to computer. Then FoneTrans will automatically detect your iPad.
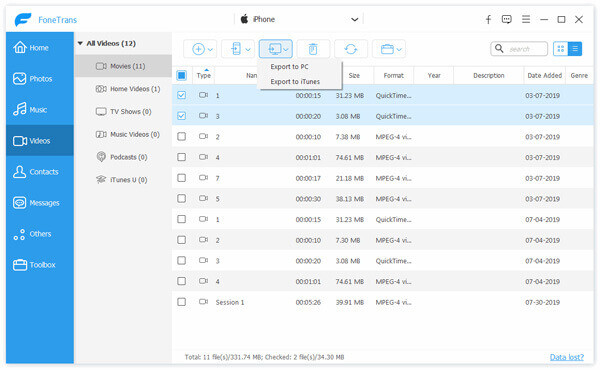
Step 2 Click "Media" on left panel, and you will see you can transfer many different kinds of files like musics in your Music app, or Movies in your Videos app, etc.
Step 3 We now want to back up videos, click "Movies" in the right panel. And select the videos you want. You can select all of your videos, or just select some of them.
Step 4 Click the arrow next to "Export to", there will be 2 options for you – "Export to PC" and "Export to iTunes Library".
Export to PC: With this option, you can back up your videos to your computer, and you can access them as usual. Click it and there will be a popup, just select a location to save your files.
Export to iTunes Library: With this option, you can back up your videos to iTunes directly.
Step 5 Wait for minutes until it finishes transferring.
Actually, Aiseesoft FoneTrans is much more powerful than you think. Not only to back up data to computer, it can also help you to manage files on your iPad like delete, add photos, music, etc. Moreover, it can de-duplicate your contacts as well.
If you want to know more about it, just download and install it to your computer and try.
Generally speaking, one does not back up data for the benefit of others. In my opinion, the major purpose of backing up data is that, if your original data have been changed or deleted, you still can access the data. Aiseesoft iOS Data Backup & Restore can help you to back up iPad in a perfect way. Let's learn what can Aiseesoft iOS Data Backup & Restore do here.
Now we will show you how to back up your iPad with Aiseesoft iOS Data Backup & Restore.
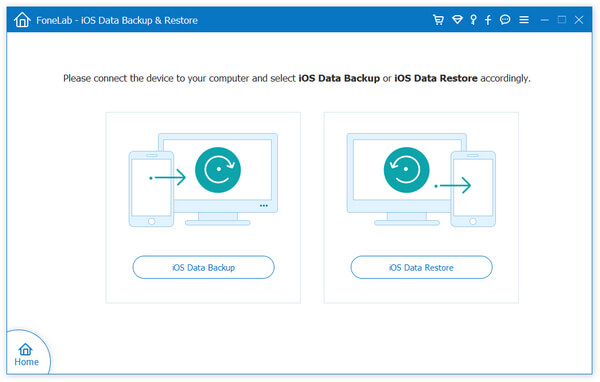
Step 1 Launch Aiseesoft iOS Data Backup & Restore, and connect your iPad to computer. Then iOS Data Backup & Restore will detect your iPad automatically.
Step 2 Select iOS Data Backup & Restore. And you will see there are 2 options for you: iOS Data Backup and iOS Data Restore.
iOS Data Backup: If you click this button, you will know you can back up your data in a standard way, or you can back up your data with a password.
iOS Data Restore: Click this button, you will be allowed to view the backup you backed up before. Just the item you want to restore to your iPad.
Step 3 Click "iOS Data Backup" button.
Step 4 In this window, you can select the type you want to back up your data. Just check the check box of "Standard backup" or "Encrypted backup".

Step 5 Click "Start". You will be allowed to choose the data you want to back up. These data divide into 4 types: Media, Message & Contacts, Memo & Others.
You can select to backup one item like iPhone Contacts, Music, Messages, or more items under these types, or you can check the checkbox of "Select All" to back up all files on your iPad.
Step 6 Click "Next" and wait for minutes until it finishes.
OK, you have learned 3 methods to back up your iPad, which method did you prefer? Choose one to try!
Restore the files is equally important compared to back up them. So some of you may be interested in how to restore the videos have been backed up to iTunes, you won't want to miss how to restore the files you just backed up: Restore backup from iTunes(/tutorial/restore-iphone-from-itunes.html).

August 17, 2018 18:30 / Posted by Nicole Jones to Back up iOS Data
 How to Recover Whatsapp Messages on iPhone
Don't worry if you lost your Whatsapp messages. You can use Whatsapp recovery tool to get the deleted conversations back.
 How to Backup Locked iPhone
If your iPhone is locked and you forgot the passcode, don't be panic. FoneLab will help you access the messages, contacts and other data in your locked iPhone.
 How to Retrieve Deleted Text Message and iMessage on iPhone
How to find & retrieve deleted text messages and iMessages on your iPhone? This post shares 4 fixes to restore these permanently deleted messages for iPhone.
