
Aiseesoft Data Recovery
 100% Secure. No Ads.
100% Secure. No Ads.
How to recover deleted photos on Mac?
You won’t be there if you can easily locate these deleted photos from Mac’s Trash. Losing important data is still a common situation, whether due to an accidental deletion, a software glitch, or a mistaken formatting. What really matters is always how to get these valuable files back.
This guide shares five proven methods to restore deleted photos on Mac, ranging from simple built-in features to professional third-party software. You can compare them and select the best approach based on your situation.
First, let’s be clear that it is entirely possible to recover deleted photos on a Mac, even for these permanently deleted ones. Before we delve into specific solutions to recovering deleted photos on Mac, let’s talk about several core factors that will determine the final recovery success.
When you manually delete a photo on your Mac, it is not immediately removed. The system does not permanently erase the data from your storage drive. Instead, it will mark the space that the image file occupied as “available” or “blank” for new data. The deleted photo remains on the disk (recoverable) until new data is written over it. Before the space is overwritten, you still get a chance to perform the photo recovery. This is the fundamental principle.
Surely, the chances of successful recovery are also determined by the deletion method and how long it has occurred. Generally, the longer you delete, the higher the risk of overwriting. If you often back up your Mac files, you may get a suitable backup to easily restore data.
Before your Mac photos are permanently erased, you have a good chance of getting them back. This section tells five reliable recovery methods, from built-in solutions to advanced options. Follow them to get your valuable files back.
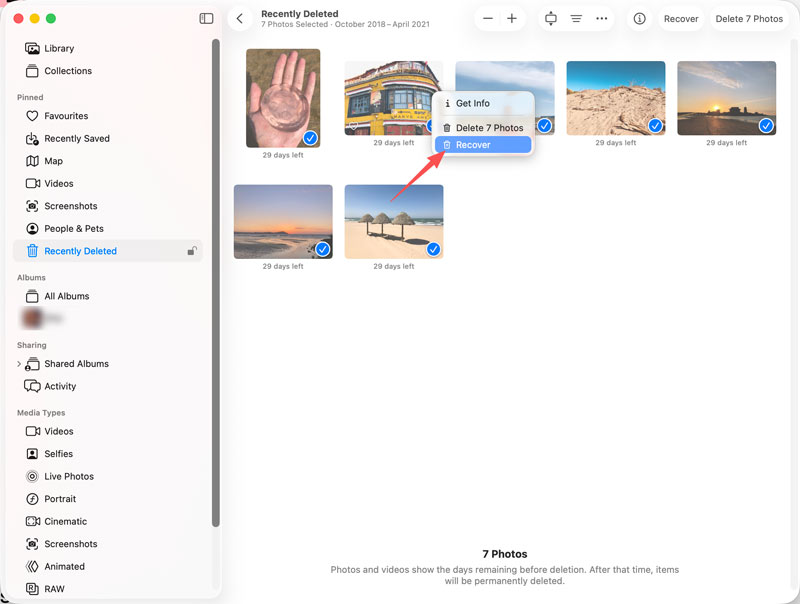
If you deleted photos from the Photos app on your Mac, you can try restoring them from the Recently Deleted folder. It is a built-in safety net for quick data recovery. Your deleted photos will be stored in the folder for 30 days before being permanently erased.
Look in the left sidebar under the “Library” or “Albums” section for an album named Recently Deleted. If you don’t see the sidebar, go to “View” > “Show Sidebar”. You are required to enter your password to check the folder.
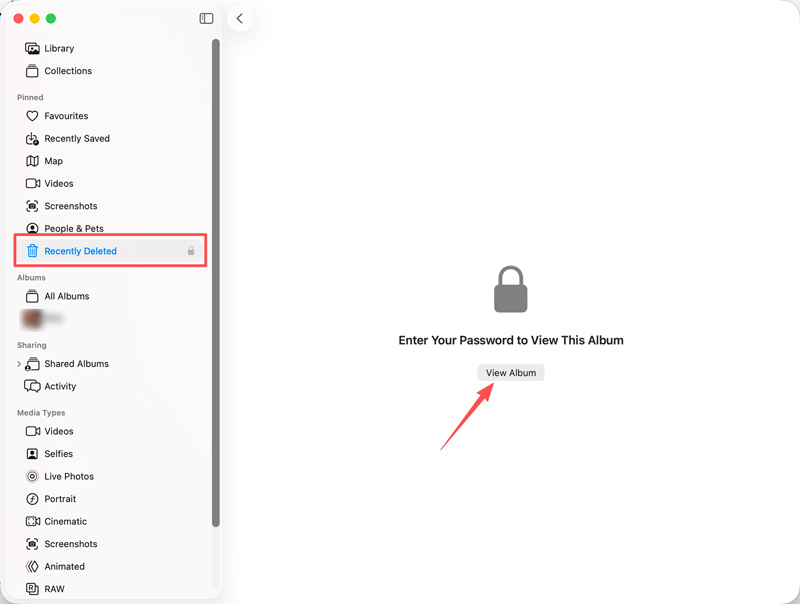
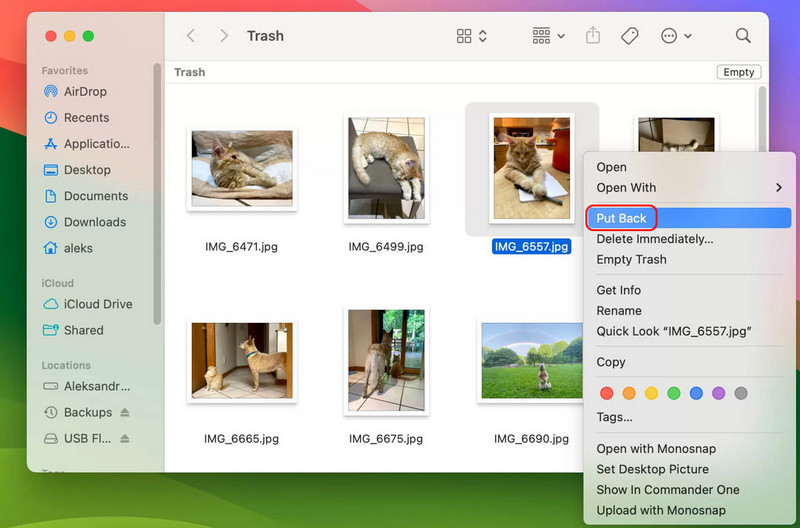
If your photos are not deleted from specific applications like Photos, you can search for them from the Mac Trash. It is a temporary holding place for deleted files until you empty it.
Click the Trash icon in your Dock to open the Trash folder. When you find the target photos, select them and choose Put Back.
If you cannot find deleted photos from the Recently Deleted album and the Trash folder, try recovering them using Time Machine. Ensure you have ever connected an external hard drive to your Mac and created a complete history of your computer’s past states.
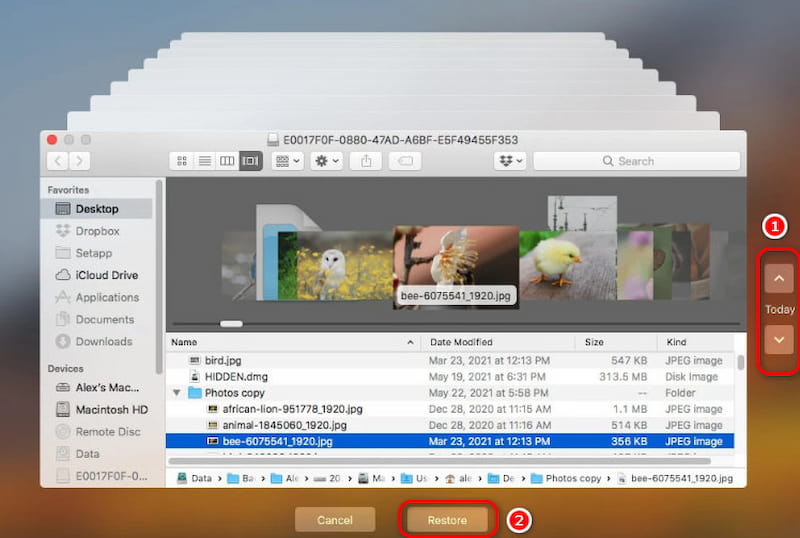
Click here to learn more about using Time Machine on Mac to recover various data.
Your photo library will be synced across all your Apple devices if iCloud Photos is enabled. Like the Photos app, it has a Recently Deleted folder in iCloud online.
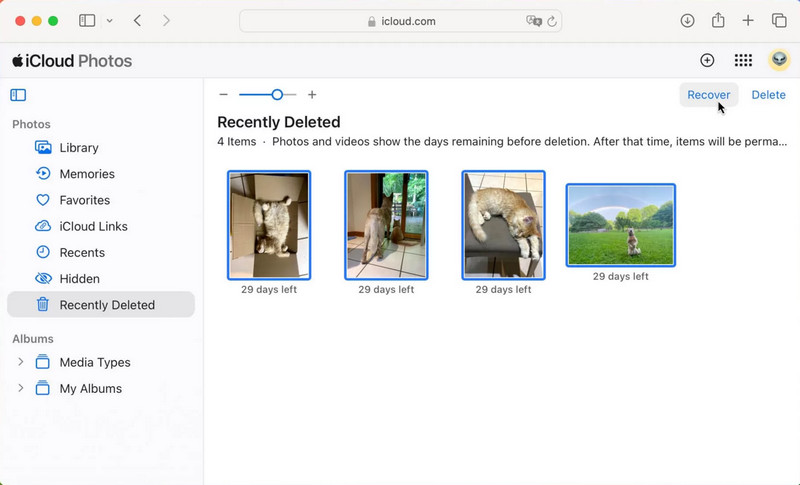
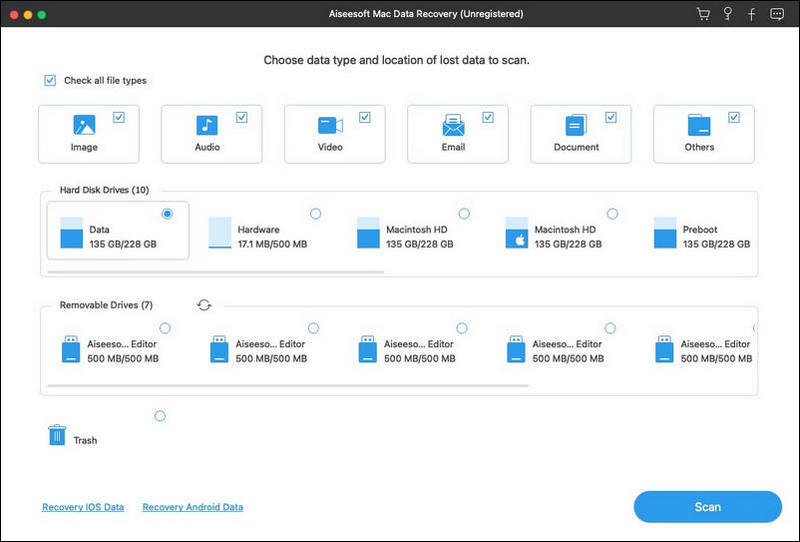
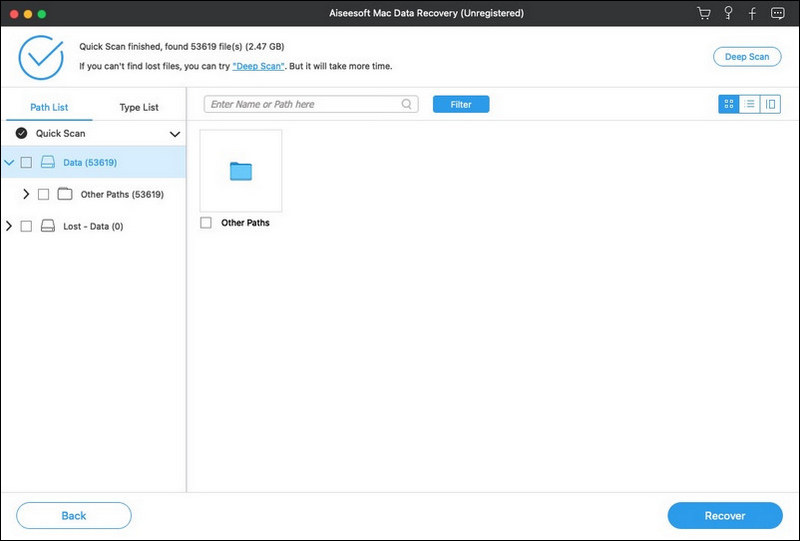
When all the methods above fail to recover deleted photos on Mac, you must turn to professional data recovery software. For these “permanently” deleted files, you still have a chance to get them back before the space is overwritten by new data. Aiseesoft Data Recovery is a powerful tool designed to scan the raw data on your Mac’s drive to find the recoverable files.
100% Secure. No Ads.
100% Secure. No Ads.
Besides the Mac’s internal drive, the software can scan external hard drives, memory cards, and other storage devices to restore deleted files, including images in various formats, such as JPG, PNG, TIFF, GIF, and more. Aiseesoft is designed with an advanced Deep Scan function to ensure the highest possible success rate.
What is the best way to avoid photo loss on a Mac?
To prevent your photos or other valuable files from being lost, you should often create backups. That ensures you always have a recent backup to rescue most data. You’d better use two or more different storage types. If you have enough cloud space, enable iCloud Photos for cloud synchronization.
How long are deleted photos kept on a Mac?
As mentioned, your deleted photos will be stored in the Recently Deleted album for 30 days. For these deleted files in the Mac Trash, they will be kept until you empty the Trash. You may configure Finder to empty it automatically after 30 days.
Is it safe to use third-party recovery software?
You should use reputable and well-reviewed third-party data recovery software. Moreover, ensure you download them from trusted developers and sources. Using known software like Aiseesoft Data Recovery, Disk Drill, or Stellar Data Recovery is often safe.
Conclusion
Losing important/precious photos can be incredibly stressful. But as this guide above shows, there are several effective methods to get them back. You can use them one by one until you finally recover deleted photos on Mac. By following the guide, you significantly increase your chances of successfully restoring your lost Mac files.
 A Comprehensive Guide on How to Delete Photos from iPhone
How do you delete photos from your iPhone but not iCloud? How can I permanently delete photos from my iPhone? Learn to remove your iPhone photos effectively.
 Google Photos Vs Google Drive: Which One Should You Choose?
Confused between Google Photos Vs Google Drive? Discover their differences in storage, file types, and backup features. Learn which is best for your needs!
 3 Ways on How to Merge iPhoto Libraries on Your Mac
How do you combine iPhoto and Photos libraries on a Mac? Can I move my old iPhoto library to Photos? This article tells how to merge iPhoto libraries on a Mac.
 Leave your comment and join our discussion
Recover Data on Mac
Recover Deleted Files on Mac Recover Deleted Photos on Mac Recover Trash on Mac Mac Data Recovery Restore from Time Machine Show Hidden Files Mac Mac Freezes
Aiseesoft Data Recovery is the best data recovery software to recover deleted/lost photos, documents, emails, audio, videos, etc. from your PC/Mac.
100% Secure. No Ads.
100% Secure. No Ads.

*Required field
*Please enter a valid email

