Need to free up space on your iPhone? The most efficient way is to manage your photos and videos. They may easily take up 30%-70% of the entire device space. You can transfer photos from iPhone to flash drive or your computer to get more available storage. However, you cannot directly drag and drop from the Photos app.
Whether you need to free up enough space for a new iOS update, back up family photos, or share work screenshots with someone, knowing how to transfer photos from an iPhone to a flash drive can save time and frustration. We will walk through three reliable methods to transfer photos.
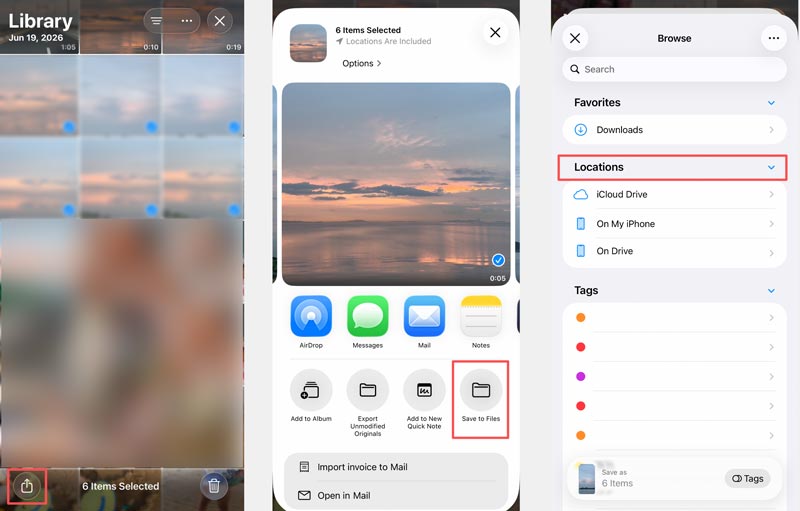
When you are running out of storage on your iPhone and want to move your photos to a UBS flash drive, you can rely on a compatible Lightning-to-USB adapter. Ensure you have an Apple-certified Lightning-to-USB adapter for your iPhone model. Besides, the Files app should be installed to manage and transfer photos and videos.
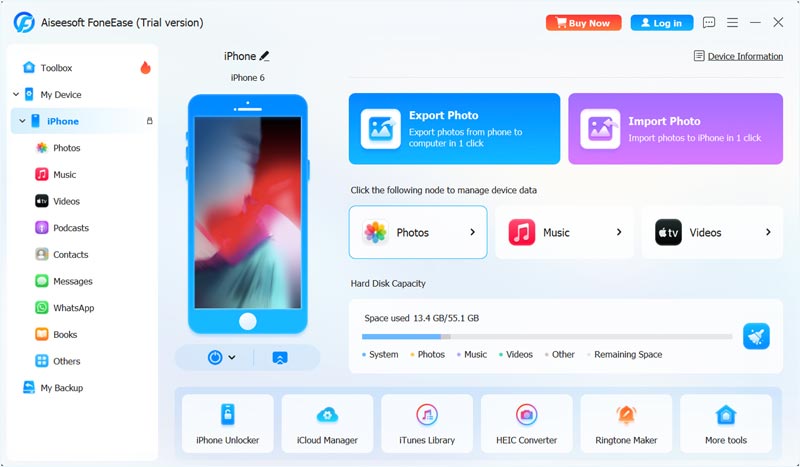
If you need to handle large photo libraries (1,000+ images), a dedicated iPhone data transfer is often the best option. Aiseesoft FoneEase is a third-party utility designed to manage your iOS files. It provides a fast, convenient way to transfer iPhone photos to a USB flash drive, a computer, or another mobile device.
 100% Secure. No Ads.
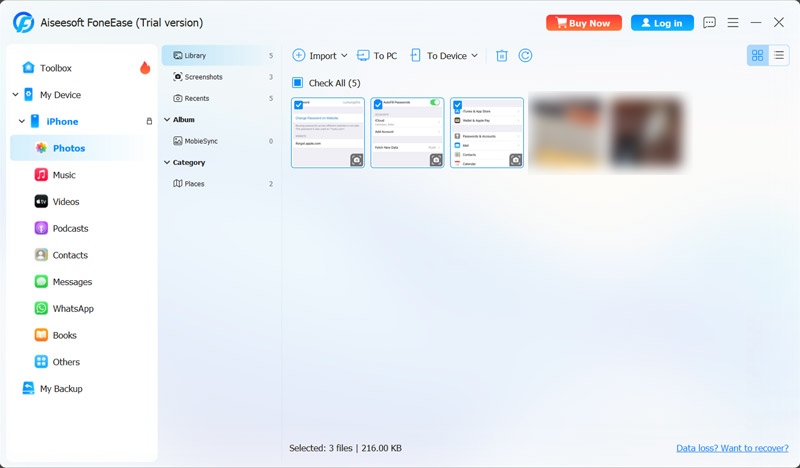
When the transfer progress is complete, safely eject the flash drive from your computer and the iPhone from the software. You can then manage photos and videos on your phone and delete large files to free up space.
If you have a Mac or Windows PC nearby, using the computer is a reliable and free method. It can serve as an intermediary for storing your image files. Once your iPhone photos are copied to the computer, transfer them to the flash drive as needed.
On Windows, you can use File Explorer or the Photos app to access your iPhone photos. On a Mac, you can use Finder (macOS Catalina and later) or the Photos app.
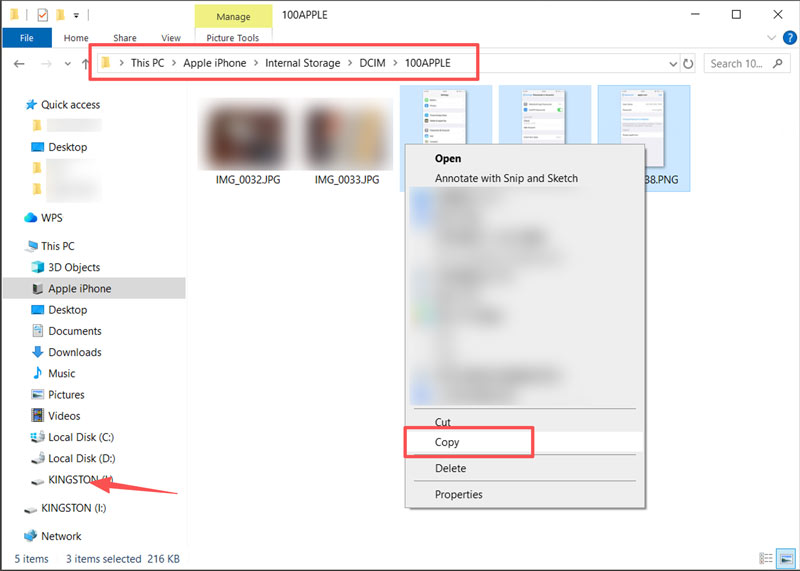
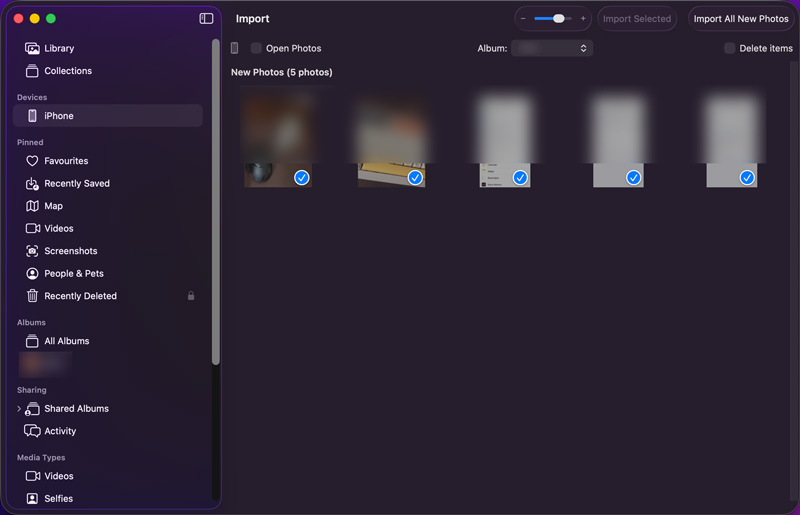
To access and manage your iPhone photos on a Mac, you can also use the Photos app. Connect the phone and open the Photos app. The iOS device will appear in the sidebar. Choose the pictures you want to transfer, then click Import Selected. After importing, you can drag them from the Photos library to your flash drive.
Question 1. Will transferring iPhone photos reduce their quality?
No. When you transfer your iPhone photos, use “Keep Originals” or “Export Unmodified Originals” to ensure 100% untouched quality. However, if you use certain third-party apps or email methods, they may reduce the image quality. When compression occurs, check and choose the right export option that preserves original files.
Question 2. Can I transfer Live Photos to a flash drive?
Yes, you have several methods to transfer Live Photos from your iPhone to a standard flash drive. However, if you simply drag them to your USB drive, they will lose the motion effect and live photos will become static images. If you want to preserve the Live Photo functionality, you will need to view them on another Apple device. On non-Apple devices, they will typically appear as still images.
Question 3. How do you transfer photos from an iPhone to a flash drive without a computer?
As you can see above, a compatible flash drive (Lightning or USB-C) or the right adapter can help you connect both devices and transfer the photo. Follow the first method to copy your iPhone photos to your flash drive through “Save to Files”.
Question 4. How to transfer a large number of pictures (1,000+) from iPhone to iPhone?
You have several effective ways to transfer lots of photos from one iPhone to another. If you just switched to a new iPhone, use Quick Start during setup to handle your 1,000+ photos effortlessly. If both iPhones are already in use and you want the photos to appear in the library, turn on Photos in iCloud. You can transfer these photos through cloud sync. If you want to selectively manage and copy your iPhone photos, FoneEase is a great choice. In some cases, you can use AirDrop to transfer pictures in batches.
This guide shares three efficient methods to help you transfer photos from an iPhone to a flash drive. You can select the right transfer method depending on your situation.
If you have a compatible flash drive or adapter, you can use it to connect directly to your iPhone. If you often need to manage your iOS files and want advanced management features, FoneEase offers a user-friendly solution. If you have a computer handy, using File Explorer (Windows PC) or Finder (Mac) is also a reliable choice.
 8 Best iPhone Backup Apps and Software to Store Your Files
Want to back up your iPhone data but don't know how to choose the tool? We'll introduce you to 7 iPhone backup apps and one of the best software to help you.
 How to Transfer Data from a Dead iPhone to a New iPhone: Easy & Fast
Need to transfer data from a dead iPhone? Learn simple ways to recover contacts, photos, and files from a dead iPhone and move them to a new iPhone quickly.
 iCloud Photos to Android - How to Access iCloud Photos on Android
Switch from iPhone to Android and want to transfer iCloud photos to Android device? How to directly access iCloud photos on Android? This post will show you 3 effective solutions to handle these iCloud pictures.
 Leave your comment and join our discussion
Aiseesoft FoneEase is a data transfer and management tool that lets you seamlessly move, back up, and manage various data between iOS, Android, and computers without resetting your phone or relying on iTunes.
100% Secure. No Ads.

*Required field
*Please enter a valid email

