Getting Started
Introduction
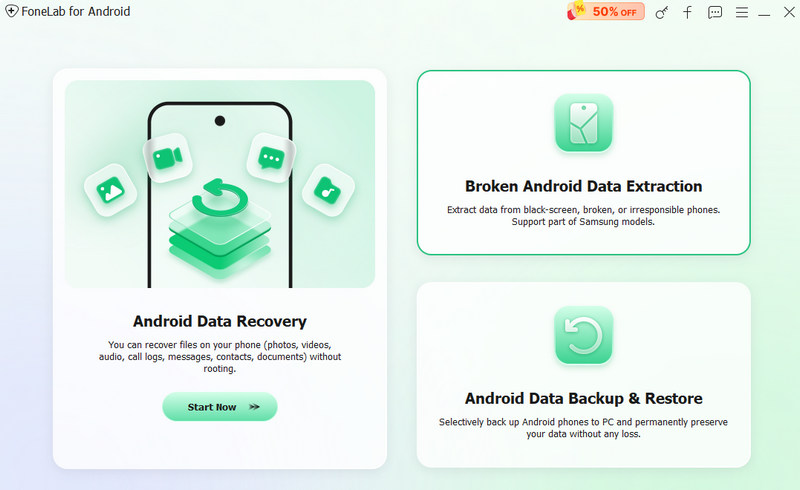
Unfortunately delete or lose some important Android data like contacts, messages, call logs, music, videos, pictures and more? Want to recover deleted/lost Android files from Android phone or SD card? Aiseesoft FoneLab for Android is your best choice to rescue your Android data.
How to Recover Deleted/Lost Android Data
Step 1 Launch FoneLab for Android
Download, install and run this powerful Android data recovering software on your computer. On the main interface, choose Android Data Recovery to recover your deleted or lost data.
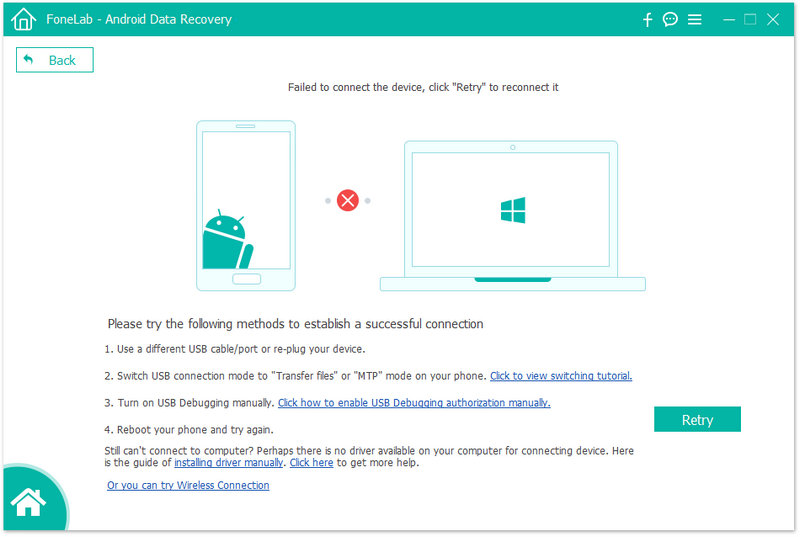
Then, connect your Android device to your computer via USB cable. Aiseesoft FoneLab for Android can automatically detect your Android phone. If your device is connected but not recognized successfully, click The device connected but not recognized? to get more methods for establishing a successful connection.
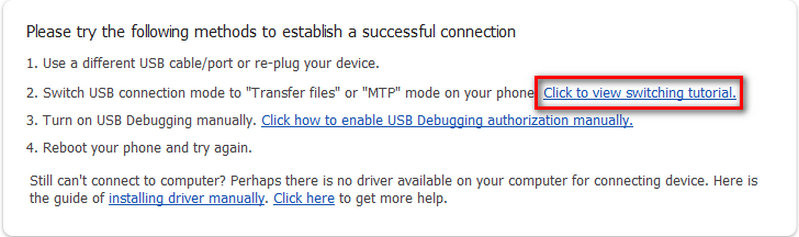
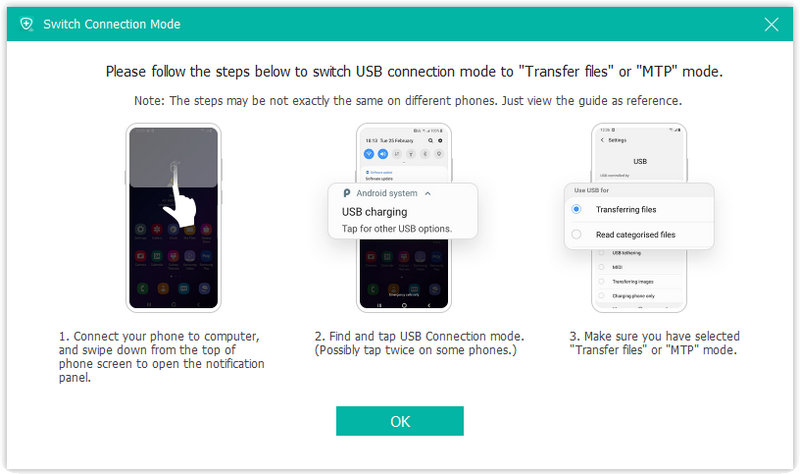
Tips: You can get detailed steps of the second method by clicking PTP/MTP to switch USB connection mode to Transfer files or MTP mode.
If you failed to connect the device to your computer, click on the Reconnect button to reconnect it.
Step 2 Enable USB debugging
FoneLab for Android will prompt you to enable USB debugging on your phone if you don't open the debugging mode. It will teach you how to open the USB debugging mode on your phone.
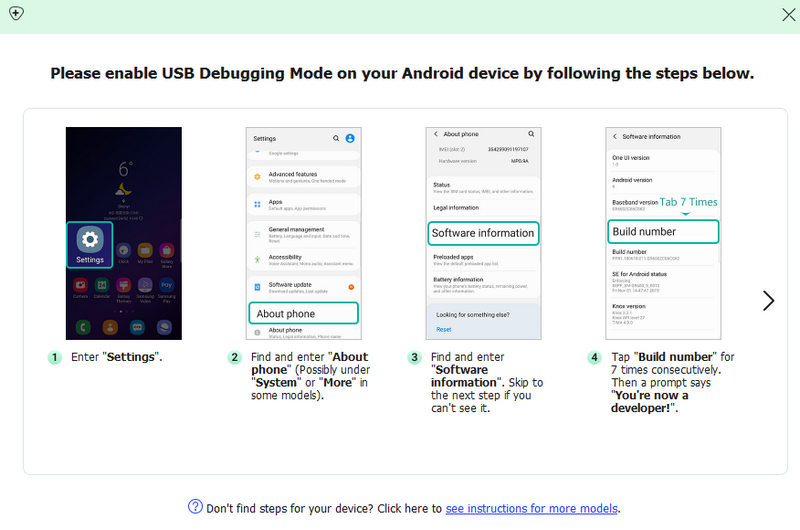
Click Allow to finish USB debugging. If you miss the pop-up on the device, hit Show Again on the program.

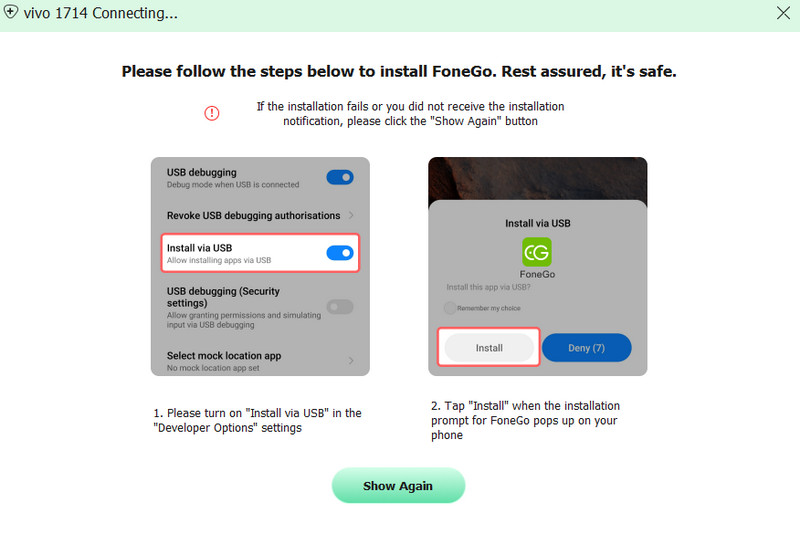
Step 3 Install FoneGo on your phone
Then, you will be prompted to install FoneGo on your phone by enabling "Install via USB" option in "Developer options". (If you miss the install pop-up or fail to install, click Show Again to install.)
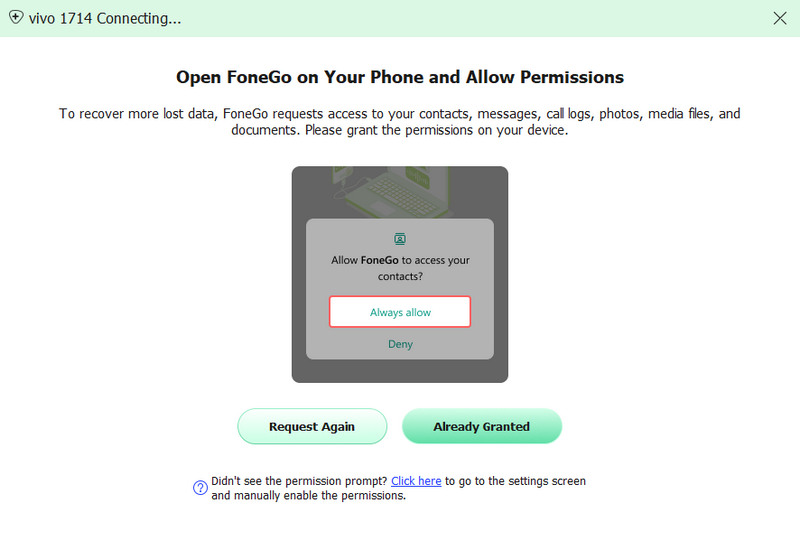
Step 4 Grant FoneGo permission to access phone information
When you finish installing FoneGo App, you can authorize this software to access all or part of your phone data that you want to recover. Next, click Already Granted > OK on the program.
Tips: If you are not authorized and the phone does not show a pop-up window, please click the bottom prompt.
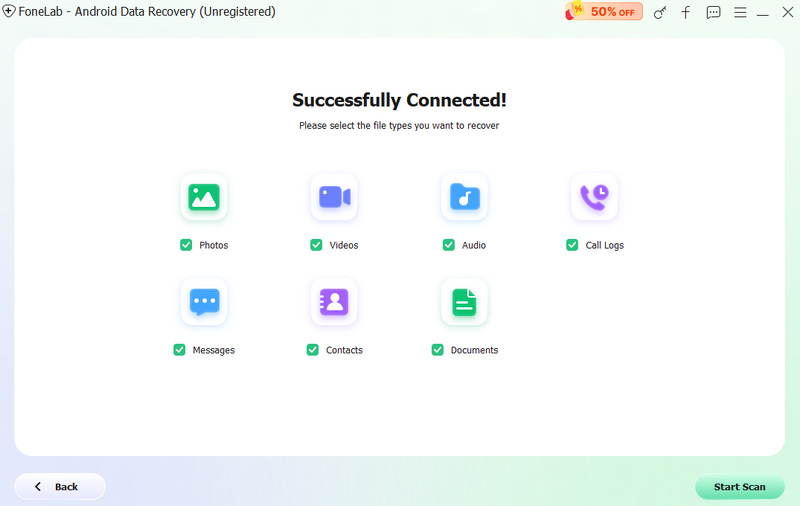
Step 5 Choose the data type
Then, various types of files we support will appear on the screen. Select the file type you want to recover and click Start Scan.
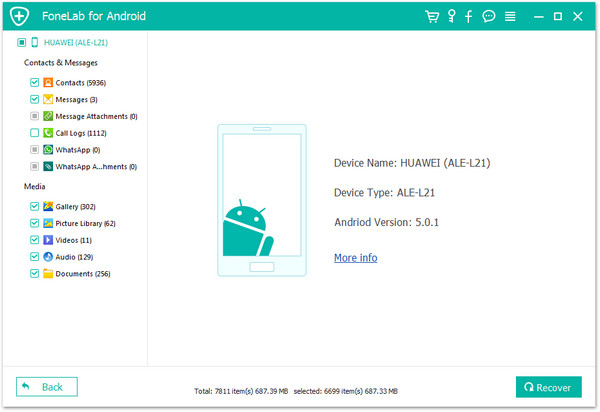
Step 6 Choose and recover the lost data
After scanning, you can view the lost data. Choose what you want to retrieve and click the Recover button in the lower-right corner.
How to Recover Backup Data from Google Drive
Step 1 Choose “Google Drive Data Recovery”.
After purchasing its Android Data Recovery function, you can open Aiseesoft FoneLab for Android and select “Google Drive Data Recovery” from the main screen.
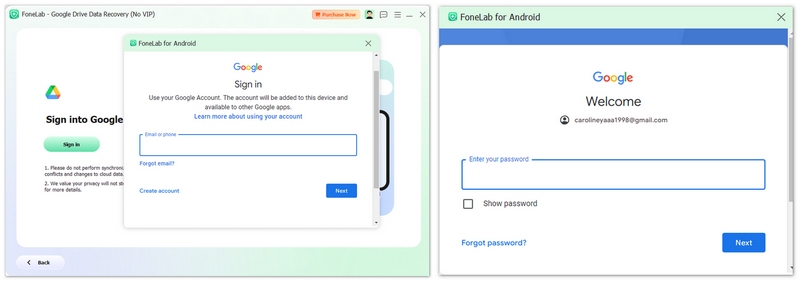
Step 2 Sign in to Google Drive
Click “Sign in” to access your Google Drive backup data. Enter your Google account and click “Next,” then enter your password and click “Next” again.
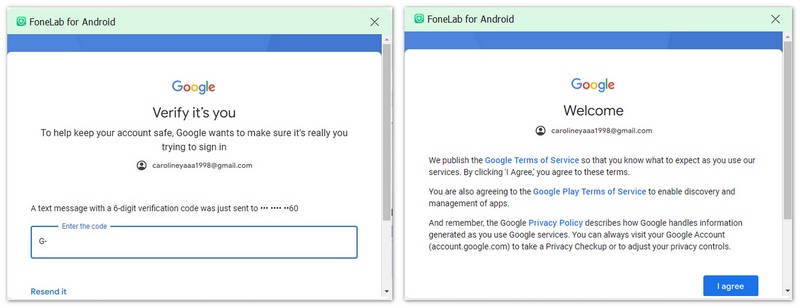
Step 3 Verify Your Identification
Verify your identity using your phone number, verification code, or a phone call, then click “I agree” to authorize access to your Google Drive backup.
Step 4 Select Data Type
Here, you can select the data type you want to recover, including contacts, messages, calendar, call logs, etc. After selection, click “Recover Now” to move to the next step.

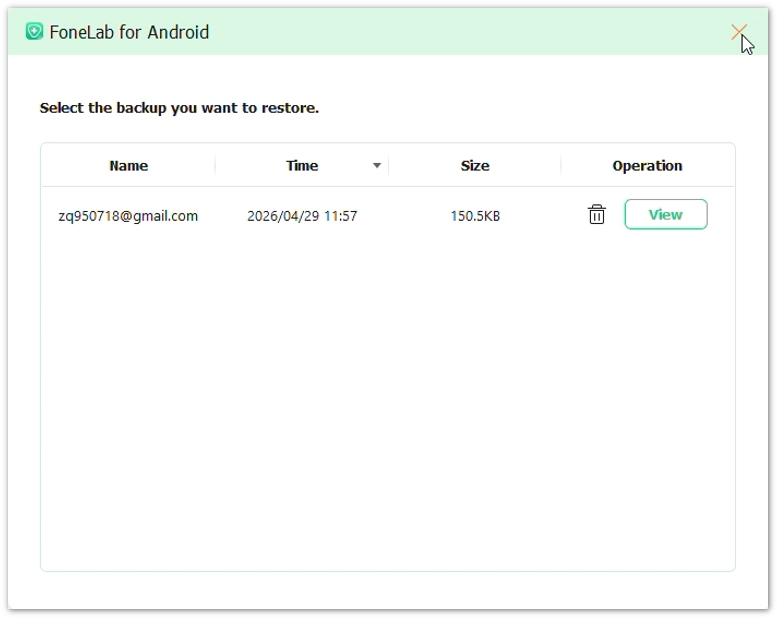
You can click “View recovery history” to check your history logs here.
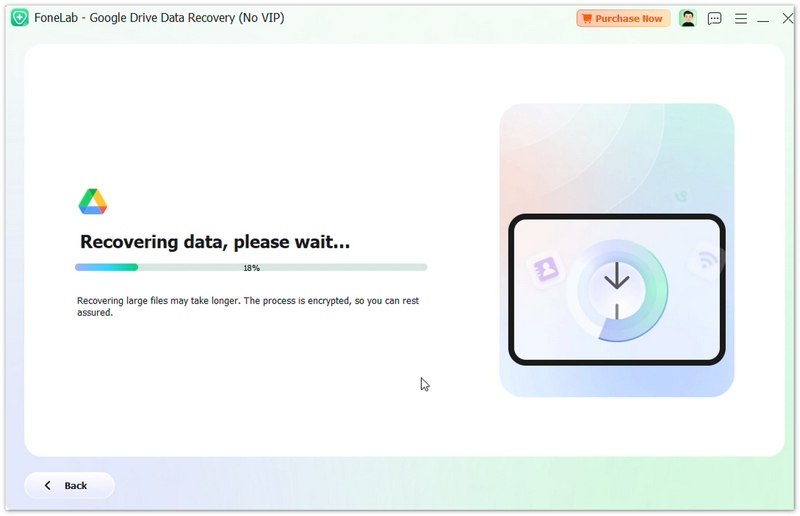
Step 5 Recovering Your Data
Then, it will start recovering your selected data type. This process may take longer based on the number of your recovered files, and it will generally complete in 1- 5 minutes.
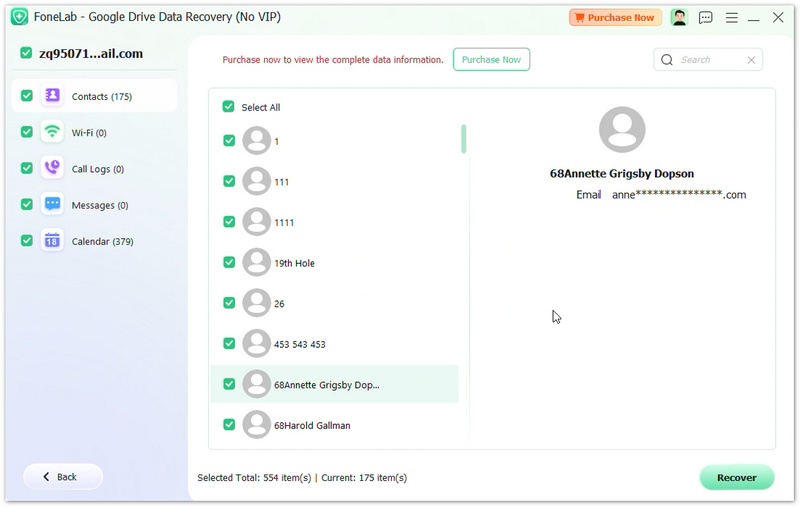
Step 6 View and Save Recovered Data
Now, you can find all your recovered data here, and you can see all the details of it. You can click “Recover” to save it to your local folder.
-
How to Recover the Deleted Contacts on Android
How to recover and get back lost or deleted contacts? Here we introduce several ways to recover contacts on your Android phone.
 Posted by Iris Walker | 04.06.2018
 -
How to Recover Android Data after Factory Reset
Want to recover the contacts from Android phone after factory reset? No worries, try the way in this post to get the easiest answer.
Posted by Iris Walker | 28.06.2020 -
How to Recover Deleted Files from Android SD Card
Free Android SD Card Recovery can easily recover photos, music and other files from SD Card and Android mobile phones and tablets.
Posted by Iris Walker | 16.12.2020 -
How to Recover Android Files without Rooting
Can you recover your deleted files on Android without rooting? Yes, you can. Follow this post to restore your deleted files from an unrooted Android.
Posted by Iris Walker | 07.05.2018 -
Free Recover Deleted Data from Samsung
Samsung Data Recovery is the best data recovery software for Samsung Android phones. It can recover deleted/lost messages, contacts, photos and call log for Samsung device.
Posted by Iris Walker | 10.12.2020 -
How to Recover Deleted Drafts on TikTok or Using Recovery App
How to recover deleted drafts on TikTok? If you have yet to delete the drafts or video on TikTok, you better read this article to retrieve it.
 Posted by Ashley Mae | 01.02.2023
 -
How to Recover Tiktok Messages on iPhone & Android [Proven Ways]
Have difficulties because Tiktok removes the message? Luckily, we include the best way to recover tiktok messages easily.
Posted by Iris Walker | 02.02.2023 -
How to Recover Deleted WhatsApp Messages
How to recover deleted WhatsApp messages? Let's learnhow to recover deleted WhatsApp messages with Android Data Recovery as well as Google Drive.
Posted by Iris Walker | 24.08.2017 -
2 Best Methods to Recover Deleted WhatsApp Chat on Android
How to recover deleted WhatsApp chat? This article shows you how to recover deleted WhatsApp chat history using Android Data Recovery and Google Drive.
Posted by Iris Walker | 31.08.2017 -
Restore Contacts - How to Restore Deleted Contacts
If you want to restore deleted contacts on your phone, then you can read this article and learn how to restore contacts on Android/iOS devices without any hassle.
Posted by Iris Walker | 06.07.2017
