Apple maps have been focusing on providing a convenient life for its users. You can use this service to search wonderful places, interesting attractions and so on. As you know, Apple maps app will keep your search history automatically for the convenience of quickly finding the places you have searched before.
If you are eager to get rid of the past search history on Apple maps app, you have come to the right place. In this passage, we are discussing specifically how to clear Apple maps history on your iPhone/iPad/iPod.

Clear Maps History
If your iPhone/iPad is running on iOS 9 or earlier, here are the detailed steps for you to clear Apple maps history on iOS 9 with ease:
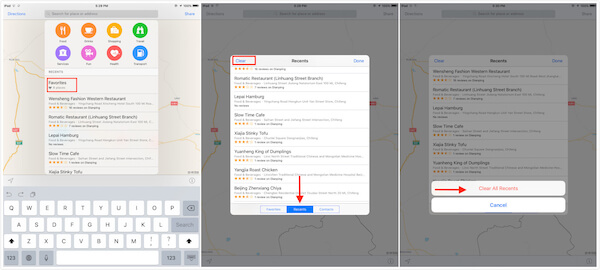
Step 1 Launch Apple Maps app
Tap on the Maps icon to open this app on the home screen of your iOS device. It is a map icon with a compass in the bottom right corner.
Step 2 Tap the search bar
Tap on the Search bar in the bottom of the page, then scroll down through the destination options and hit on Favorite option.
Step 3 Tap on Recents option
Next click on the Recents option. There will be a pop-up window to list your recent search history on Apple Maps. Check if you need to clear all the recent search history.
Step 4 Clear recent search history
You can find a Clear option on the upper left corner in the pop-up window. Simply click on it, and choose Clear All Recents to clear your maps history on iPhone/iPad.
If your iOS device is running on iOS 10 and later, you can follow the steps below to clear Apple maps history on your iDevice without effortlessly:
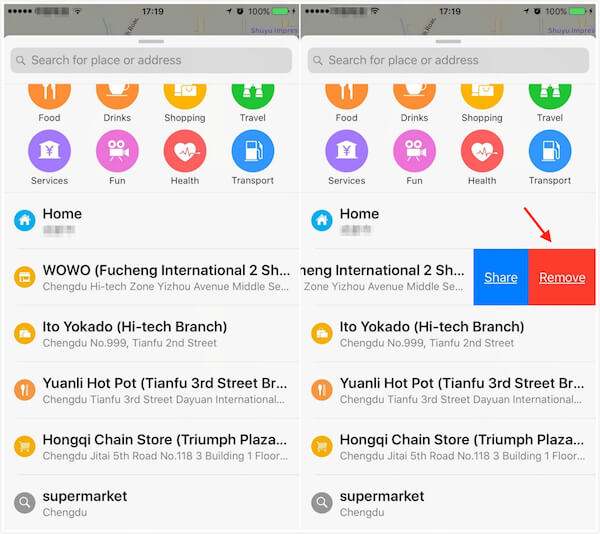
Step 1 Open Apple Maps app
Also, you need to launch Apple Maps app on your iPhone/iPad. It is on the home screen of the iDevice.
Step 2 Select a certain search history
Next scroll up the list that shows your recent searching destinations, local at a specific search history that you want to clear and wipe from right to left.
Step 3 Two options shows up
Now you can see two different options. One in blue comes up for Share, and the other in red says Remove.
Step 4 Tap Remove option
Just tap on the Remove option to clear the selected search history on Apple Maps app. It is done!
You may need: How to Fix Apple Maps Not Working
One thing to illustrate before you start clearing the maps history, the maps history will be gone once you remove it. If you just want to store the old search recordings but do not want them available for reading in the Maps app, here is another solution for you to take into consideration: you can share the maps history to a Secured Notes files instead of clearing them.
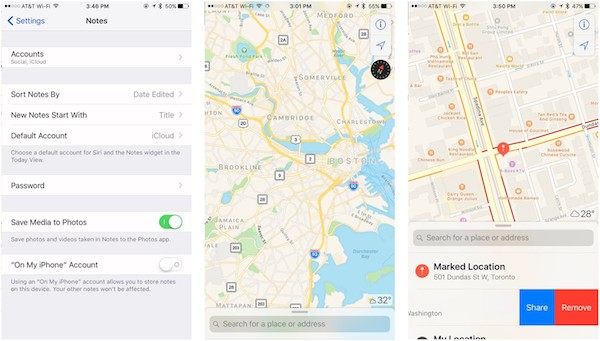
Step 1 Set up new Notes
Set up Notes with a secure password in your iOS device. And turn to Maps app, scroll up to display the Recents menu.
Step 2 Open "More" option
On a set of directions, swipe left to open the "More" option. Or you can tap a location to type in its information card. Tap the Share button and click "Add to Notes" option.
Step3 Share maps history to Notes
Turn back to Notes app again, choose the note with your address and hit on the Share button. Finally, enter the password to lock this newly created note.
If you are looking for a solution to permanently clear Google maps history in your iPhone/ iPad, a professional erasing program should be of great necessity. Aiseesoft FoneEraser is rated as the most useful and powerful utility to erase all content and settings permanently and thoroughly from iPhone, iPad and iPod Touch, which is highly recommended to you.
After understanding the detailed features about FoneEraser, now follow us to learn how to use this app to clear Google maps history in your iPhone/iPad/iPod:
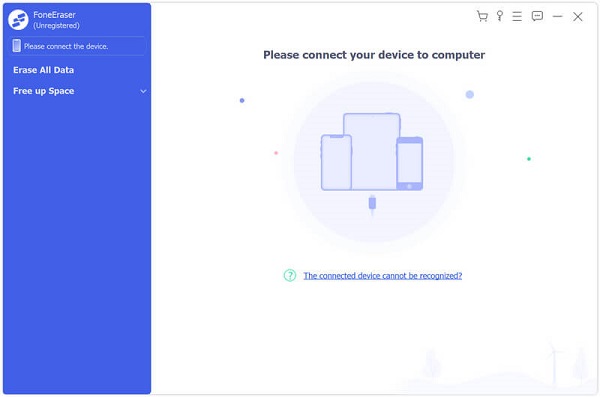
Step 1 Install FoneEraser
Firstly, free download FoneEraser on your computer. Then follow the instructions to install it. You are suggested to backup data and file beforehand to prevent this app wipe out all your content and settings in iPhone.
Step 2 Connect iOS device to computer
After launching Aiseesoft FoneEraser, connect your iPhone to the computer via a USB cable. Once connected, it will detect and scan your device automatically.
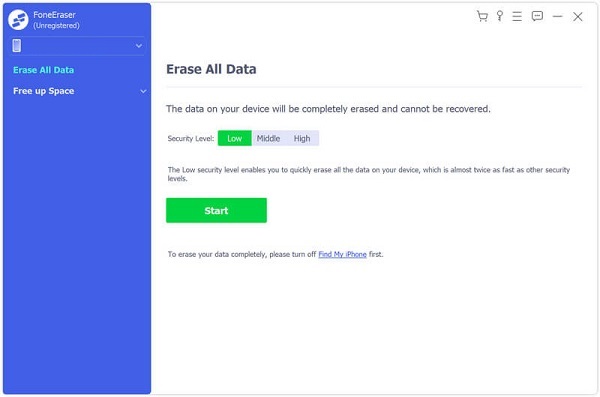
Step 3 Select the erasing level
Next you can choose the different mode that you are going to apply to clear search history on Google Maps app. There are low, medium and high levels for you to apply.
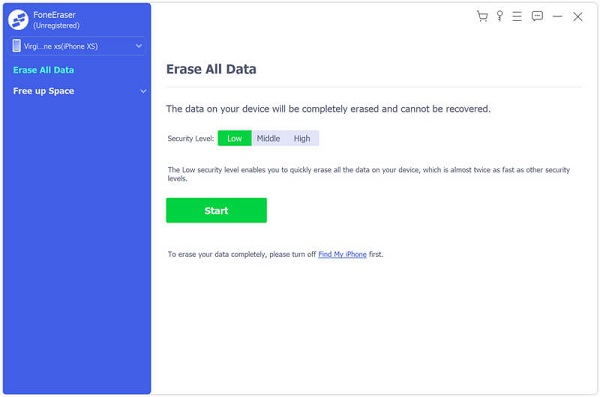
Step 4 Start clearing process
After all is set, simply click on the "Start" button to clear Google Maps history permanently in your iPhone/iPad. Once the cleanup is done, you can never see your recent search history in Maps app.
Follow solutions mentioned above, you must learn the correct steps to clear maps history on your iPhone and iPad. And believe me, FoneEraser will never disappoint you. If you have more thoughts about how to clear cache on iPhone/iPad, you can share them in the comments. Do not forget to share this passage to your friends if it helps you to some extents!

July 17, 2018 18:30 / Posted by Louisa White to Delete iOS Data, Delete Android Data
 Clear YouTube Watch/Search History in 4 Easy Ways
How to clear or manage YouTube watch history and search history? This article will help you and introduce a great YouTube History Cleaner for you.
 How to Delete Snapchat Conversations Permanently
How to delete Snapchat history easily and permanently? This article gives you the best way to clear all Snapchat history.
 How to Clear Facebook Search History Safely and Completely
How to clear Facebook search history? Worry about some search history that might be found by others? Here we show you how to delete Facebook search history.
