Note
We'll take Samsung Galaxy S7 Edge for instance in this article.
Most of us need to call almost every day, for communication, business, and maintaining relationship, etc. Since making a phone call became an essential part of our life, how to back up and restore call logs become more and more important as well.
As we all know, call history can record all the missed, received, dialed calls, and also the rejected one. But it seems that most of us have no idea about the call logs can only be stored for 30 days on an android phone. We all probably encounter a number of situations now and then:
These situations would reduce the stored time of call logs from 30 days to zero in one minute.
Now you further realize that how important it is to back up call logs on android, but how?
Don't worry, we'll get into the topic right away.

Our article will provide 2 methods for you to back up and restore your call history. It will divide to 2 parts. Let's begin.
Note
We'll take Samsung Galaxy S7 Edge for instance in this article.
If you are using a HTC phone, you will know that there is a built-in back up and restore feature called HTC Backup. It enables you to back up and restore your call logs and other files conveniently.
But not all android phones has the built-in backup feature like HTC. For those phones users, we would like to show you how to back up and restore call logs via SMS Backup & Restore, which is highly rated in Google Play Store.
Step 1 Install SMS Backup & Restore on your android phone, then launch it.
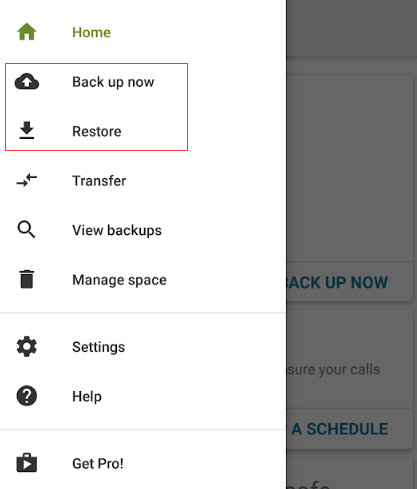
Step 2 Tap on the three-short-line icon on the left of "SMS Backup & Restore".
Step 3 If you want to back up your call logs, just tap on "Back up now". If you want to restore your call logs, tap on "Restore".
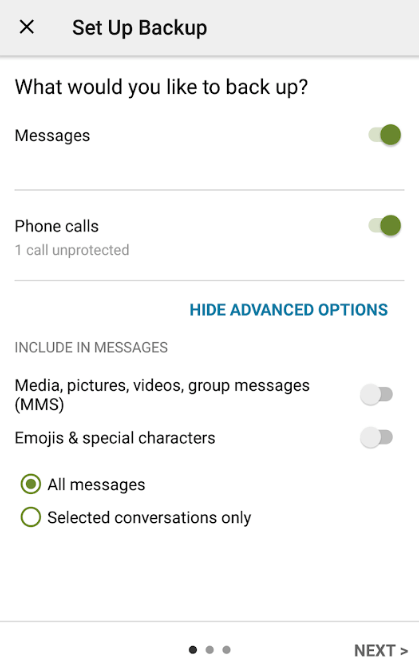
Step 4 You will be asked "What would you like to back up/restore?". Just turn on the button of "Phone calls". If you also want to back up or restore messages, just turn on its button either. Then tap on "NEXT".
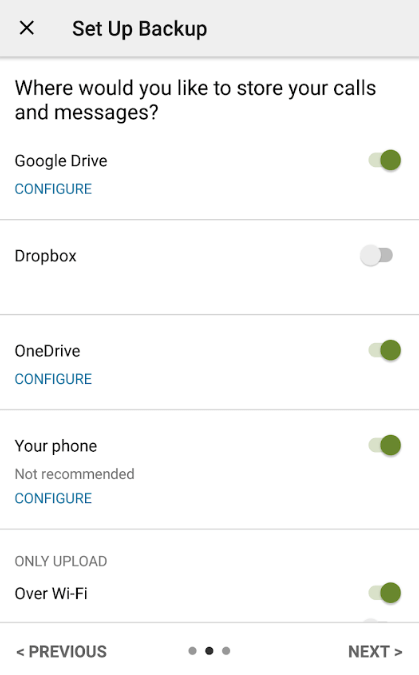
Step 5 At this step, you can choose the back up or restore location as you like. You can back up your call history to Google Drive, Dropbox, OneDrive, and your phone, you can restore them from Google Drive, Dropbox, OneDrive as well.
Note that you need to log in your account of Google Drive or Dropbox, or OneDrive first.
If it finishes, you will get a "Backup/Restore complete" message.
Even though SMS Backup & Restore provides three more options to back up or restore your call logs, and save it as an XML file. It is still not so convenient because it needs log in your account to proceed this back up or restore. If you forget your account, you won't be allowed to access your backup any more.
With an XML file, it can be accessed with some specific apps, which means it is not so safe.
And if you want to back up more other types of the data like videos, photos, audios, etc., it cannot help you.
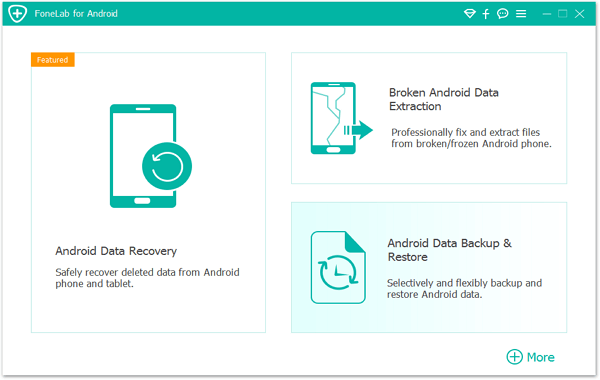
Is there any software that can do what SMS Backup & Restore cannot do? Yes, it's FoneLab Android Backup & Restore.
FoneLab Android Backup & Restore is powerful software which enables you to safely back up and restore your android data in one click. With this software, you can back up and restore all your data in one click, you can also select the data you want to back up or restore. It enables you to back up or restore contacts, messages, call logs, gallery, videos, audio and documents. Besides, you can save it anywhere on your computer.
It will generate an encrypted backup file which can only access your backup via itself. This makes users feel safer.
Step 1 Connect your android device to computer via USB cable, and FoneLab Android Backup & Restore will automatically detect your android device.
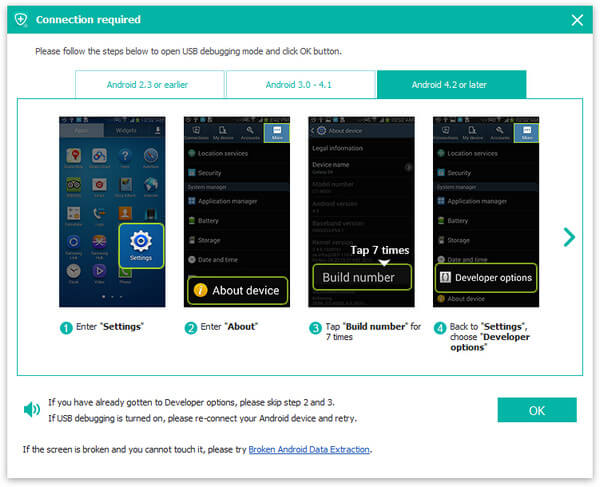
Step 2 Enable USB debugging
If you enabled USB debugging, just skip this step and head to Step 3.
FoneLab Android Backup & Restore needs to open debugging mode so that it can access your device. It will show you how to enable USB debugging on your phone in the pop up window.
Just click "OK" button to the next step after finishing enable USB debugging.
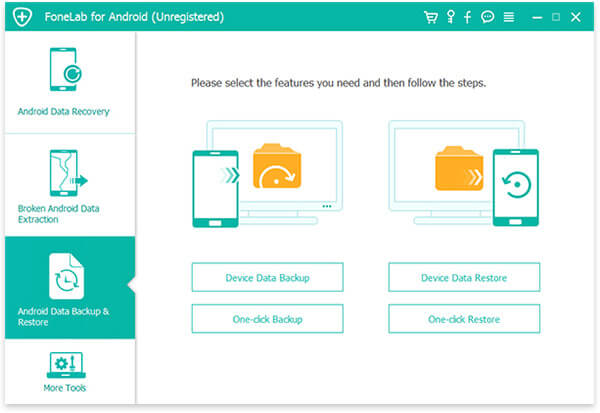
Step 3 Click on "Android Backup & Restore" in the interface, you will see both back up and restore options.
Step 4 Just wait for seconds, you will get a "Congratulations!" message after it back up or restore your call logs completely.
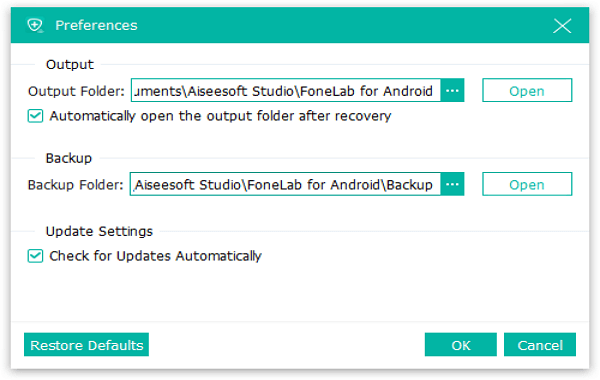
If you want to change your backup's location, just click "Menu" > "Preferences..." to set a new path as you like.
See, it is so easy to back up or restore your call logs, even other types of files via FoneLab Android Backup & Restore, try it, and you'll find it is the one you need.

August 14, 2018 13:51 / Updated by Iris Walker to Back up Android Data
 How to Backup Contacts from iPhone X/8/7/6/5/4
The article mainly presents five options for iPhone users to help them deal with the issue of backing up contacts. Just select a proper one to make your iPhone contacts backup.
 How to Recover Deleted Text Messages on Android? Best Ways You Need to Know
How to recover deleted text messages on Android? You are able to get some useful solutions to recover deleted SMS/text messages on Android phones or tablet in Samsung Galaxy, HTC, Sony, etc.
 How to Restore Deleted Contacts on Android or iPhone
How to restore contacts on iPhone/Android? This article shows you how to restore iPhone contacts from iCloud or restore Android contacts from Gmail or Google.
