How to download photos from iPhone to computer/PC? This article is going to show you 5 ways to download and transfer photos from iPhone X/8/7 Plus/7/6Plus/6/SE/5s/5c/5/4S to Windows 10, Windows 8, Windows 7, Windows Vista, Windows XP.

The iOS Transfer we use here is an efficient iPhone Photos Transfer software which can save you a lot of time when you want to download photos from iPhone to computer. iOS Transfer can help you export and transfer iPhone photos to PC with ease.
Click here to learn more info about transfer videos from iPhone to your PC.
Step 1 Install iOS Transfer and connect iPhone
Download and install iOS Transfer. Launch the program and use a USB cable to connect the iPhone with your PC

Step 2 Select photos you want
Click on "Photos" from the left menu. Then you can see your iPhone photos. Choose the photos you want export to PC.

Step 3 Transfer iPhone photos to PC
After that, click "Export to" button. Select the destination folder and click "OK" button.
Besides, iOS Transfer also lets you sync iPhone, iPod or iPad files (contacts, text messages, notes, media files) to your PC or Mac, export data to PC or iTunes as backup and also exchange files between iPhone/iPad/iPod.
In case you have photos in iPhone photo stream, you are able to sync photos from photo stream to PC wirelessly. 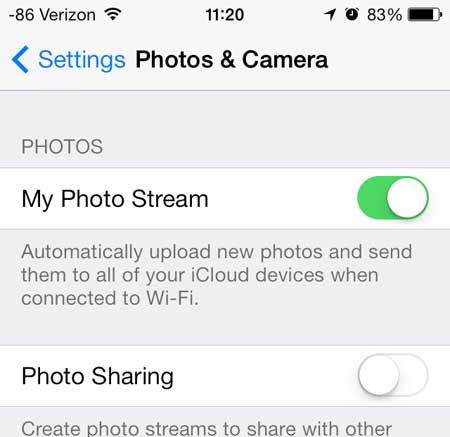
1 First of all, you need to install iCloud Control Panel on your PC.
2 Sign into iCloud Control Panel with your Apple account and password.
3 iCloud will automatically download photos from iPhone photo stream to PC.
You will also like reading: Transfer Text Messages from iPhone to Computer .
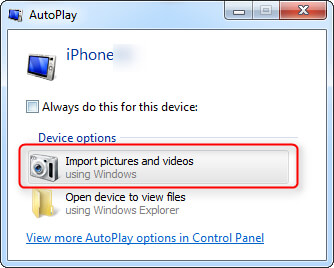
1 Connect iPhone to PC. When the AutoPlay window shows up, click the option of "Import Pictures and Video using Windows" > Choose "Import pictures and videos".
2 Choose the link of "Import Settings" and click the "Browse" button next the "Import images to" to choose the destination.
3 Click "OK" button to import photos to PC.
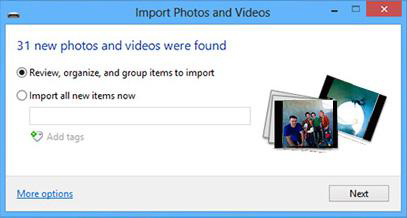
1 Connect iPhone with your Windows 8 PC. Click on "This PC", right-click on the iPhone device to choose "Import pictures and videos".
2 Select "Review, organize, and group items to import" or hit "Import all new items now" if you've imported photos from your iPhone. Click "Next" then.
3 Clicking "More Option" link to choose where to put your iPhone photos. Click "OK" button and then > "Next" after choosing the folder.
4 Select the photos you want to transfer, and click the "Import" button.
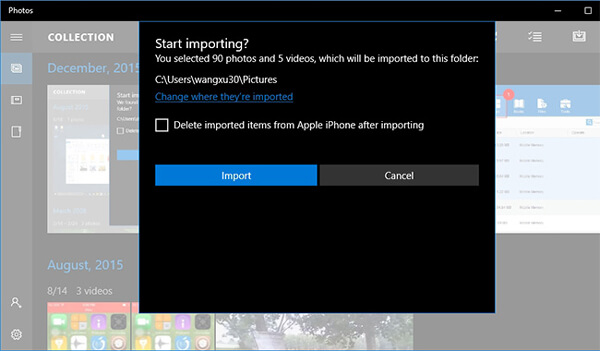
Windows 10 computer has a Photos app that enables you to download and transfer photos from iPhone to computer.
1 Connect iPhone to Windows 10 via a USB cable and launch Photos app on computer.

2 Hit the "Import" button from Photos app. Choose the photos and click on "Import" button to transfer photos from iPhone to Windows 10.
Windows File Explorer enables you to view and manage iPhone photos, so that you can use this feature to download photos from iPhone to PC.
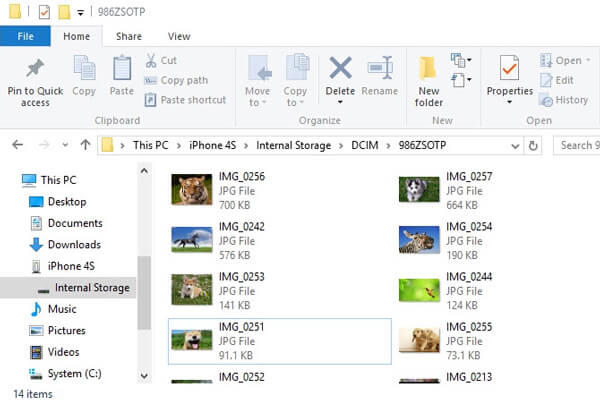
1 Connect your iPhone with Windows PC.
2 Under "Computer" for Windows 7 or "This PC" for Windows 8/10, you should see your iPhone as a drive. Double-click iPhone drive > "Internal Storage" > "DCIM", all photos and videos from your iPhone camera roll are here.Connect your iPhone with Windows PC.
3 Then you can select the photos to move them to Windows 7/8/10. Connect your iPhone with Windows PC.
Don't miss: Transfer Notes from iPhone to Computer.
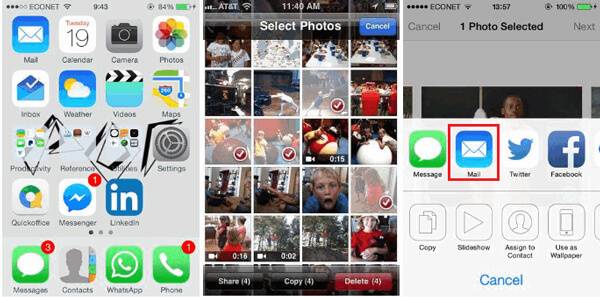
1 Navigate to iPhone Photos app. Tap the "Select", and choose the photos you wish to transfer to your computer.
2 Tap the "Share" button and choose "Mail". But this method only enables you to send up to five photos once. It will prompt the mail application and let you send a new message with the photos you selected attached.
3 Enter your email address such that you send the photos to yourself.

June 29, 2018 17:27 / Updated by Louisa White to Transfer iOS Data, Photo
 iPhone Unlock – Unlock Verizon/AT&T/Sprint/T-Mobil
If you get the refurbished iPhone with carrier lock, just unlock the iPhone.
 Best Ways to Save iMovie on Mac
How to save an iMovie? You can learn how to save iMovie project in this post.
 Efficient Ways to Fix Broken Screen for your iPhone
The refurbished iPhone suffers from a fragile screen?
