Music is beautiful in life. A favorite ringtone for your iPhone can bring you happiness. However, Apple just offers its users the built-in ringtones, and you have to purchase and download M4R ringtones from iTunes store if you want to set a fresh iPhone ringtone. Otherwise, you could not get free ringtones for your iPhone. And even if pay for it, you may not get your favorite ringtones on iPhone from the store. At this point, you must need to find a way to customize iPhone ringtones according to your need. Exactly, in this article, we will share you two ways to direct you on how to make ringtones for your iPhone.
How to make a song as a ringtone for your iPhone 6? How to convert MP3 to M4R as ringtones for iPhone? In the second method of making iPhone ringtone, we will turn to iPhone Ringtone Maker for help. This ringtone maker for iPhone enables you to change MP3, AAC and more music formats to iPhone M4R ringtones, and then transfer ringtones to iPhone without iTunes. Also, if you want to make ringtones out of music saved on your Windows/Mac computer, and add them to your iPhone directly, this app can help you too. First, you need to download, install and launch this M4R ringtone converter. Then follow the detailed steps,
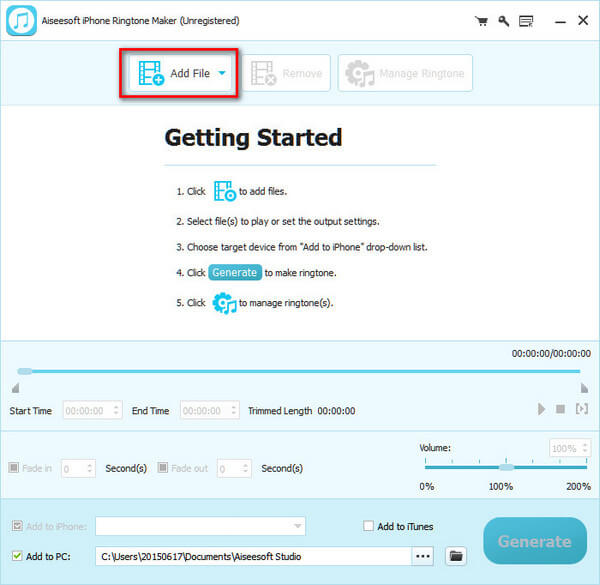
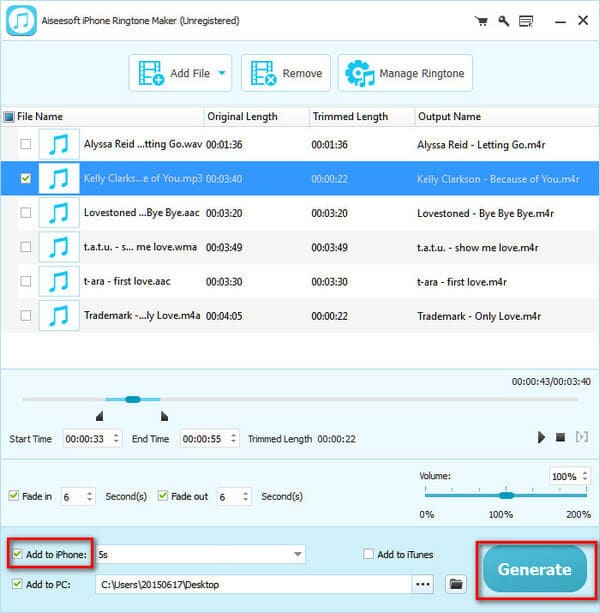
Step 1 Add music files
Launch this ringtone maker, and click Add File to import your favorite songs to this program. You could add the songs in bulk.
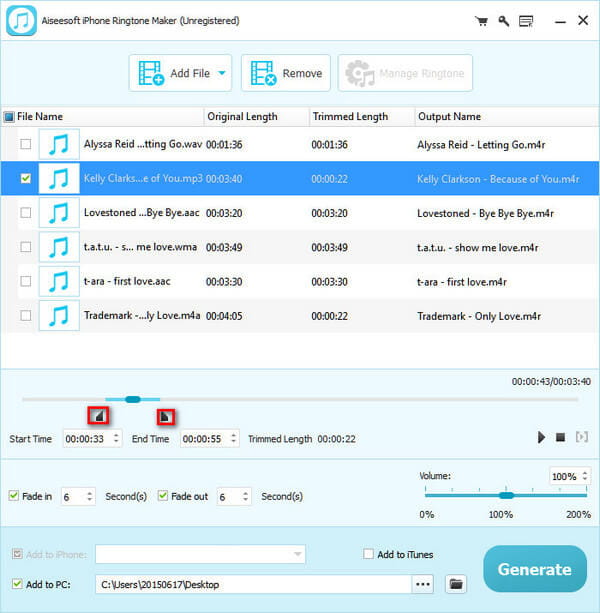
Step 2 Set iPhone ringtones
Drag the arrow to set the start and end time. Also you could input the number for your start and end time. This program enables you to define the audio effects by setting the fade in/out time. After making all the settings, you could click the play button to play your ringtone. You could make multiple songs for the settings one by one.
Step 3 Make a song as an iPhone ringtone
With this MP3 cutter and ringtone maker, you could click Generate on the right bottom to get fresh ringtones for your iPhone. Then you could transfer ringtones to iPhone iPad iPod or other devices for future use.
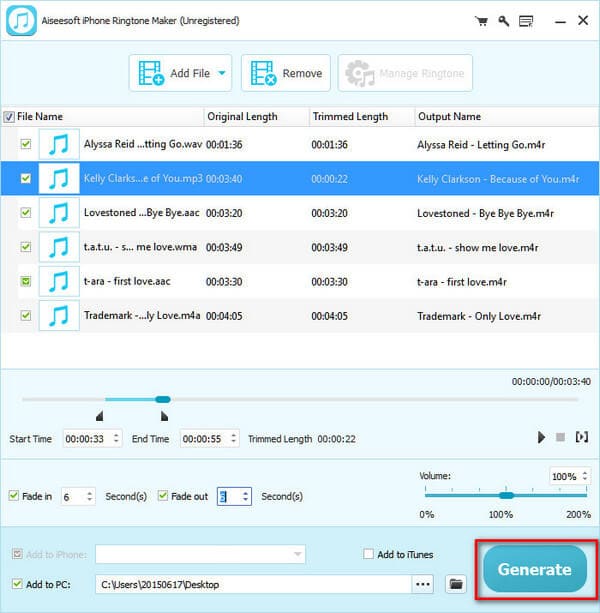
Or you can add your created ringtones to iPhone directly, and you need to do one more step. Connect your iPhone to PC with USB cable, tick Add to iPhone, click Generate to sync ringtones to iPhone. Here if you need, you are able to sync the created ringtones to iTunes when making ringtones.
This way of making your own iPhone ringtones is easier than the first method. This ringtone App for iPhone converts your input MP3, MP2, AAC, AC3, WAV, WMA, M4A, RA, OGG, etc. to M4A directly.
When it comes to iTunes, the first thought for users is to sync music to iPhone. Beyond that, it could help you create free ringtones for your iPhone. The steps are as the following,
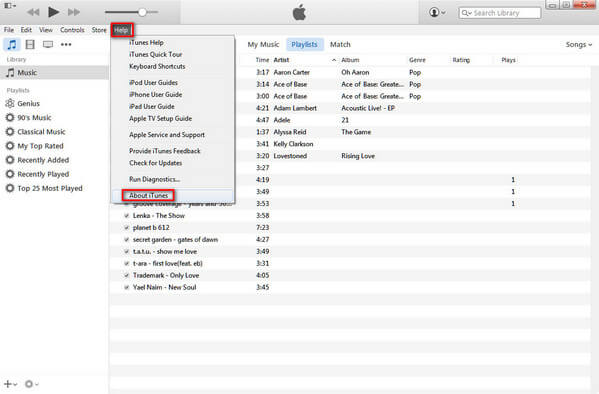
Step 1 Run iTunes on PC computer
Run iTunes on your PC or Mac, you must confirm that your iTunes version is 12.0 or later before you continue the next steps. Click Help > About iTunes to check your iTunes version. If it is not the latest version, then upgrade iTunes.
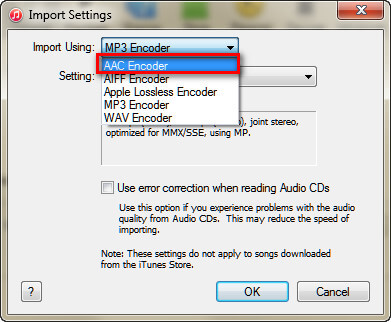
Step 2 Set AAC Encoder
Click Preferences from the drop-down of the icon in the upper left corner. Click General > Import Settings > Import Using > AAC Encoder.
iTunes supports AAC, AIFF, MP3, WAV, and Apple Lossless Encoder (M4A). However, iPhone only allows you to add M4R ringtones. So no matter what favorite ringtones you set for your iPhone, you have to convert your MP3, WAV, etc. ringtones to M4R ringtones at first. For continuing the next steps, you need to set your iTunes to support creating AAC Encoder.
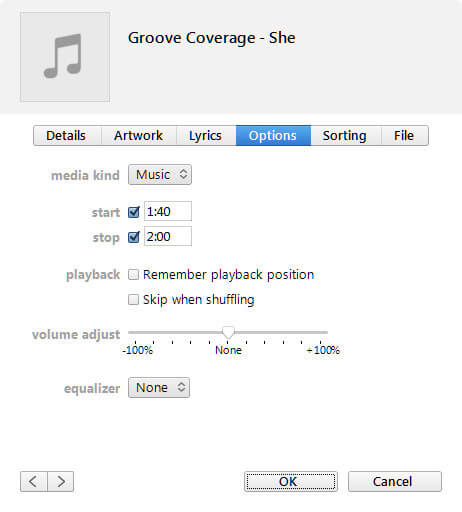
Step 3 Clip favorite ringtone song
Back to main interface of iTunes, click Music to find the song that you want to set ringtone for your iPhone. Right click the song -> Get Info. Set the starting and stopping time for your ringtone by clicking Options in the drop-up. Click OK to save the changes. (Note that iPhone ringtones keep no longer than 40 seconds, and you must clip the time length less than 40 seconds.)
Step 4 Change M4A to M4R
In the main interface, right click the chosen song again, and select Create AAC Version. Wait a second; a copy of the clip will appear beneath the original song in your iTunes interface directly. Drag this copied ringtone to your desk or other place where you want to save it on your PC. Then, in the interface of iTunes, right click the ringtone -> Delete File. Then, Navigate to your dragged ringtone, you will find it saves in the extension of ".m4a". Right click the ringtone -> Rename to change the ringtone file from M4A to M4R.

Step 5 Put ringtone on iPhone
Drag this M4R ringtone into iTunes source column. And the M4R ringtone will be added to the ringtones folder in iTunes automatically. Connect iPhone to PC, and wait minutes to find your iPhone in iTunes. Click the iPhone icon > Tones. In the bottom right corner, click Sync to add your cool ringtone to your iPhone from iTunes. Later, you could set your favorite ringtone for your Reminder alerts, Facebook Post, text, call, etc. on iPhone.

Compared with downloading paid ringtones on iPhone, this way to make free iPhone ringtones is a little complicated. If one step is misunderstood, you have to restart to make your ringtone again.
After you making the rigntones for iPhone, you can use iTunes to transfer ringotnes to iPhone.
Now set your favorite songs as iPhone ringtones by yourself, and even if you want to change one ringtone on iPhone every day, you can make it by yourself easily and freely.

May 25, 2018 16:00 / Updated by Louisa White to Transfer iOS Data
 How to Customize Ringtones for Android
Want to make ringtones for Android with songs? This post will show you how to make ringtones for android phone.
 Two Ways to Sync Ringtones to iPhone
This post introduces to you 10 best free ringtone apps for Android/iPhone including Myxer, Zedge and other ringtones app.
 3 Simple Ways to Convert MXF to MP3 [Free & Professional]
How to convert MXF to MP3 free? Is there any simple and free way to convert MXF to MP3 with high audio quality? This post shows 3 MXF to MP3 converters including 2 free ones to help you easily make the MXF to MP3 conversion.
 How Do You Backup iPhone? Best Ways Here
How to backup iPhone X/8/7/6/5/4 securely? This article introduces three methods for you to backup iPhone.
 3 Ways to Recover Data from iPhone With or Without Backup
How do you recover permanently deleted files on your iPhone? Can I recover data from a broken iPhone without a backup? Learn 3 ways to restore your iPhone data.
 2018 Best iPhone Apps & Troubleshooting
Check best iPhone apps of 2018 by popular categories (music, photo, video, social networking, etc.) as well as iPhone app troubleshooting tips.
