Your iPhone or Android phone should be water-resistant. That helps prevent accidents, such as when your phone slips out of your hand and drops into water. When you pull it out, it should work normally. All you need to do is wipe up the surface water on the device. However, in some cases, your phone’s screen goes black immediately.
How to fix a water-damaged phone?
You might have heard a dozen different fixes for the situation. For example, some guides advise you to bury it in rice or blast it with a hair dryer. If you are not sure which one works, you are in the right place. This guide walks you through what to do immediately, what to avoid, and what to try if the phone still won’t boot after all steps.
There are also some things you should not do. For instance, you should not charge the phone, use it, or press buttons repeatedly. Also, you don’t need to put a water-damaged phone in rice. For a long time, you were told to do that. The truth is, rice won’t help with a water-damaged phone.
Once you’ve powered the phone off (or it already blacked out) and removed what you can, the next step is to dry it. As mentioned, you don’t need to bury it in rice. Also, don’t blast it with heat or shake it around. Instead, let it dry naturally.
- When you dry a wet phone with a soft cloth, pay attention to the charging port, speakers, and SIM card slot. You can gently tilt your phone to let pooled water drain out of the ports. As mentioned, do not shake it vigorously.
- To quickly dry a water-damaged phone, turn to silica gel packets. You can find those little desiccant packets in your shoeboxes and some electronics packaging. Collect as many as possible, then put them and your phone in a sealed container. Compared to rice, silica gel absorbs moisture far more effectively. If possible, leave them in there for at least 48 hours.
- Even though air drying is not advised, you can use a vacuum cleaner on a low setting to gently dry a wet phone. Use it carefully, and avoid creating suction to damage internal components.
After 48 hours, the water-damaged phone should be properly dried. You can then press the Power button to turn it on. What if the phone won’t turn on? Or worse, it boots loops, showing the Samsung logo or Apple logo repeatedly and won’t reach the home screen. This section tells you what to do if your phone won’t turn on.
Ensure your water-damaged phone is completely dry. After that, connect it to a charger and leave it for at least 20 minutes. When your phone has enough power, it may boot automatically.
Make sure you are using a compatible charger. If the phone vibrates or shows any sign of life (like the device logo) during charging, you are in a much better position than you might think.
If your phone still won’t boot normally after charging, the issue may be software-related, especially when you see boot loops or frozen logos.
In that case, try putting it into Recovery mode or DFU mode to fix it. In Recovery/DFU mode, you can restore the operating system or reinstall the firmware.
You need to use the related button combinations to boot into Android Recovery mode or iPhone Recovery mode. If your phone can enter Recovery mode or DFU mode, that means the core hardware is still communicating with the system.
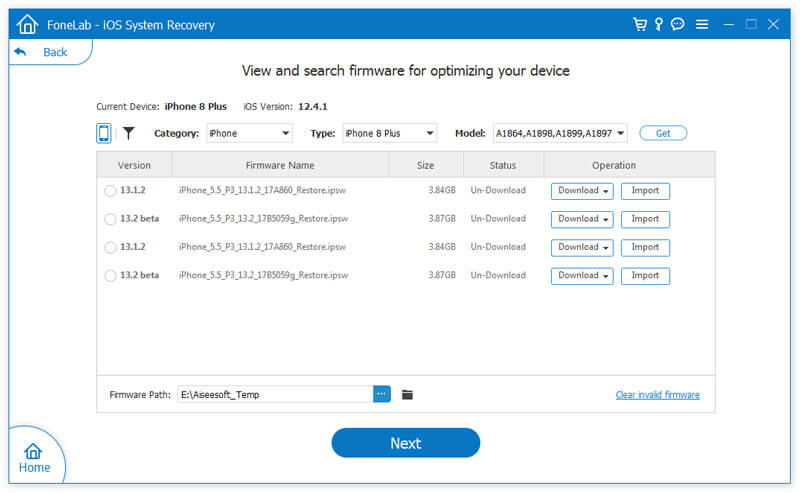
For iPhone users who deal with a boot loop or stuck Apple logo after water exposure, Aiseesoft FoneLab is a tool worth trying. It is designed to fix iOS system issues without necessarily erasing your data. More importantly, it specifically supports water-damaged iOS devices stuck in Recovery mode or DFU mode.
 100% Secure. No Ads.
The software offers two modes: Standard Mode to fix the iOS system while keeping your data, and Advanced Mode for a deeper repair that erases everything. Start with the Standard Mode to fix a water-damaged phone.
The internet is full of bad or improper advice about wet phones, and some of it can turn a recoverable situation into a permanent loss. This part would like to discuss and clear up the biggest offenders.
Rice. This is the most persistent myth, and it is simply wrong. Apple’s official support documentation explicitly advises against putting a wet iPhone in rice because small particles can enter the device and cause further damage.
Hair dryers. Heat is the big enemy of electronics. A hair dryer on a high setting can easily warp internal components, melt adhesives, and may push moisture further into the device. Even on a low setting, the airflow will force water into places it hadn’t reached yet.
Direct sunlight. Leaving the wet phone on a sunny windowsill might seem harmless, but prolonged UV exposure and heat may easily damage the screen and battery.
Pressing buttons. Every time you press buttons on a water-damaged phone, you risk sending current through water that’s bridging connections inside. If the phone is off, leave it off. If it’s on but malfunctioning, force it off and stop using it.
Question 1. Can I recover data from a water-damaged phone that won’t turn on?
Yes, in many cases. If you store or back up important files on a microSD card, you can easily restore them from there, even if the phone is completely dead. Moreover, some recovery specialists can scan and retrieve files directly from the storage chip. If you have a backup, the recovery process is much simpler. You can easily restore it to a new phone. Without a backup, if your computer can recognize the wet phone, use a professional recovery tool like FoneLab Android Data Recovery or iPhone Data Recovery.
Question 2. How long should I wait before trying to turn on my phone?
At least 48 hours. Some guides say 24 hours, but water trapped deep inside can take longer to evaporate.
Question 3. My phone is water-resistant. Do I still need to worry?
Almost all modern smartphones are water-resistant. However, water-resistant doesn’t mean waterproof. For instance, with an IP68 rating, your phone can survive 30 minutes at 1.5 meters of fresh water. However, seawater, pool water, and soapy water are all more damaging than fresh water. Your water-resistant phone may still be damaged.
Conclusion
This guide shares several useful tips to fix a water-damaged phone. A wet phone is stressful, but it can often be rescued, especially if you act fast and avoid the common mistakes. Read these tips carefully and take the necessary steps immediately. If your device is completely damaged, use a trustworthy recovery tool to rescue your data.
 iPhone Charging Slowly: Tips to Solve Device Charging Issues
Your iPhone is not charging; what can be done to fix it? Before you let professionals look at the device, here are a few solutions you should try first.
 Deal with Broken Android Phone: Best Ways to Fix and Save Your Data
The cell phone is at a high risk of damage. If you accidentally break it, this post will offer the best ways to help you fix it and maximize data protection.
 Learn 5 Methods to Fix Your Damaged or Corrupted SD Card
Can I fix a corrupted SD card on my Samsung Android phone without a card reader? You can learn five helpful ways to fix broken, corrupted, or damaged SD cards.
 Leave your comment and join our discussion
Fix your iOS system to normal in various issues like being stuck in DFU mode, recovery mode, headphone mode, Apple logo, etc. to normal without any data loss.
100% Secure. No Ads.
100% Secure. No Ads.

*Required field
*Please enter a valid email