Summary: Want to know how to transfer voice memos from iPhone to computer? This post is going to give you 3 simple & quick methods to copy voice memos from iPhone to PC computer.
Have you ever used Voice Memos app on your iPhone? I know that some of you may regard Voice Memos as a very impractical tool or even never opened it before, but it is actually a very convenient feature that allows you to record audio notes anytime and share some personal audio messages in seconds. The process of recording a voice memo is very simple, and there are several methods you can use to transfer voice memos from iPhone to computer for a safer storage.
How to transfer voice memos from iPhone to computer?
In the following guide, I am going to show you how to transfer voice memos from iPhone to computer via emails, iTunes or a professional iPhone Transfer tool.
Transferring voice memos from iPhone to PC via email would probably be the easiest method. But the problem is that you can only send one memo at a time. If you only want to send a small size of voice memo, you can simply repeat the steps below several times.
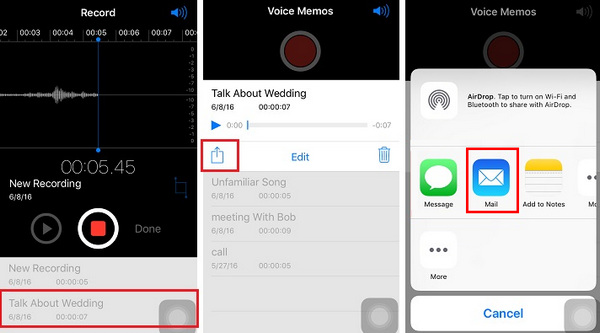
Step 1Open the Voice Memo app on your iPhone, select the voice memo file you want to transfer to your computer.
Step 2Tap the Share icon. Under the share windows, select Mail to send voice memo as an attachment.
Step 3Type the email address and other info, then hit Send button.
Step 4Open the recipient email on your PC, then you can download the voice memo attachment.
Transfer voice memos from iPhone to computer via email
As we all know, Apple has many limitations and can't support most media files like music, videos to transfer from iPhone to iTunes. Luckily, that doesn't include voice memo. Therefore, you can use iTunes to sync voice memos from iPhone to computer. Here are the steps.
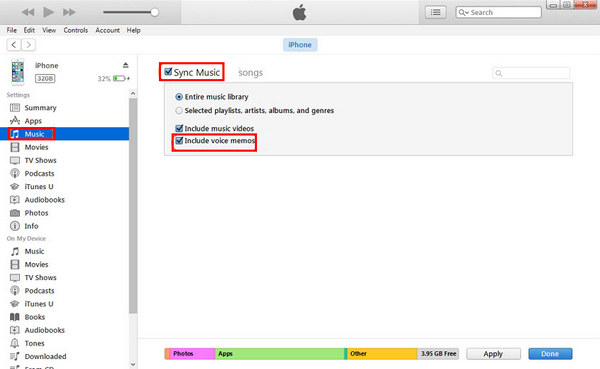
Step 1Download and open the latest version of iTunes. Connect your iPhone to computer via a USB cable.
Step 2After your iPhone is detected automatically, you'll see a device icon appears on the tool bar.
Step 3Click on the device icon, and select Music under Summary panel.
Step 4Check mark Sync Music option and then Include voice memos options. Press Apply button at the bottom.
How to transfer voice memos from iPhone to computer via email
After this, iTunes will sync all the voice memos present within your iPhone. Wait for a few seconds, then you'll see voice memos transferred in the Music list. You can access the actual audio file simply by right-clicking on the memo, you can also drag and drop them to your computer's desktop, put them in folders or share them as you want.
Want to transfer voice memos from iPhone to computer without iTunes? You can also get help from a third-party iPhone Transfer tool, it is actually easier and quicker than iTunes. Here we would like to recommend you the professional iPhone transfer program called FoneTrans, which only costs you several clicks to transfer iPhone voice memos to computer. More features are listed as below:
1. Export 20 + types of iPhone data from iPhone to PC, including voice memos, voicemail, music, photos, text messages, contacts, notes etc.
2. Transfer voice memos from iPhone to computer, from computer to iPhone, or from iPhone to iPhone.
3. Preview and download voice memos selectively.
4. Fully compatible with iPhone X/8/7/6/5/4, works on both Windows PC and Mac.
Now free download this iPhone transfer tool, and follow the simple steps below to transfer voice memos from iPhone to PC or Mac (Here we will take Windows version as an example).
Step 1Open iOS Transfer tool
Install and run FoneTrans on computer, connect your iPhone to computer via USB cable. Wait until your iPhone is recognized automatically.
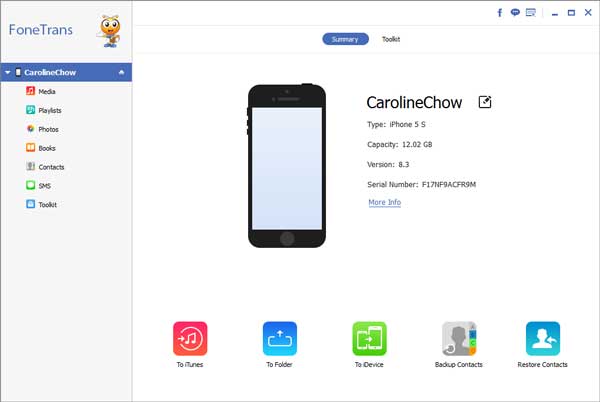
How to transfer voice memos from iPhone X/8/7/6/5/4 to computer - Step 1
Step 2View voice memos on iPhone
All types of data on iPhone will be listed in categories on the left panel. Choose Media, and then find Voice Memo from the top menu bar. Then you can preview all voice recordings.
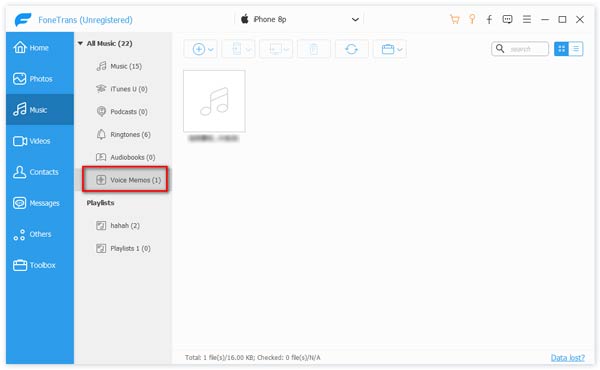
How to download voice memos from iPhone to computer - Step 2
Step 3Transfer voice memos from iPhone to computer
Select the voice memos you want to transfer, then click Export > Export to PC in the menu bar, and choose the destination for your file. When everything is set, click OK button.

How to export voice memos from iPhone to computer - Step 3
Wait for a few seconds, then you can see voice memos downloaded on your computer. FoneTrans could not only support you to transfer voice memos from iPhone to computer, but also transfer other files like music/video/photos/text messages/notes to computer for backup. You should download it and have a try.
In this article, we have mainly showed you three methods to transfer iPhone voice memos to computer. Which one is the best for you? Leave us your comments down below.

June 05, 2018 15:40 / Updated by Louisa White to Transfer iOS Data
 How to Transfer Voice Memos from iPhone to Mac
Want to Transfer Voice Memos from iPhone to Mac? This article show you how to transfer voice memos from iPhone and move them to Mac using voice memo importing app.
 How to Restore Deleted Contacts on Android or iPhone
This article shows you how to restore iPhone contacts from iCloud or restore Android contacts from Gmail or Google.
 How to Backup iPhone with iTunes/iCloud/PC and Restore to New iPhone 8
How to backup iPhone 8/7/6/5/4 securely? This article introduces you three methods you backup and restore iPhone using iTunes, iCloud or PC.
