When I try to take a screenshot, I get a message saying the screenshot can't be saved, because I don't have permission to save files in the location where screen shots are stored. Why is this and how can I fix it?
Generally, taking a screenshot on Mac is easy to realize for its built-in screenshot tool. But still some users may find themselves stuck in the same problem, like we mentioned above, while capturing the screen on Mac. So how can we fix this kind of issue and use the screenshot feature normally on Mac? Keep reading and you'll find the solution.
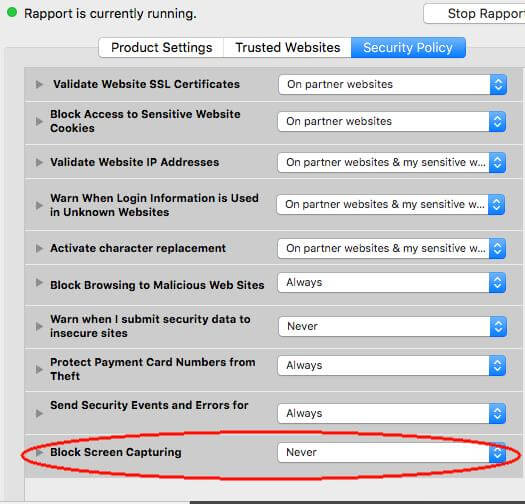
When you open Mozilla Firefox, you find it blocks the screenshot on Mac. Perhaps it has something to do with Trusteer Endpoint Protection (Rapport). If that is installed on your Mac, you should be aware that it has a preference setting that blocks screen shots. So you need to go to Console on Trusteer, and choosing Never for blocking screen capturing.
If you receive a message saying "Your screen shot can't be saved. You do not have permission to save files in the location where screen shots are stored", maybe your destination folder for saving screenshots is locked. You should find your destination folder and right click it. Then choose Get Info and check if the folder is locked in General.
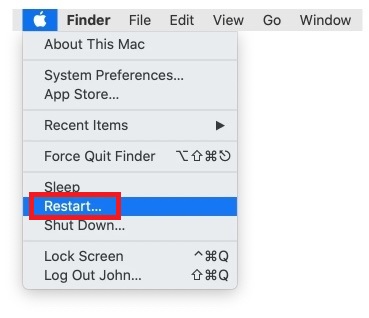
When you continuously use your Mac for a long time, especially when you run too many programs, the efficiency of Mac will be compromised. It may cause some small glitches while you capturing the screen. To solve this issue, you should restart your computer by clicking the Restart button under the Apple menu.
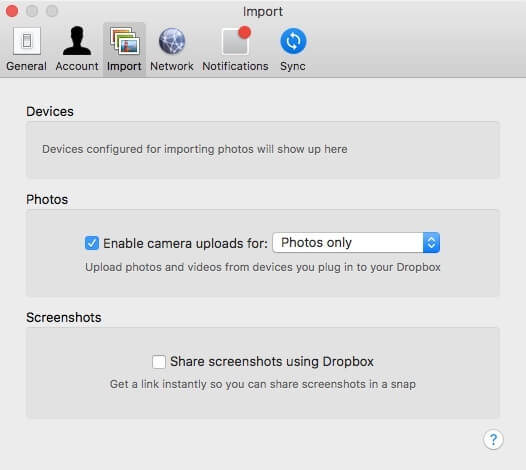
If you have installed Dropbox on your Mac, that may explain why you can't find the screenshots you took anywhere. Because if you enabled "Share screenshots using Dropbox", then your screenshots will be saved to Dropbox automatically instead of the desktop. To fix it, please change your Dropbox settings.
NVRAM, short for Non-Volatile Random Access Memory, is in charge of plenty of important MAC internal settings. Therefore, resetting NVRAM may be the most efficient way to solve all kinds of problems while using Mac, including the problem that screenshot on Mac doesn't work.

Sometimes, screenshot on Mac doesn't work while using some particular versions of macOS. You'd better update your macOS to fix your problem.
If the tips above cannot fix your problem, why not use the powerful and professional Aiseesoft Mac Screen Recorder? Comparing to the built-in screenshot tool on Mac, it is a much more convenient screenshot tool, which can help you take screenshots and save in the format you need, like JPG, PNG or GIF.

Downloads
![]() 100% Secure. No Ads.
100% Secure. No Ads.
![]() 100% Secure. No Ads.
100% Secure. No Ads.


Q1: How can I take a screenshot on my Mac?
If you want to capture the entire screen, press and hold CMD + SHIFT + 3.
 To capture a portion of the screen, press and hold CMD + SHIFT + 4. Then drag the crosshair to select the area of the screen to capture and release your mouse or trackpad button to take the screenshot.
 Open the window or menu that you want to capture. You can press and hold CMD + SHIFT + 4 + Space Bar to capture it.
 To cancel taking the screenshot, press the Esc (Escape) key.
Q2: Where to find the screenshots?
Screenshots will be saved to your desktop by default.
Q3: How can I edit the screenshots on Mac?
If you see a thumbnail in the corner of your screen while using the screenshot tool on Mac, click it to edit the screenshot.
Conclusion
So far, we have shared so many methods to fix the problem of screenshot on Mac not working. Hope you can find the perfect solution. If none of them works, maybe you need to restore your Mac to factory settings.
 2 Ways for You to Record Gameplay on PS 4
In this article, you will know how to record a PS4 gameplay via PS4 itself or our Screen Recorder.
 Top 3 Ways to Fix OBS Black Screen - OBS Display Capture Black Screen
This post shares 3 easy trouble-shootings to help you fix OBS game capture black screen issue.
 10 Best Free Screen Recorder without Watermark
Here we identify and list top 10 free screen recording software with no watermark for Windows 10/8/8.1/7, Mac OS X, iPhone, iPad and Android users to capture their screens.
Screenshot Troubleshooting
Image Capture Cannot Detect iPhone Where is Image Capture on Imac Image Capture not Working Screenshot Cant be Saved Mac where-do-screenshots-go-on-windows Where Are Screenshots Saved on Android
Aiseesoft Screen Recorder is the best screen recording software to capture any activity like online videos, webcam calls, game on Windows/Mac.
![]() 100% Secure. No Ads.
100% Secure. No Ads.
![]() 100% Secure. No Ads.
100% Secure. No Ads.
*Required field
*Please enter a valid email
