iTunes, Apple's official media player and management software, offers a seamless and reliable method to back up your iOS files and settings. This post will walk you through the process of backing up your iPhone to iTunes, providing detailed instructions, highlighting the advantages and disadvantages of the method, and guiding you through the restoration process. Moreover, a great iTunes alternative is introduced to better manage and back up your valuable data.
While the daily usage of your iPhone, it has collected lots of essential data, precious memories, personal information, and customized settings. An iPhone backup ensures that your irreplaceable content keeps safe and secure in the event of device loss, damage, or malfunction. This part will tell the manual steps to back up your iPhone using iTunes.
Before embarking on the backup journey, ensure that you get the latest iTunes installed on your computer and that your iPhone is connected using a USB cable.
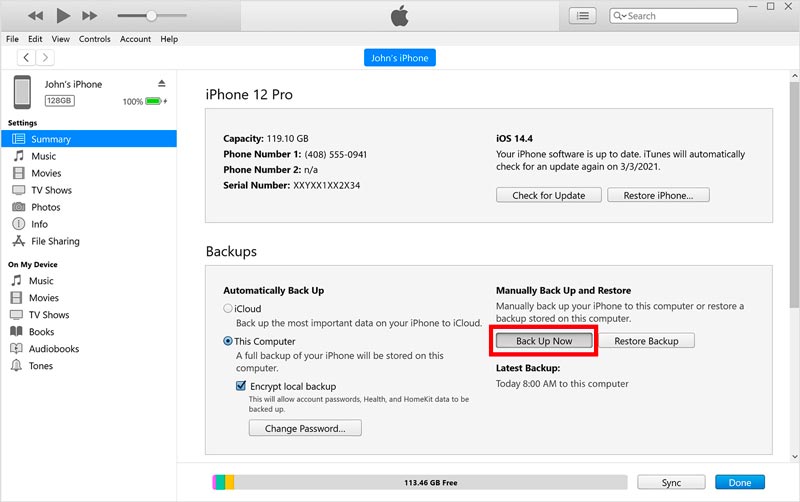
For higher protection, you can choose to encrypt your iTunes backup by ticking the Encrypt local backup checkbox. This option requires you to create a memorable password, which should be stored securely.

iTunes provides a straightforward and user-friendly interface for backing up your iPhone data and settings. It can back up many commonly used iOS files, including your contacts, messages, photos, videos, and app data. Moreover, iTunes allows you to restore your iPhone from a backup at any time.
However, iTunes backups are stored locally on your computer, requiring sufficient storage space. Unlike iCloud backups, iTunes backups require manual initiation. Simultaneous synchronization of multiple devices may lead to conflicts.
Restoring your iPhone from an iTunes backup is a simple way that allows you to retrieve your data if your device is lost, damaged, or undergoes a factory reset. When your iPhone encounters any issues, or you wish to restore it to a previous state, iTunes can help you recover your data with ease.
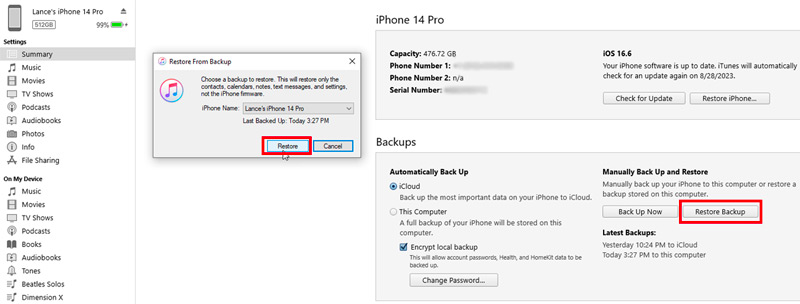
The restore process may take some time, depending on the amount of data being restored. Observe the progress bar to track the completion of the restoration.
Aiseesoft FoneTrans is an easy-to-use iOS data management tool that offers many necessary features. It enables you to back up, restore, transfer, and manage various types of iOS data, including contacts, messages, photos, videos, music, and more. FoneTrans is compatible with both Windows and macOS computers, making it a good option for users of different platforms.

Downloads
FoneTrans - Best iTunes Alternative to Backup iPhone
![]() 100% Secure. No Ads.
100% Secure. No Ads.
![]() 100% Secure. No Ads.
100% Secure. No Ads.
Unlike iTunes, which performs a full backup of your iPhone, FoneTrans allows you to selectively back up and restore specific files, such as photos, contacts, messages, music, videos, and more. That saves storage space and allows you to restore only the data you need.

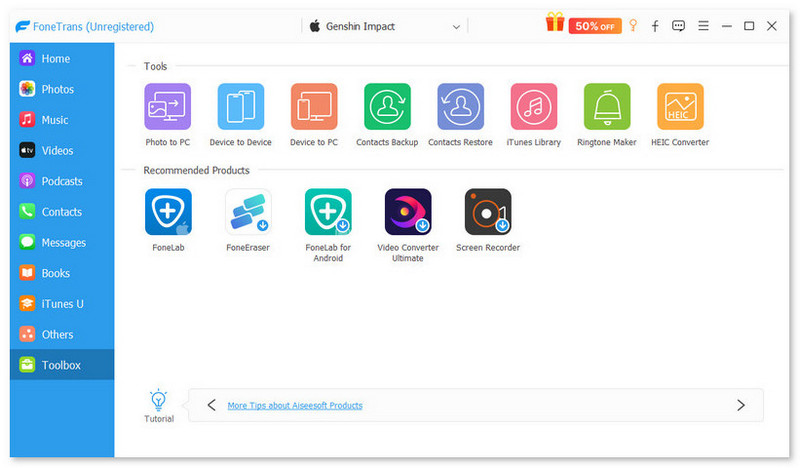
Open FoneTrans and connect your iPhone to it. Once detected, its main interface will display your iPhone's information and various data types. Click the specific data type on the left and select the files you would like to back up. It lets you easily back up iPhone data to your computer or iTunes.
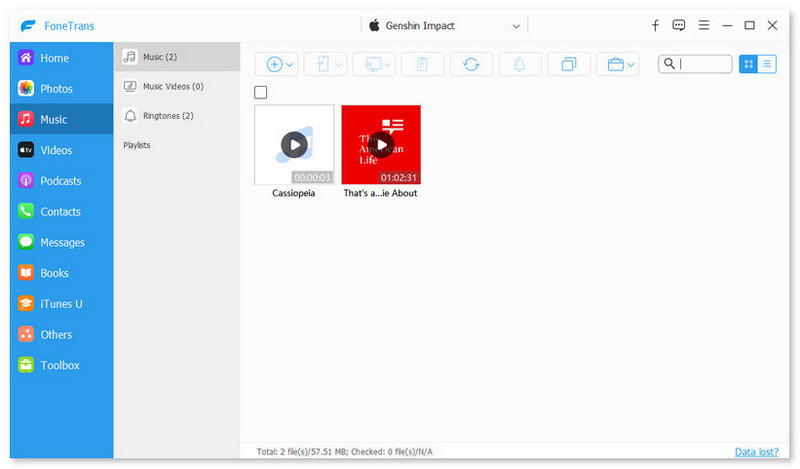
FoneTrans offers several additional features in its Toolbox, such as Contacts Backup, iTunes Library, Ringtone Maker, HEIC Converter, iOS System Recovery, and more.
Does iTunes backup videos from iPhone?
Yes, iTunes does back up videos from iPhone. By default, iTunes backs up all the data on your iPhone, including videos. However, you can also choose to selectively back up only the videos you want to keep.
Will the video quality drop in iTunes after backing up?
Backing up your videos to iTunes will not affect their quality. The videos will be stored in their original format and resolution, and they will play back just as they did before you backed them up. That is because iTunes simply makes a copy of your videos and stores them on your computer. It does not compress or re-encode the videos in any way.
Can you convert incompatible backups to iTunes?
No, iTunes cannot convert incompatible backups. If you try to restore an incompatible backup to your iPhone or iPad, you will see an error message that says the backup is incompatible with this device. Because the backup may have been created for a different device or a different version of iOS.
If you need to restore your iPhone or iPad from a backup, you will need to use a compatible backup. You can try to find a backup that was created for your current device, and that is compatible with the version of iOS that you are using.
Conclusion
You can back up an iPhone to iTunes to safeguard all valuable iOS data. Following the instructions provided, you can easily create an iTunes backup of your iPhone and restore it whenever necessary. While iTunes offers a reliable and user-friendly backup solution, it's essential to acknowledge its limitations, such as the reliance on local storage and the potential for synchronization conflicts. Consider these factors when choosing between iTunes and iOS data transfer tools like FoneTrans.
 Complete Guide: How to Restore iPhone/iPad with iTunes & Alternative
Learn how to restore your iPhone or iPad with iTunes and the best alternative on the market. Instructions and additional information are added on backup up on iTunes.
 Backup iPad to iCloud, MacBook, iTunes, and External Drive
Can you backup your iPad to an external hard drive? Can I backup my iPad without iCloud? Learn to backup iPad to iCloud, MacBook, iTunes, or external drive.
 A Single Article to Help You Completely Understand iCloud Backup
Here is a comprehensive guide about iCloud backup for iPhone and iPad users to view, manage, delete, and download your data in your iCloud backups.
Backup iPhone
1.2 How to backup iPhone to iCloud
1.3 How to backup iPhone to iTunes
1.4 How to backup iPhone to computer
1.5 How to backup iPhone to Mac
1.6 Backup iPhone to external hard drive
1.10 iPhone won't backup
The best iOS Transfer software to manage and transfer iOS files from iPhone/iPad/iPod to your computer or reversely without running iTunes.
![]() 100% Secure. No Ads.
100% Secure. No Ads.
![]() 100% Secure. No Ads.
100% Secure. No Ads.
*Required field
*Please enter a valid email
