It’s necessary to back up all the valuable iOS data on your iPhone.
Backing up an iPhone is crucial to protect important files in case the device is lost, stolen, or damaged. Moreover, when you switch to a new iPhone, you can handily restore previous data and settings from a suitable backup. That helps to set up the new device quickly and guarantees a smooth user experience. This article gives you a comprehensive guide on how to backup iPhone with iCloud. You can keep reading and follow the guide below to easily back up all your iPhone data.
Most iOS users don’t like to back up their iPhones with iTunes. Backing up iPhone data using iTunes requires manual initiation and connection to a computer. What’s worse, these backup files are tied to a specific computer. You can’t access iTunes Backup on another device. Moreover, these backup files may save a lot of space on your computer.
Compared to iTunes, iCloud offers a more convenient and accessible way to back up all types of iOS data. It can seamlessly integrate with your other Apple services. In that case, you can handily access your iCloud backups from any device linked to the same Apple ID. Moreover, you can set your iPhone to create iCloud backups automatically. That ensures you have a recent backup to restore various iOS files and settings.
iCloud is a security measure for data backup and restore. Apple brings encryption and two-factor authentication to protect your iCloud data. In addition, you can select from various iCloud storage plans based on your specific needs.
iCloud offers a straightforward way to wirelessly back up various data on your iPhone, iPad, and Mac. It lets you back up the most commonly used files, including photos, contacts, videos, call logs, messages, app data, and settings. As mentioned above, iCloud backup is a simple way to ensure your data is safe and accessible. You can follow the steps below to backup your iPhone to iCloud.
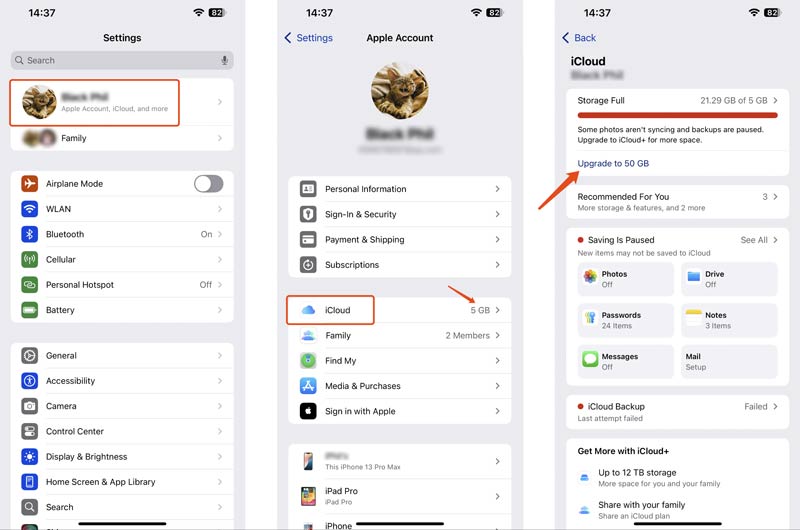
Before creating a new iCloud backup of your iPhone, you should check and ensure you have enough storage available for the backup. Otherwise, you will need to purchase additional iCloud storage.
Open the Settings app, tap your iCloud account name, and then go to iCloud to check details. If you don’t have enough space, you will see a prompt saying that the last iCloud backup attempt failed.
To ensure a fast iCloud backup speed, you’d better connect your iPhone to a good and stable Wi-Fi network. Choose iCloud in the main Apple Account interface. Tap iCloud Backup and then choose Back Up Now to start backing up your iPhone to iCloud immediately.
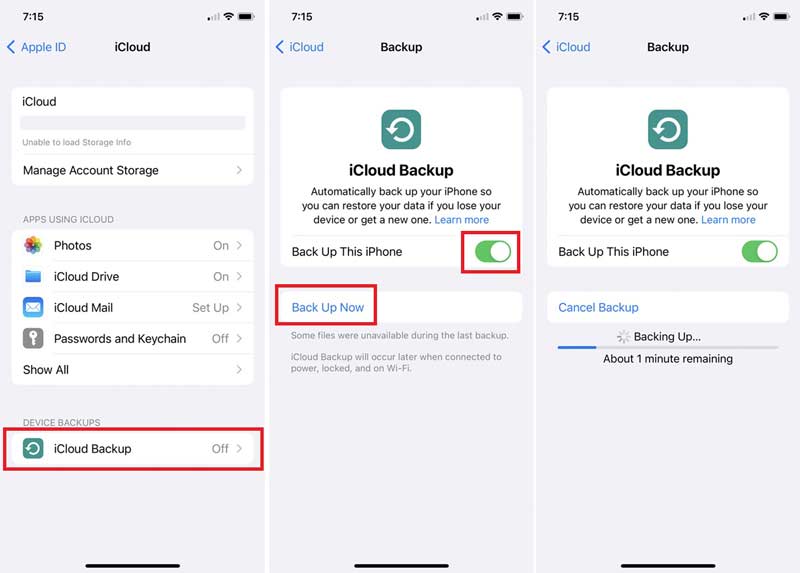
You are allowed to set up your iPhone automatically with iCloud. Ensure Back Up This iPhone is turned on. If your iPhone doesn’t have enough iCloud storage space, you will see a failed iCloud backup alert. You can follow the onscreen steps to upgrade to a higher plan with more iCloud storage. You should often check the details of your iCloud backup to guarantee that all the essential iOS data is backed up.
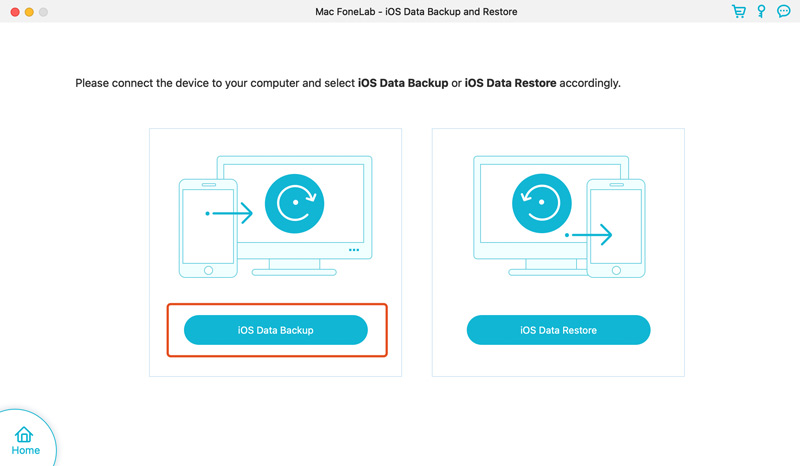
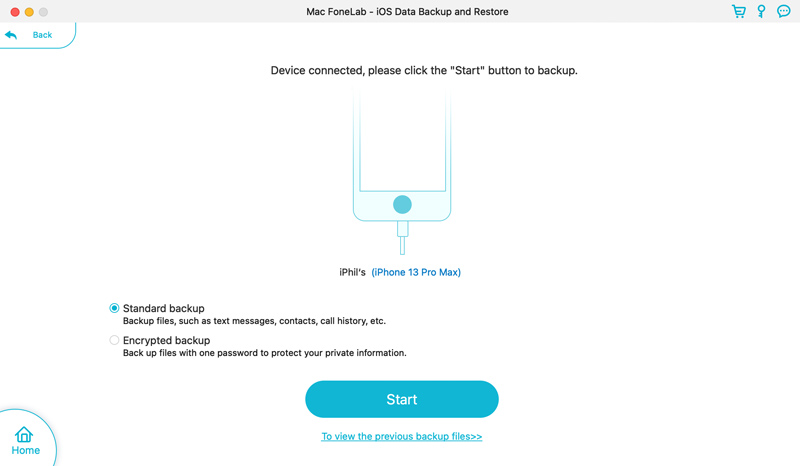
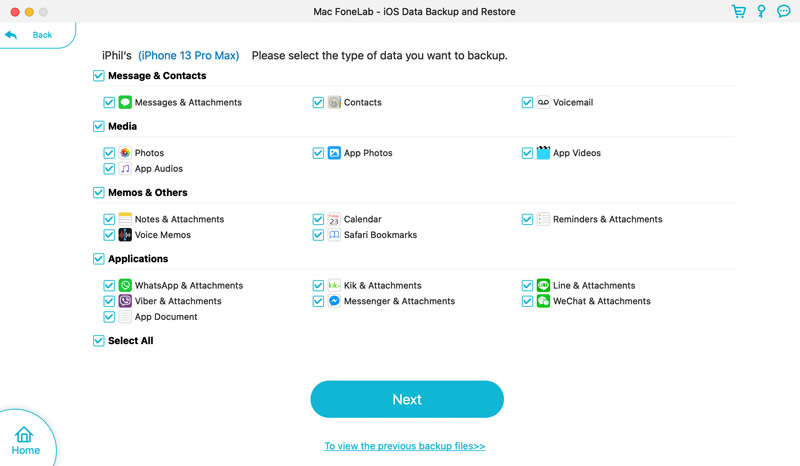
iCloud offers a convenient way to back up all iOS data on your iPhone. It comes with 5GB of free storage, which can be limited. If you have many files gathered on your iOS device, especially for many photos and videos, you must upgrade to a paid plan to get more iCloud storage. If you prefer to back up your iPhone data on a computer, you can use the popular iOS Data Backup & Restore. It gives you more control over the backup process and the specific data types you want to back up. More importantly, it allows you to open the backup file and check the details of your iPhone data.

Downloads
![]() 100% Secure. No Ads.
100% Secure. No Ads.
![]() 100% Secure. No Ads.
100% Secure. No Ads.
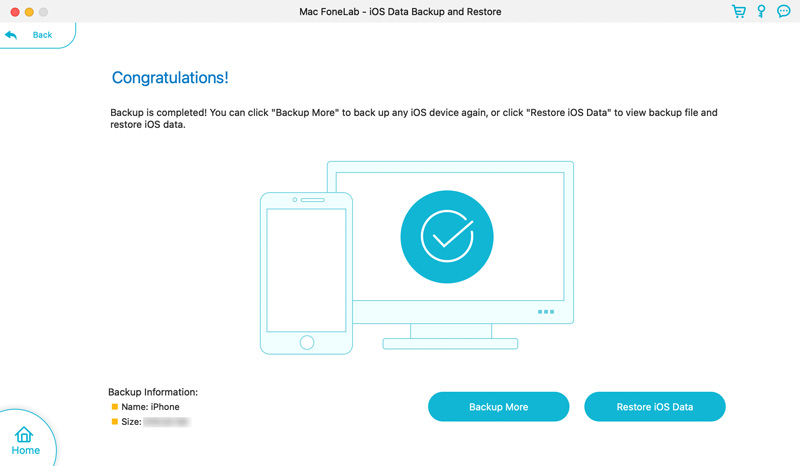
As mentioned above, you can check and manage all iOS data you have backed up. Back to the home window of iOS Data Backup & Restore and choose the iOS Data Restore function. All the backups you ever made will be listed. Click to highlight the target backup and then click View Now.
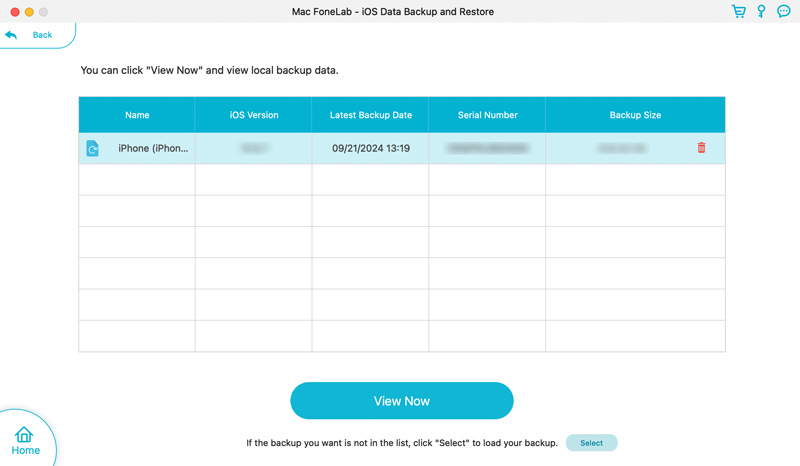
Select the specific data type on the left and then view details on the right. Based on your needs, you can restore your selected data to an iOS device or a PC. Better than iCloud, Finder, and iTunes backup solutions, it enables you to check iPhone data directly from a backup file. That can be quite helpful, especially when you only need to recover several small files, such as important phone calls, contacts, notes, reminders, or voice memos.

You may fail to back up your iPhone with iCloud for various reasons. The most common cause is insufficient iCloud storage. Your iPhone won’t be able to back up when the storage is whole. Also, a weak or unstable connection may cause your iPhone to fail to create an iCloud backup. Moreover, incorrect backup settings, system glitches, two-factor authentication issues, content restrictions, and other reasons may prevent your iPhone from backing up data with iCloud.
When you face the iPhone won’t back up to the iCloud issue, you should first check the available iCloud storage and ensure enough space is available. Then, test the Wi-Fi network your iPhone is currently connected to. You can switch to a different network to see if the iCloud backup can be created typically. Sometimes, when your iPhone fails to make a backup with iCloud, you can choose to reset all settings.

If your iPhone still can’t create an iCloud backup, restart the device and try again. Moreover, ensure your iPhone is running the latest iOS version. iCloud backups fail; try backing up your iPhone using the introduced iOS Data Backup & Restore above.
Does iCloud backup include all iPhone data?
No, not all iOS data will be backed up to iCloud. iCloud will back up all the photos and videos you captured in the Photos app. It will also back up your messages, contacts, notes, passcodes, most app data, and various device settings.
How long does an iPhone iCloud backup take?
Various factors will affect the iCloud backup speed on an iPhone. First, a faster Wi-Fi network connection will lead to a quicker iCloud backup. Also, the more iPhone data you set to back up, the longer the backup will take. Moreover, the time it takes for an iPhone iCloud backup to complete may vary on different models. Generally, older iPhones will take longer to back up. Sometimes, the available iCloud storage space will affect the final backup time. To speed up the iCloud backup process, plug your iPhone into a power source and close all the unnecessary apps.
How to backup iPhone contacts to iCloud?
You should enable the iCloud auto-backup feature to ensure all your iPhone contacts are backed up to iCloud. Go to the Settings app, tap the Apple account name, and then choose the iCloud option. Tap iCloud Backup and turn on Back Up This iPhone. When you enter the main interface of iCloud, you can tap See All to manage how apps and features on this iPhone sync with iCloud. Please scroll down to find the Contacts option and enable it. That lets iCloud back up all contacts on your iPhone.
Can I backup my iPhone from iCloud on a PC?
No, you are not allowed to cannot directly back up your iPhone from iCloud on a PC. iCloud is designed to back up and sync iOS data between Apple devices. When creating a backup of your iPhone data on a computer, you can rely on iTunes, Finder, or the introduced iOS Data Backup & Restore.
Can I backup my iPhone data to iCloud and restore it to my new iPhone?
Yes, iCloud offers a simple way to restore iPhone data from a backup file to the new device. You'd better create a new backup to ensure all the valuable files and settings are synced to the latest iPhone. Once the backup is created, you can set up your new iPhone and choose Restore from the iCloud Backup. Sign in to the same Apple account and select the backup you want to restore.
Conclusion
Compared to iTunes and Finder, iCloud offers a more convenient way to back up all iOS data on your iPhone and iPad. Moreover, these iOS files and settings can be easily accessible from your other Apple devices. This article gives you a step-by-step guide to backup your iPhone to iCloud. It would be best if you often created iPhone backups to ensure all necessary contacts, photos, videos, notes, and other data are protected.
 WhatsApp iCloud Backup - How to Backup WhatsApp on iCloud
Why I can't backup my WhatsApp to iCloud? How do I access WhatsApp on iCloud? How to backup WhatsApp on iCloud? This post shares 3 simple ways to create a WhatsApp iCloud backup.
 A Single Article to Help You Completely Understand iCloud Backup
Here is a comprehensive guide about iCloud backup for iPhone and iPad users to view, manage, delete, and download your data in your iCloud backups.
 How Do I Fix iCloud Backup Failed on My iOS Devices
Why won't my iCloud backup when I have enough storage? To help you fix the iCloud backup failed issue, we will analyze all aspects and give you solutions.
iOS Backup Encryption
Bypass Backup Encryption
Bypass iOS Activation Lock
iOS Data Backup
To fix iPhone screen locked, wiping password function can help you a lot. And you also can clear Apple ID or Screen Time password easily.
![]() 100% Secure. No Ads.
100% Secure. No Ads.
![]() 100% Secure. No Ads.
100% Secure. No Ads.
*Required field
*Please enter a valid email
