Aiseesoft iPhone Unlocker
![]() 100% Secure. No Ads.
100% Secure. No Ads.
![]() 100% Secure. No Ads.
100% Secure. No Ads.
Contents
For most users around the world, the iPhone or iPad is elegant and beautiful just as it is. Thousands of apps, movies, and more content are provided to choose on the Apple Store, which is quite enough. However, not all people can stand being limited to Apple-approved apps, and that's when you may consider jailbreaking your iPhone or iPad.
Through jailbreaking, you can bypass the lock put in place by Apple on iPhone/iPad and gain access to other unofficial apps and app marketplaces. However, you can't guarantee that all applications that Apple hasn't authorized are completely safe and clean, so it is a rather risky process. In this article, we will show how to jailbreak iPhone/iPad in detail. Continue to read and learn all about iPhone jailbreak.
Is it safe and legal to jailbreak my iPhone/iPad? Should I jailbreak my iPhone or iPad? Actually, it is legal to jailbreak them. When the iPhone or iPad is completely jailbroken, there are even more things that the user can do than what a less informed person may initially believe, but as we mentioned, it also comes with some potential loss. Check more pros and cons of jailbreaking below.
PROS
CONS
Yes, you can use the iPhone Unlocker to jailbreak the iPhone/iPad that is running iOS 18 or below. Before you start, ensure to review the list of devices that are supported by iPhone Unlocker's jailbreaking feature.
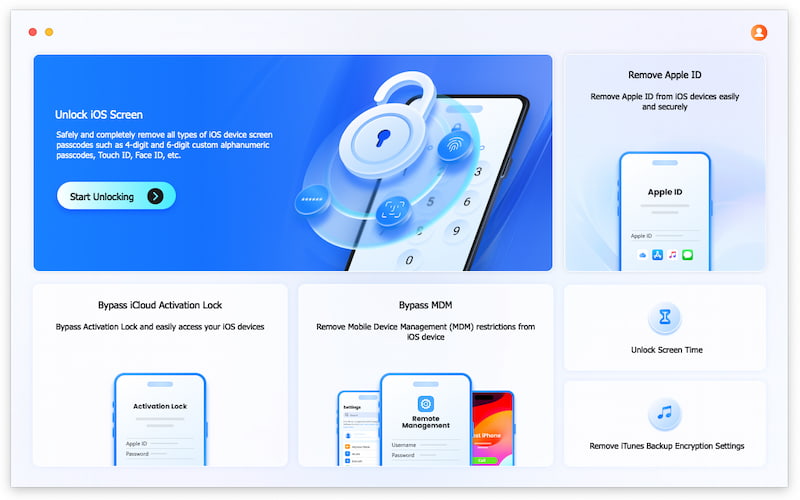
Aiseesoft iPhone Unlocker is an amazing program that can jailbreak from your iPhone/iPad. Perhaps you forgot your passcode, got locked out by trying too many times, or want to bypass Apple ID and Screen Time limits – whatever the reason is, you’re certainly not alone, and that software has your back. Aiseesoft iPhone Unlocker is really easy to use, whether you're a tech expert or completely new to all of that, thanks to its intuitive design and a step-by-step guide to unlock and jailbreak your phone. And it’s loaded with great tech, so you can breathe easy knowing your data is safe whilst you sort everything out. But here’s the thing: can you really jailbreak your device with Aiseesoft iPhone Unlocker? Let’s look at what the software can do and why so many people love it when they want to access more on their iPhones or iPads before we get to that.
![]() 100% Secure. No Ads.
100% Secure. No Ads.
![]() 100% Secure. No Ads.
100% Secure. No Ads.
We recommend using a Mac computer to jailbreak as it is easier to operate and supports a wider range of device models, ranging from iOS 10 to iOS 17. Windows computers only support devices with models from iOS 10 to iOS 14, and the operation is very complex. If you still want to jailbreak on your Windows computer, you can click here to go directly to Part 5
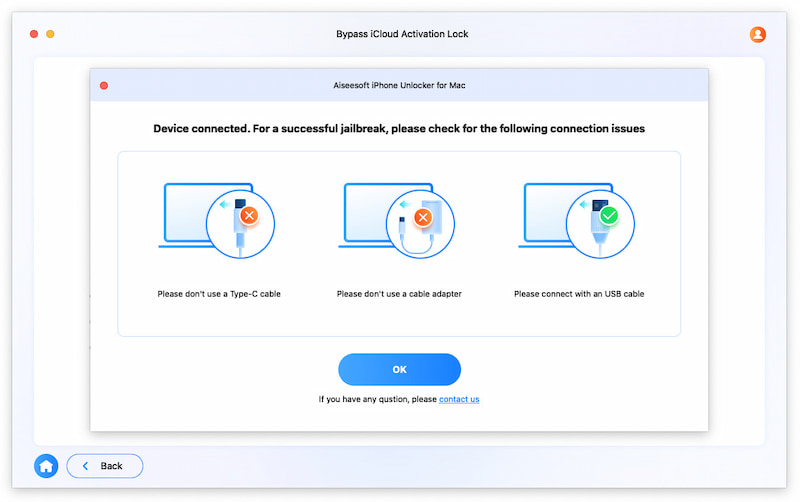
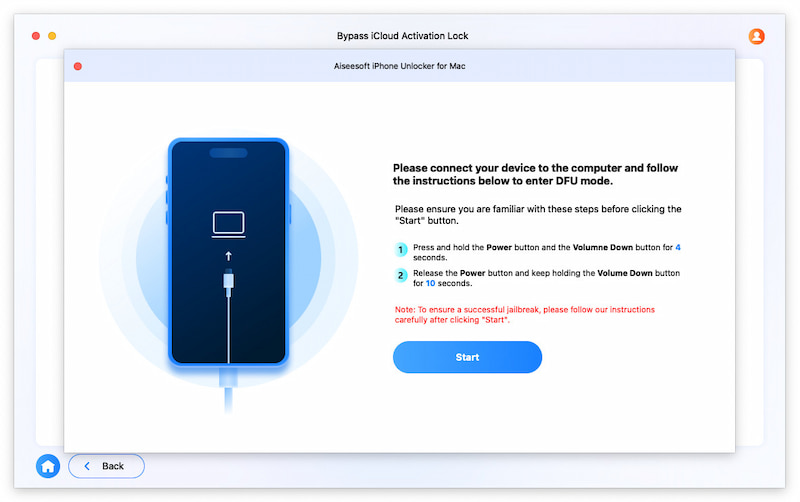
For iOS 15 to iOS 17, Aiseesoft iPhone Unlocker can help you jailbreak with the steps below. (But if you purchased the Windows version of Aiseesoft iPhone Unlocker, but still want to jailbreak your iOS 15 to iOS 17 on a Mac computer because of the difficulty or failure in jailbreaking on Windows, you can go to Part 5 directly.)
![]() 100% Secure. No Ads.
100% Secure. No Ads.
![]() 100% Secure. No Ads.
100% Secure. No Ads.
If the prompt indicates that the device does not match the jailbreak model, please follow the steps in Part 4 to try another method - Checkra1n.
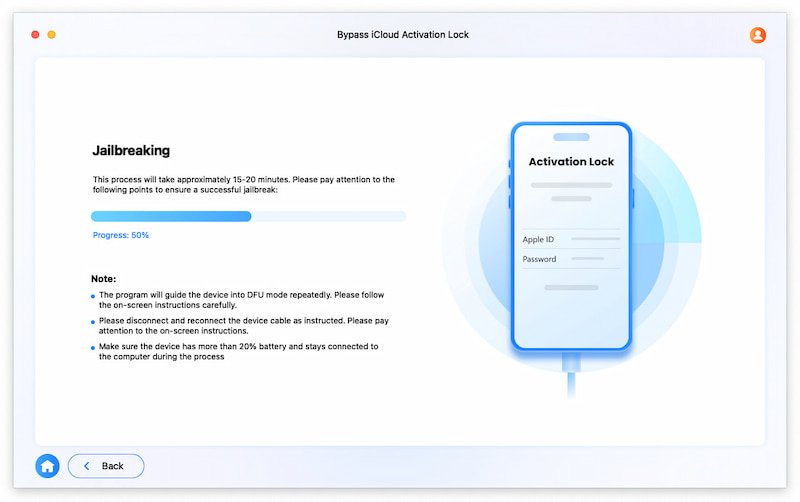
Note: If you cannot jailbreak successfully on the first attempt. Don't lose heart. It is normal due to the difficulty of jailbreaking. The program will let you enter the DFU mode again to deeply analyze your device. Wait patiently for this process.
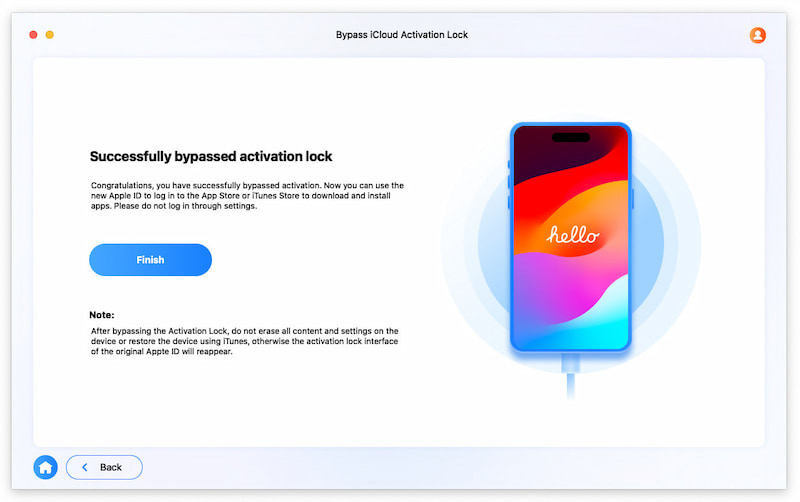
If the second jailbreak is successful, the program will automatically bypass the activation lock and display the Finish interface as mentioned!
Tips: The jailbreak is a very complex process, so your patience is crucial. Just try one more time when you see the picture below. Re-jailbreak means trying again, and Advanced Jailbreak Mode helps you first flash a ROM to your iPhone/iPad, as some settings or programs in your device may prevent jailbreaking, and then retry the jailbreak.

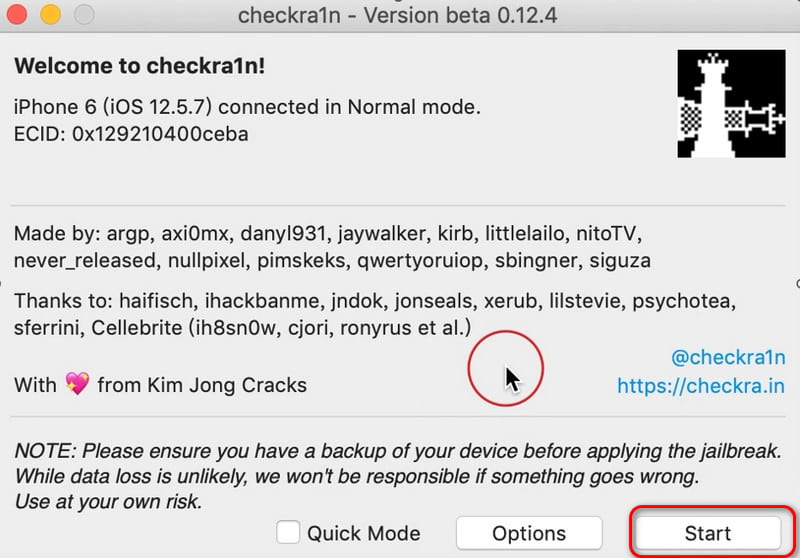
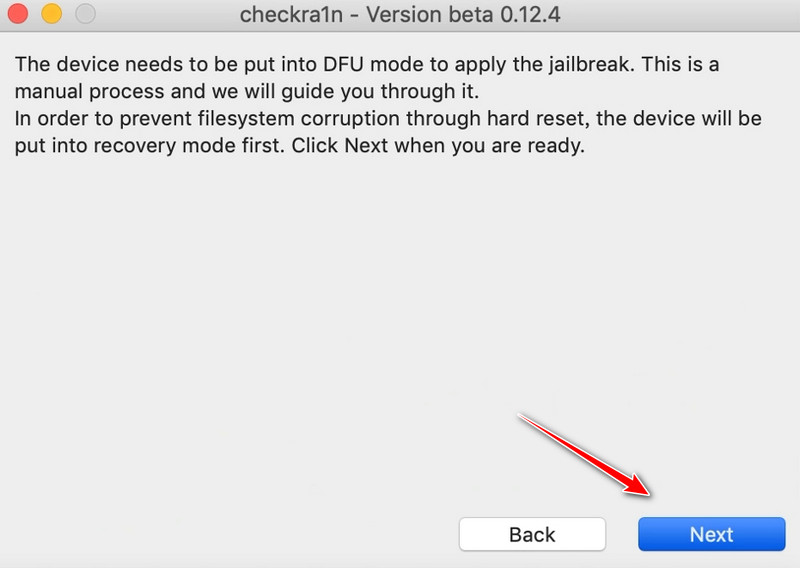
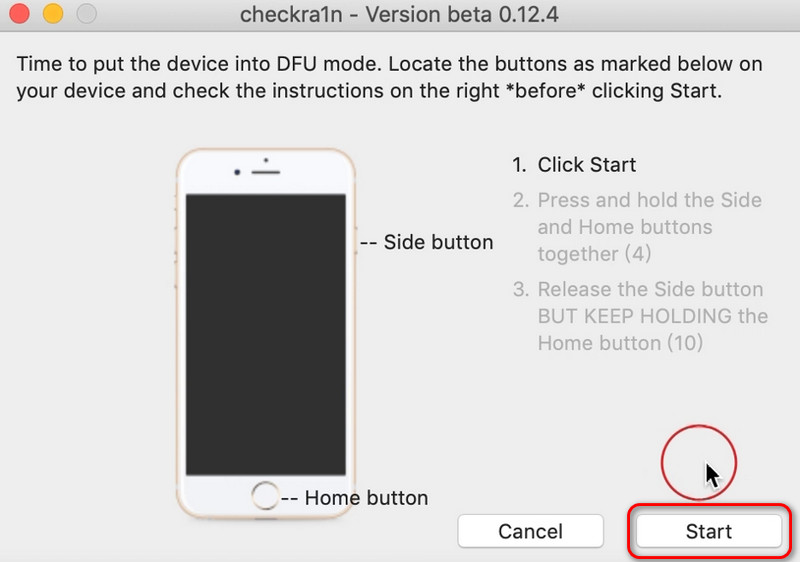
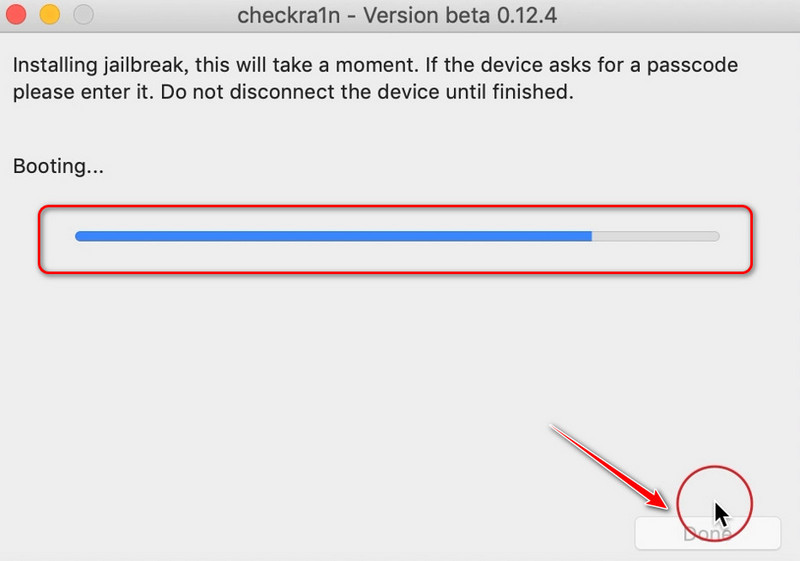
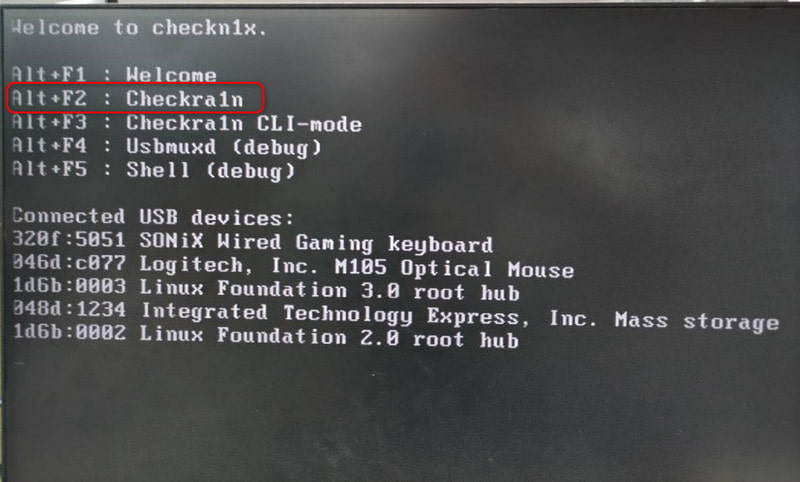
For iOS 10 to iOS 14, Checkra1n can help you jailbreak.
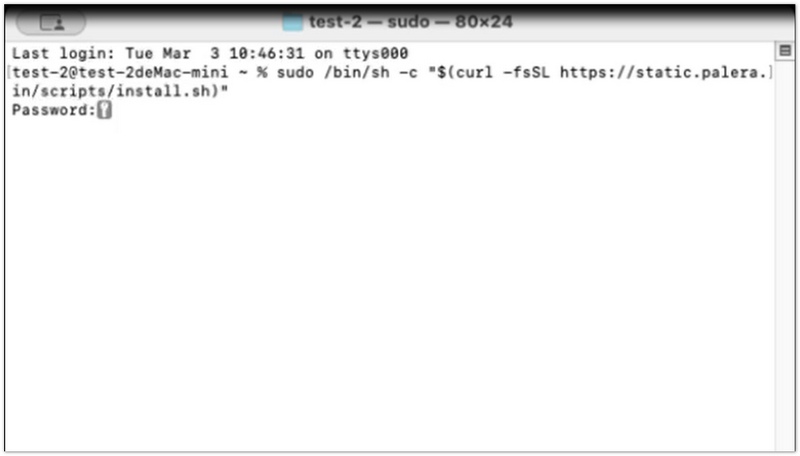
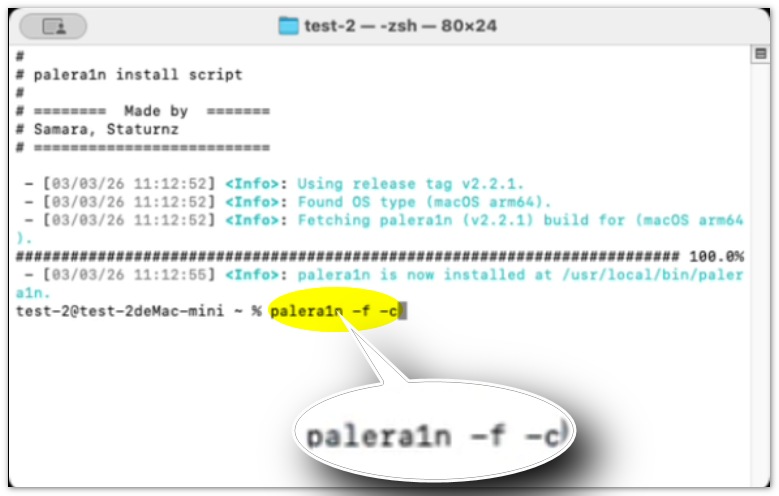
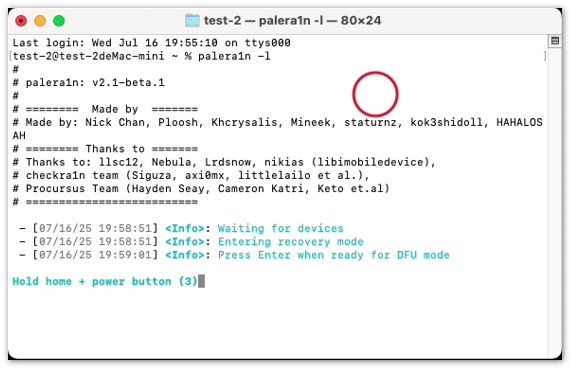
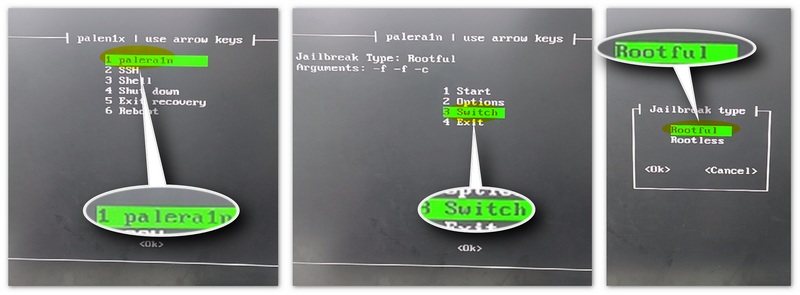
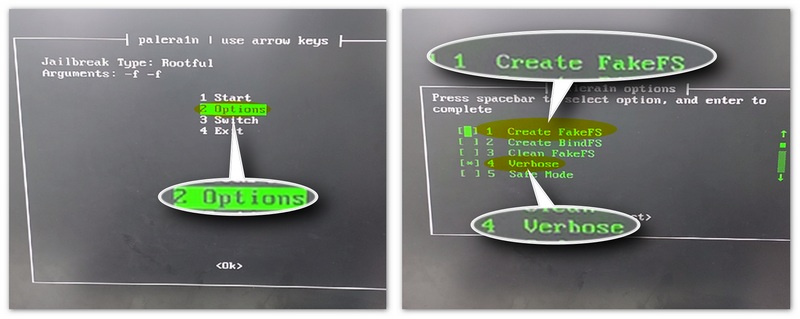
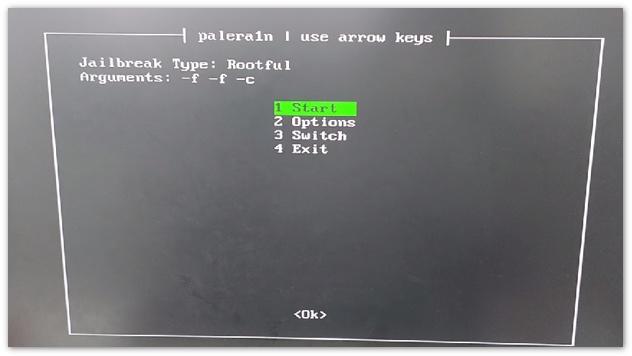
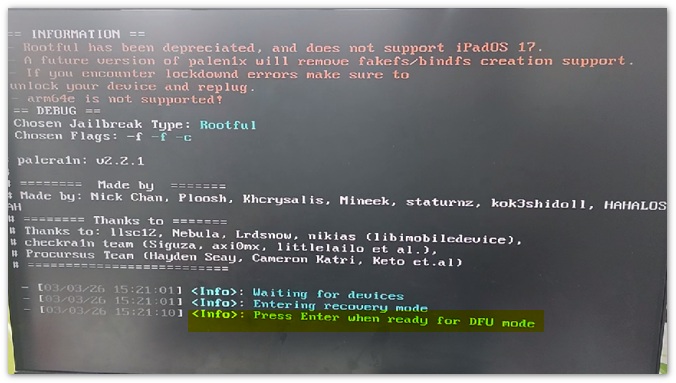
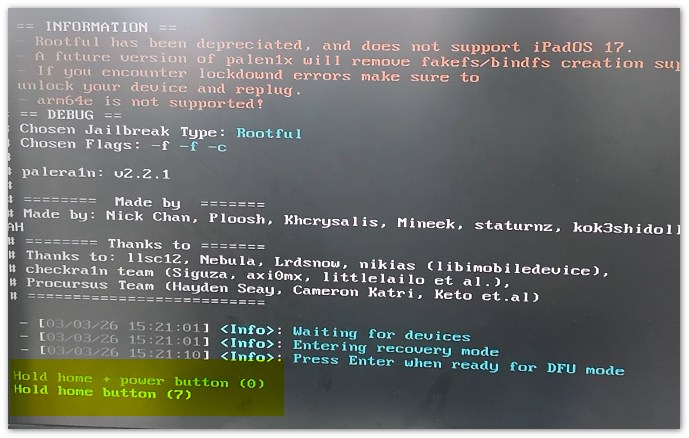
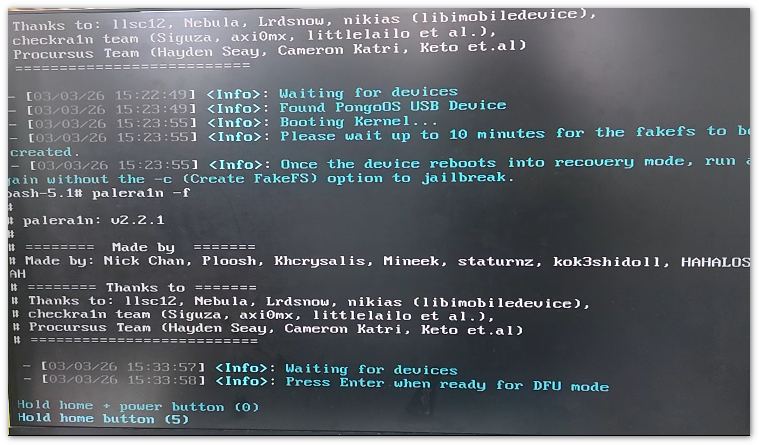
For iOS 15 to iOS 17, Palera1n can help you jailbreak.

Then, press Enter again to confirm.

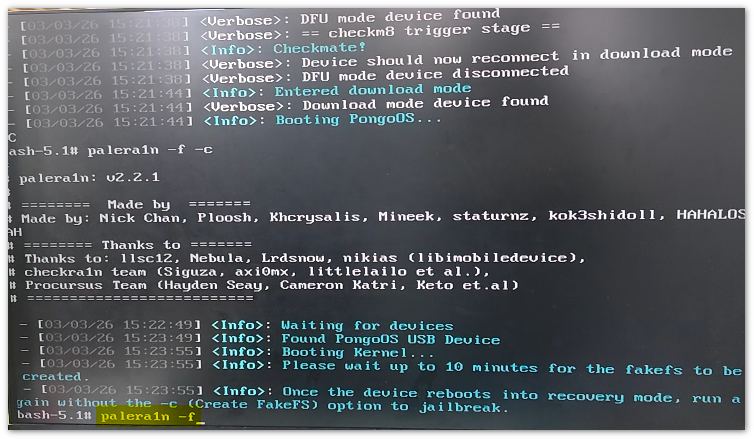
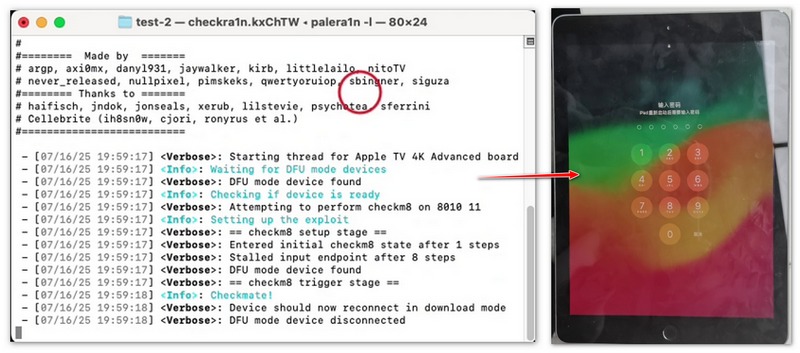
If the program gets stuck during execution, you can use Ctrl + C to exit the current process, and then simply re-enter the previous command.
Reminder: To jailbreak via a Windows computer, you need to use another device to display the tutorial, as the jailbreak process for Windows requires exiting the Windows system and cannot display the tutorial
You'd better use an empty USB drive or back up the files in the USB drive. Creating a USB drive may cause damage to the original data.
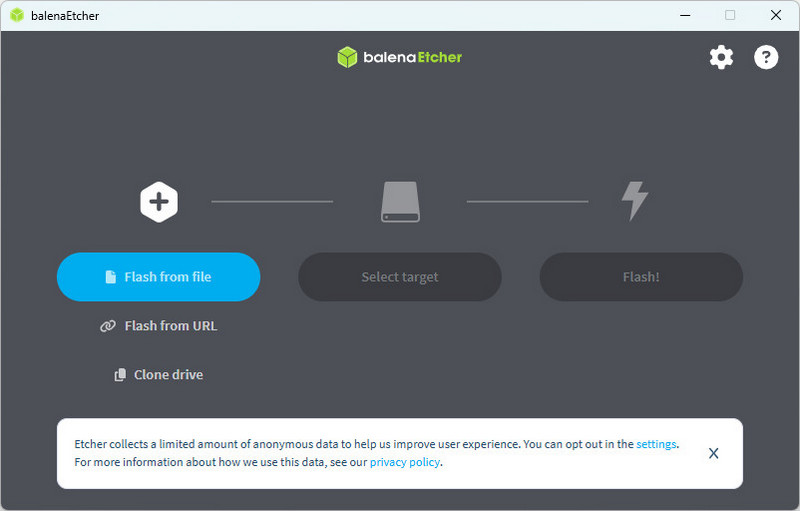
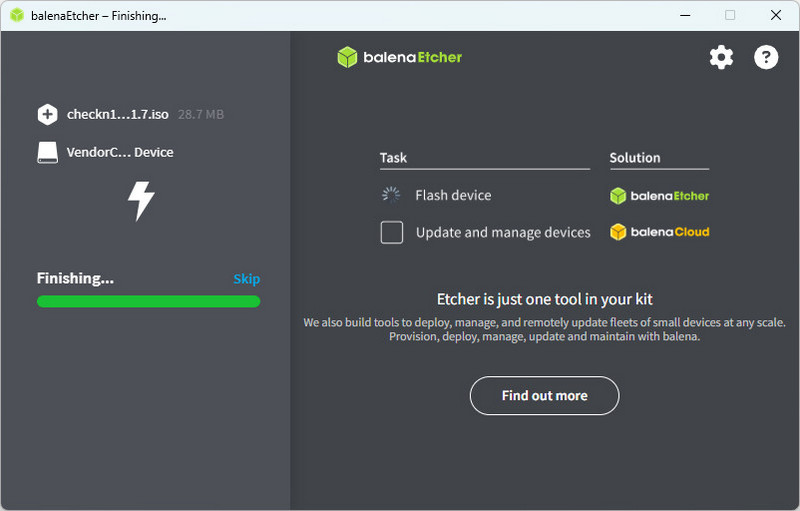
Install the tool balenaEtcher on its website for creating USB drives and start it.
You can refer to the table below:
| Brand / Model | BIOS Hotkey | Notes |
| Lenovo | F1 / F2 / Fn+F2 | ThinkPad usually uses F1; IdeaPad often uses F2; some models require holding Fn |
| HP | Esc → F10 | Some models go directly with F10 |
| Dell | F2 | Press when the Dell logo appears |
| ASUS | F2 / Del | Desktops usually use Del; laptops usually use F2 |
| Acer | F2 | May require holding Fn |
| MSI | Del | Common for gaming laptops and motherboards |
| Gigabyte | Del | Common for desktop motherboards |
| Samsung | F2 / Esc | Varies by model |
| Toshiba | F2 / Esc | Older models often use Esc to open boot menu, then select BIOS |
| Microsoft Surface | Volume Up button (hold) | Hold Volume Up while powering on to enter UEFI |
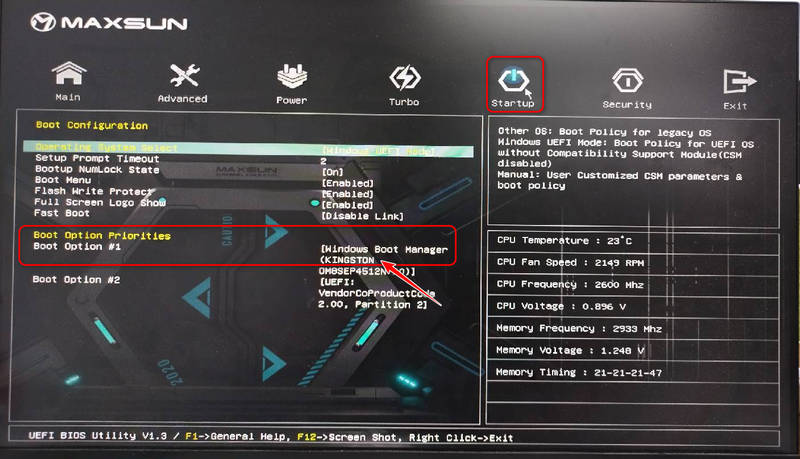
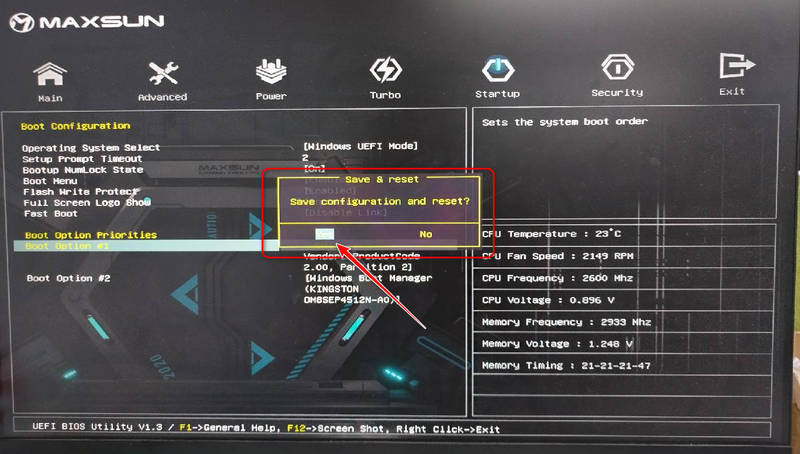
If your computer is not connected to other devices, the default first one is the Windows system, and the second one is the USB drive.
Jailbreaking is a rather complex process. If you fail, please try a few more times.
Note:
After a successful jailbreak, you had better enter the BIOS again and change the startup order back to prioritize starting the Windows system. Otherwise, the next time you insert the USB drive, the USB file will start first by default.
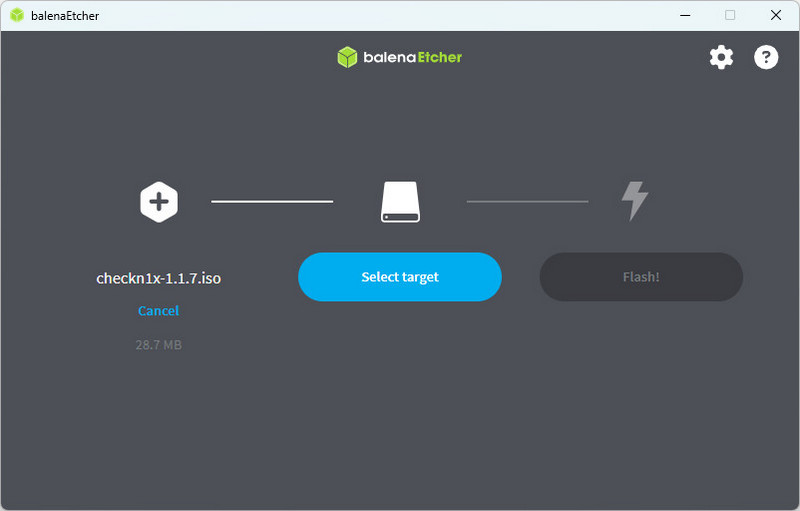
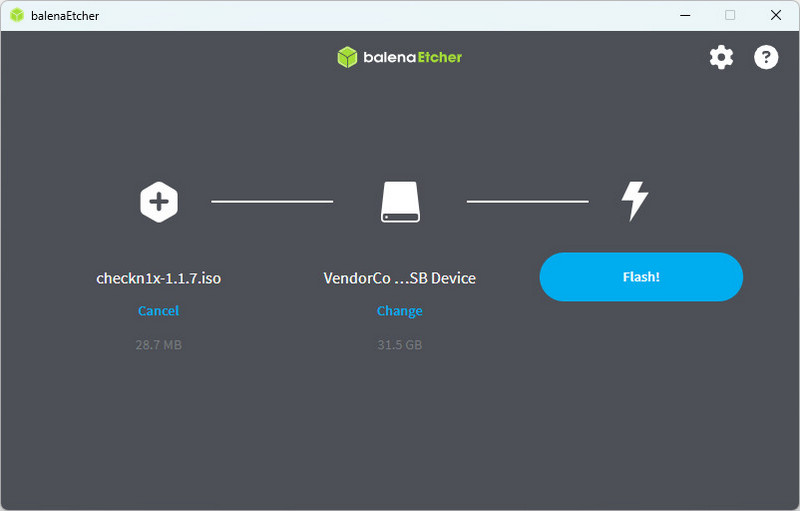
You can create a USB drive using the balenaEtcher: The steps for creating a bootable USB drive are the same as the “A. Create a Jailbreak Environment via a USB Drive” section introduced in the last part, only the ISO file is different.
ISO file download links:
32-bit: https://github.com/palera1n/palen1x/releases/download/v1.2.1/palen1x-v1.2.1-x86.iso
64-bit: https://github.com/palera1n/palen1x/releases/download/v1.2.1/palen1x-v1.2.1-x86_64.iso
Please refer to "B. Set the Computer to USB Boot Priority" for detailed instructions, as the steps are identical and will not be repeated here.
After a while, you will then successfully jailbreak your iOS device.
If you encounter that your iOS devices are stuck in recovery mode, you can try FoneLab iOS System Recovery to fix it. It can solve all kinds of iOS issues, including iPhone or iPad stuck in recovery mode, stuck on Apple logo, white screen, and more. It works perfectly with iPhone, iPad, and iPod and is fully compatible with the newest iOS version.
![]() 100% Secure. No Ads.
100% Secure. No Ads.
![]() 100% Secure. No Ads.
100% Secure. No Ads.
Is it safe to jailbreak my iPhone or iPad?
Jailbreaking an iPhone/iPad is an effective way to get more control over your device, but it's essential to note that rooting a device might lead to problems, such as iPhone broken, etc.
Is it legal to jailbreak iPhone/iPad?
Actually, it is legal to jailbreak your iOS devices. However, Apple doesn't allow users to jailbreak its devices or install unauthorized software.
Can I jailbreak Android devices?
Yes, you can. See how to jailbreak Android devices to learn about more details. Jailbreaking on Android is also called root. Although rooting your Android phone will grant you the highest control level, some critical settings might be changed unconsciously, leading to devices’ malfunctions.
Conclusion
Though jailbreaking your iPhone or iPad is not recommended since it has risk factors of data loss and device damage, it is a good choice to use a jailbreak app. You can use the methods provided above: Aiseesoft iPhone Unlocker, Checkn1x, and Palera1n. Also, if you are stuck while jailbreaking.
 Jailbroken iPhone Reset
What is jailbreak iPhone? Do you have a jailbroken iPhone? You can learn how to reset jailbroken iPhone in this post.
 Unjailbreak iPhone
"How to un-jailbreak an iPhone running iOS 12, iOS 11, iOS 10, iOS 9, etc. This post gives you 3 methods to unjailbreak iPhone with or without restoring.
 Jailbroken iPhone
Here are 3 complete tutorials of how to restore a jailbroken iPhone. What's more, you can also learn steps to restore jailbroken iPhone without losing jailbreak here.
iOS Unlock Tips
Unlock iOS Screen
Bypass iOS Activation Lock
Recover iOS Data
To fix iPhone screen locked, wiping password function can help you a lot. And you also can clear Apple ID or Screen Time password easily.
![]() 100% Secure. No Ads.
100% Secure. No Ads.
![]() 100% Secure. No Ads.
100% Secure. No Ads.
*Required field
*Please enter a valid email
