There is nothing worse than the feeling of being awaked up from your sleep by a phone call ringing. What sucks you most is that you did turn on the Do Not Disturb (DND) mode on iPhone, but still be disturbed.
What is going wrong?
Do Not Disturb is not working on your iPhone, which occurs usually in the users who just updated to iOS 13 or 14.
Why does the Do Not Disturb mode not work? How to fix the problem?
There might be many reasons for the issue, but you can follow the 6 workable solutions here to figure it out.
Now, let's move on.
What does Do Not Disturb do on iPhone?
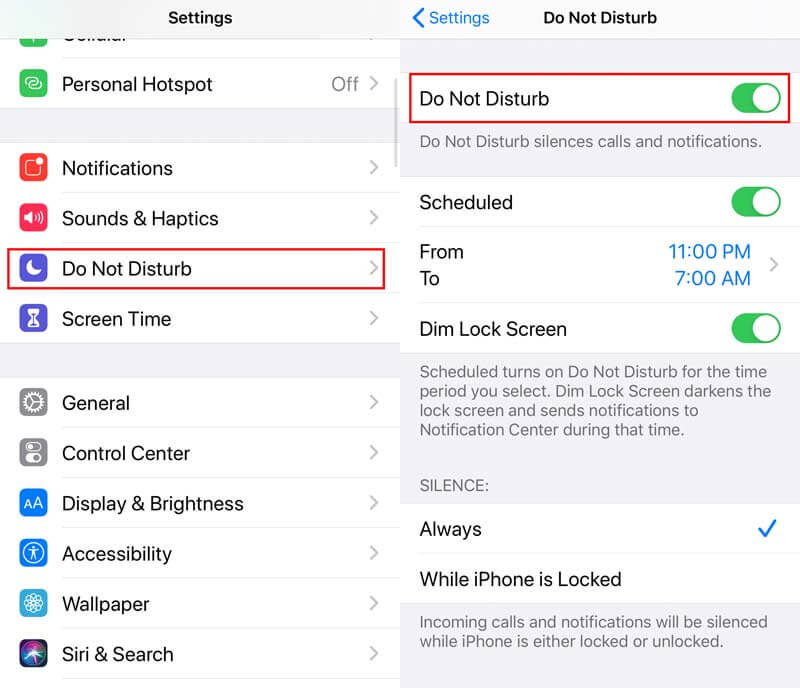
It is the function on iPhone, where you can silence calls, alerts, and notifications that you get while your device is locked. Though the settings, you can also set the app exceptions to allow the calls from someone.
Yes, you know the meaning, but it does not mean that you can get the correct settings to turn on Do Not Disturb.
The first solution is to enable Do Not Disturb on iPhone.
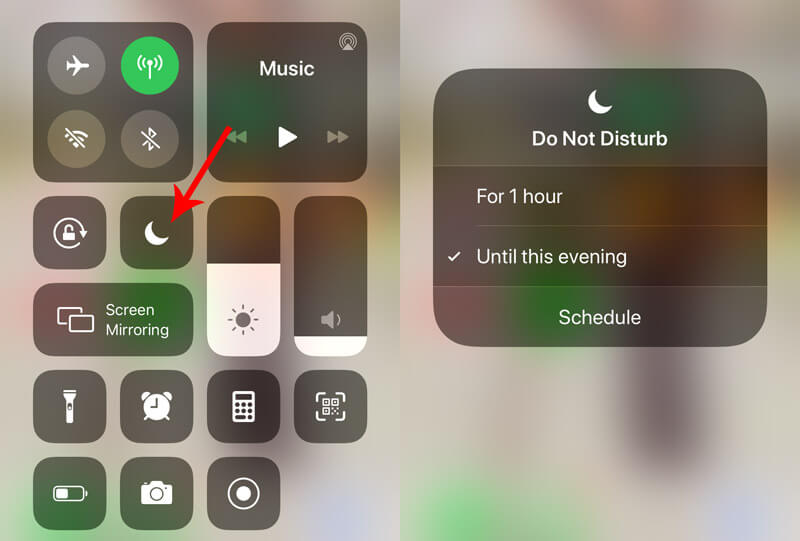
Alternatively, you are allowed to open Control Center > touch and hold the Do Not Disturb icon (crescent moon) to quickly adjust your Do Not Disturb settings.
 1. DND not working on Messages. I can still hear the message notifications.
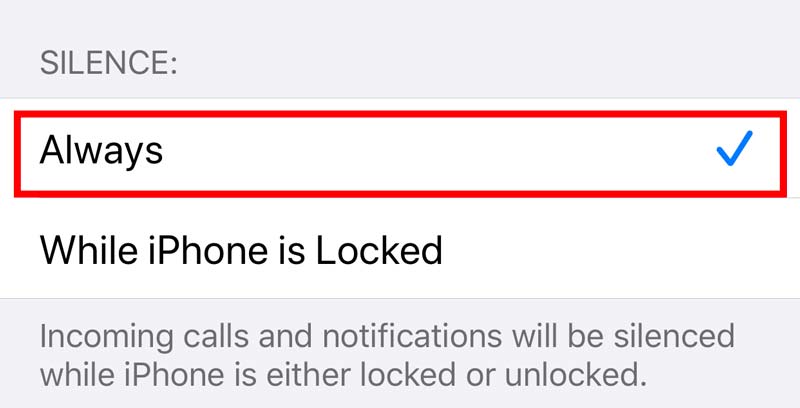
While DND (Do Not Disturb) is enabled, the incoming calls and notifications will be silenced while iPhone is locked or unlocked. If you can still hear the message notifications, just make sure you have check-marked Always under SILENCE.
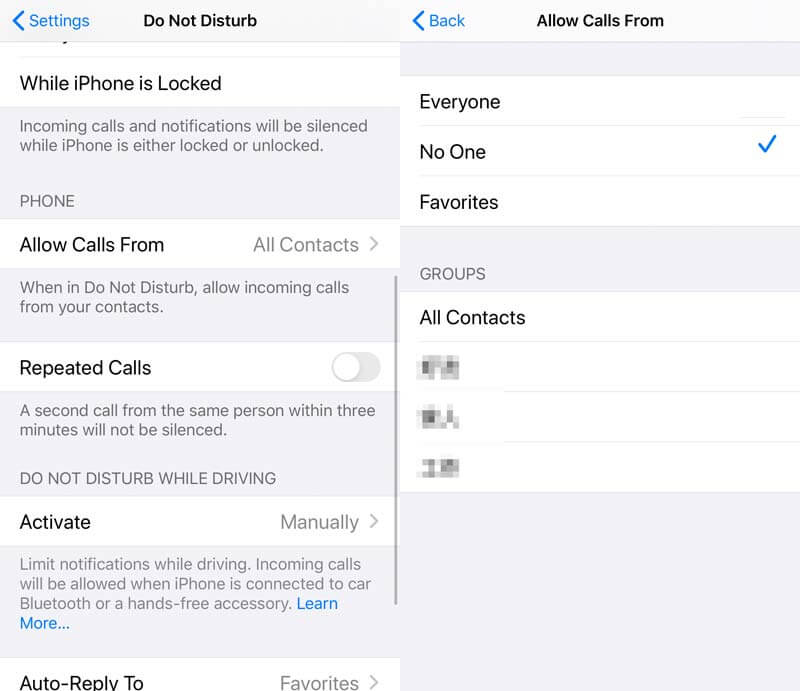
 2. DND not working on Calls. I can still hear the call ringing.
If you do not want to receive the calls from anyone, just make sure the settings of Allow Calls From are No One. Then the incoming calls will not any sound or vibration, and they will be sent directly to your voicemail, without missing any calls.
Surely, you are allowed to receive the calls from specific contacts from the contact groups, anyone or your favorites.
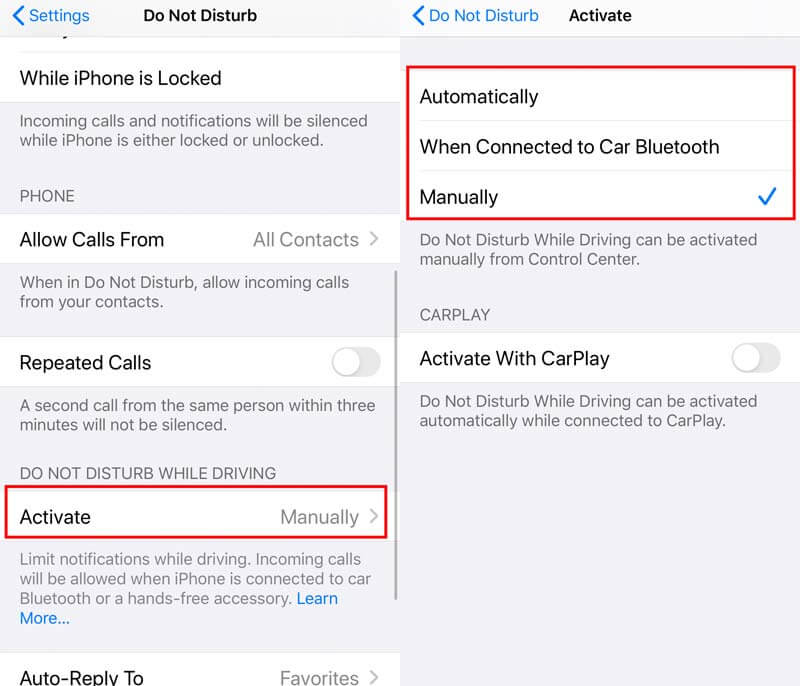
 3. Do Not Disturb not working while driving.
 Do Not Disturb while driving feature is not available in all countries or regions. For turning on it, you need to go to Settings > Control Center, then tap Customize Controls > Tap the plus icon next to Do Not Disturb While Driving.
For iPhone X and later, you can swipe from down from the top-right corner of your screen to tap the car image to turn on Do Not Disturb.
For iPhone 8 or earlier, you need to swipe up from the bottom of your screen and tap the car image to enable Do Not Disturb.
Then when you connect iPhone to the car via Bluetooth or when your iPhone senses the driving motion automatically, the feature will be activated.
You can change the activation settings by tapping Activate under DO NOT DISTURB WHILE DRIVING.
 4. DND not working on Alarm. It still rings in Do Not Disturb mode.
Do Not Disturb and the Ring/Silent switch on iPhone don't affect the alarm sound. Even if you set your Ring/Silent switch to Silent or turn on Do Not Disturb in the scheduled time, the alarm still sounds.
After confirming all the settings correctly, you should continue the next solution if DND is still not working on iPhone.
Restarting an iPhone is a universal solution to fix all iPhone related problems.
Again, it is an old story to restart an iPhone. Read the detailed story here.
Still cannot work? Move the next solution.
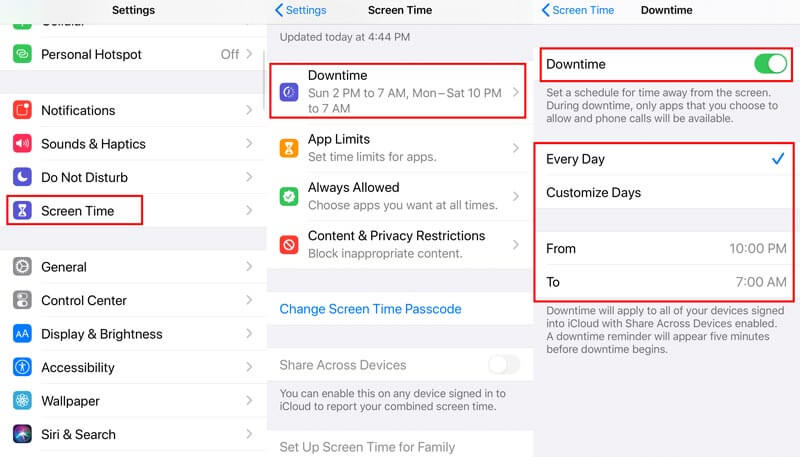
While Do Not Disturb is grayed out and you cannot enable it, or While Drive is not enabled in the Do Not Disturb mode, you should check the Restriction settings.
Restriction settings on iOS 13 are moved to Screen Time, which is the feature to block or limit the specific apps and features on iPhone.
For dragging the Do Not Disturb mode to the normal state, you should get the correct settings in Screen Time.
1. Go to Settings > Screen Time > Downtime to make sure the using time of Do Not Disturb is not in the Downtime you set here.
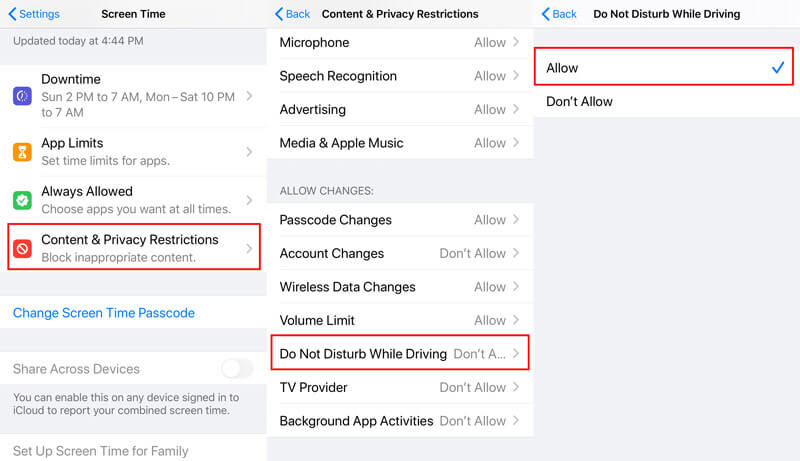
2. Then return to Screen Time > Content & Privacy Restrictions > Toggle on Content & Privacy Restrictions > Scroll down to navigate ALLOW CHANGES > Switch Do Not Disturb While Driving to Allow.
Then go to check the Do Not Disturb mode to see if the problem is resolved.
If the above solutions do not help you to bypass the not-working Do Not Disturb on iPhone, you can try to reset all the settings, which can also remove including the restriction settings, and enter Do Not Disturb mode again.
Go to Settings > General > Reset > Reset All Settings, and then you can try to set Do Not Disturb by following the first solution.
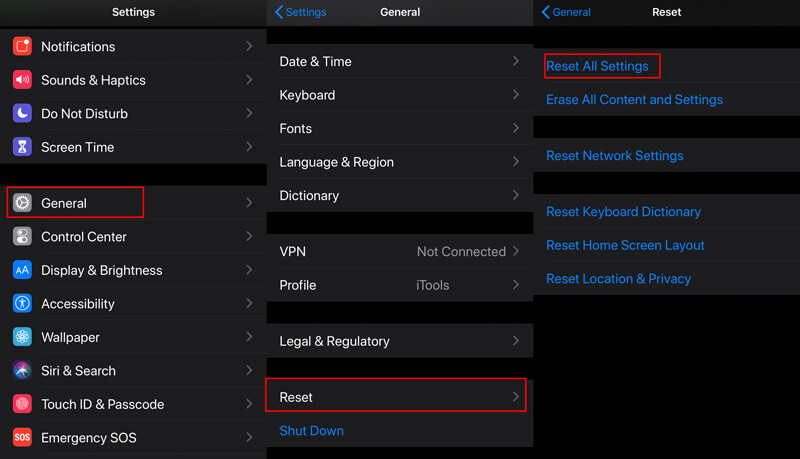
Resetting all the settings will not erase any data or files on this iPhone, but all the settings you made before will be removed. You have to set them one by one, like network, alarm bedtime, etc.
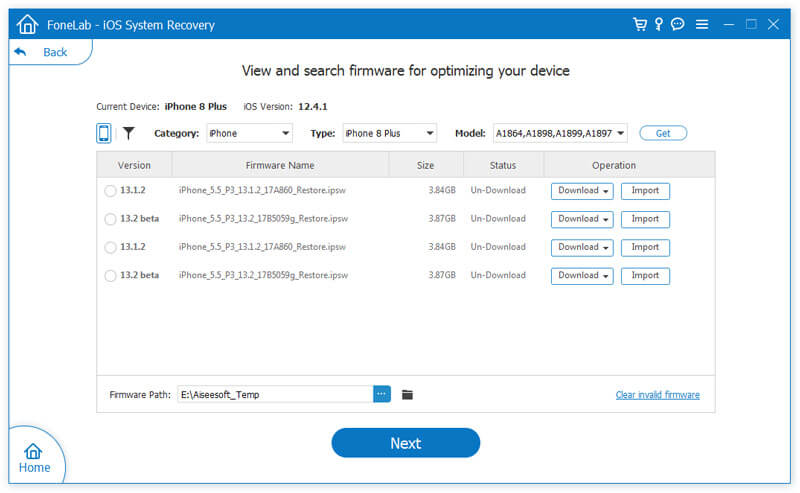
Some users complain that Do Not Disturb is valid after updating to iOS 18/17/16/15/14/13. Generally speaking, if the iOS system is bugging, Apple will release a new version to fix it. However, while there is no new official iOS version, you could try to downgrade iOS to its previous version or install the beta new iOS version on iPhone.
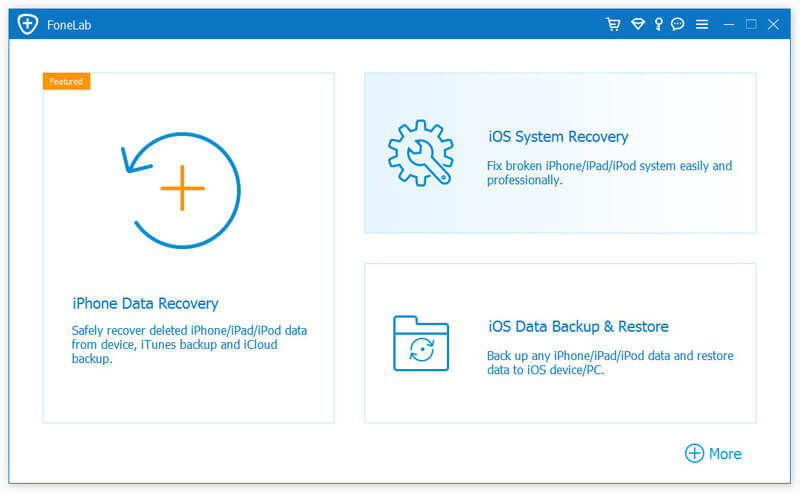
It seems neither way is offered by Apple. Do not worry and Aiseesoft iOS System Recovery will help you exactly.
Aiseesoft iOS System Recovery is the iOS system repair software, which can fix various system issues like Apple logo, white screen, loop restart, DFU mode, iTunes Recovery mode, etc. Moreover, it can upgrade iOS to the newest version including the beta version, and downgrade iOS to its previous versions.
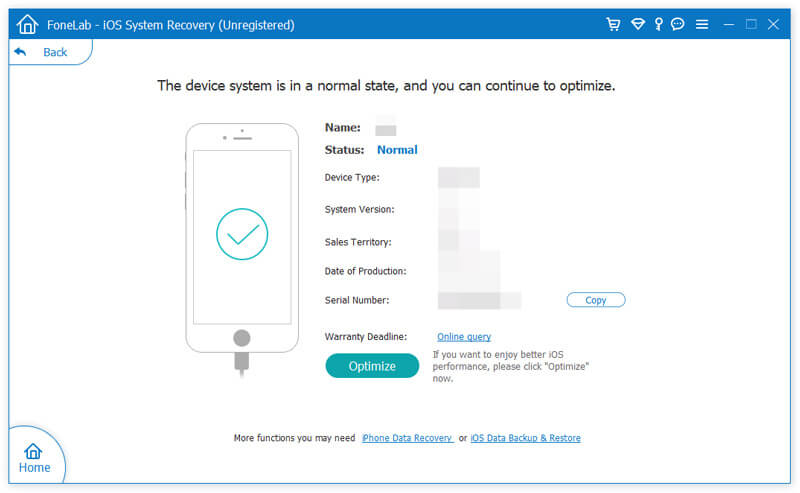
With it, you can easily get Do Not Disturb mode normal on your iPhone, which is caused by the iOS system error.
Downloads
![]() 100% Secure. No Ads.
100% Secure. No Ads.
![]() 100% Secure. No Ads.
100% Secure. No Ads.
![]() 100% Secure. No Ads.
100% Secure. No Ads.
![]() 100% Secure. No Ads.
100% Secure. No Ads.
In the main interface, choose "iOS System Recovery" from the main interface.
Plug your iPhone into computer with the USB cable. If promoted, just unlock iPhone and tap "Trust" on iPhone.

After trying all the solutions above and Do Not Disturb is still not available, you may try the last solution.
The last solution is the bottom solution, but it is not highly recommended.
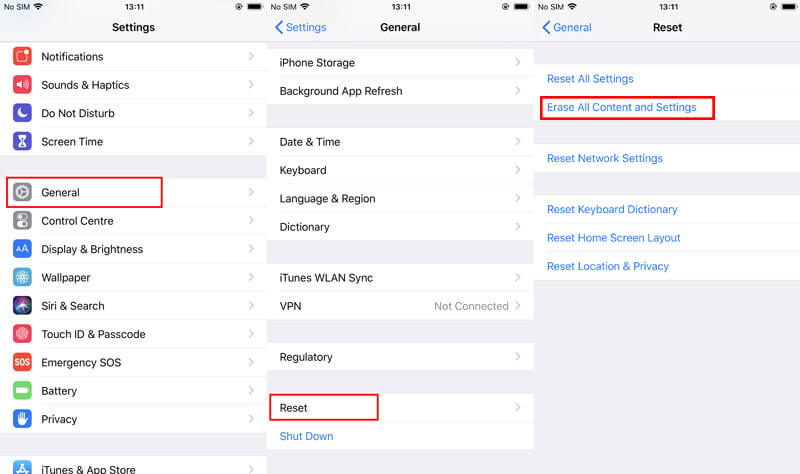
Restoring iPhone to factory settings will erase all content and settings on iPhone.
Though it is another one universal solution to fix iPhone issues, it will take more time and lose some data.
The easiest way to restore iPhone to factory settings is by going to Settings > General > Reset > Reset All Content and Settings > Input your Apple ID password to confirm it.
Then your iPhone will be restarted and you should activate it again like a new iPhone. After that, just try to use the Do Not Disturb on iPhone to see if it is OK now.
More ways of restoring iPhone to factory settings and restoring from the iTunes/iCloud backup, just check it in details here.
Conclusion
Do Not Disturb is very useful when you do not want to be disturbed by your iPhone notifications from calls, messages, alarm, etc., while driving or staying in a quiet environment. However, Do Not Disturb not working occurs many users. This article gathers the quick 6 solutions to fix it.
Have you enabled DND successfully?
Any questions you have can be left in the following comments.
 Make Backup of iPhone Photos to Computer, iCloud and iTunes
Are you looking for a safer place for all precious photos on your iPhone? Read this guide and learn how to back up iPhone photos to iCloud, iTunes or computer.
 How to Transfer Photos from iPhone to PC (Windows 10/8/7 Included)
How to transfer photos from iPhone to Windows PC? This article will show you best ways on how to from iPhone X/8/7/6/5 to PC (Windows 10/8/7 included) with ease.
 5 Best Split Screen Video Editor Available to Windows 10/Mac
Feel boring about the regular videos? Here are top 5 best split screen video editors to help you create unique effects with your own videos and photos.
Fix Mac Issues
Fix iPhone Echo Fix "Do Not Disturb Not Working" on iPhone iPhone Keeps Dropping Calls What You Can Do When Call Forwarding Stop Working on Your iPhone Facetime Camera Not Working On iPhone Fix Facebook Messenger Keeps Crashing iPhone Reminders Not Working How to Fix iPhone Weak Signal Issues? Here are the Real Tips
Fix your iOS system to normal in various issues like being stuck in DFU mode, recovery mode, headphone mode, Apple logo, etc. to normal without any data loss.
![]() 100% Secure. No Ads.
100% Secure. No Ads.
![]() 100% Secure. No Ads.
100% Secure. No Ads.
*Required field
*Please enter a valid email
