Getting Started
-
- Media Metadata Editor
- Video Compressor
- GIF Maker
- 3D Maker
- Video Enhancer
- Video Trimmer
- Video Speed Controller
- Video Reverser
- Video Merger
- Video Rotator
- Volume Booster
- Audio Sync
- Audio Compressor
- Video Watermark Remover
- Image Converter
- Video Cropper
- Video Watermark
- Color Correction
- File Date Changer
- Noise Remover
- Video Player
-
Part 7. More Preference Settings for Video Converter Ultimate
Introduction
As the best Mac video software ever, Video Convert Ultimate enables you to easily convert and edit videos including 4K/5K/8K videos on Mac. Follow the tutorials below to learn how to use Aiseesoft Mac Video Converter Ultimate.
Part 1. Convert Video to Other Video/Audio formats
This Mac Video Converter Ultimate can easily help users enjoy any video file on Mac and portable devices. With its powerful converting features, it can convert video to MP4, AVI, MPEG, FLV, MOV, etc.
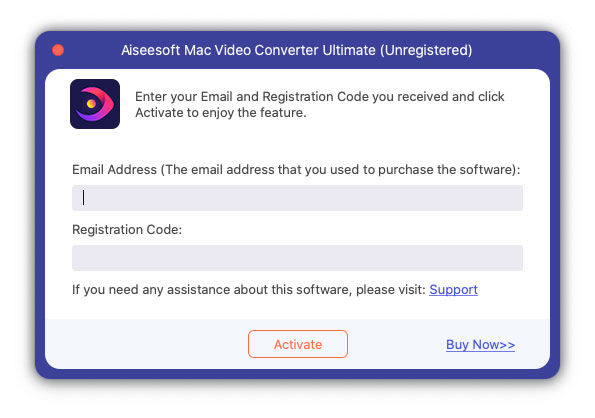
Step 1 Free download, install and open Mac Video Converter Ultimate. You can register with the email address and registration code.
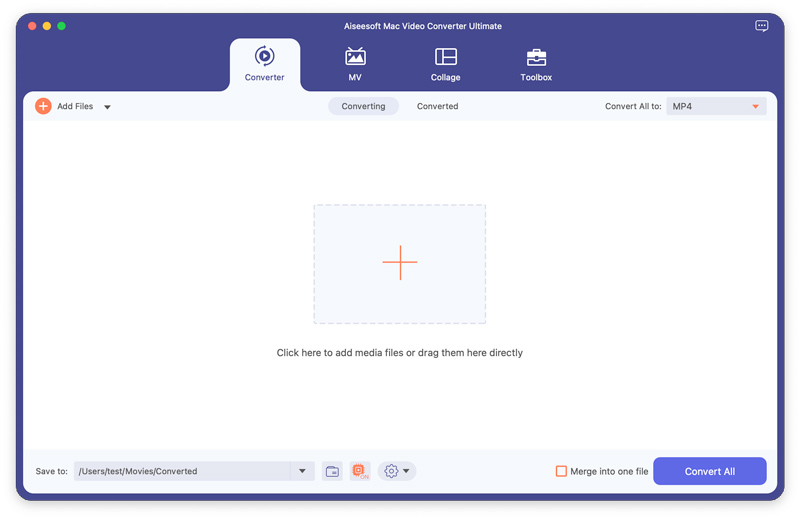
Step 2 Click the Add Files button to add video files from computer, or click the drop-down arrow next to Add Files to add video/audio files or a file folder. You can also drag the video you want to convert into the main interface of Mac Video Converter Ultimate.
Step 3 After adding source file, you can choose to edit the source video effect by clicking the Edit or Cut button. You can trim video length, crop video, add watermark, adjust video brightness/saturation/contrast/hue/volume, and so on.
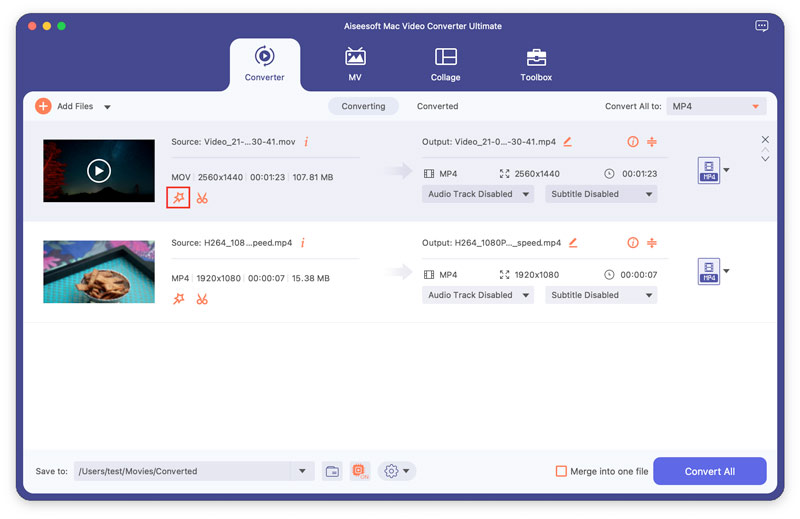
Step 4 Click on the Format button or the drop-down arrow besides Convert All to to open the output format window. Here you can search in the quick search box and find the video format you want.

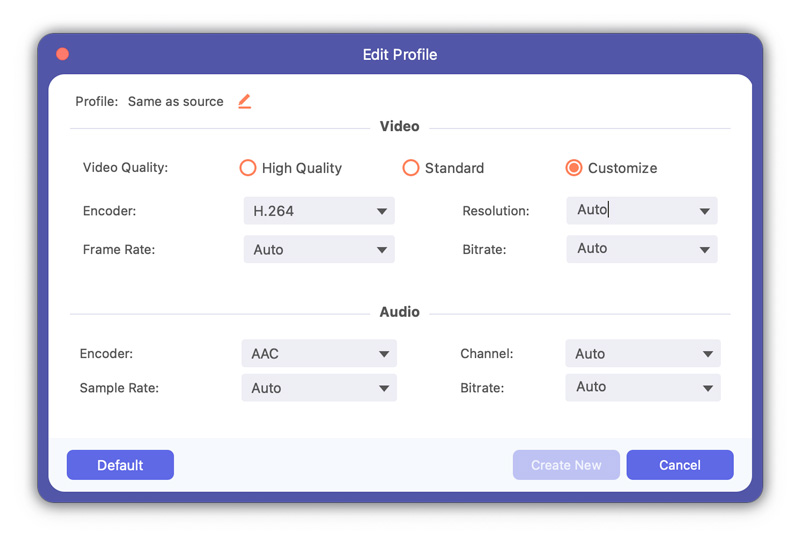
You can also click the Gear button at the right side to customize the profile settings, including quality, encoder, resolution, frame rate and bitrate.
Step 5 If you have several videos to be combined, you can tick the Merge into one file option at the bottom. Then click the Convert All button to start converting the video file on your computer.

Part 2. Edit Video Effects and Enhance Video Quality
Trim & Split Video
Step 1 Select a video clip and click the Cut button.

Step 2 Drag the sliders in the progress bar to set the duration, or enter the start and end time to clip an accurate segment.
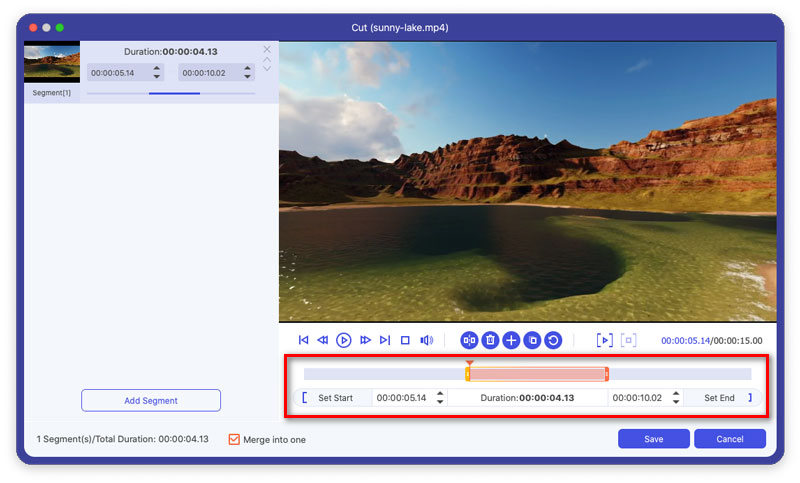
Step 3 With the above buttons, you can also split one video to two parts, delete one selected segment, add segment to the left list, or copy and create a new segment.
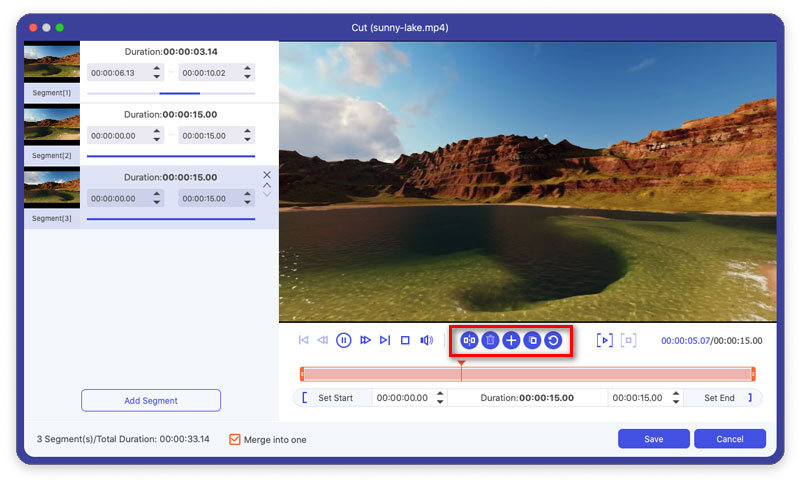
Step 4 You can rearrange the video segments in the left list and tick the Merge into one option to combine these video clips. After that, you can click the Save button to save the video.
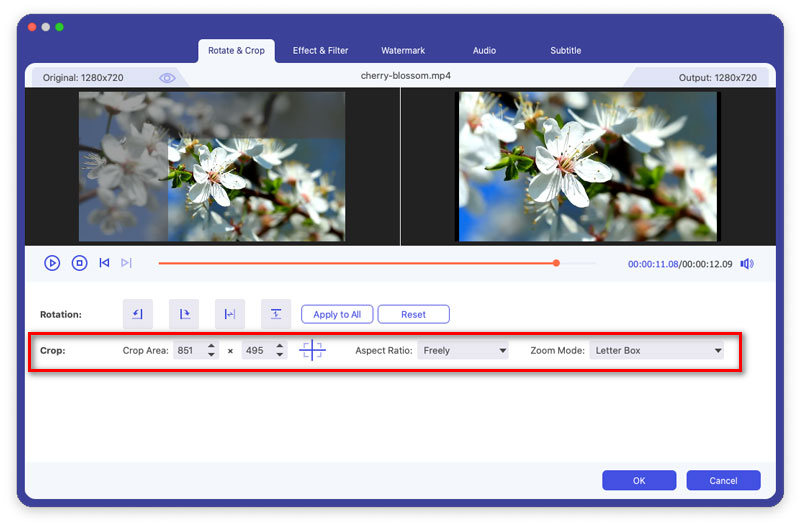
Rotate & Crop Video
Step 1 Select the video and click the Edit button. In the Rotate & Crop tab, you can rotate 90 degrees to the right or left, flip the video horizontally or vertically.
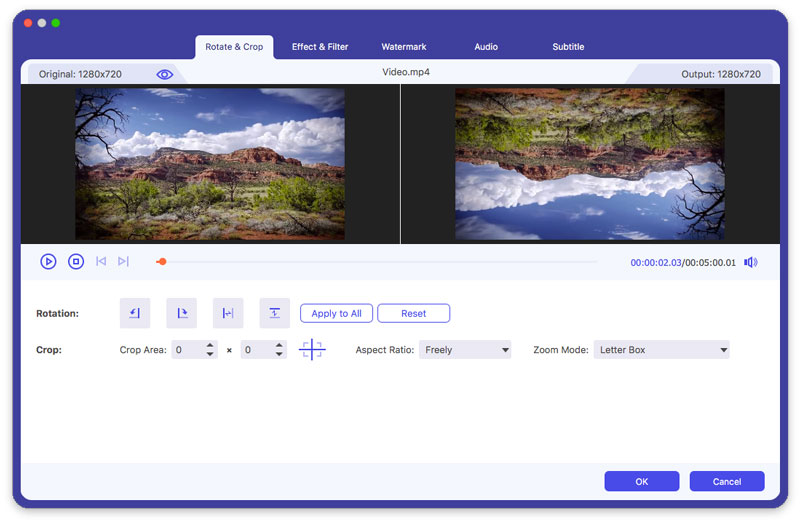
Step 2 The Crop function can remove the black edges of the video. You can set the crop area, select aspect ratio from 16:9, 4:3, 1:1 or 9:16. You can also select the Zoom mode from Letter Box, Pan & Scan or Full to get the best effect.
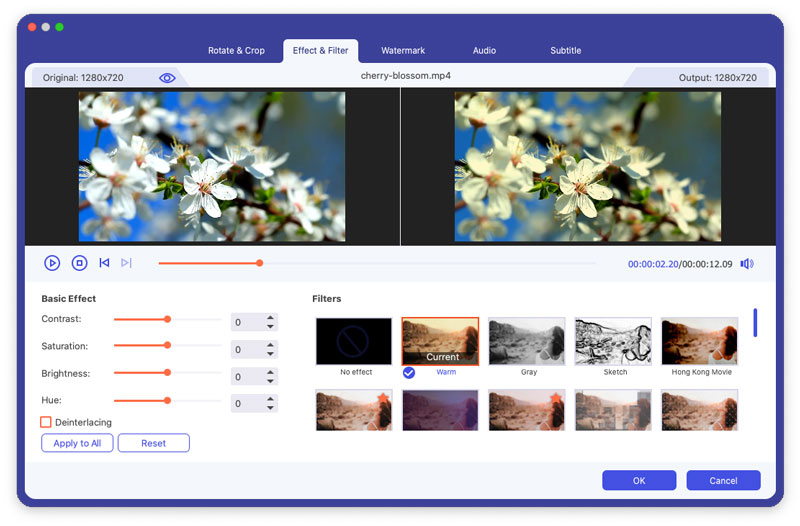
Add Filter & Effects
Step 1 Locate to Effect & Filter in the Edit window. Here you can adjust basic effects like contrast, saturation, brightness and hue.
Step 2 This Mac Video Converter Ultimate provides filters like Warm, Gray, Sketch, Hong Kong Movie, Orange Dots, Purple, Plain, Coordinates, Stars, etc. You can click on one filter and preview the effect. Then click the OK button to apply the effect.
Add Watermark
Step 1 Select the Watermark tab in the Editing window. Select the Text option and enter the text in the blank space. You can change the text font, size, font style, color, position and writing system. Besides, you can drag the slider to rotate the text watermark to any angles or adjust the opacity from 1% to 100%.
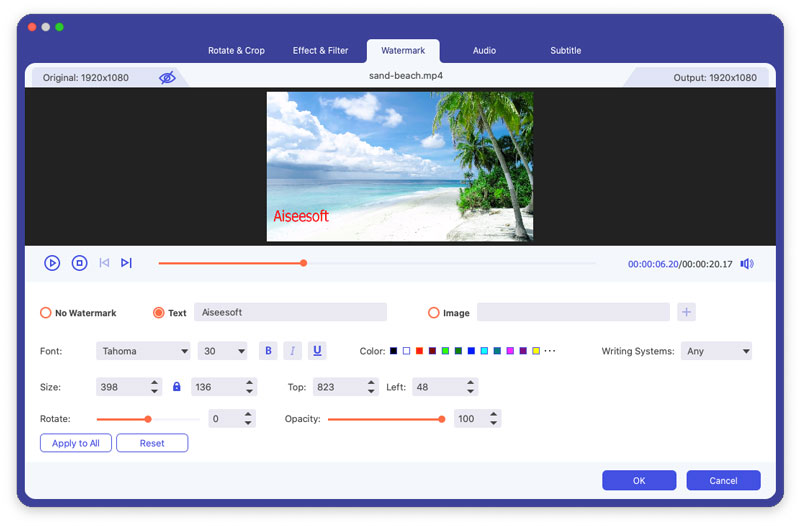
Step 2 If you want to add a logo to your video, you can select the Image option and click Add Picture to add the picture logo. You can adjust the photo watermark size, position, rotation and transparency.
Adjust Audio
Step 1 Find the Audio tab in Edit window. You can click the Add Audio button to add the audio track. If the audio not sync with video, you can adjust the volume and delay time to make them match.
Step 2 Click the OK button to apply the changes.

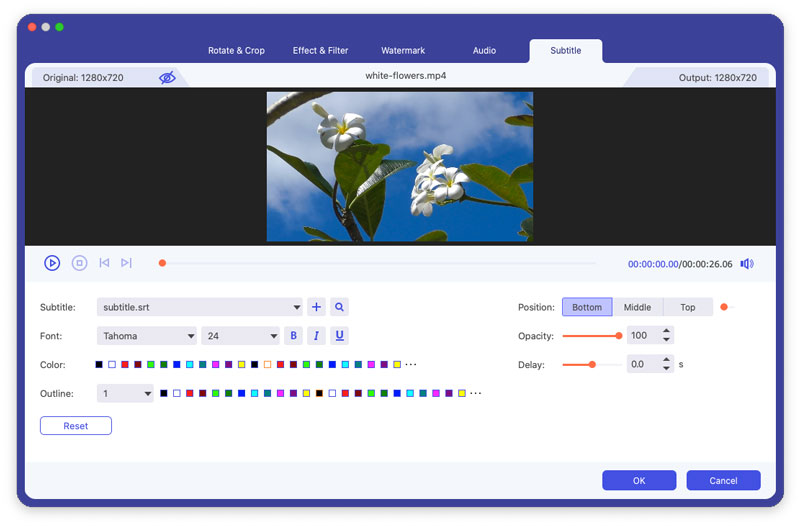
Add Subtitle
Step 1 Find the Subtitle tab in the editing window. Click Add Subtitle(s) to add the (*.srt, *.ssa, *.ass) from your computer. You can adjust the font size, font style, color and outline.
Step 2 Click the OK button to save the changes.
Part 3. MV Making
This software has an MV making feature which you can use to make a video by footages or pictures.
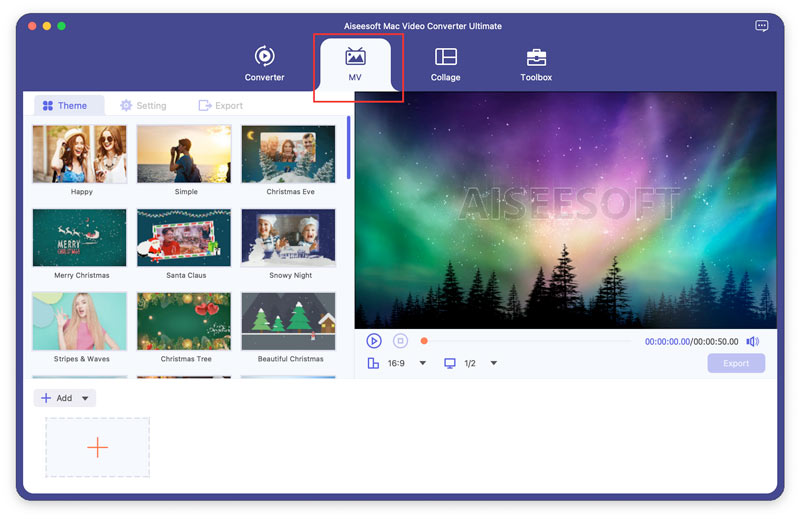
Step 1 Click MV
After opening the program, click the MV tab and enter it into the MV-making interface.
Step 2 Add files
Click the Add button which is located at the bottom left of the interface to add your footages or pictures.
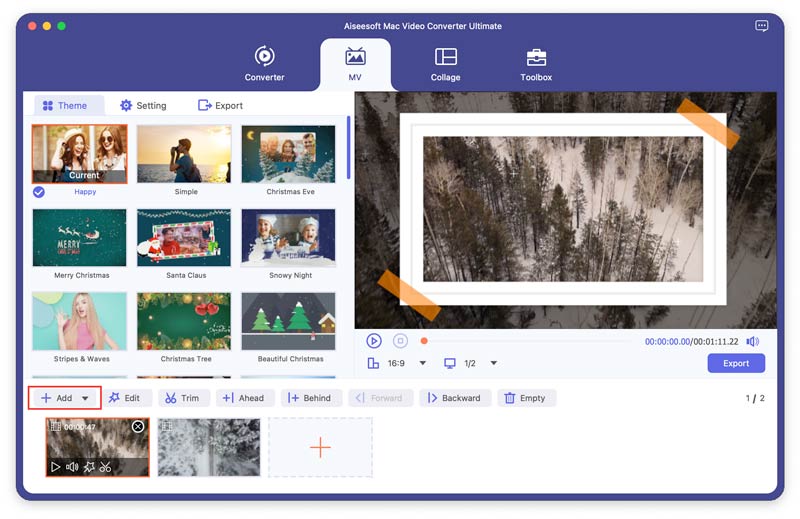
After adding these files, you can adjust the order of them by moving one file with the mouse or clicking Forward and Backward.
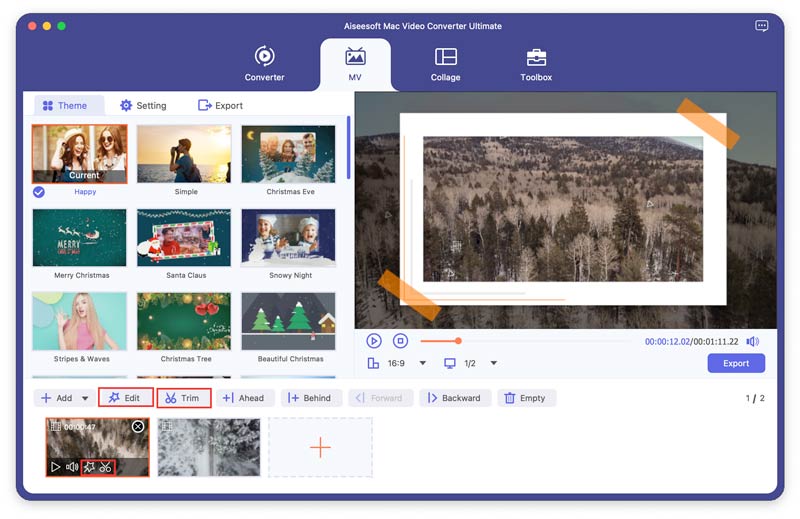
Step 3 Edit videos
You can edit or trim the whole video by clicking the Edit or Trim button before saving it, you also can edit or trim your footages or pictures separately.
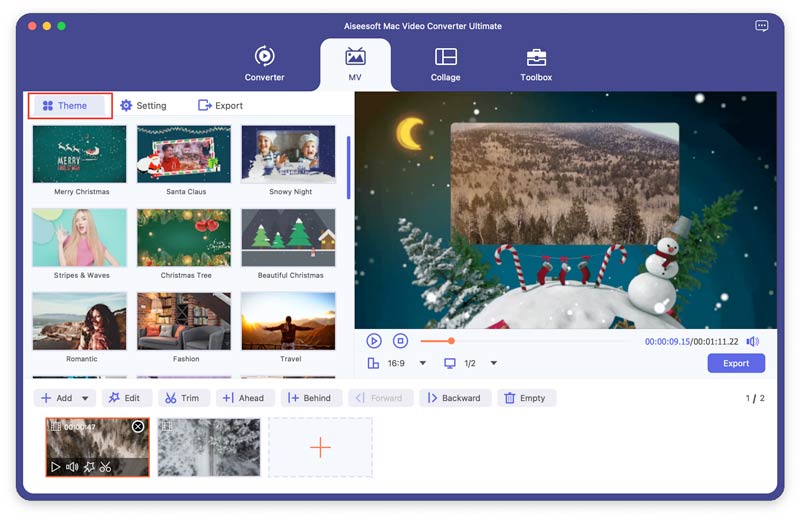
Step 4 Select a theme
After editing or trimming videos, you are able to select a theme from the Theme tab which is located at the left for your MV. Click the Theme tab and choose the theme you like for your MV.
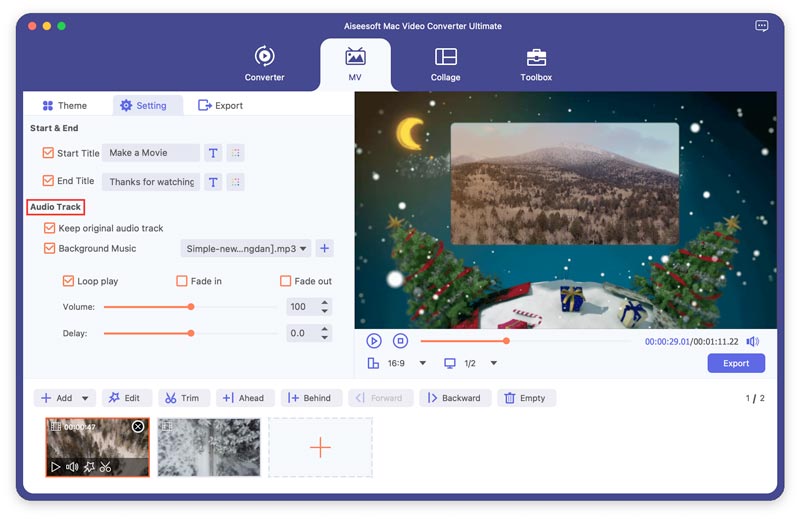
Step 5 Set titles and the audio track
Click the Setting tab, and then you can add titles for your MV. Check the boxes of Start Title and End Title, later you can edit the beginning title and ending title for the MV.
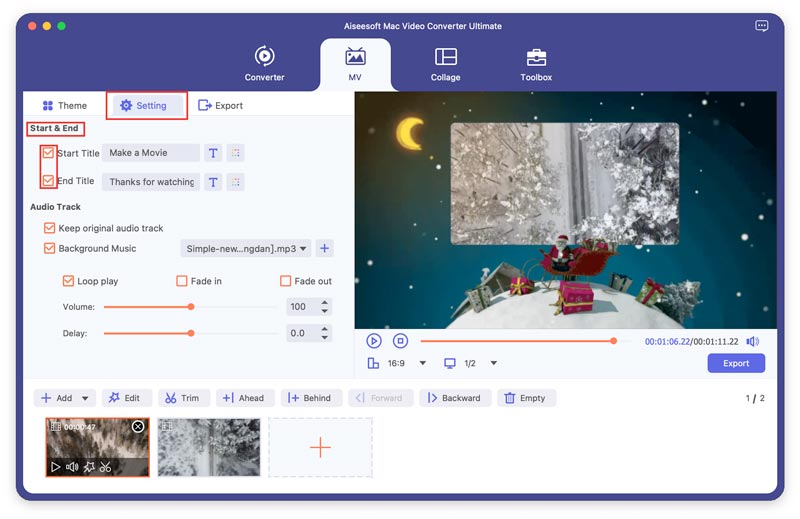
Apart from that, you also can set the background music for your MV, and the original audio track is allowed to be maintained. Besides, Loop play, Fade in, Fade out, or all could be set as the audio transition.
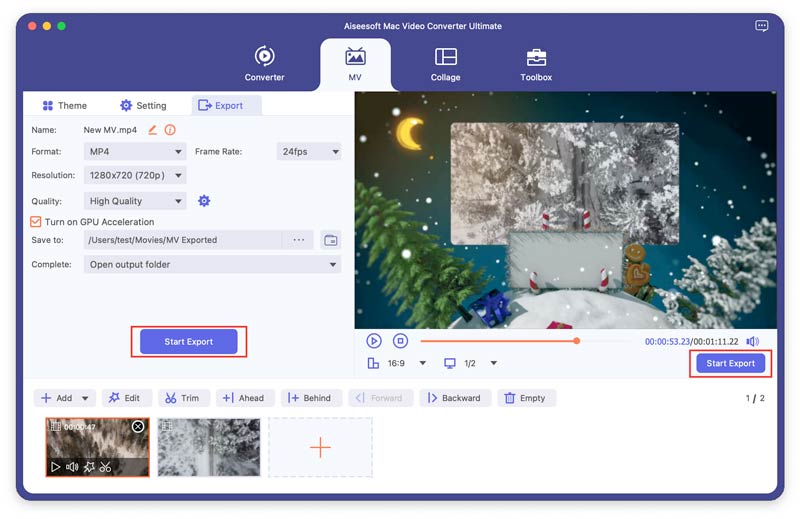
Step 6 Export MV
You can choose the format you want to save the MV with by clicking the pull-down which is located beside the format.
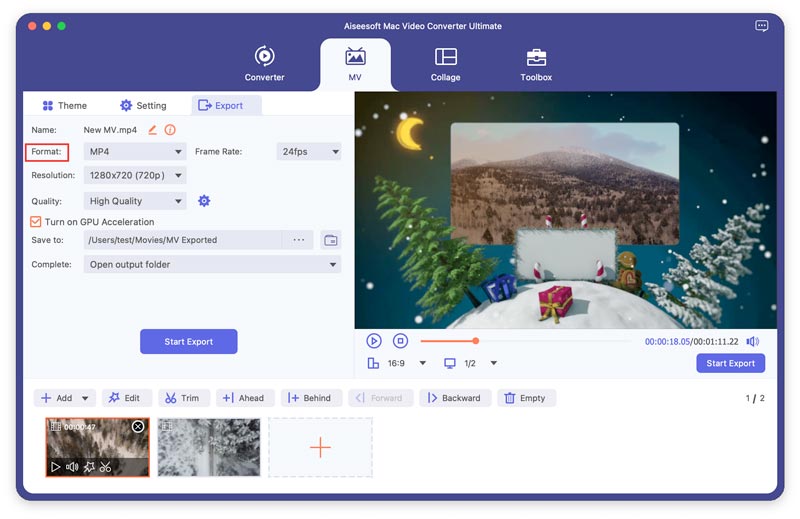
Click the Start Export button to produce your MV.
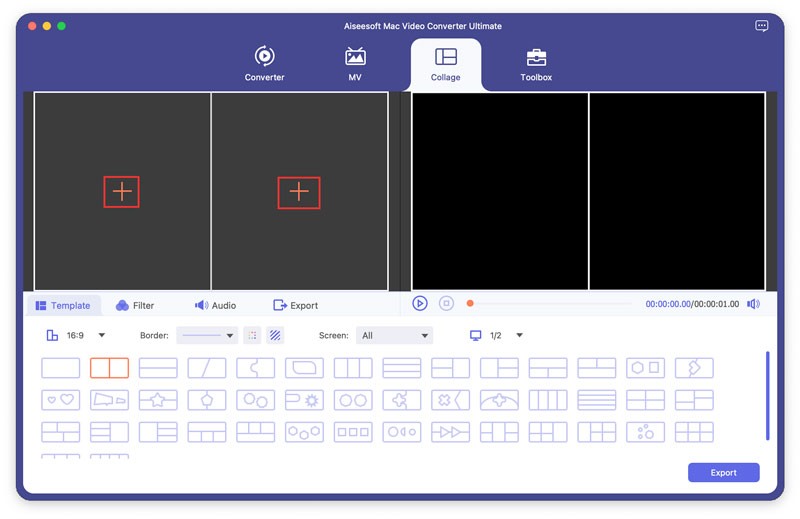
Part 4. Split Screen Video Making
This program can let you combine several shots into one video screen. And you can use it to perform the task of putting videos side by side and play them at once.
Step 1 Choose split-screen layout
Click the Collage feature, go to click Template tab to choose a split-screen layout as you like.
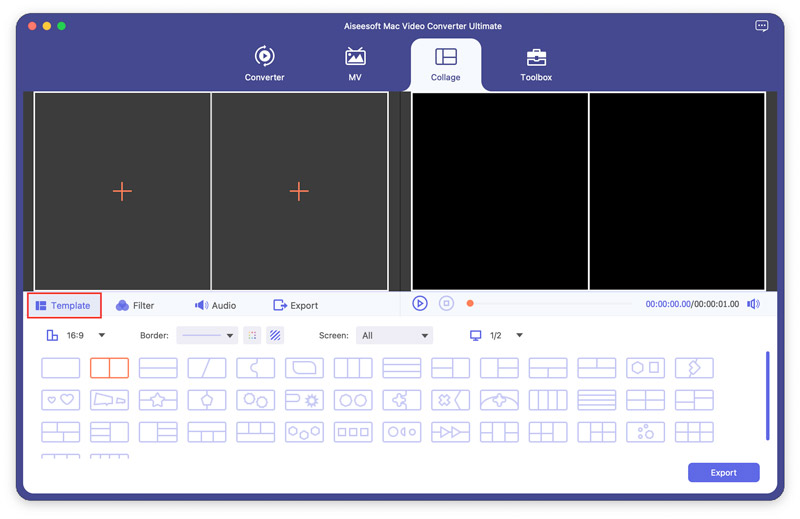
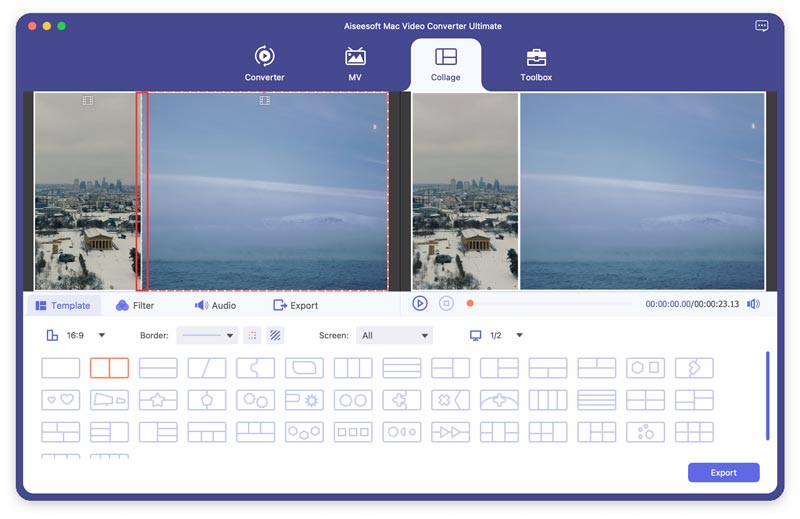
Step 2 Add files
Click + to add videos you want to make into a split-screen video.
After adding videos, you can adjust them through dragging the line.
Step 3 Edit videos and choose filters
You are allowed to edit your videos at the Collage interface. Choose the video you want to edit and then click the Edit button. Then, you can crop, rotate, add filters, add watermark, and more.
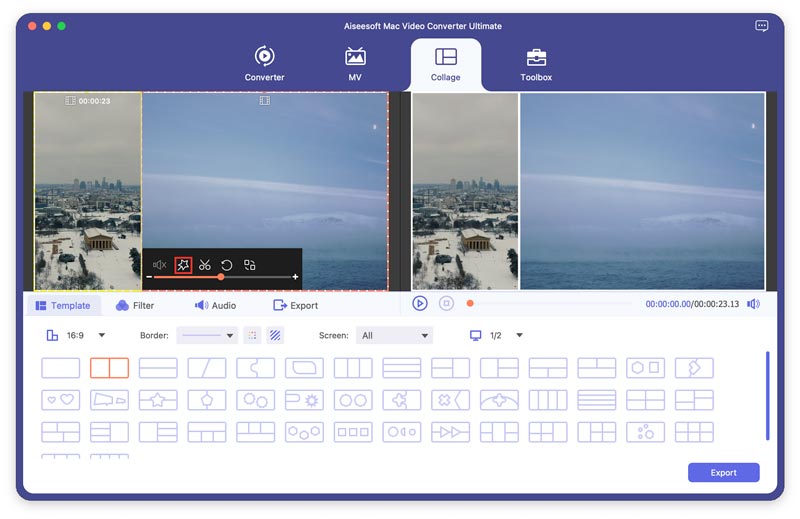
After editing your videos, you can choose a filter to beautify at the Filter tab.

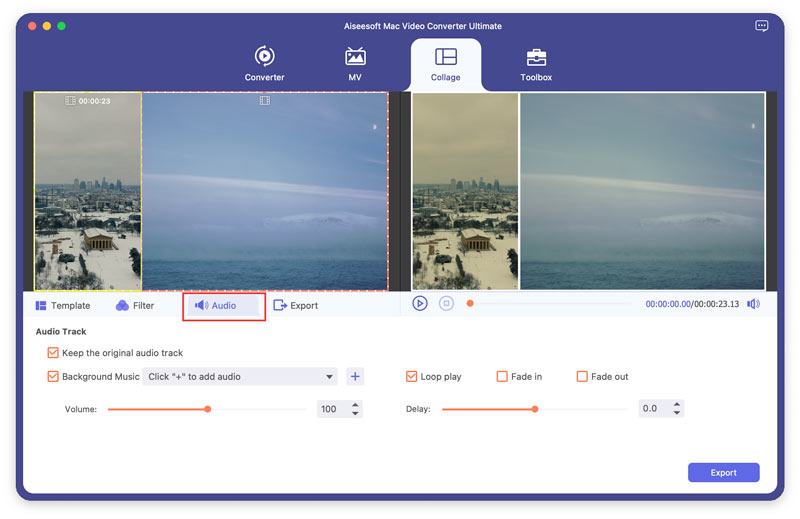
Step 4 Adjust audio track
If you want to keep the original audio track in the video, you can check the Keep original audio track option. To add a song as the background music, check Background Music and then choose the song from your computer. There are other audio settings to configure, such as loop play, fade in or out, volume, etc.
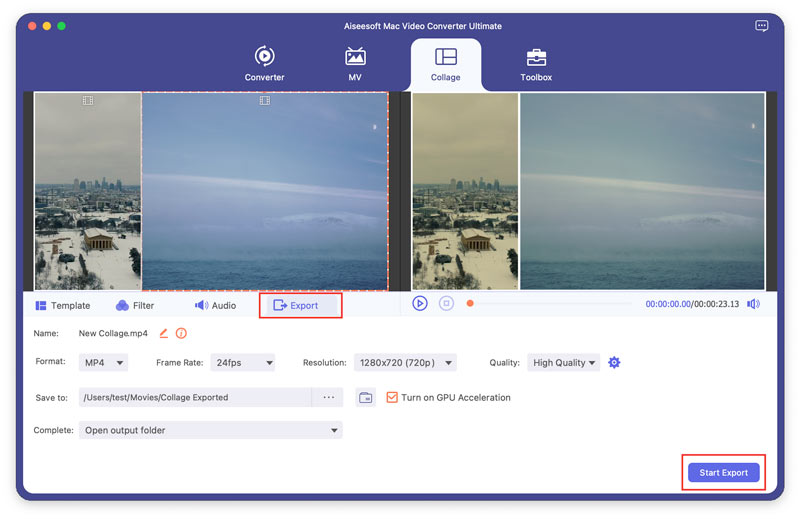
Step 5 Export the video
Go to the Export tab, click the Start Export button to produce the split-screen video, and then save it to your computer.
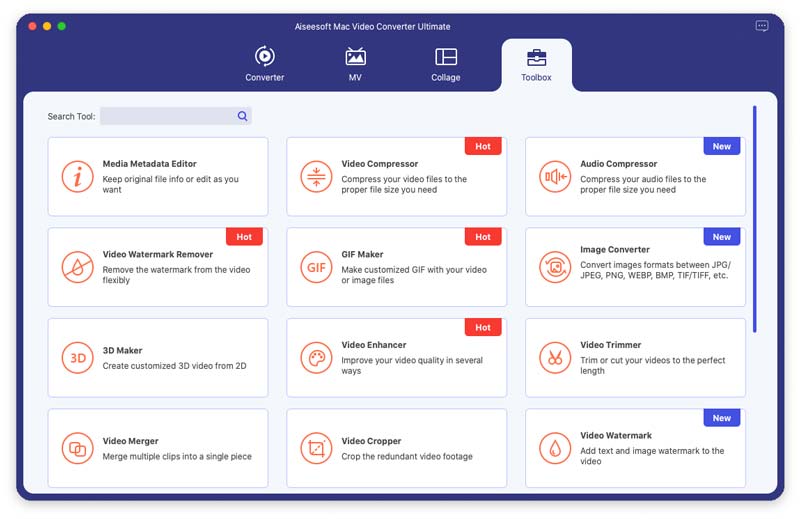
Part 5. Toolbox
Media Metadata Editor
Step 1 Click Toolbox at the top and you can view all the popular tools. Click Media Metadata Editor to use this tool.
Step 2 Click the big plus button to add the media file you want to edit. Here, you can rename the media file, change media metadata like title, artist, album, composer, genre, year, track and comment.
Step 3 Click the Save button to save the changes.

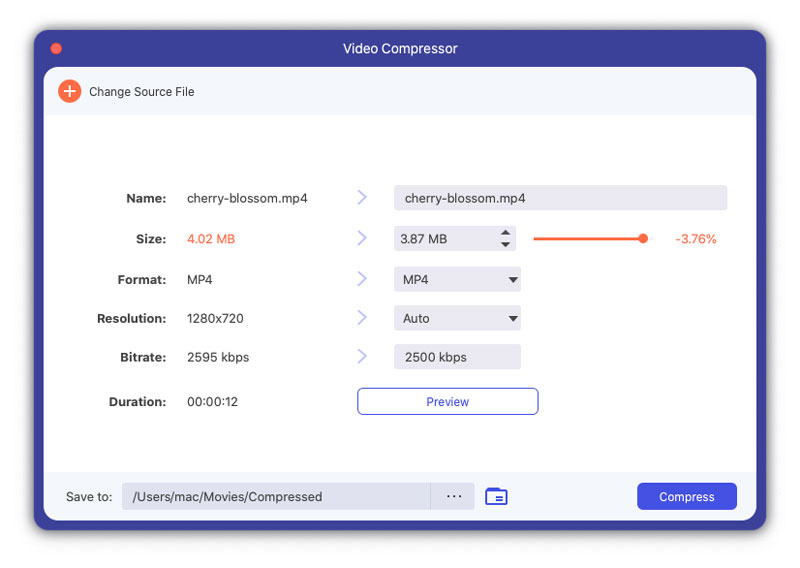
Video Compressor
Step 1 Click Video Compressor from the Toolbox interface. You can upload the video by clicking the big plus button.
Step 2 You can change video name, adjust compression rate, select output format, resolution, bitrate and preview the compression effect.
Step 3 Click the Compress button to compress your large video to small size.
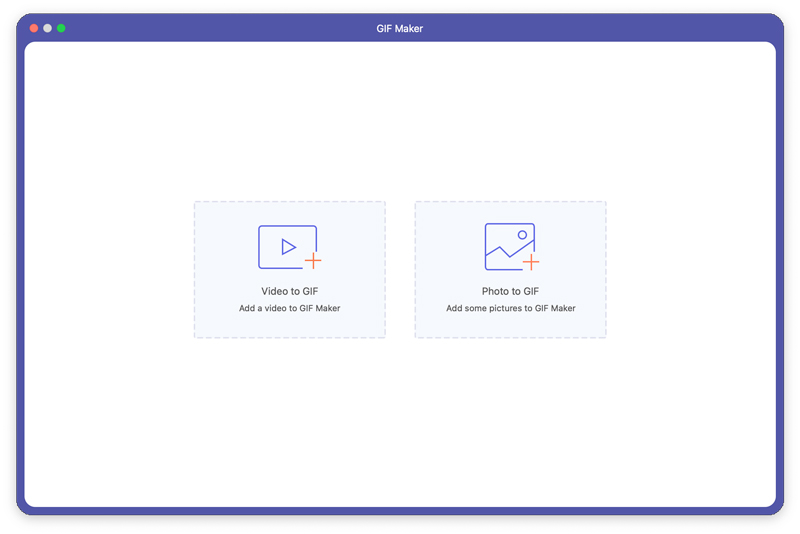
GIF Maker
Step 1 Click GIF Maker from the Toolbox interface. Add a video or some pictures to it.
Step 2 If you add a video, you can edit the video with various features, such as Rotate & Crop, Effect & Filter, Watermark, Audio, and Subtitle. Or cut the video and save the part you want to make a GIF. And you also can set the output screen size and Frame Rate.
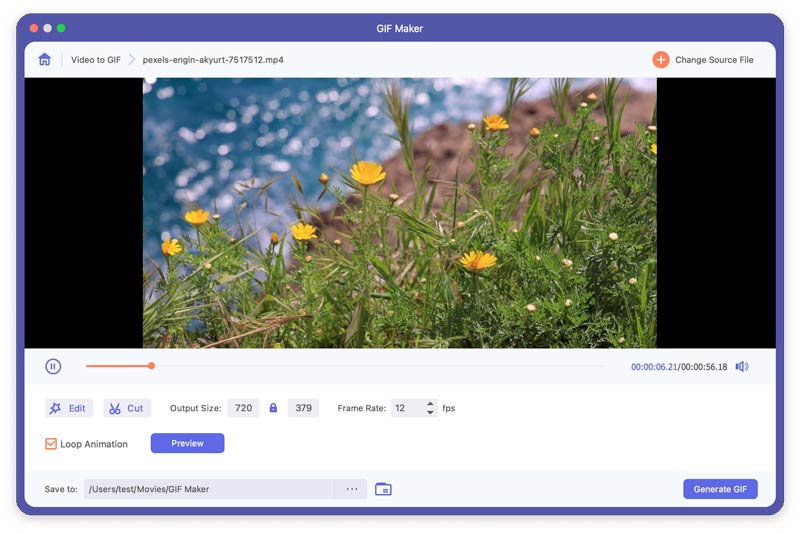
If you add some pictures, you can adjust the order of these pictures by moving your mouse or click the Forward/Backward button.
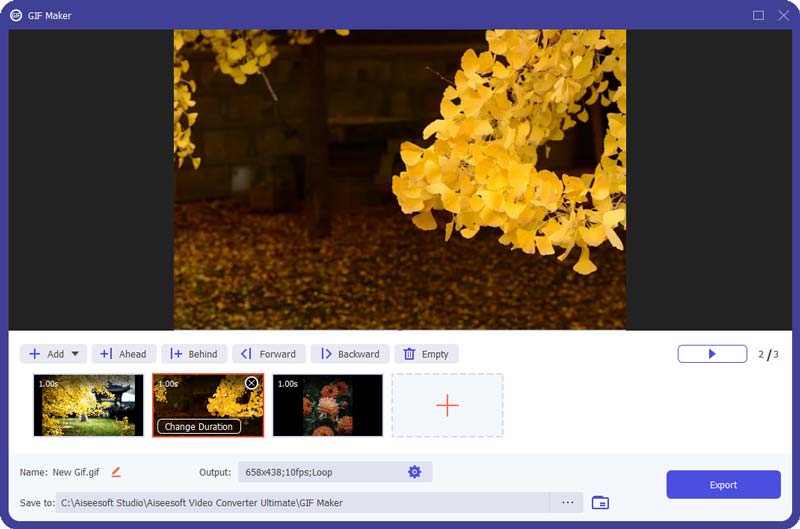
Step 3 Click Generate GIF or Export to create your GIF.
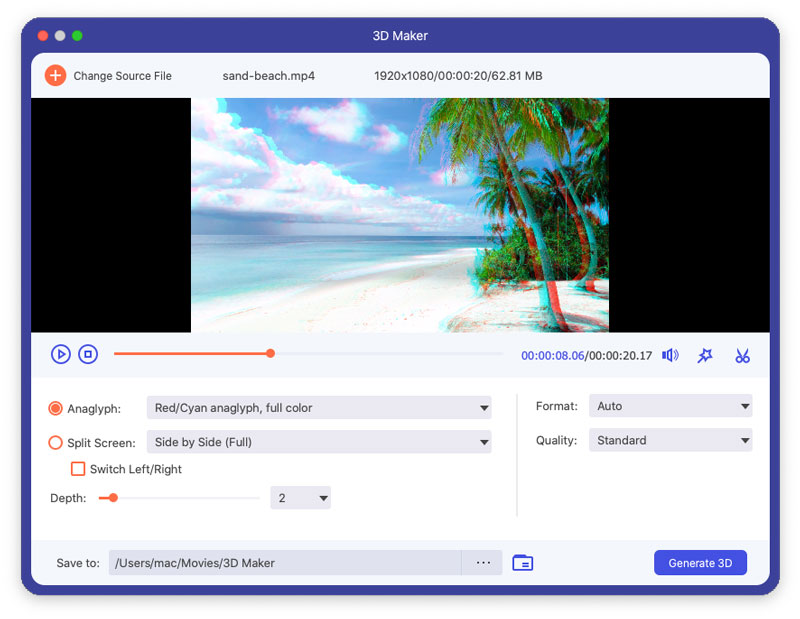
3D Maker
Step 1 Find 3D Maker in Toolbox. Click the big plus icon to add the video to 3D Maker.
Step 2 You can choose Anaglyph 3D effect, or Split Screen 3D effect like Side by Side (Full/Half-Width) or Top and Bottom (Full/Half-Height).
Step 3 Click the Generate 3D button to add 3D effect.
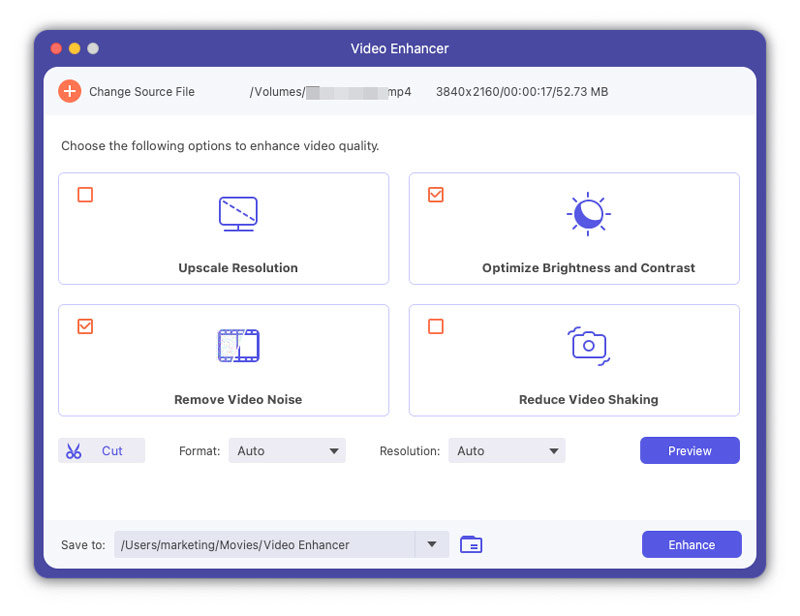
Video Enhancer
Step 1 Click Video Enhancer in Toolbox. And add a video to this tool by clicking the central plus sign.
Step 2 You can improve your video quality by selecting and applying these four features.
Upscale Resolution: You can use this feature to convert a low-resolution video to a high-resolution video.
Optimize Brightness and Contrast: You can use this feature to adjust the brightness and contrast of your video automatically.
Remove Video Noise: You can use this feature to erase video noise from your video automatically.
Reduce Video Shaking: This feature can help you stabilize your shaky videos.
Step 3 Click the Enhance button to improve your video quality.
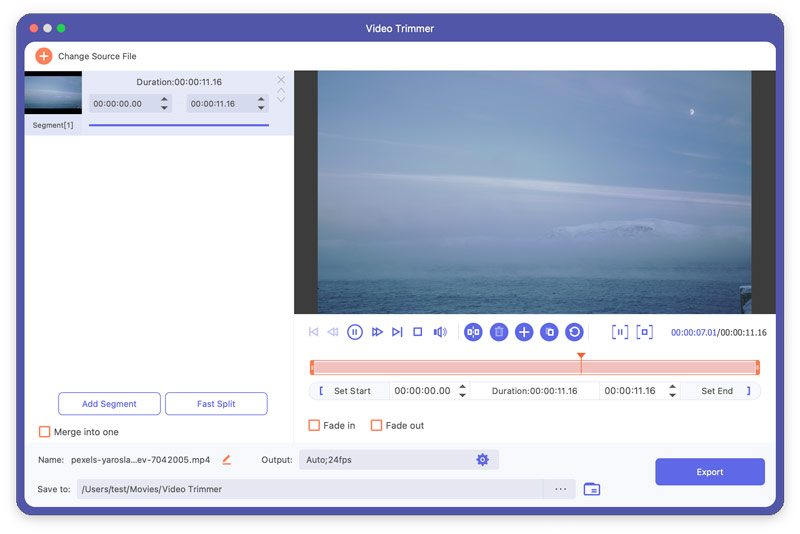
Video Trimmer
Step 1 Click Video Trimmer from the Toolbox interface. Add a video to it.
Step 2 You can drag the clipper on the progress bar or enter the start and end time directly on the bottom Duration bar to cut off parts you do not want. Click Add Segment, If you want to add more or other segments. Click Fast Split, the current segment can be split into pieces by average or by time.
Step 3 If you would like to add the Fade in/out effect, check the options under the progress bar. Check Merge into one, if you want to merge all clips into one. Click the Export button to export the video you trimmed.
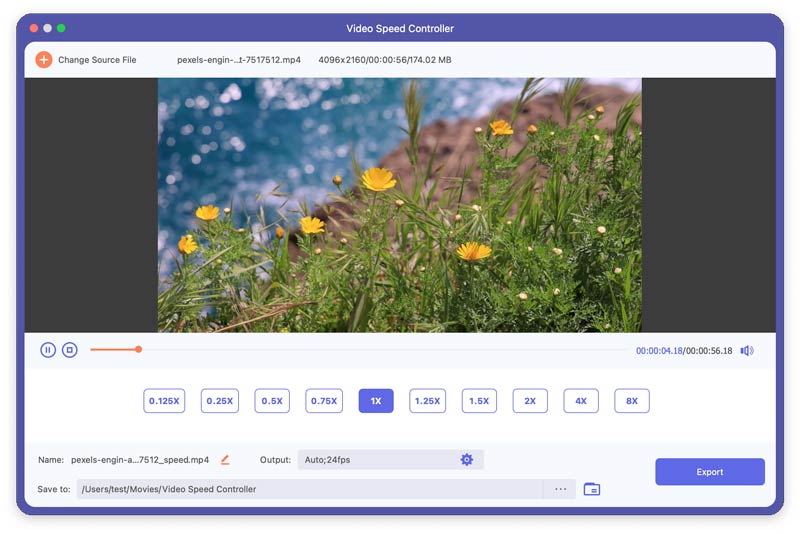
Video Speed Controller
Step 1 Click Video Speed Controller from the Toolbox interface. Add a video to it.
Step 2 Select a speed according to your need and you can preview the effect.
Step 3 Click the Export button to export the video at a new speed.
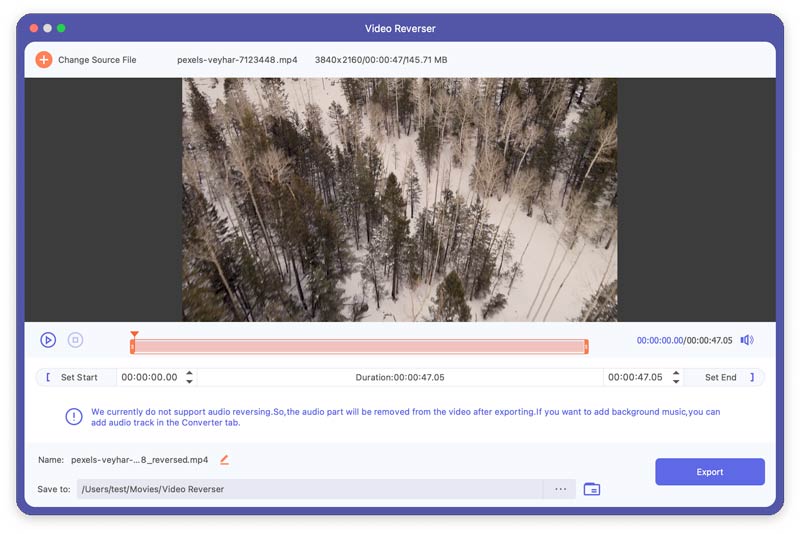
Video Reverser
Step 1 Click Video Reverser from the Toolbox interface. Add a video to it.
Step 2 Click the Export button to export the video you reversed.
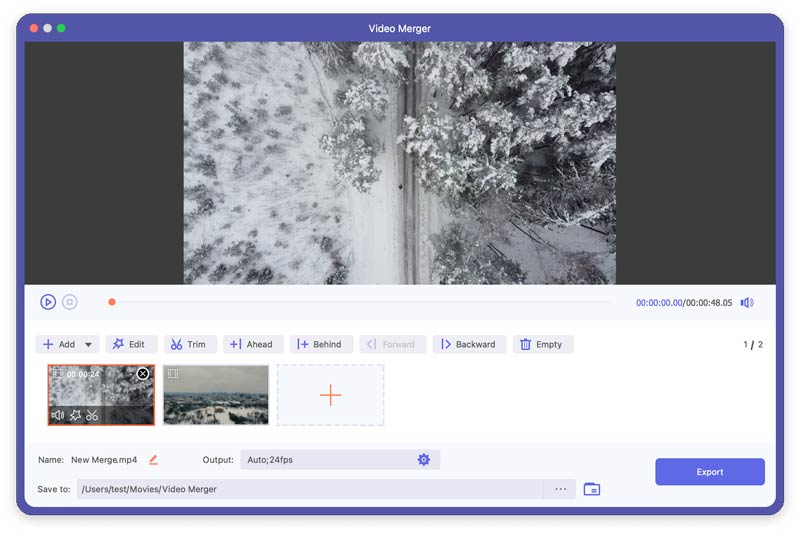
Video Merger
Step 1 Click Video Merger from the Toolbox interface. Add video(s) to it.
Step 2 After adding these files, you can adjust the order of them by moving one file with the mouse or clicking Forward and Backward. You can also edit and trim the video clips in this interface. Click the Empty button to remove all the clips.
Step 3. Click the Export button to export the video you merged.
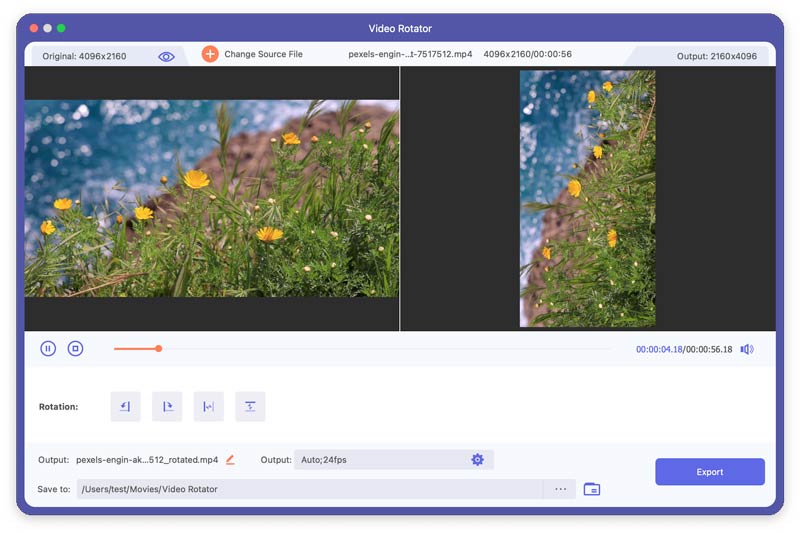
Video Rotator
Step 1 Click Video Rotator from the Toolbox interface. Add a video to it.
Step 2 You can rotate 90 degrees to the left/right, and flip horizontally/vertically. And you can preview the result at any time.
Step 3 Click the Export button to export the video you rotated.
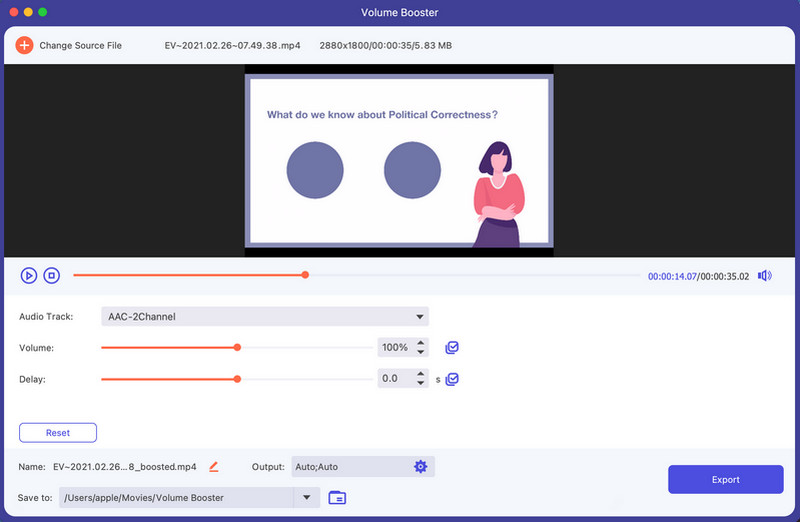
Volume Booster
Step 1 Click Volume Booster from the Toolbox interface. Add a video to it.
Step 2 You can adjust the volume of the video through dragging the point on the bar.
Step 3 Click the Export button to export the video.
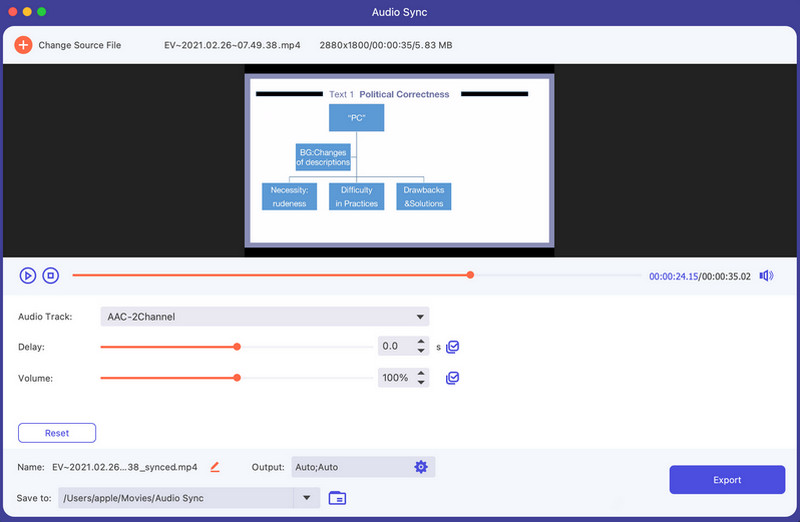
Audio Sync
Step 1 Click Audio Sync from the Toolbox interface. Add a video to it.
Step 2 When the audio track of your video is out of sync, you can fix the issue with Audio Sync. To speed up or slow down the audio by dragging the point on the Delay bar based on your need.
Step 3 Click the Export button to export the video.
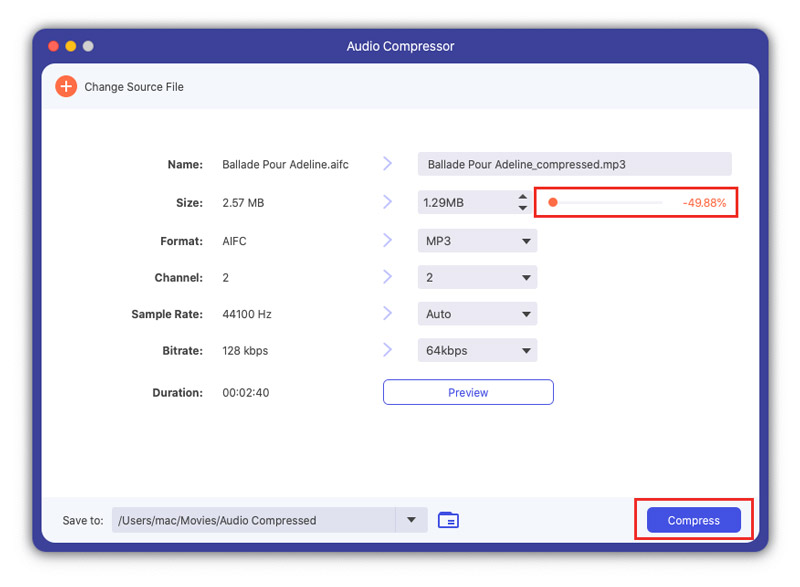
Audio Compressor
Step 1 Choose the Audio Compressor function in Toolbox. Click the central plus sign to add the audio your need to compress. Next, you can reduce the audio size by sliding the bar directly. The file name, format, channel, sample rate, and bitrate can also be edited based on your needs.
Step 2 Lastly, you can select the path to save the compressed audio file and click Compress to complete the audio compression.
Video Watermark Remover
Step 1 Go to the Toolbox tab and click the Video Watermark Remover button to enter the function.
Step 2 Click the Add watermark removing area to select the watermark area you want to erase by dragging the frame. You also can change the number of Size, Top, or Left to select the watermark area.
Step 3 You can drag the progress bar if you only want to remove the watermark from specific time periods.
Step 4 Finally, click the Export button to finish.
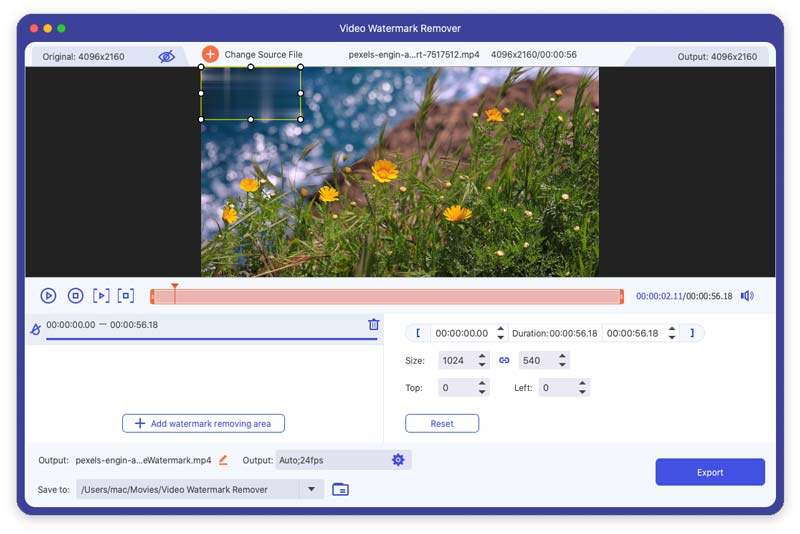
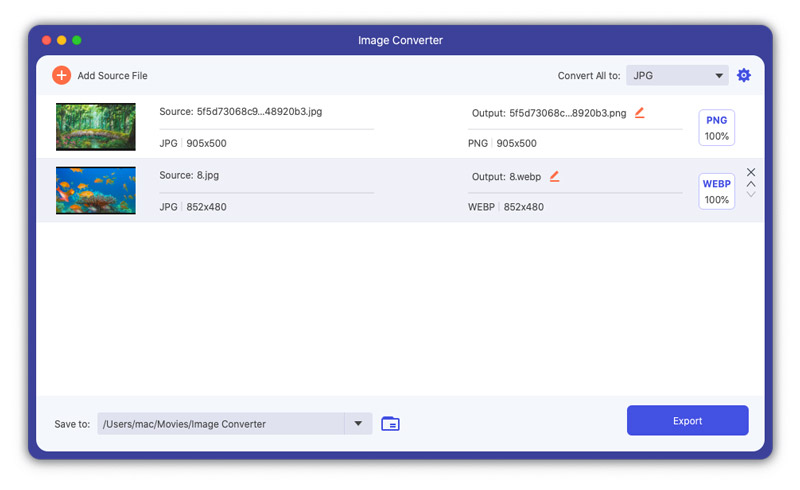
Image Converter
Step 1 You need to enter the Image Converter tool from Toolbox to convert the image format. After that, you can add pictures by clicking the plus sign. You can add multiple images to convert and select the output format at a time. You also can change the output format separately. In addition, you can click on the format icon at the left to change the resolution and quality of your image as you like.
Step 2 Later, click the Export button to save converted images to your device.
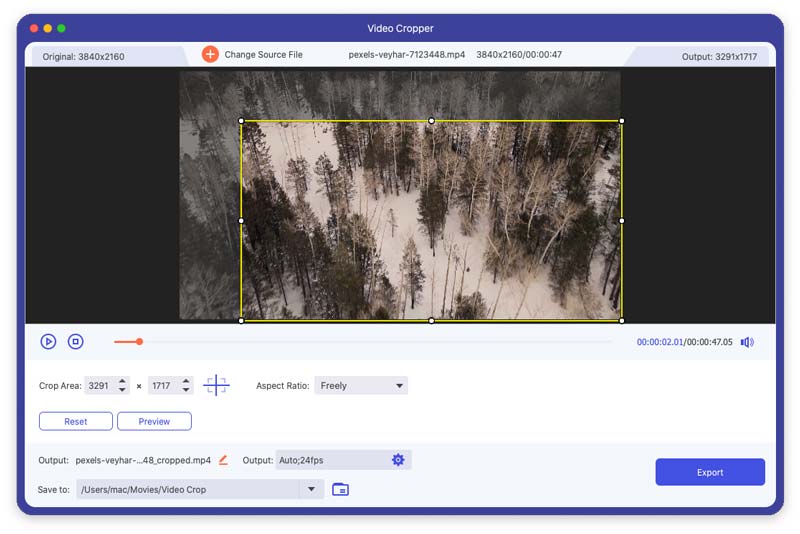
Video Cropper
Step 1 To crop videos, please open Video Cropper in Toolbox and click the big plus sign to add a video.
Step 2 To crop, you can directly drag the yellow rectangle based on your needs on the video picture. You can also choose the area to keep by changing the Crop Area number.
Step 3 If you want to see the result of cropping, please click the Preview button. Next, click the Export button to save the cropped video.
Video Watermark
Step 1 Select the Video Watermark in the Toolbox tab and add a video to this tool by clicking the central plus sign.
Step 2 In this function, you can add text watermarks and image watermarks to your videos.
If you want to add a text watermark to your video, please select Text Watermark. Here you can change the text font and color.
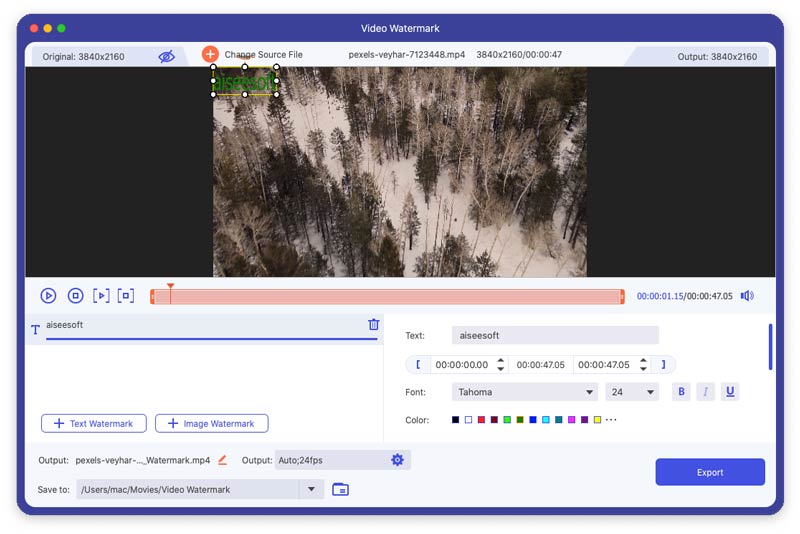
If you want to add an image watermark or an existing logo to your video, you can select Image Watermark. Here you can change the orientation and the opacity of the image watermark.
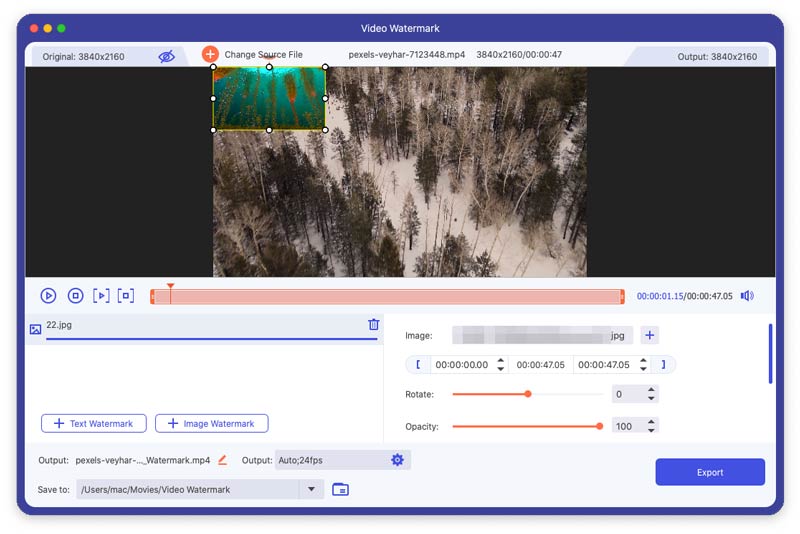
Step 3 Lastly, click the Export button to save your video with a watermark.
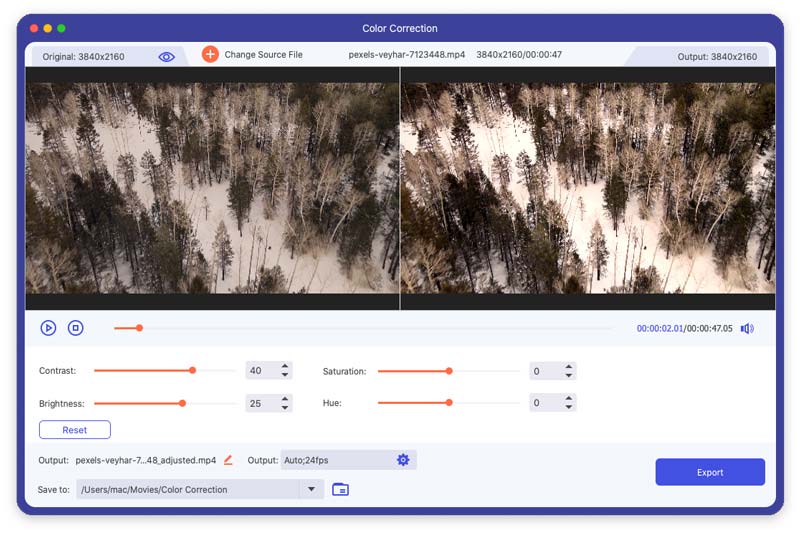
Color Correction
Step 1 Select the Color Correction in the Toolbox tab and add a video to this tool by clicking the central plus sign.
Step 2 While using this tool, you can change the Contrast, Saturation, Brightness, and Hue of your video as you like.
Step 3 Later, click the Export button to save the video.
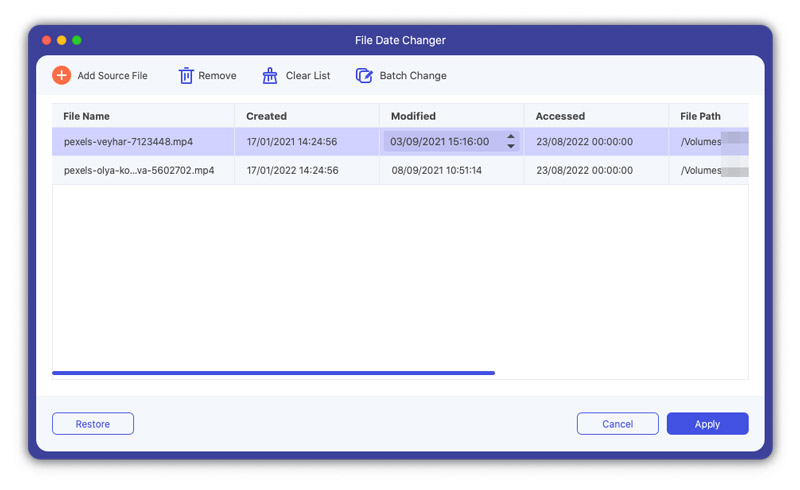
File Date Changer
Step 1 To change your file date, click File Date Changer in Toolbox. Here you can change the created date, modified date, and accessed date of your file. And you can change multiple file dates in batches.
Step 2 Next, click the Apply button to complete the modification.
Noise Remover
Step 1 Find Noise Remover from the Toolbox interface. Select a video to input.
Step 2 When you think the noise in your video is annoying, you can tackle the issue with Noise Remover. To remove the excess noise, you can check the Enable audio noise reduction box and click the Checkbox button behind to apply to all audio tracks based on your needs.
Step 2 Click the Export button to export the video.

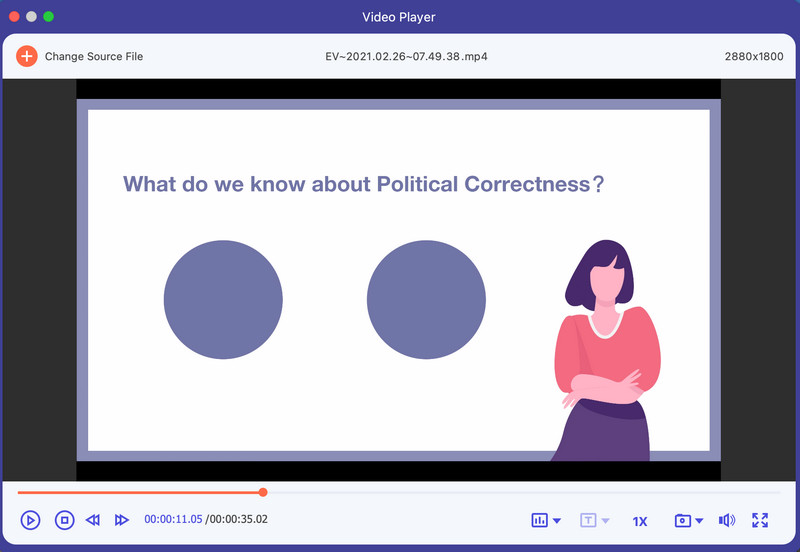
Video Player
Step 1 Find Video Player from the Toolbox interface. Input your targeted video.
Step 2 To play and enjoy your video, you can use different features with Video Player. At the bottom menu, you can check the separate icons to play, stop and move the video to previous or next 5 seconds, select the audio track, edit subtitles, change play speed, take snapshots, adjust volume and enter full screen.
Part 6. Set Preferences for Different Needs
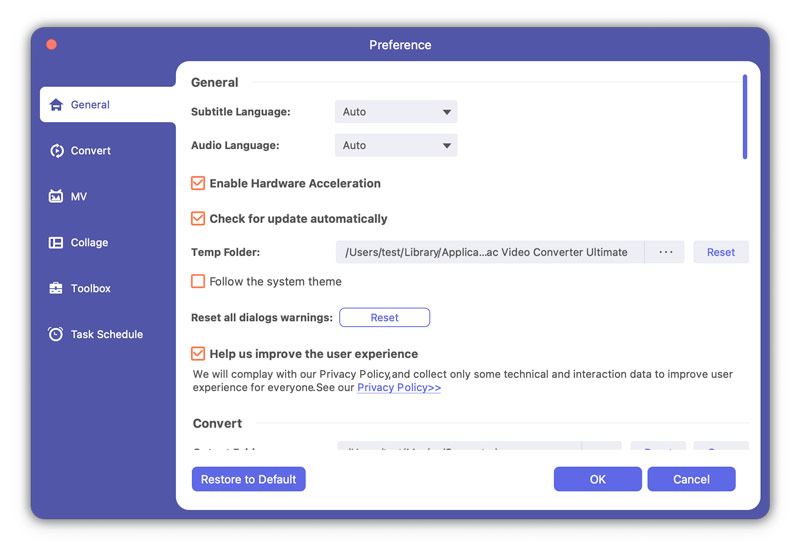
When you are using the converter function, you can click the Gear icon at the bottom of the interface. This is the button for Preferences.
There are five options in it.
1.General
You can set Subtitle Language, Audio Language, and so on in this section.
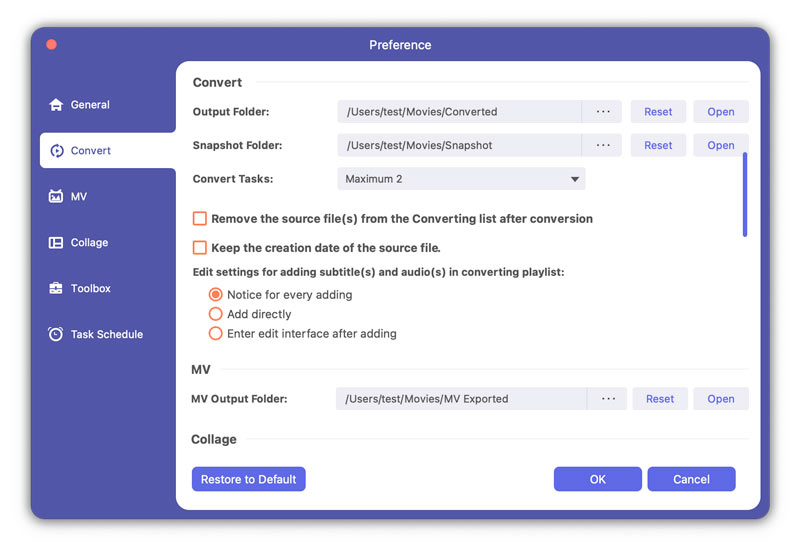
2.Convert
You can set output folder, snapshot folder, convert tasks, and so on in this section.
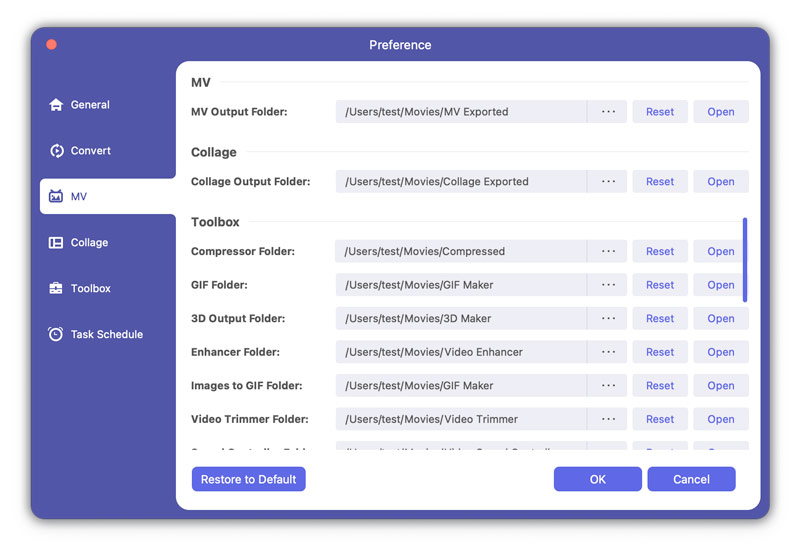
3.MV
You can change the MV output folder in this section.
4.Collage
You can change the collage output folder in this section.
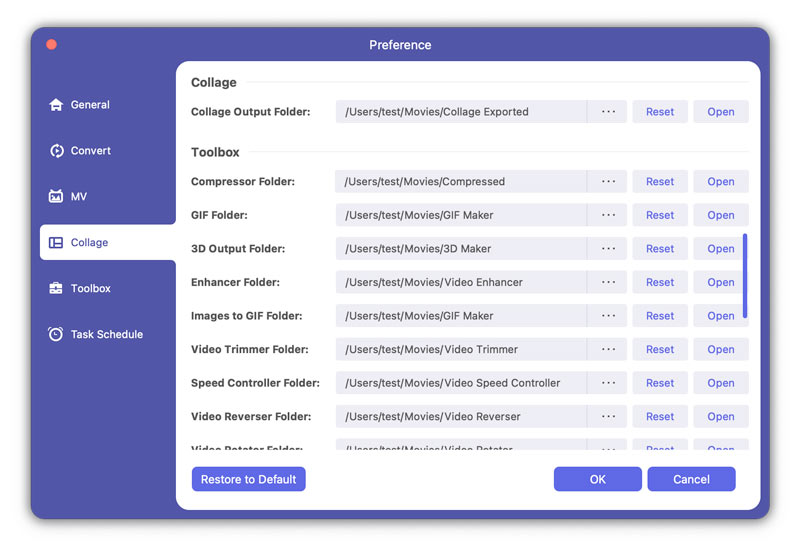
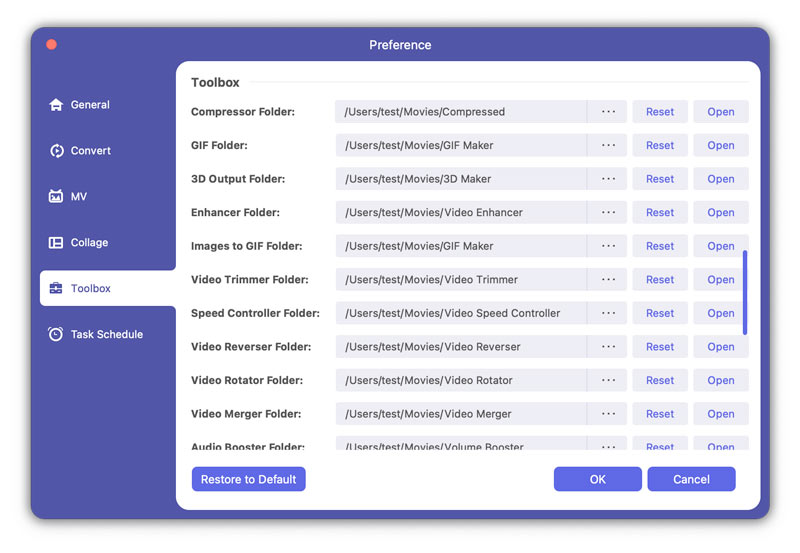
5.Toolbox
You can set the output folders of the compressor, GIF, 3D, images to Gif, video trimmer, speed controller, video reverser, video rotator, video merger, audio booster, and audio sync in this section. You can also check the box of Keep the creation date of the source file here.
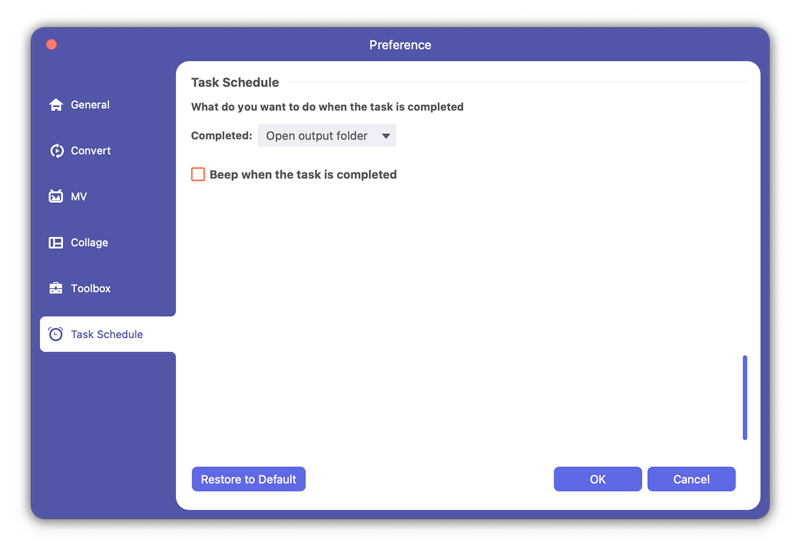
6.Task Schedule
You can choose the action like opening the output folder, shutting down the computer, sleeping computer, exiting the program, or doing nothing after completing the task in this section. You can also choose to let the software beep or not after completing the task by checking the box of Beep when the task is completed.
Part 7. More Preference Settings for Mac Video Converter Ultimate
Apart from the best converting, editing and enhancingfeature, there are also more preference settings for Mac Video Converter Ultimate, including:
Update
For checking the new feature of this software, you need to make settings to get the update reminder. Click Menu > Help > Tick Check Update...
-
How to Put iMovie Video into Famous Online Site
How to solve different problems when you upload video to the famous online site from iMovie? How to upload iMovie to the famous online site?
 Posted by Jenny Ryan | 06.12.2017
 -
How to Convert MTS to MOV
If you have taken some MTS videos by your camera, do you know how to convert them to MOV and play them on your Mac? This post will tell you clearly.
Posted by Jenny Ryan | 22.02.2013 -
How to Convert MTS to MP4 HD
When you convert MTS to MP4, you should make sure the high quality of output file. Find the detail for how to convert MTS to high quality MP4 file.
Posted by Jenny Ryan | 22.02.2013 -
How to Convert MOV to SWF
The article explains the detail about the procedure for transcoding MOV to SWF.
Posted by Jenny Ryan | 14.03.2014 -
How to Convert ASF to MOV
When you get some education videos in ASF, you have to convert ASF to MOV in order to use for Apple devices. Learn the easiest way to turn ASF to MOV now.
Posted by Jenny Ryan | 24.08.2012 -
Simple Ways to Convert M4V to MP4
Want to convert M4V to MP4? You can learn how to convert M4V to MP4 online and convert M4V to MP4 on Mac/Windows with M4V to MP4 converter in this post.
Posted by Jenny Ryan | 08.03.2016 -
How to Convert DAT to MP4 with MP4 Converter
In order to make sure the DAT file more playable for more devices, you need to convert DAT file to MP4. Try the DAT to MP4 Converter in this article.
Posted by Jenny Ryan | 22.02.2013 -
How to Convert MP4 to XviD on Windows and Mac
Having problems when converting MP4 to XviD? This article will give you solution about it on Windows/Mac.
Posted by Jenny Ryan | 22.02.2013 -
How to Convert TS to MP4
If you have to use TS files, you can convert TS to MP4 file. What should be important when you change TS files to MP4? You can find the detail from the article.
Posted by Jenny Ryan | 21.07.2017 -
How to Convert VOB to WMV for Windows Movie Maker
The article provides the best to load VOB files to playback and edit with the initial VOB to WMV Converter.
Posted by Jenny Ryan | 22.02.2013 -
How to Convert M4V to WMV
What can you do to use iTunes files on Windows operation, you have to convert M4V to WMV. Just learn how to change encrypted M4V to WMV easily from the article.
Posted by Jenny Ryan | 08.03.2016 -
How to Convert ASF to WMV
If you need to convert ASF to WMV format, you should learn the differences between ASF and WMV. The article explains the easy way to change ASF files to WMV.
Posted by Jenny Ryan | 14.03.2014 -
Three Methods to Convert WMV to SWF
While Windows Movie Maker says no to your WMV video, you do not worry. Just convert WMV to SWF before loading it.
Posted by Jenny Ryan | 14.03.2014 -
How to Convert WMV to MP3 Using Free Video Converter
You just want the .mp3 audio? Then, this free video converter will help you convert your .wmv file to .mp3 audio easily and quickly.
Posted by Jenny Ryan | 14.03.2014 -
How to Convert AVI to WMV
A professional AVI to WMV converter makes it quite easy to convert AVI to WMV on computer.
Posted by Jenny Ryan | 27.06.2018 -
How to Convert AVI to WMA with High Quality
If you have some devices compatible with audio file only, you can convert AVI to WMA with high quality. Just learn more detail information about how to change AVI to WMA from the article.
Posted by Jenny Ryan | 22.02.2013 -
Best All-in-One AVI to 3G2 Converter
This article shares you the best All-in-One AVI to 3G2 converter. You can easily convert AVI video files to 3G2 files and personalize the video output as you want.
Posted by Jenny Ryan | 27.12.2016 -
How to Convert M2TS to AVI for HDTV
When you have to use AVCHD files on HDTV, you have to convert M2TS files into AVI. The article explains the best and easiest method to transcode M2TS to AVI.
Posted by Jenny Ryan | 11.12.2017 -
How to Burn HD Video to Blu-ray Disc
Aiseesoft Blu-ray Creator can create Blu-ray disc with high-definition videos. Burn TS, MTS, HD MP4, MPG,/MOV, MXF, MKV video to Blu-ray disc without quality loss.
 Posted by Louisa White | 19.06.2014
 -
How to Convert VOB to MKV Easily and Quickly
If you come across problems converting VOB to MKV, Aiseesoft MKV Converter is the best conversion program for you. This article tells how to convert VOB to MKV files using this powerful VOB to MKV converter in steps.
Posted by Jenny Ryan | 22.02.2013 -
How to Import Video from Camcorder to Mac
This guide shows you how to connect your camcorder to your Mac, and then copy footage from the camcorder into iMovie.
Posted by Jenny Ryan | 14.03.2014 -
How to Convert MKV to Xvid
You can change MKV to Xvid format for DVD Players, Xvid players and even DivX players. It is the article explaining the detail procedure to transcode MKV to Xvid.
Posted by Jenny Ryan | 13.12.2016 -
How to Convert MKV to DivX Format
If you have downloaded some MKV movies for your PS3 or Xbox, you can convert MKV to DivX format. Find the best way to change MKV file to DivX from the article.
Posted by Jenny Ryan | 13.12.2016 -
How to Convert FLV to DivX Format
As a popular video format for online streaming, you convert FLV to DivX format in order to playback on HDTV. Learn the detail about changing FLV to DivX file.
Posted by Jenny Ryan | 22.02.2013 -
How to Convert FLV to 3G2
When you have some FLV video files, you should convert FLV to 3G2 for mobile. In order to transcode FLV to 3G2 as you requirement, you can learn the details now.
Posted by Jenny Ryan | 22.02.2013 -
How to Convert FLV to WMA
Do you need to use the online video for your Player? You should convert FLV to WMA. Learn the best method to transcode FLV to WMA from the article.
Posted by Jenny Ryan | 06.04.2017 -
5 Best Split Screen Video Editor Available to Windows 10/Mac
Feel boring about the regular videos? Here are top 5 best split screen video editors to help you create unique effects with your own videos and photos.
 Posted by Ashley Mae | 08.04.2021
 -
How to Convert MKV to MPG
If you have to change MKV to MPG, you can learn more detail about the two formats first. And then learn the detail procedure to convert MKV to MPG easily.
Posted by Jenny Ryan | 27.12.2016 -
How to Convert M4V to MPEG
If you have some iTunes files, you have to convert M4V to MPEG in order to play iTunes on DVD. Learn the best method to transcode M4V to MPEG from the article.
Posted by Jenny Ryan | 08.03.2016 -
How to Convert MPG to VOB
When you need to convert MPG to VOB, you can easily find a MPG to VOB converter. But what should be the right type of VOB file? Learn more from the article.
Posted by Jenny Ryan | 22.02.2013 -
How to Convert MPEG2 to MPEG4
If you have recorded any file in MPEG2, you have to use the file on devices by converting MPEG2 to MPEG4. Learn the best way to transcode MPEG2 to MPEG4 now.
Posted by Jenny Ryan | 22.02.2013 -
How to Convert 4K MTS to MPEG
When you have some AVCHD files, you need to convert MTS to MPEG for online streaming. The article explains the requirements to transcode MTS files to MPEG.
Posted by Jenny Ryan | 14.03.2014 -
How to Convert VOB to MPEG
If you have to edit the VOB files from your DVD, you have to transcode the VOB file to MPEG at first. The article provides the best method to convert VOB to MPEG.
Posted by Jenny Ryan | 22.02.2013 -
How to Convert VOB to 3GP
If you want to watch the VOB files from your DVD on your Android phone, then you have to convert VOB to 3GP to play on your portable player.
Posted by Jenny Ryan | 22.02.2013 -
How to Convert RMVB to 3GP for your Cell Phone
If you have to use RMVB file on cell phone, you have to turn RMVB to 3GP file. Just learn the detail method to convert RMVB to cell phone compatible format 3GP.
Posted by Jenny Ryan | 27.12.2016
