How to Make Image Background Transparent for Free

September 10, 2020Ashley Mae

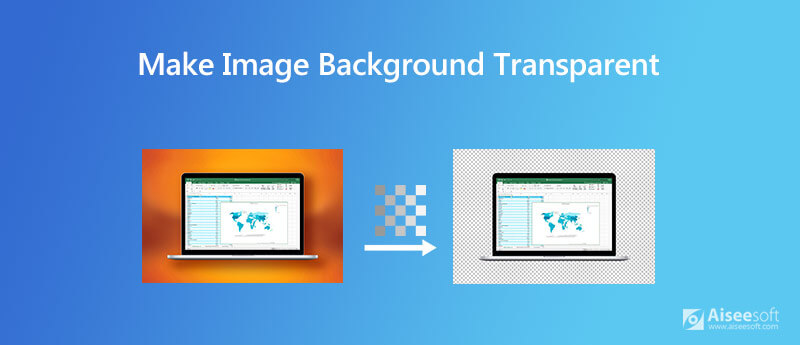
Sometimes when you design a logo or edit pictures, you may want to get rid of the unwanted background and replace it with another one. Then the first thing you should do is to make the image background transparent.

In this article, we will introduce 7 free practical means to you, which can assist you in erasing the background from your image.

Make Image Background Transparent

Part 1. How to Free Make Image Background Transparent Online

If you are a beginner to photo editing, then what you need is an intelligent and easy-to-use background remover. And it would be best if the remover can analyze the image and capture the background automatically without special skills.

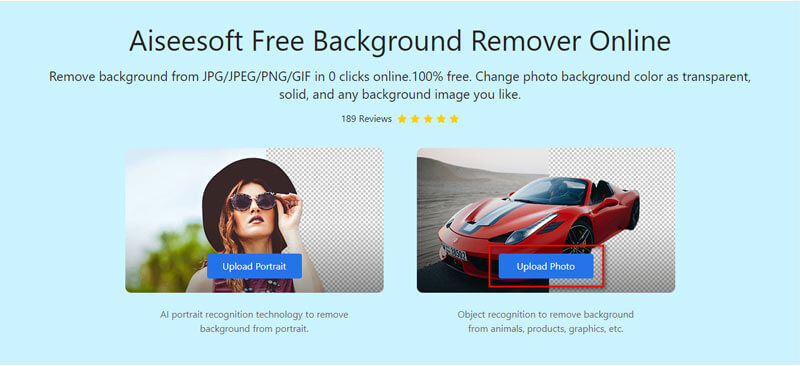
Here we highly recommend you to use Aiseesoft Free Background Remover Online, the most powerful background erasing tool that suits you best. With the advanced AI image recognition technology, this background remover can realize a massive saving in time. You can perform the erasing operation effortlessly without paying a penny. And at the same time, it can protect the object you want to keep from damage.

Besides making the background transparent, the built-in editor of Aiseesoft Free Background Remover even enables you to alter the background to a different color or image as you like. You are able to resize, crop, rotate and move the image to create personalized content.

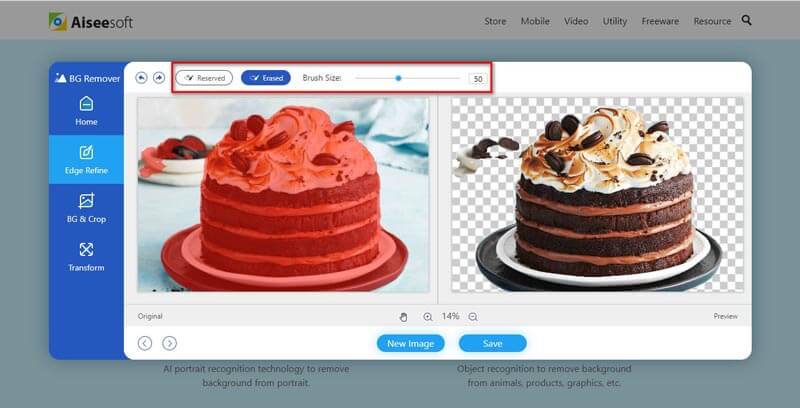
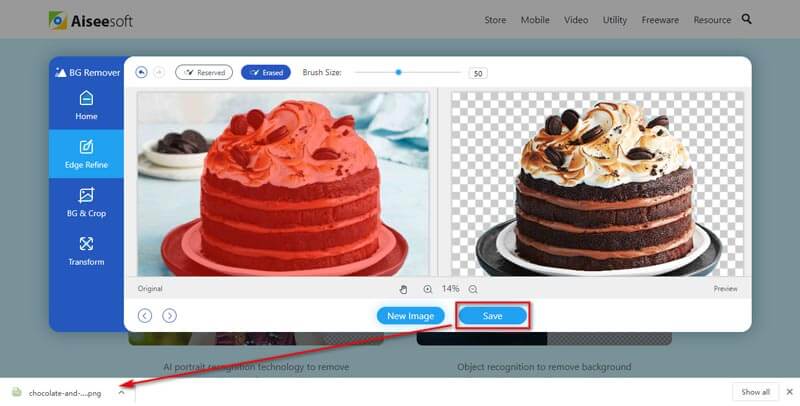
The steps below will get you up and running quickly.

Step 1.
Click the link above to navigate to Aiseesoft Free Background Remover Online. Then you can choose to remove the background from a portrait or a normal photo. Here, to demonstrate, we will enable the Upload Photo mode and delete the background from a cake photo.
Upload Photo
Step 2.
After uploading the photo, this remover will scan the photo and capture the foreground object automatically. As you can see in the picture below, the cake has been recognized and most of the background is removed. But there is still a small area that needs to be erased manually. Click the Erase button on the top and adjust the Brush Size to a reasonable value.
Brush Size
Step 3.
Now move your mouse to the place you want to erase. You will see a yellow circle on top of the photo. Then press and hold the left button of your mouse, and drag the eraser to erase the redundant part of the area. After that, you will get a perfect cake photo with a transparent background. Click on the Save button to download the changed photo to your computer. The default output format is PNG.
Save

Pros

  • Free & Easy to use
  • Preview the image changes in real-time
  • Offer multiple helpful editing and refining features
  • Work on Windows, Mac, and Linux

Cons

  • Cannot adjust the image quality

Part 2. How to Free Remove Image Background in Photoshop

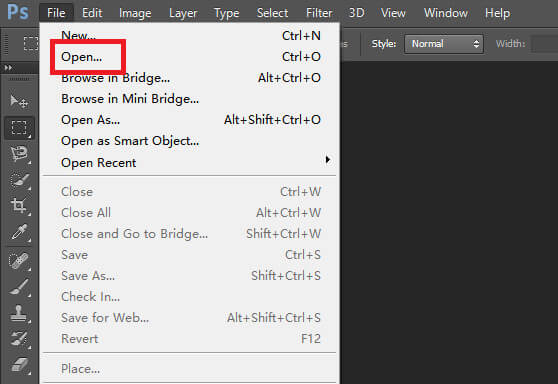
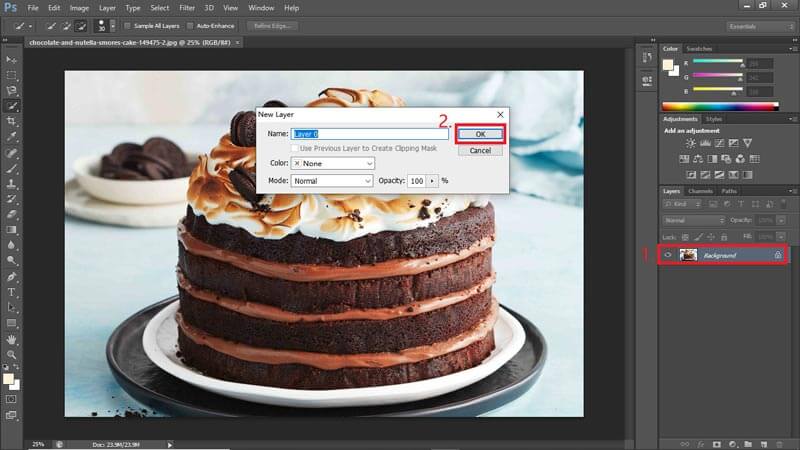
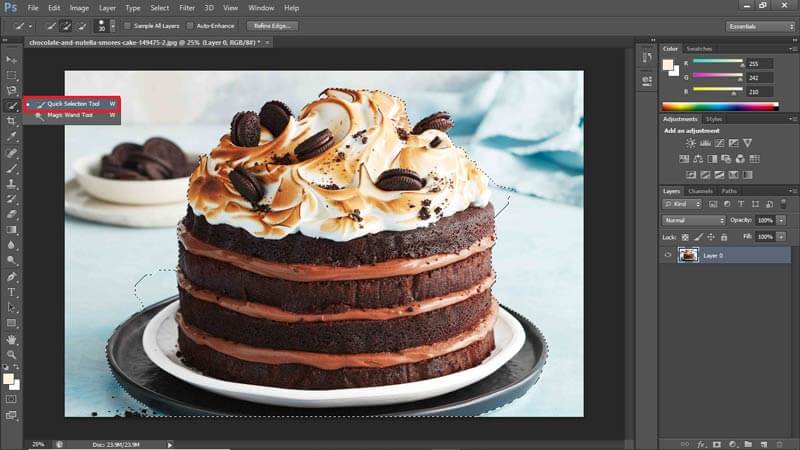
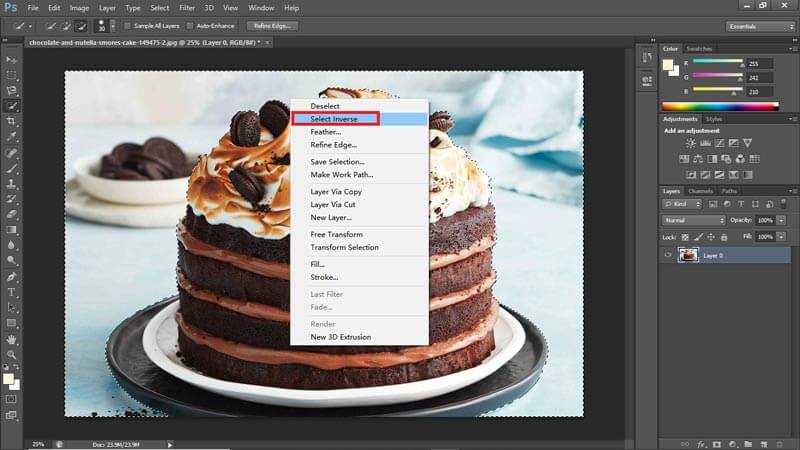
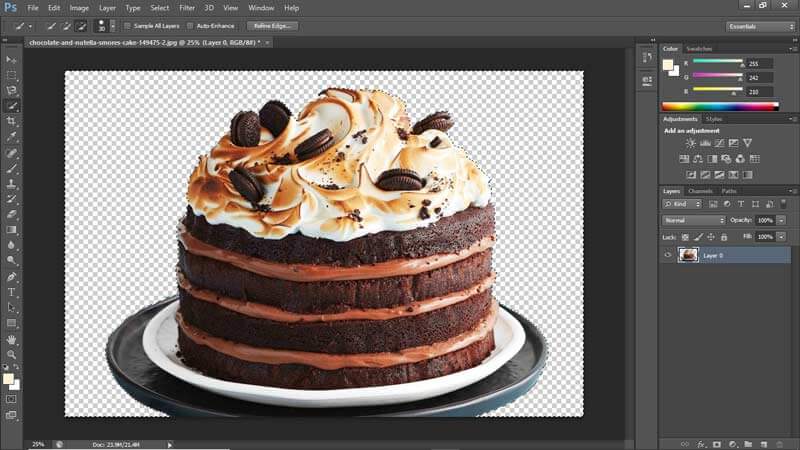
When it comes to photo editor, most people may think of Photoshop. Adobe Photoshop is the most famous image editing tool that contains numerous features like removing the watermark, modifying portrait, etc. But some users complain that this software is a little hard to operate. Photoshop can indeed be quite demanding sometimes. But if you practice hard enough, you will understand the strength of Photoshop.

But for now, just take it easy. We will share the simplest way to help you remove background with Photoshop. By the way, the following operation is based on Photoshop CS6.

Step 1.
Launch Photoshop on your computer. Then open the image you want to edit with this program. Then double click on the layer of your image if it is locked. Click OK to make a new layer.
Open File New Layer
Step 2.
Find the selection tool from the left toolbar and pick Quick Selection Tool. Then press and hold the left button of your mouse after clicking on the main object. Move your mouse slowly to select all the area you want to keep. Please stay away from the background.
Quick Selection Tool
Step 3.
Sometimes, you may need to enable Subtract from selection mode to adjust the edges by yourself due to the incorrect automatic selection.
Enable Subtract
Step 4.
After that, please right-click the selection and choose Select Inverse. Now, the image background will be selected.
Select Inverse
Step 5.
Click Delete on your keyboard to remove it. Don't forget to save the changed image into a new file. Just go to File > Save As and choose the output format as PNG.
Remove Background

Pros

  • All-in-one image editor
  • Precise erasing tool

Cons

  • Hard to install and configure sometimes
  • Free trial only lasts 30 calendar days

Part 3. How to Free Utilize GIMP to Create a Transparent Background

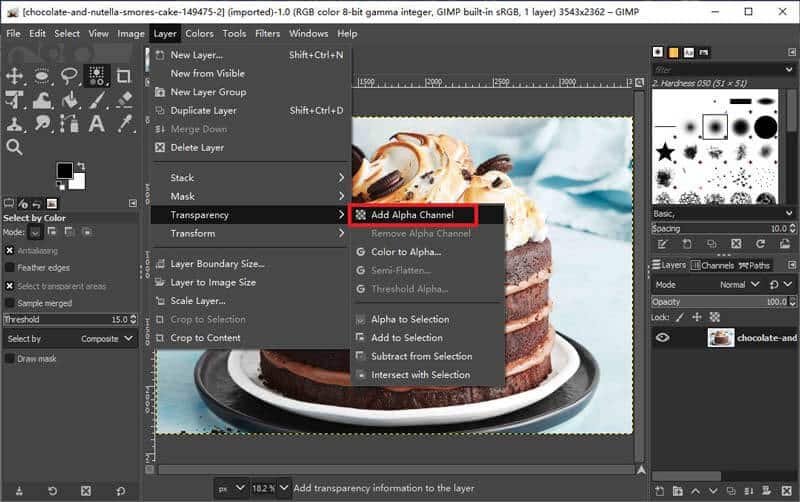
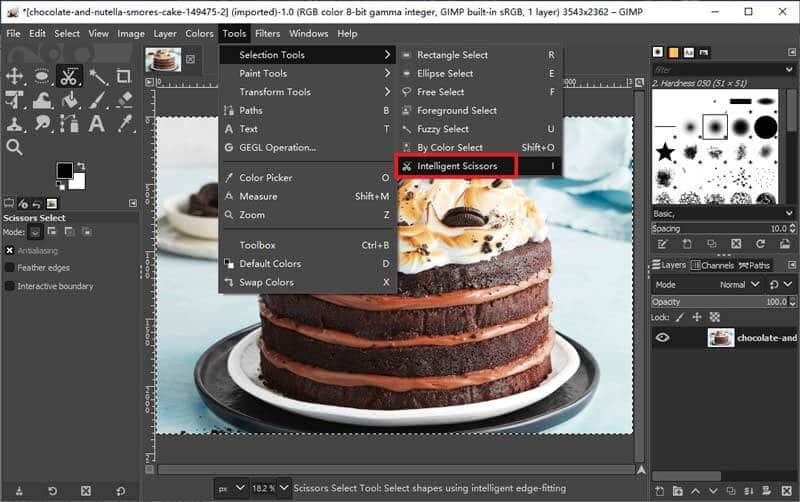
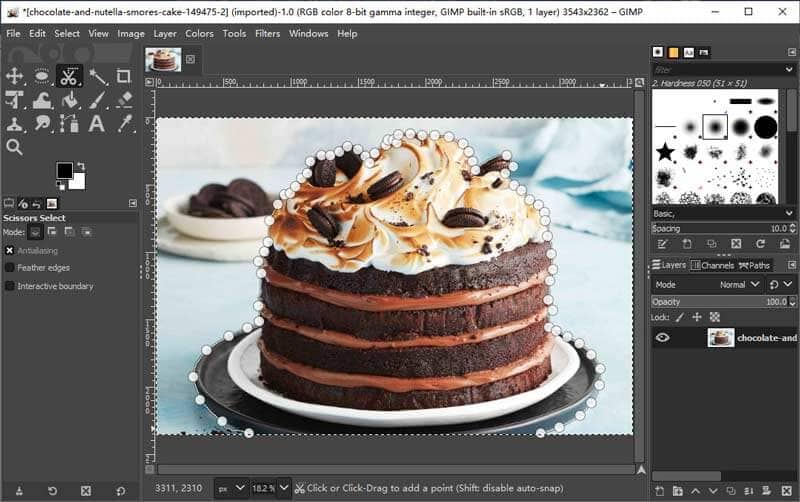
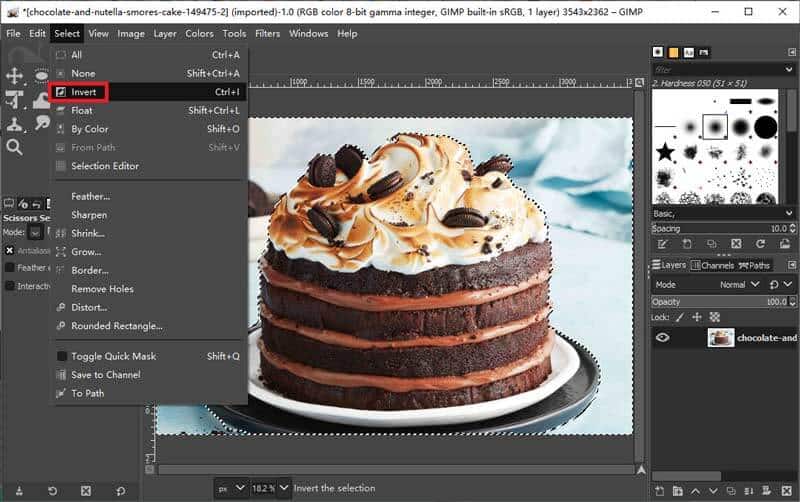
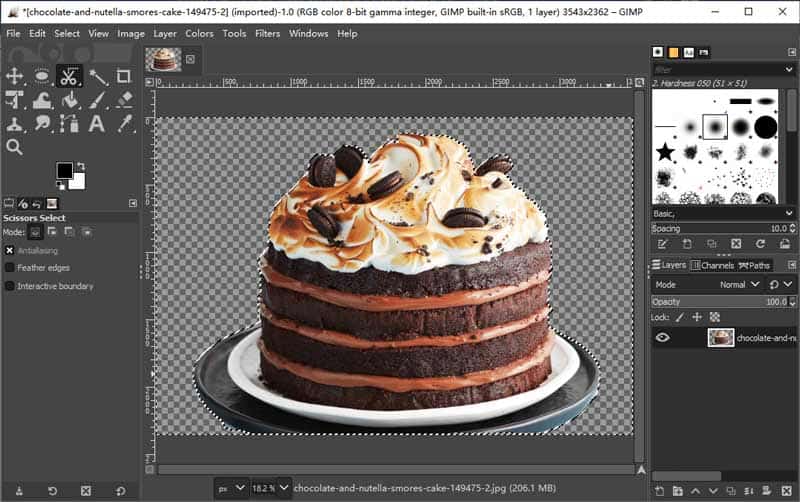
GIMP stands for GNU Image Manipulation Program, which is a free and cross-platform image editor. Like Photoshop, it also has many sophisticated features and customized options. Here are the steps to erase the background.

Step 1.
Download and install GIMP on your computer. Run it. When you enter the main interface, please Open the picture file in GIMP. You can zoom in/out if the image size doesn't fit the current window.
Step 2.
Then navigate to Layer > Transparency > Add Alpha Channel to add transparency to your image.
Add Alpha Channel
Step 3.
After that, please go to Tools > Selection Tools > Intelligent Scissors.
Intelligent Scissors
Step 4.
Now you need to click node after node around the outline of your main subject. To get a better image quality, you can add more nodes and make them closer to each other. Then if you reach the original point, please press Enter on your keyboard to convert the selection.
Click Nodes
Step 5.
Invert your selection and click Delete on the keyboard.
Invert
Step 6.
You will see an image with a transparent background. Export it to PNG file format.
Remove Background

Pros

  • Open source and free
  • Support third-party plugins

Cons

  • Take up lots of time and energy
  • Cannot recognize a complex image precisely

Part 4. How to Free Change Picture Background Transparent with Paint

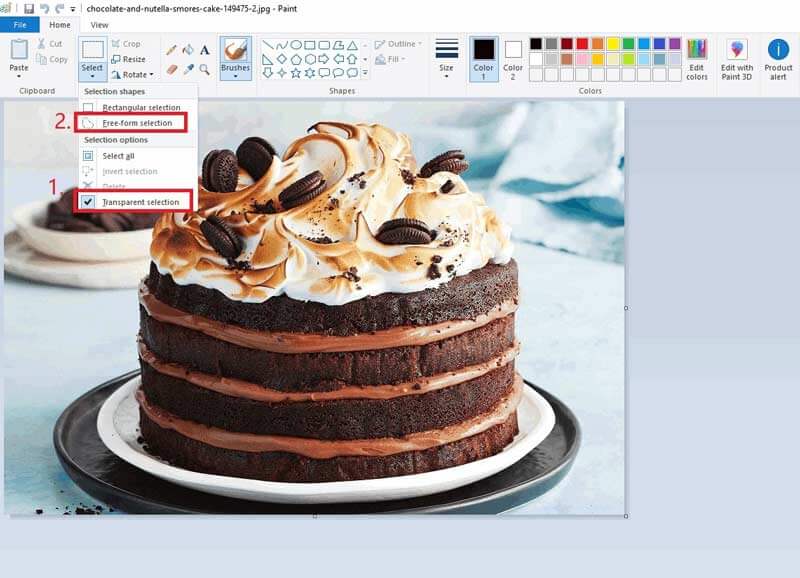
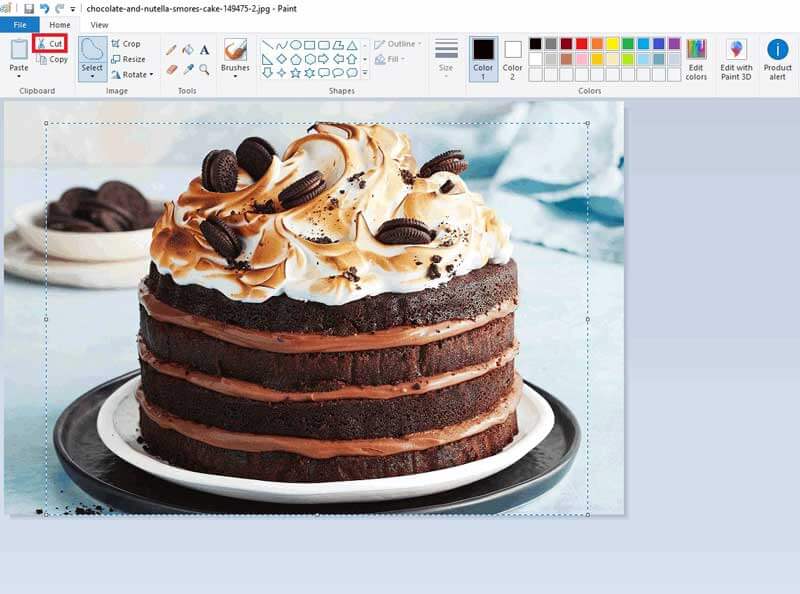
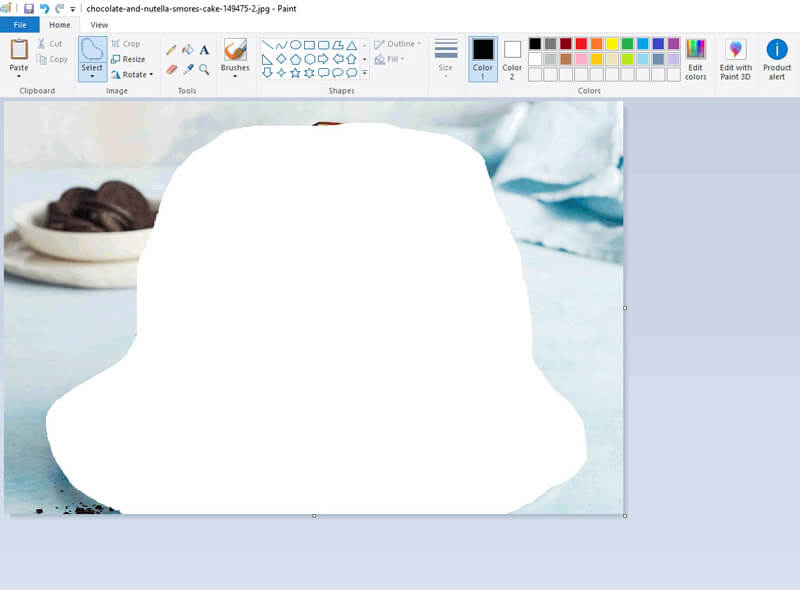
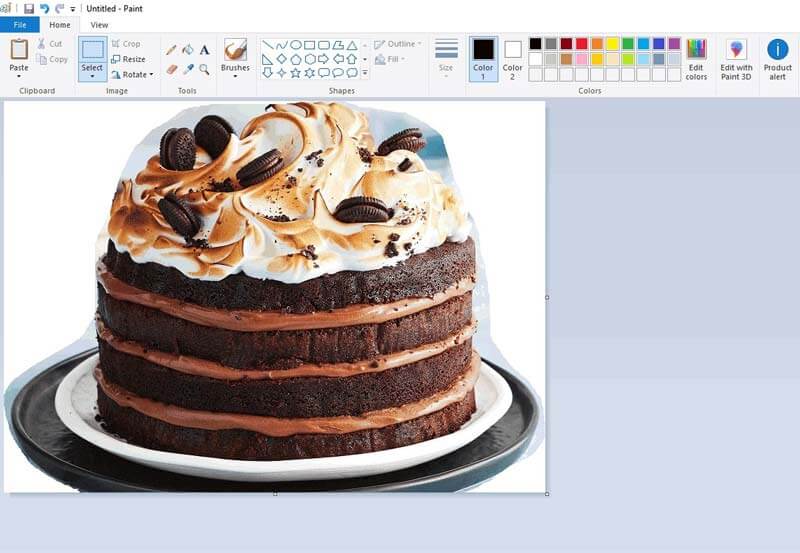
In fact, this method is for Windows users. With the pre-installed Paint software, you can make an image with a transparent background. You don't have to download any extra programs to your PC, as long as you are running Windows 7 or later. This tool is also a good way to crop pictures.

Step 1.
Find the image you want to refine and open it with Paint. First, choose the Select button from the toolbar. Enable the Transparent selection option.
Transparent Selection
Step 2.
Then click Select again and choose Free-form selection. Click-drag your mouse and draw around the foreground area. When you finish, you will see a rectangle around the selected zone.
Free-form Selection
Step 3.
Click on the Cut button to capture the selected object. At present, you have already cut out the image background.
Cut
Step 4.
Create a new image in Paint. Paste (Hotkeys: Ctrl + V) the captured object into the white canvas and drag it to the right place. Export a PNG image file.
Create New Image

Pros

  • No extra installation

Cons

  • Cannot process a difficult image
  • Windows only

Part 5. How to Free Get a Transparent Background Using Illustrator

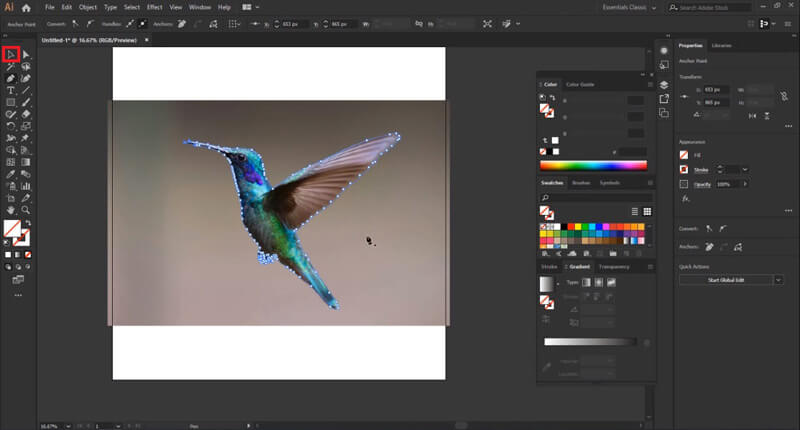
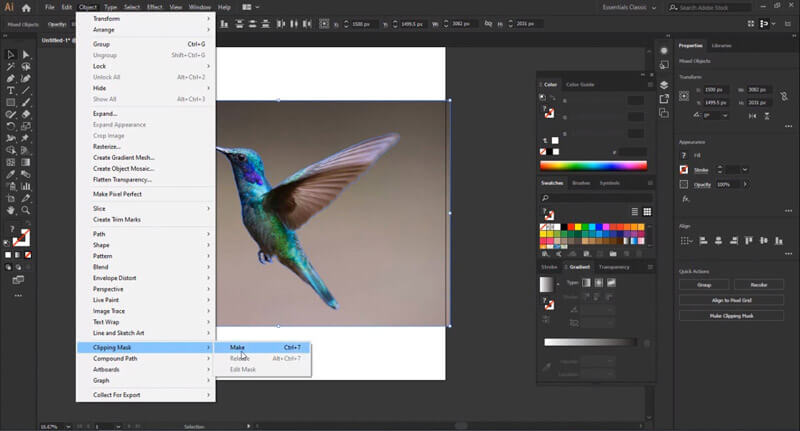
Even though both Illustrator and Photoshop belong to Adobe, they are not alike exactly. Illustrator is a vector graphics editor that usually is used to create graphics for print, web, mobile, and more. However, you can still use it to deal with an unwanted background with a few special skills.

Step 1.
After installing the software on your computer, you should use it to open the picture. Then click on the Pen icon in the left toolbar.
Pen Tool
Step 2.
Click on the edge of the main object, again and again, to surround the foreground object with nodes and curved lines. You can use the Zoom feature to improve precision during the process. To complete the outline, please click on the first node one more time.
Step 3.
Find a black Mouse Cursor icon on the top of the toolbar.
Mouse Cursor
Step 4.
Go to Select > All to select the whole image with an outline.
Step 5.
Locate Object in the menu bar. Next, Clipping Mask > Make. Now, the background is deleted. You can save the image to your computer.
Clipping Mask

Pros

  • Professional tool
  • High precision

Cons

  • Not free forever
  • Need time and patience to add nodes around the outline

Part 6. How to Free Make Photo Background Transparent in PowerPoint

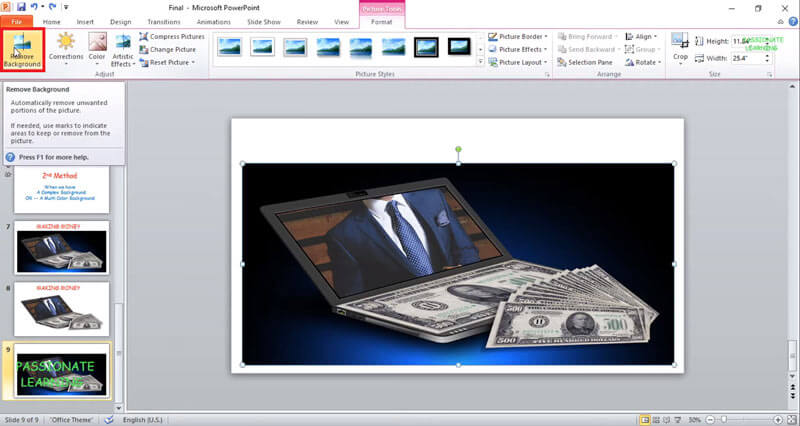
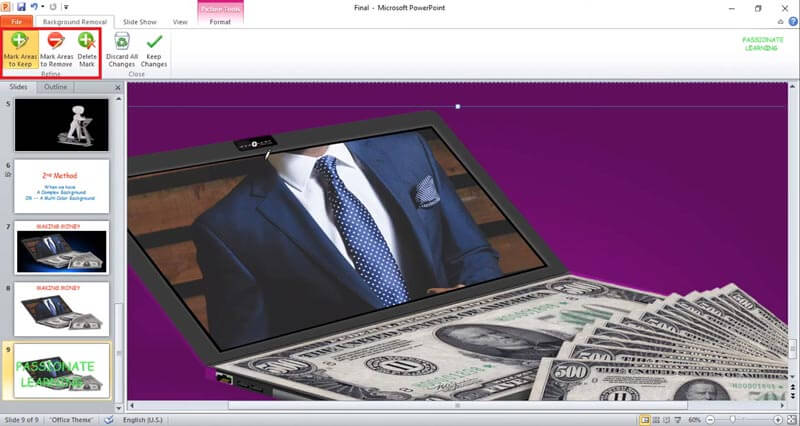
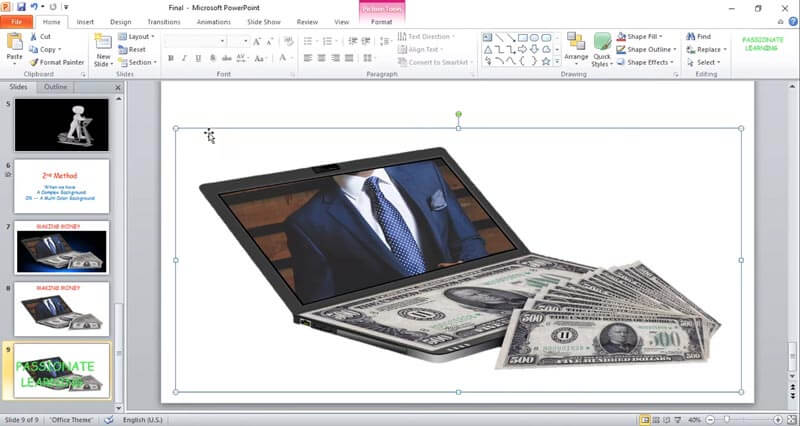
You may only see PowerPoint as a presentation tool. But surprisingly, you can utilize this program to make your image background transparent.

Step 1.
Open PowerPoint and Insert the picture with a background. Click on your picture, and you will go to the Picture Format tab by default. Choose the option of Remove Background. PowerPoint will recognize the foreground object automatically.
Remove Background
Step 2.
The violet part will be erased. You'd better check the detecting result. If necessary, you can adjust the selection manually with the Refine tool above.
Refine
Step 3.
Once you finish adjusting, you can apply the changes by clicking the Keep Changes button near the Refine Tool. The final job is to save the changed image in PNG format.
Keep Changes

Pros

  • Automatic recognizing tool

Cons

  • Work only on Windows
  • Difficult to separate the object when the image has low contrast

Part 7. How to Free Erase White Background with Publisher

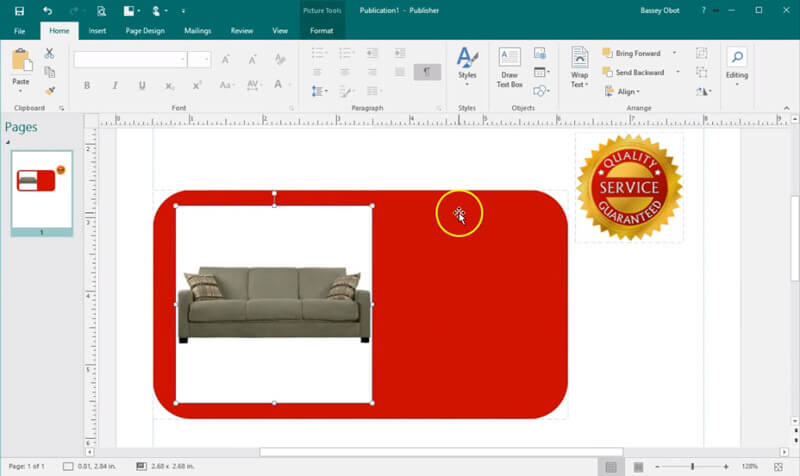
The last method we are going to introduce to you is also from Microsoft Office package. It is called Publisher, a useful implement to design calendars, posters, greeting cards, etc.
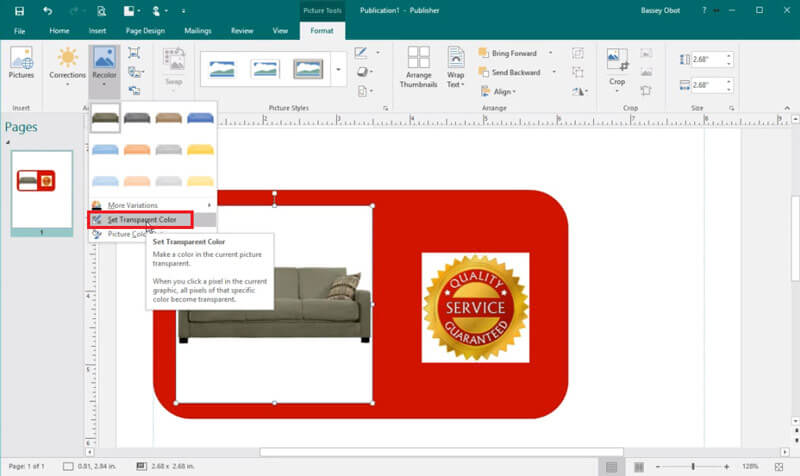
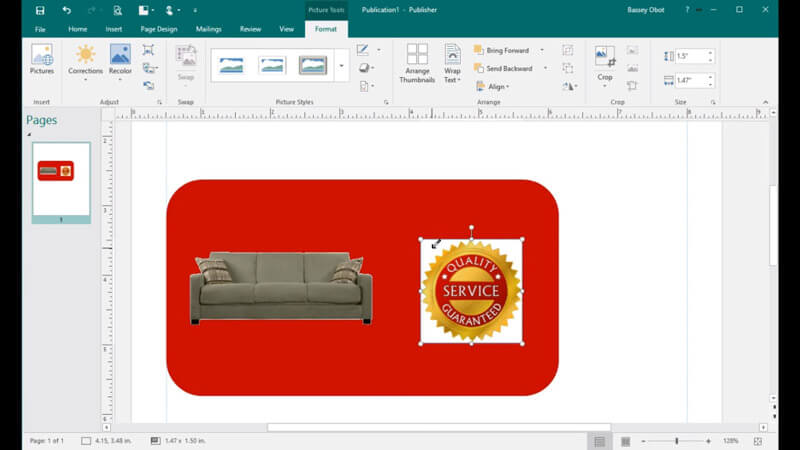
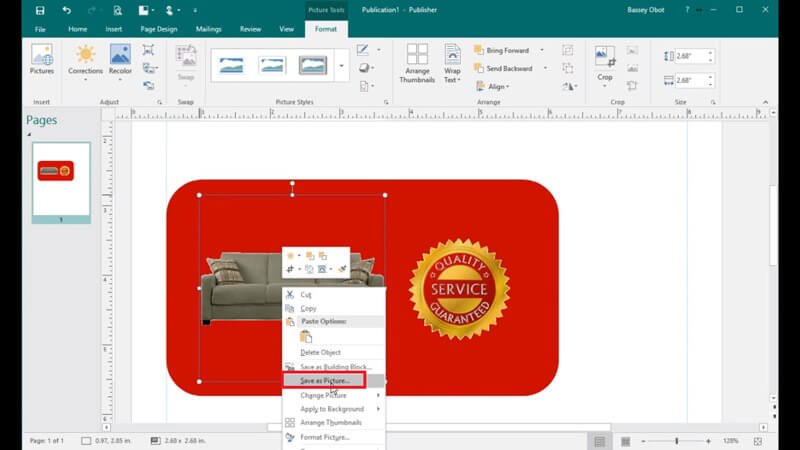
Step 1.
Import the image to Publisher. Then click on the image you want to change to select it.
Add Picture
Step 2.
Select Picture Tools and click Recolor. Choose Set Transparent Color.
Set Transparent Color
Step 3.
Move the pen to the white background. Click once to make the white background transparent.
Remove Background
Step 4.
Save the changed image as PNG. If you need, you can crop the PNG image to improve the composition.
Save

Pros

  • Simple to operate

Cons

  • Only compatible with Windows
  • The background should be a solid color

Part 8. FAQs of Making Background Transparent

1. Can I get a JPG image with a transparent background?

No, you can't. You should use PNG or GIF instead. These 2 formats support transparency.

2. What is PNG?

When you search for logos on the Internet, you will find most results are in PNG format. PNG is short for Portable Network Graphics, which is usually used for web design. The best part of this file type is that it can provide a transparent background.

3. How do I get rid of transparent background?

If you want to add a new background to your image, you can try Aiseesoft Free Background Remover to help you with that. Just upload your image and then select any background color or picture to make your image look better.

Conclusion

Most methods we have introduced today are based on Windows system. If you have already installed the software like Paint, PowerPoint, and Publisher on your PC, then you can give them a shot. Just remember that not every image background can be removed. To make a transparent background with these programs, you need to make sure that the picture has a plain background.

As for PS, Illustrator, GIMP, and Aiseesoft Free Background Remover, they are more professional and powerful. Among them, Aiseesoft Free Background Remover is easier to understand. It works perfectly on both Windows and Mac. And you don't need to install any software on your computer.

Hope you have found the one that suits you best. Contact us if you have further questions.

What do you think of this post?

Excellent

Rating: 4.7 / 5 (based on 119 votes)Follow Us on

Disqus IconLeave your comment and join our discussion

Change Image Background

Make Image Background Transparent Remove White Background Change Photo Background to White Remove Background from Image Change the Background of Pictures Blur Background Apps Blur Photo Background Background Changer Apps Make Background of a Picture Black Add Background to Photo
Video Converter Ultimate box

Video Converter Ultimate is excellent video converter, editor and enhancer to convert, enhance and edit videos and music in 1000 formats and more.

Free DownloadFor Windows

Secure100% Secure. No Ads.

Free DownloadFor macOS

Secure100% Secure. No Ads.

Back to top