What is an iPhone HDR image compared to the ordinary one? Do you have met some problems that when you took some photos but the sun is so shiny that ruined your pictures? And you have tried several times to solve the trouble, such as adjusting your position, choosing a shadow place, using other camera app to solve the problem, but finally you still got a photo that cannot balance the shadows and highlights.
HDR iPhone
The camera just cannot adjust the high dynamic range as the eye view. It is the reason that you need to use iPhone HDR mode for your camera. Now let me introduce what is HDR photography on iPhone and why would we want to use this iPhone camera effect? Just read the article and get the idea of what is HDR on iPhone.
Before you take steps to use HDR on iPhone, you should know what HDR is. HDR stands for High Dynamic Range, which works to balance the shadows and highlights of photos so the sense of picture. Usually you can combine 3 or more different images with bracketed exposures into a single shot. When you take photos in HDR mode within iPhone, the device will output two images, one is shot in an iPhone HDR mode, and the other is in the normal mode.
You can find a big difference between these two similar photos. And the iPhone HDR mode would tell you how different between the brightest parts of the scene and the darkest parts of the scene that is the dynamic range of a scene have told you. Because human eyes can see a much large dynamic range than a camera, that is why we should use HDR mode to make up the difference.

What 's more, whatever your phone is older than iPhone 5, iPhone6 or the latest one iPhone X, HDR has been there for a long time on iPhone. Actually HDR mode on iPhone makes a big difference when you are in a necessary situation and want to take better-looking photos, which are near to the truth scene.
For example, if you want to take a photo in front of your new house to share with your friends or relatives on social network. You shoot it at first time waiting in hope. Because it is a sunny day, the picture is in overexposed. You can only see the brightest background is too shiny and it makes the trees and house in photo are washed out.
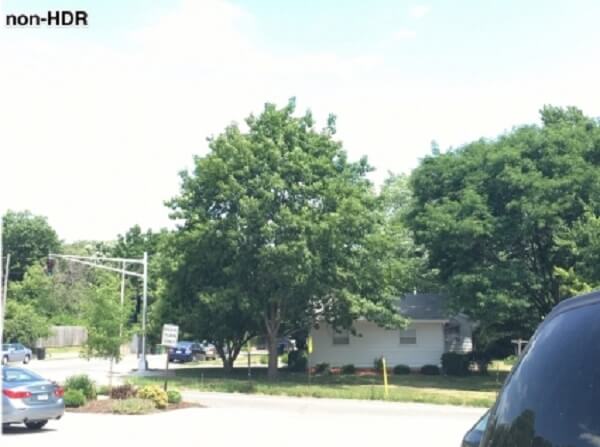
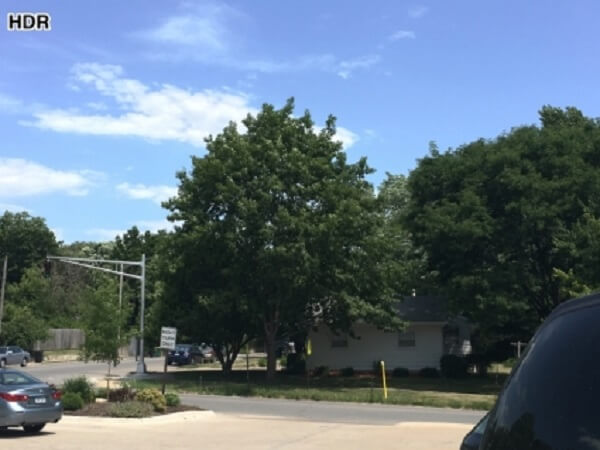
But when you take photos in a HDR mode on iPhone, you will see a vivid picture just like the real scene. HDR mode on iPhone has weakened the brightest of the sky and increases the darkest part of the other scenes. HDR mode on iPhone can combine multiple exposures so that both the house and the sky can be exposed properly. You can see the latter photo is much better than the former one.
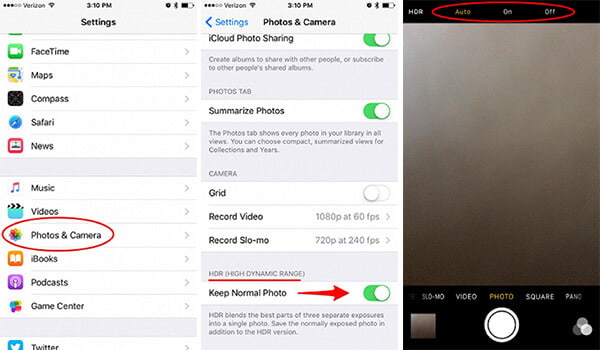
Step 1 Open "Settings" on your iPhone home screen, you can to find "Photos &Camera" icon to turn on iPhone HDR. When you can take a contrast to choose better-looking images. Usually photos are HDR mode, which will be seeing on the top of the left corner of the preview.
Step 2 After that you can tap Photos and Camera to find HDR (HIGH DYNAMIC RANGES). When you toggle it on to "Keep Normal Photo", you only keep the ordinary photos. When toggle it off only to keep the HDR version.
Step 3 Open your Camera app, tap HDR on the top, or you can choose on to keep the HDR mode and choose Auto to let it open the HDR mode on iPhone when necessary. When you have set the mode for keeping both the HDR photo and the non-HDR photo, once you shot a photo, you will get two images. One is the HDR photo, the other is the non-HDR photo on iPhone.
Usually using HDR mode on iPhone will take a longer time to shoot a photo. Because it needs some time to combine three different exposures into one single shot. You would better keep your iPhone still by using a tripod or not move your hands. Now there are several steps to take HDR photos on iPhone.
Step 1 Open Camera app on your iPhone, find "HDR Off" at the center top of the screen.
Step 2 Tap the icon to open HDR, after which will show as "HDR On"
Step 3 Choose a scene you want to shoot and tap the photo button
But there are some situations that you would better not use HDR on iPhone.
HDR is best used to balance high contrast scenes. HDR mode on iPhone is available; simply tap on HDR Auto to take a photo, which just used a few seconds. And it is capable of capturing the light and the dark scene in one shot, which do not make the image too overexposed. So if you want to be a more professional cameraman just use an iPhone, just start the steps and follow it as we recommend. You will find your own way to capture the beautiful world and find the meanings of snapping a photo by using HDR mode on iPhone. Just try it now. If you have any questions you would like to contribute, please share your feedback in our comments. Thanks for your views.

May 17, 2018 13:46 / Posted by Louisa White to Fix iOS Problems
 How to Backup Everything on Android
How to backup everything on Android? This article introduces Android Backup & Restore tool you can use for Android backup.
 Everything You Need to Know About the New iPhone
Want to know something about the new iPhone X and iPhone 8/8 Plus? Read this article and find the things you may interest about the next iPhone.
 iPhone Is Disabled? Here's the Fix
iPhone is disabled? This article focuses on how to fix an disabled iPhone with or without connecting iTunes.
 How to Restore iPhone without iTunes
How to restore iPhone data or disabled iPhone without iTunes? This article tells the best method for you.
 3 Ways to Recover Data from iPhone With or Without Backup
How do you recover permanently deleted files on your iPhone? Can I recover data from a broken iPhone without a backup? Learn 3 ways to restore your iPhone data.
 How Do You Backup iPhone? Best Ways Here
How to backup iPhone X/8/7/6/5/4 securely? This article introduces three methods for you to backup iPhone.
