Getting Started
-
- 1. Video Compressor
- 2. GIF Maker
- 3. 3D Maker
- 4. Video Trimmer
- 5. Video Merger
- 6. Video Cropper
- 7. Video Watermark
- 8. Color Correction
- 9. Video Speed Controller
- 10. Video Reverser
- 11. Video Rotator
- 12. Video Player
- 13. MV Maker
- 14. Collage Video Maker
- 15. Audio Compressor
- 16. Volume Booster
- 17. Audio Sync
- 18. Media Metadata Editor
- 19. Image Converter
- 20. File Date Changer
- 21. AI Vocal Isolator
- 22. AI Vocal Remover
Introduction
Aiseesoft Video Converter Ultimate is the best video converting software. It allows you to convert 4K, even 8K videos to popular video formats, like MP4, M4V, MKV, and MOV. And the conversion speed is up to 120× faster with remuxing technology, as you can see more clearly in converting HD/4K UHD. Apart from the conversion function, its editing features are also attractive. It enables you to add external audio tracks, add watermarks, crop, rotate, and trim videos. In the latest version, there are some new features, like Media Metadata Editor, Video Compressor, Video Enhancer, AI Vocal Remover, AI Vocal Isolator, GIF Maker, Video Speed Controller, Video Reverser, etc. This page will show you how to use these powerful functions in detail.
Part 1. Convert Video/Audio to Various Formats
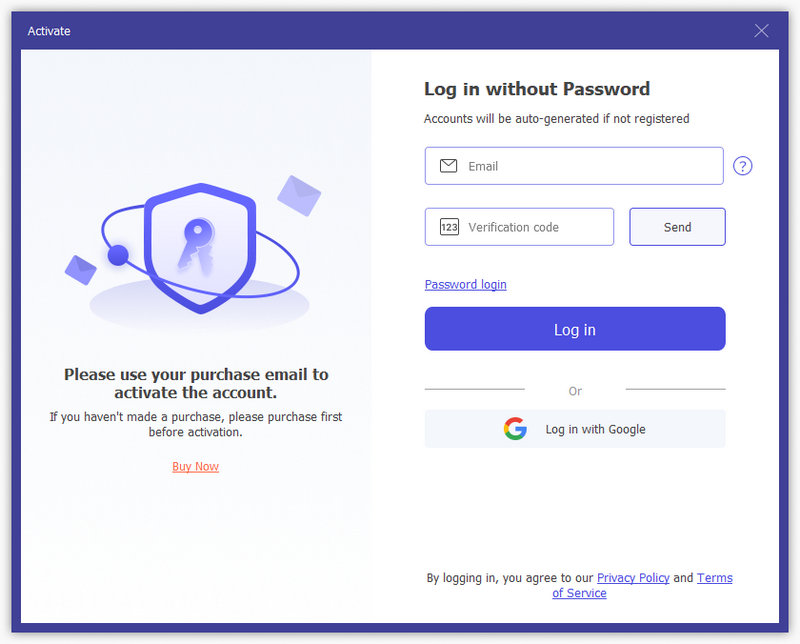
Step 1 Install and launch Aiseesoft Video Converter Ultimate on your computer. Please activate your account by entering your email and verification code or password. If you have not registered before, when you enter the information above, a new account will be auto-generated.
If you are stuck in activating the benefits process after purchasing, please check this guide for purchased benefits activation.
Step 2 Click the Getting Started area to add your video/audio, or directly drag the video and audio files into the program.
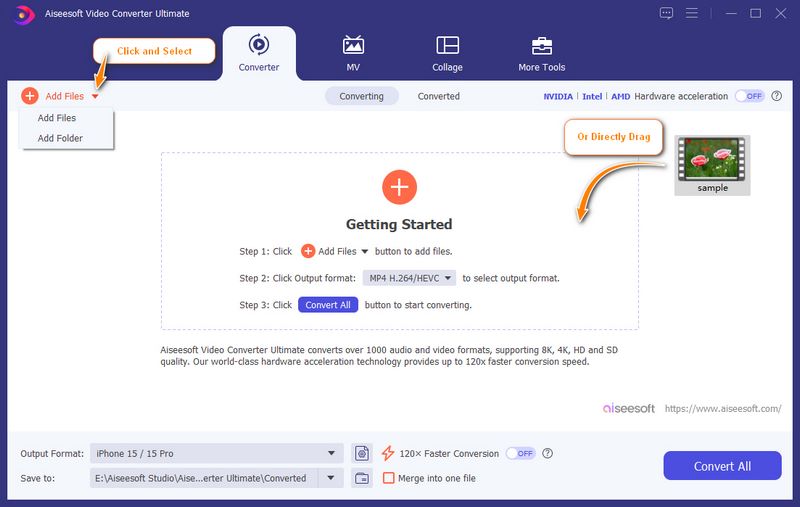
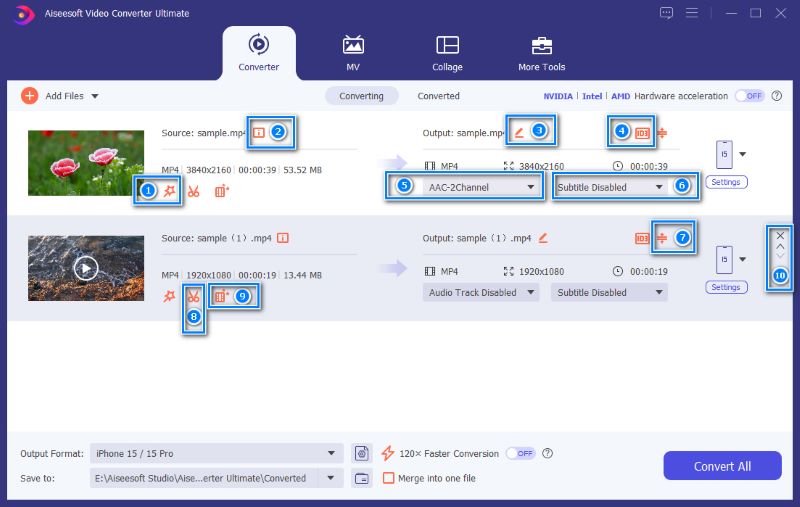
After adding files, you can see its information on the interface, like the original format, the screen size, and the time length. You can also make some quick adjustments by clicking on the corresponding buttons.
1. Edit the video
2. Check the video info
3. Rename the file
4. Change the Metadata
5. Manage audio track
6. Manage subtitles
7. Compress the video
8. Cut the video
9. Enhance the video
10. Move the file position in the list
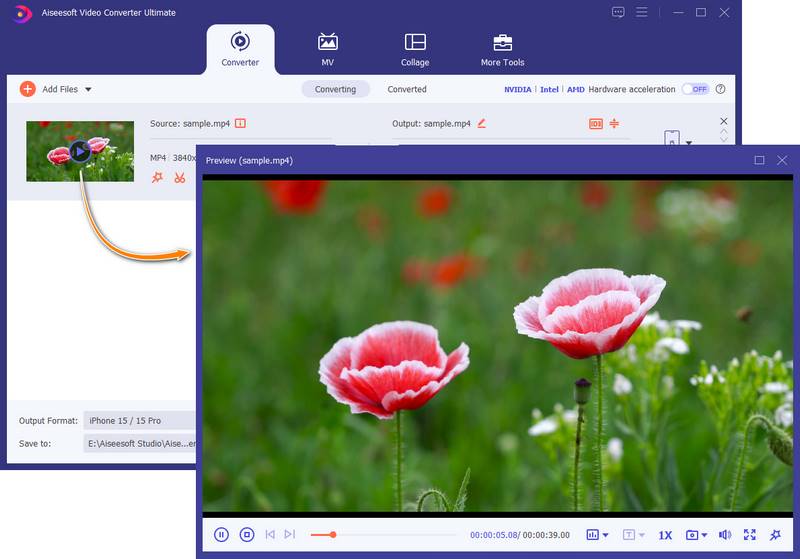
You can click the video to play it. You can also take snapshots and edit the video on the playing interface.
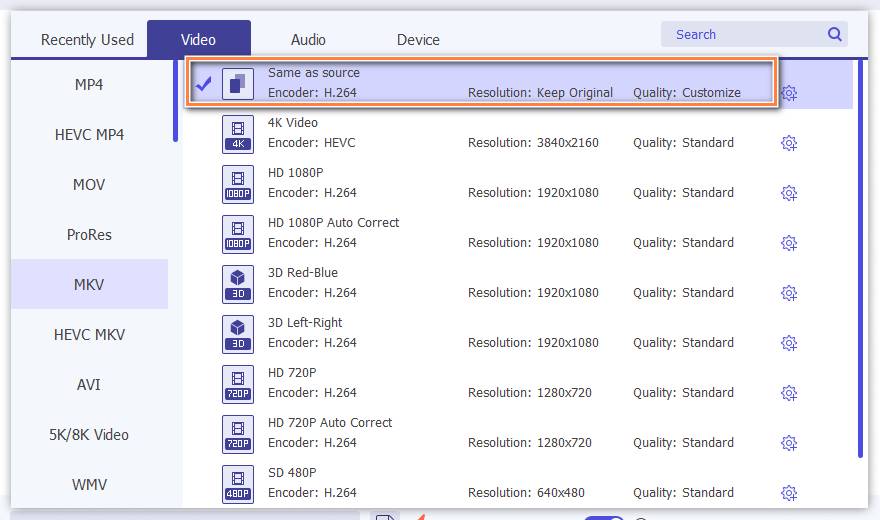
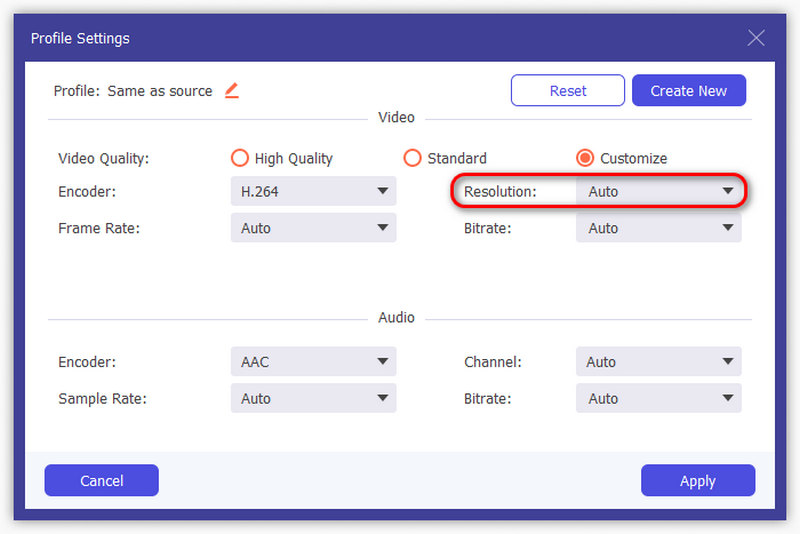
Step 3 You can set the output format of the videos separately from the format pop-up window on the right of each row. You can also customize the parameters of the output format by clicking Settings or the gear icon next to a preset format in the opened format window.
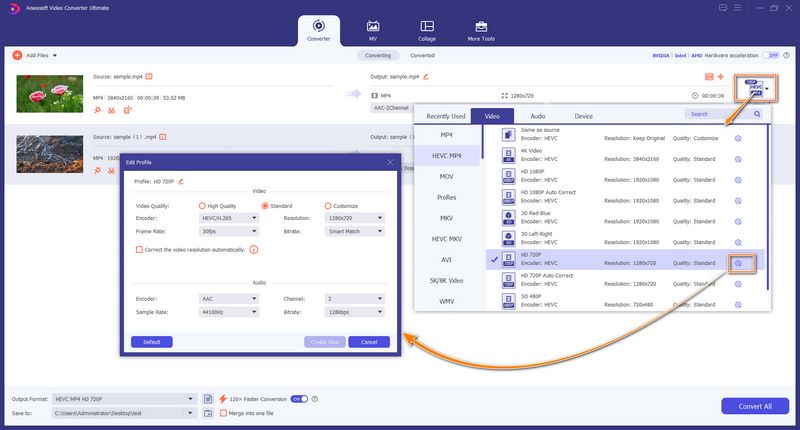
Or, you can set a unified output format for all the files in the list by choosing a format in the Output Format bar at the bottom. Similarly, you’ll be able to customize an output format from the gear icon next to the bar, or the one next to a preset in the menu.
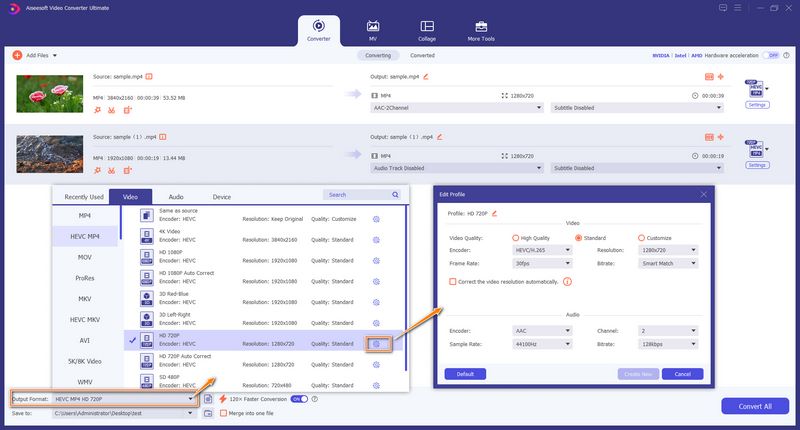
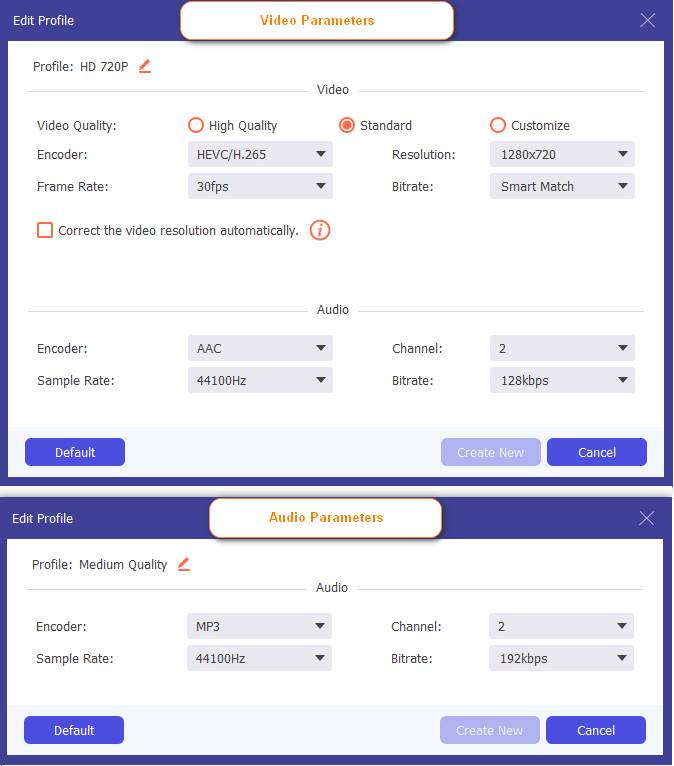
The Parameters that can be adjusted for videos include Quality, Encoder, Resolution, Frame Rate, and Bitrate. For audio, you can adjust the Encoder, Channel, Sample Rate, and Bitrate.
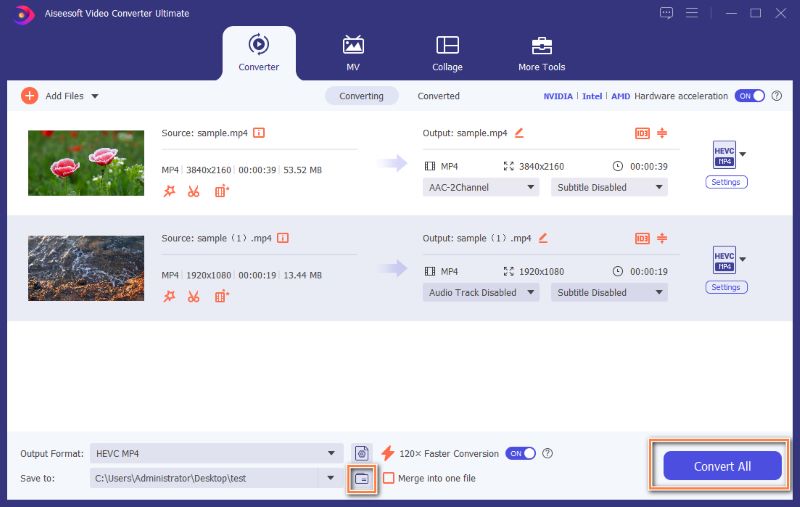
Step 4 Select a path for the converted files to be saved in the bottom bar. You can turn on the Hardware acceleration from the top right corner to speed up your conversion. Or you can turn on the 120x Faster Conversion to accelerate even more, which remuxes the video into a different container without re-encoding, making the process much faster.
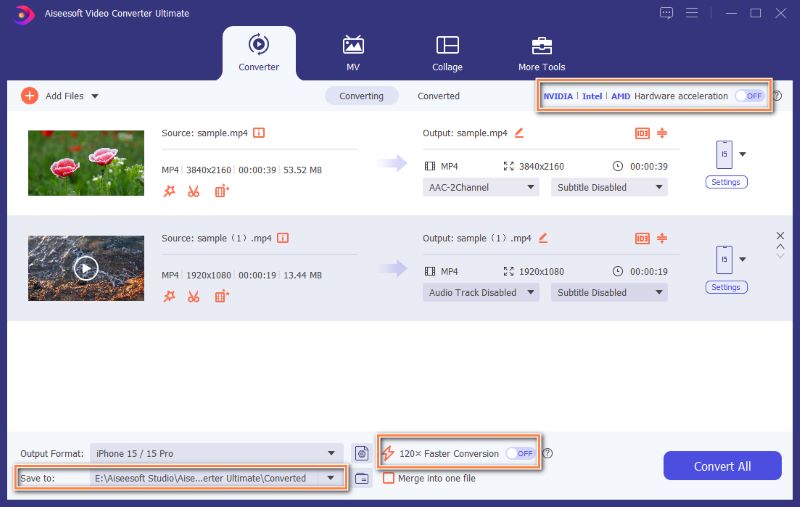
The 120x Faster Conversion only works if the input format is among MP4, MKV, AVI, M2TS, MTS, MOV, MPG, TS, TRP, M4V, and FLV, and with the output format from MP4, MKV, AVI, MOV, M4V, settings Same as source. If the selected formats are not supported by 120x acceleration, the Hardware acceleration will be automatically applied.
At last, click the Convert All button on the main interface to start the high-speed conversion. You can view the exported files in folder by clicking on the file icon next to the Save to bar.
Note:
Tick Merge into one file beside the Save to bar if you need to have all videos in the list merged into one file after the conversion. The output format of the conversion with that option on will be fixed as MP4, you can convert it later into the format you need.
Part 2. AI Enhance Video
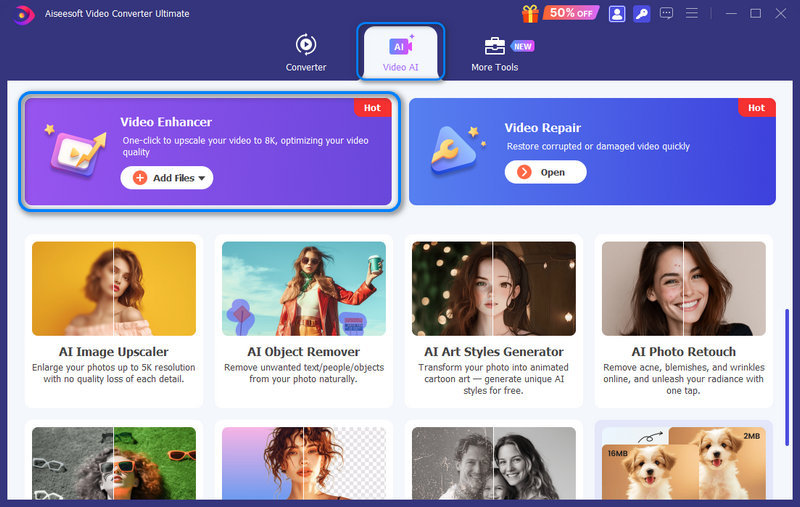
The program also has a professional Video Enhancer that enables you to upscale, enhance, HDR-convert, colorize, and optimize your video with 10 more advanced AI models.
Step 1 Choose Video Enhancer
After launching the program, click Add Files under Video Enhancer under Home tab to import the video you want to enhance. Or you can add files by clicking Add File(s) button or dragging file(s) directly onto the main area under the Enhancer tab.
Step 2 Choose an AI Model
Select an AI model based on your needs. There are 11 AI models for you to choose from, including the General Enhancement Model, the Video Denoise Model, the Frame Interpolation Model, the SDR to HDR Model, and so on.
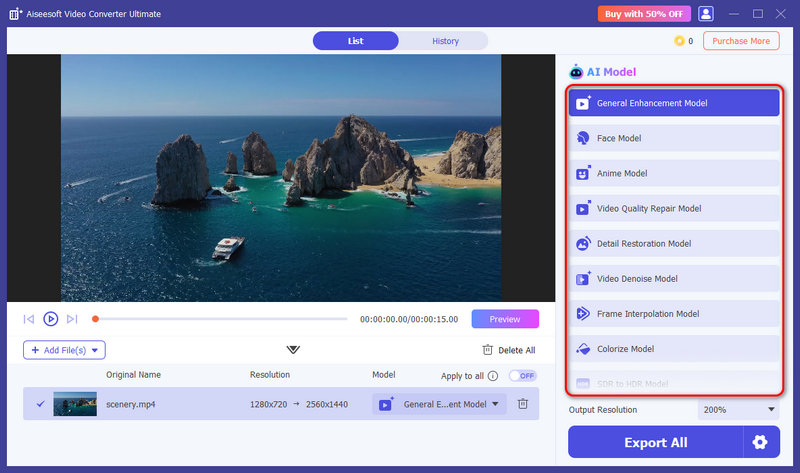
Step 3 Preview the Results
Click Preview and check the enhanced result. Here you can choose to view the enhanced version in full screen or compare it with the original one.
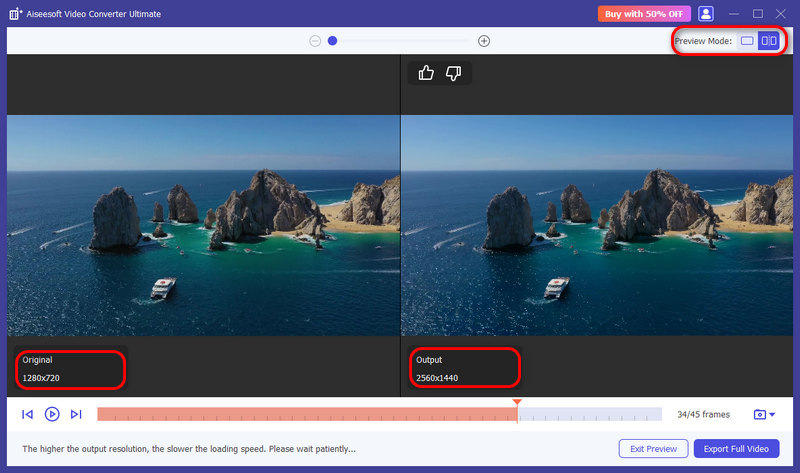
Step 4 Export the Video
Click Export Full Video to save your video.
Part 3. Edit Video/Audio with Multiple Effects
Trim & Split Video
Step 1 Select a video file and click the Cut button.
Step 2 To cut off unwanted parts, you can drag the clipper on the progress bar or set up the start and end time directly on the timeline. The part you chose is what will be left. Click Add Segment, and a new clip will be created.
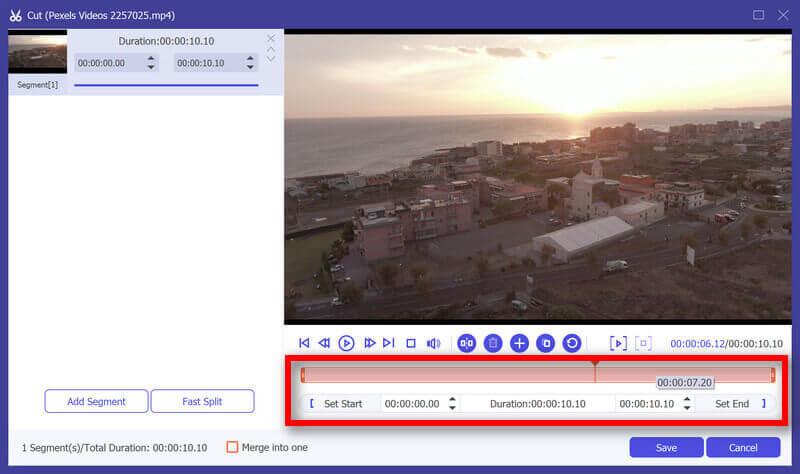
If you want to cut the video into equal segments, click Fast Split to choose how many parts the video should be split into or the duration of each segment.
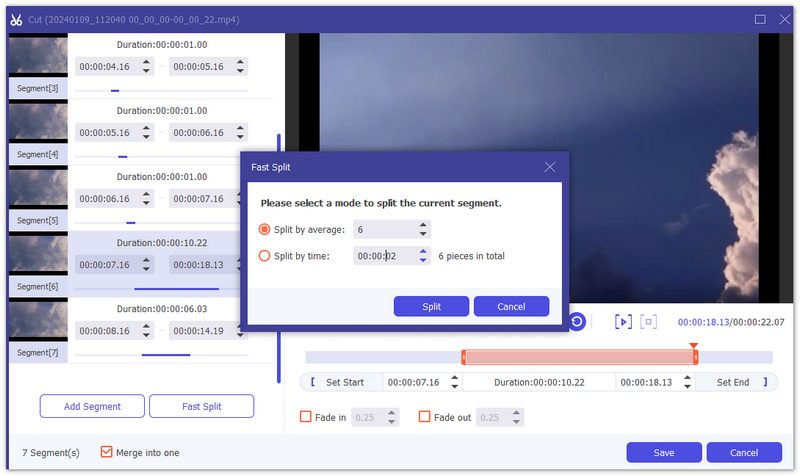
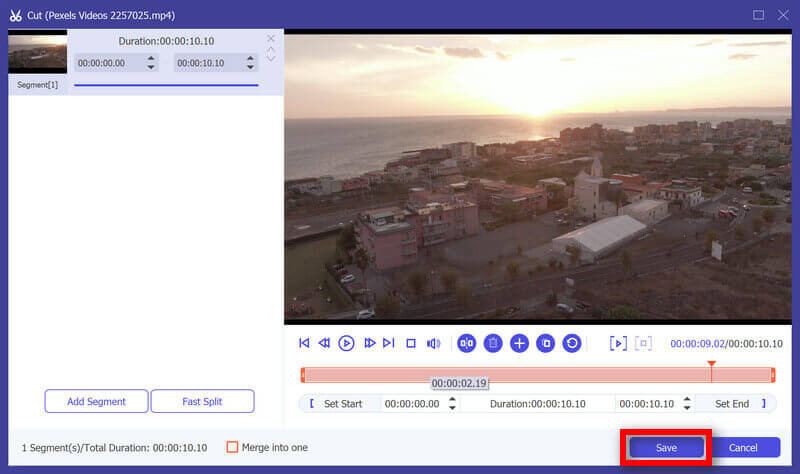
Step 3 After you make all right, you can click Save. If you want to merge them into one, check on Merge into one on the bottom left of the Cut window.
Step 4 Now you are back to the main interface. Preview the video by clicking the thumbnail. If that's just what you want, Click Convert All. If you still need to modify the video, click the scissor button again, the segments are still there.
Rotate & Crop Video
Step 1 Click the Edit button. Find Rotate & Crop in pop-up window. And you can see other editing features in this window.
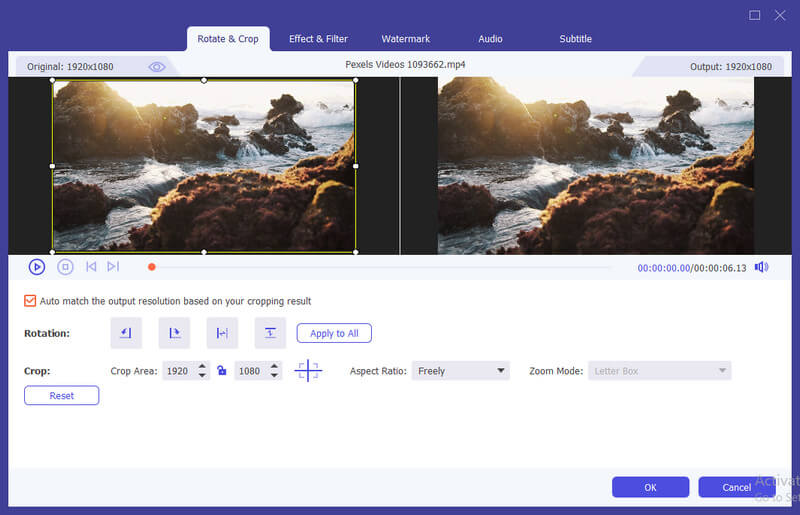
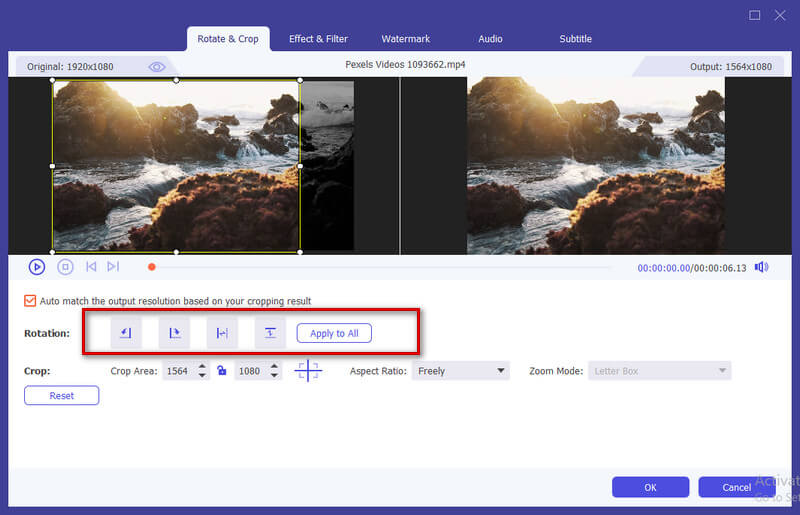
Step 2 Here you can flip video vertically and horizontally, rotate 90 degrees, rotate 180 degrees or rotate 270 degrees. Then, you can check the result in the preview.
Step 3 Below the Rotate option is the Crop option. there are several types in Aspect Ratio, like 16:9, 4:3, 1:1 and 9:16. It can help you quickly get the size you want.

If you have other size needs, you need to select Freely in Aspect Ratio first, then input number in Crop Area to set the size. Dragging the frame of the left playing screen is also the same. If you want the center screen, click Cross after setting the size and it will put the cropped screen in the center.
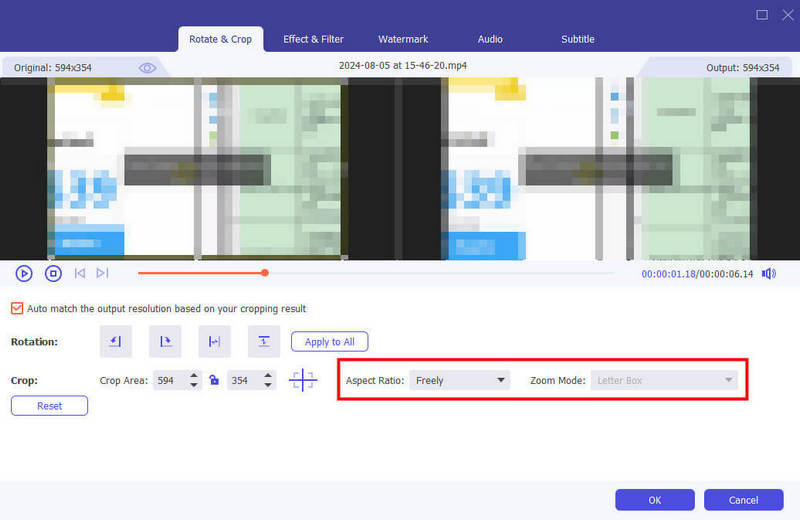
Besides Ratio, you can also select the right Zoom Mode to get the best effect.
Full Mode: Make the selected screen become the biggest size, which would stretch the screen.
Letter Box: Add black edges up and down.
Pan & Scan: Make the screen size to 16:9. But it would not show left and right edges in 16:9 or up and down in other size.
It is up to your needs.

Step 4 Click the OK button to save the changes.
Tips: If you encounter the problem of cutting the black edge of the video size, please correct it using the following solutions.
Method 1. Eliminate it while keeping the target resolution.
You can adjust the video size in Zoom Mode and Aspect Ratio.
Method 2. Change the output resolution to fill the black edge.
Click Auto match the output resolution based on your cropping result. The video will automatically fit the border to eliminate the black edge problem.
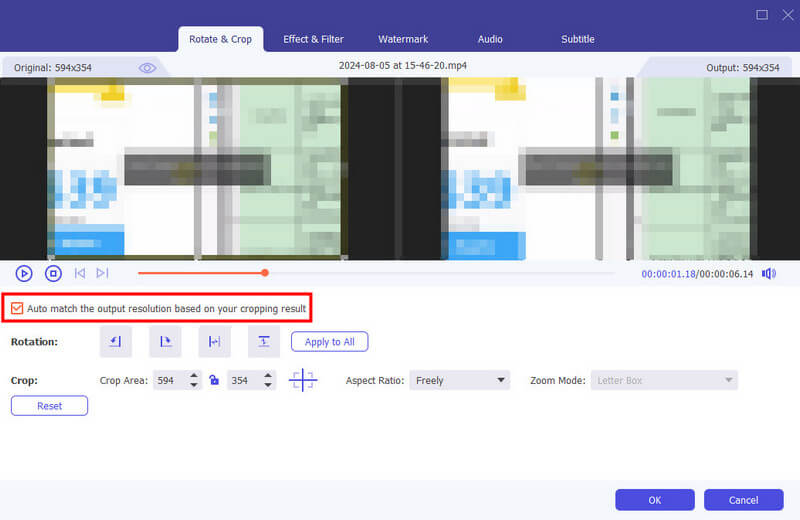
Find Settings and change the output resolution to match the border.
Effect & Filter
Step 1 Find Effect & Filter in the Edit window. You can adjust brightness, contrast, saturation, hue and select deinterlacing as you need. Besides, you can choose a filter to beautify your video.
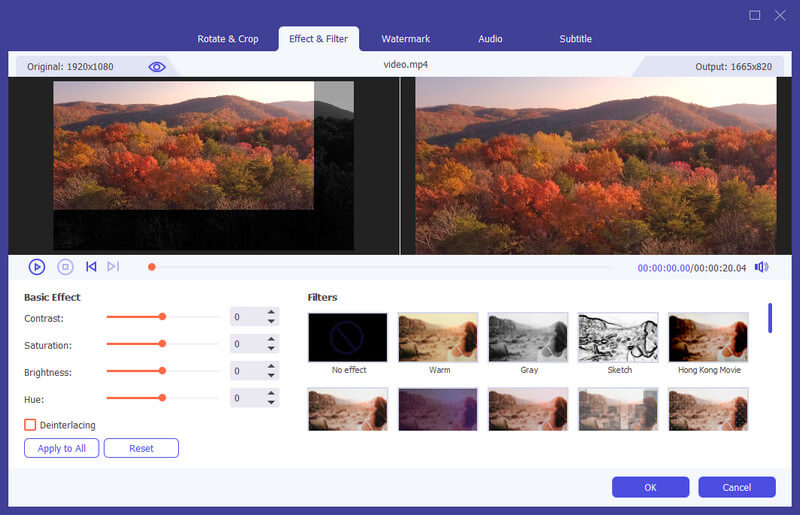
Step 2 Click the OK button to save the changes.
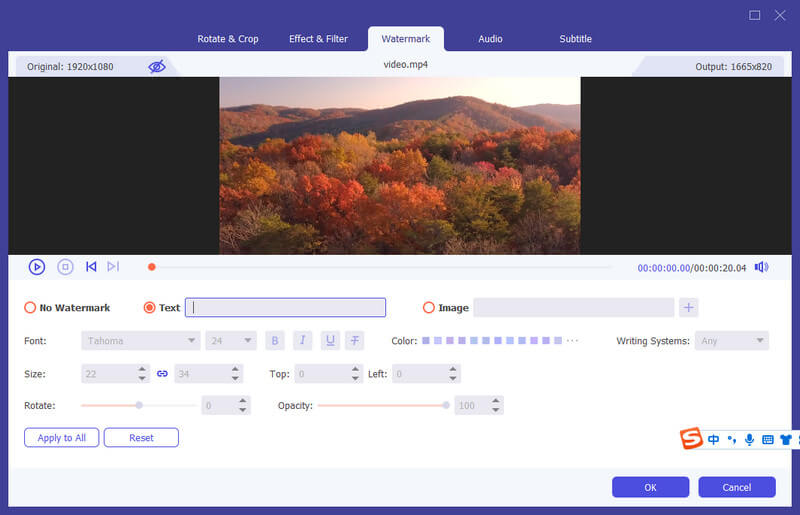
Watermark
Step 1 Find Watermark in the Edit window. If you want to add a text watermark, check Text and enter the text to the blank. You can adjust the text fonts, colors, writing system and size. Then place the text watermark by dragging or setting size.
Furthermore, you also can rotate text and set opacity.
If you want to add an image watermark, check image and click the Add button to select an image. And then adjust the size and place it on your video. You can also rotate text and set opacity.
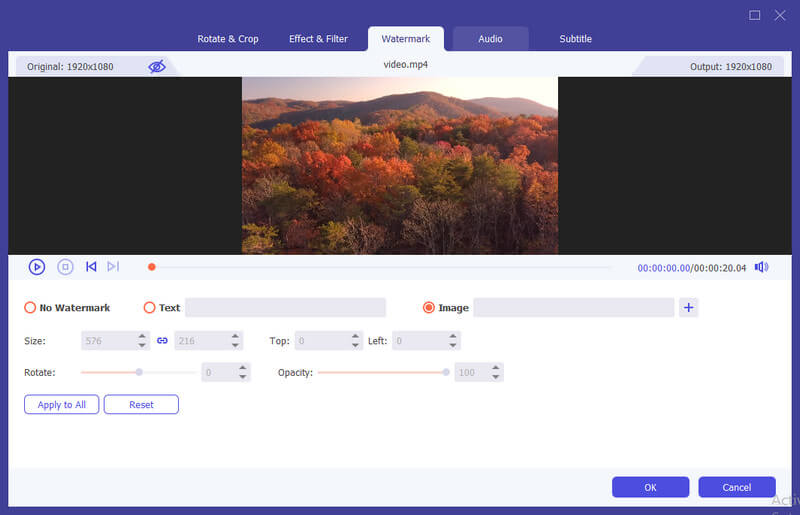
Step 2 Click the OK button to save your settings.
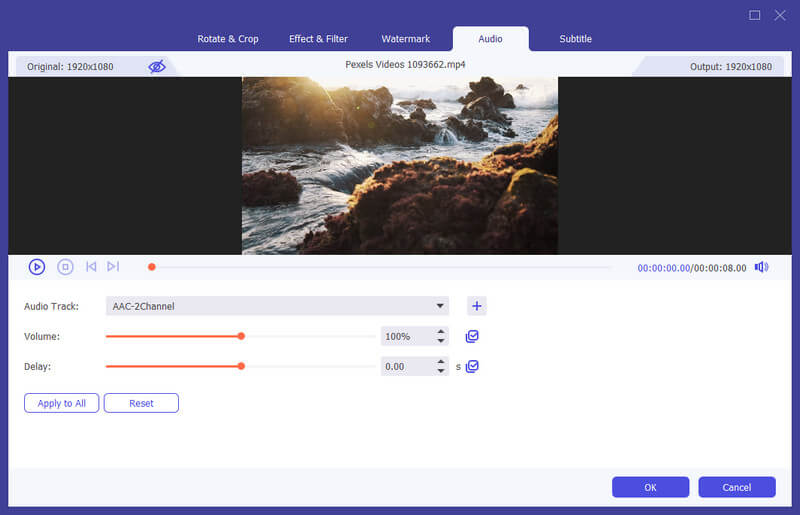
Audio
Step 1 Find Audio in the Edit window. Select the audio track you would like to play. Or click the Plus button besides the Audio Track bar. You can adjust the audio volume and change the delay time to decide when to play audio track.
Step 2 Click the OK button to save your settings.
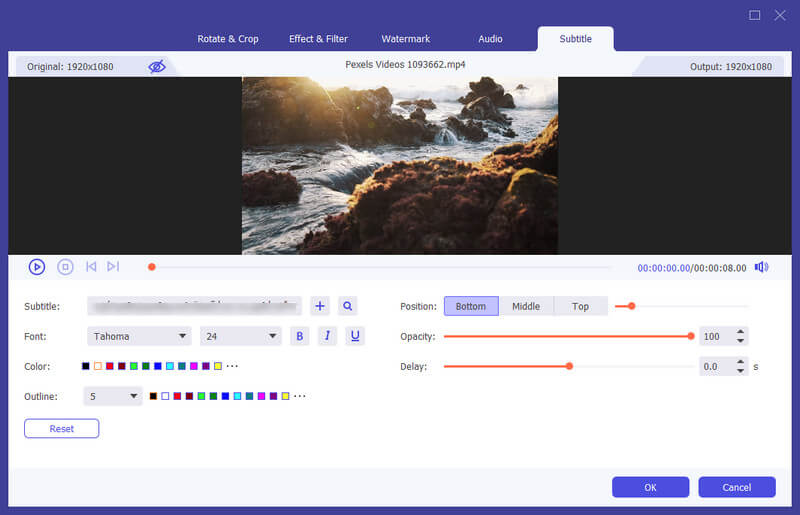
Subtitle
Step 1 Find Subtitle in the Edit window. Click + to import the subtitle file (*.srt; *.ssa; *.ass) from your computer. After that, you can adjust the position, font, color, opacity, delay time and outline.
Step 2 Click OK to save the adjustments.
Part 4. More Tools
Apart from converting and enhancing videos, there are more tools for you to use.
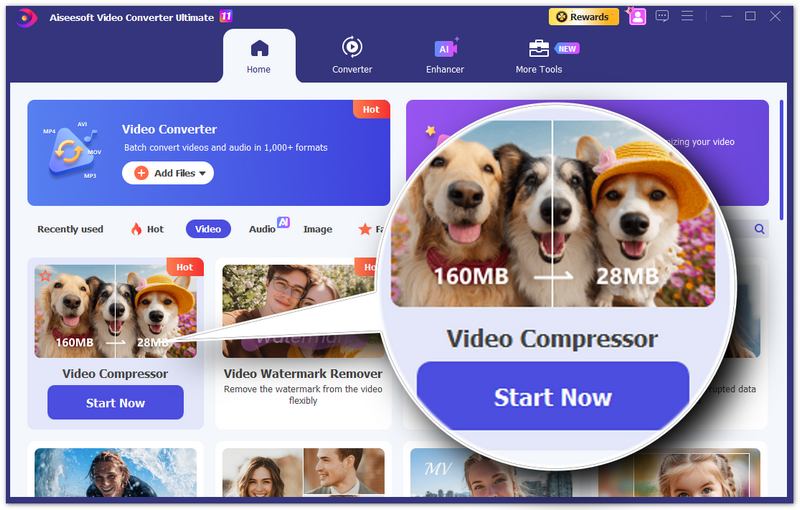
Video Compressor
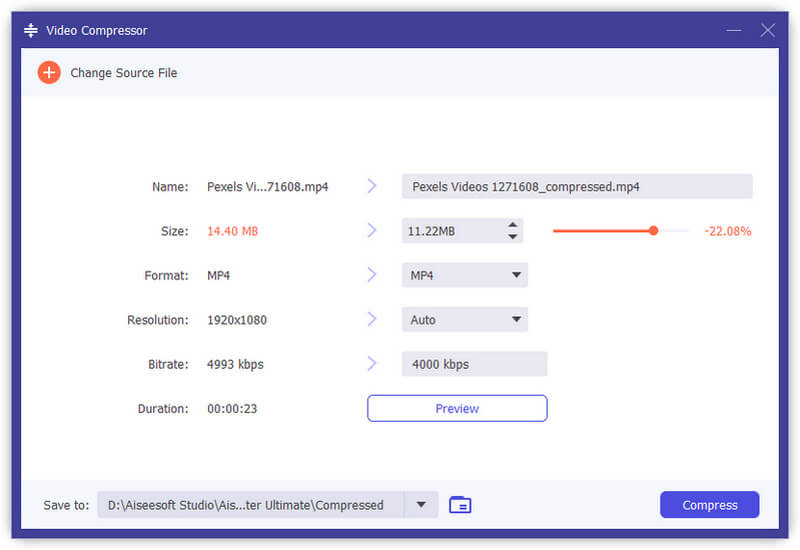
Step 1 In the home screen, find Video Compressor under the Video tab. Or you can also find this tool under the More Tools tab. Add a video to compress. After adding files, you can change the size, name, format, resolution, bitrate of the target file.
Step 2 Then set the path to save your compressed file, and click the Compress button.
GIF Maker
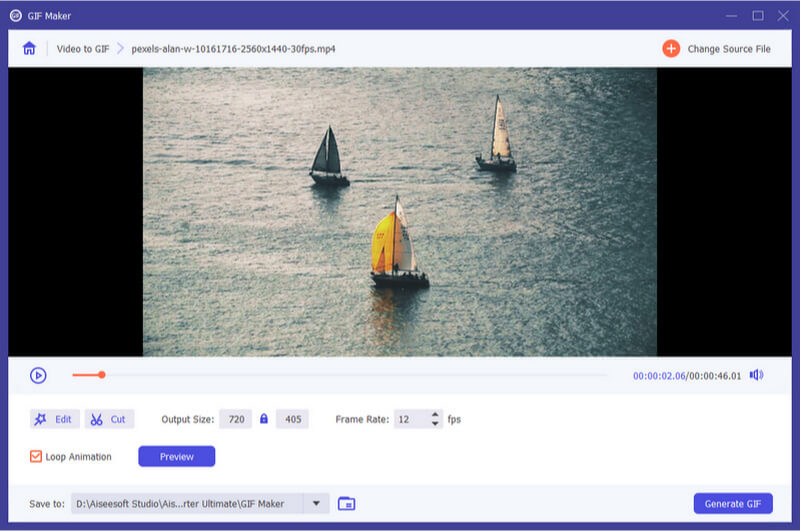
Step 1 Find GIF Maker in More Tools or under the Video tab in the Home screen. Add a video to GIF Maker. As you see, you can edit the video with various features, such as Rotate & Crop, Effect & Filter, Watermark, Audio, and Subtitle.

Or cut the video and save the part you want to make a GIF. And you also can set the output screen size and Frame Rate.
Step 2 Click Generate GIF to create your own GIF.
3D Maker
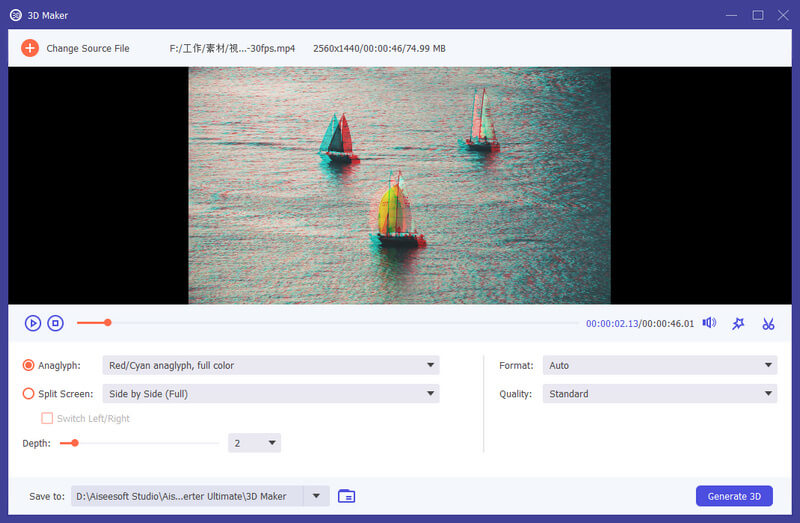
Step 1 Find 3D Maker in More Tools or under the Video tab in the Home screen. Add the video to 3D Maker.
Step 2 It offers various options to make 3D video.
Anaglyph: You can choose one 3D anaglyph effect from Red/Cyan anaglyph, monochrome/half color/full color/quality Dubois; Green/Magenta anaglyph/half color/full color; Amber/Blue anaglyph, monochrome/half color/full color.
Split Screen: Side by Side (Half-Width), Side by Side (Full), Top and Bottom (Half-Height), Top and Bottom (Full)
Depth: You can change the depth of an anaglyph 3D image from 0 to 15.
Switch Left/Right: Use the Switch Left/Right option to change from Left/Right to Right/Left or Right/Left to Left/Right.
Step 3 Click Generate 3D to create your 3D video.
Video Trimmer
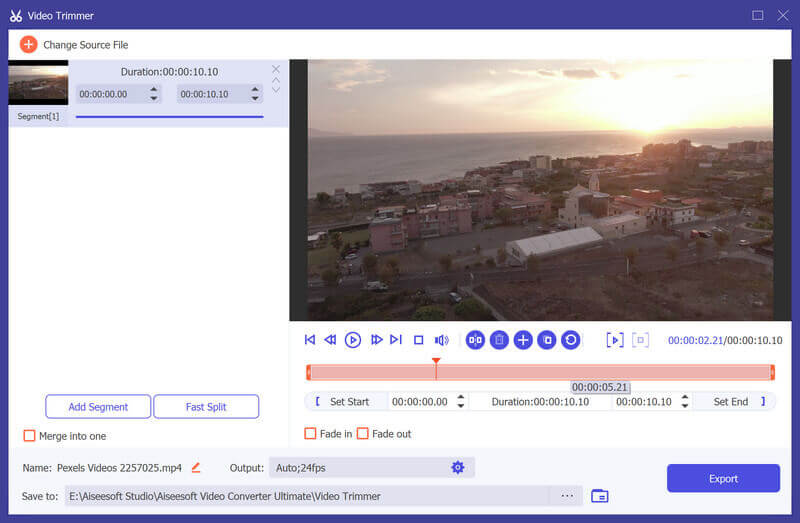
Step 1 Find Video Trimmer in More Tools or under the Video tab in the Home screen. Add the video to Video Trimmer.
Step 2 To cut off unwanted parts, you can drag the clipper on the progress bar or enter the start and end time directly on the bottom Duration bar. The part you chose is what will be left. If you want more segments, click Add Segment and a new clip will be created. Choose another wanted part in the same way. You can also use the Fast Split feature to split the current segment into pieces by average or by time.
Step 3 If you need to add the Fade in/out effect, just enable the options under the progress bar. After you make all right, you can rename the video, adjust the output settings, and select the destination. If you want to merge all clips into one, check on Merge into one on the bottom left of the Video Trimmer window. Click on the Export button to export the trimmed video.
Video Merger
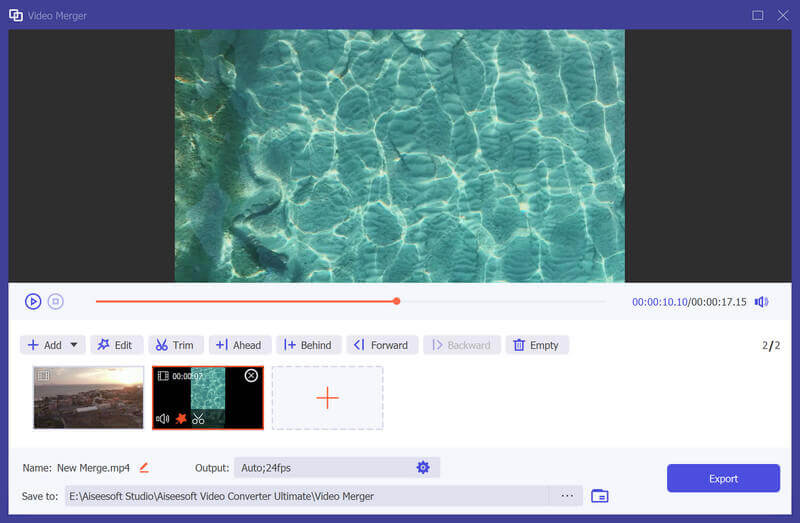
Step 1 Find Video Merger in More Tools or under the Video tab in the Home screen. Add the video(s) to Video Merger.
Step 2 After importing your files, you are able to adjust the order by dragging the clips to the correct position or use the Forward/Backward feature. If you need to add new clips, you can simply click on the Add/Plus button or click Ahead/Behind to locate the clip to the right place directly. You can also edit and trim the video clips according to your need. To remove all the clips please hit on Empty button.
Step 3 Once you finish editing, you can change the name, settings, and saving path for the output file. Then click on the Export button to export the merged video.
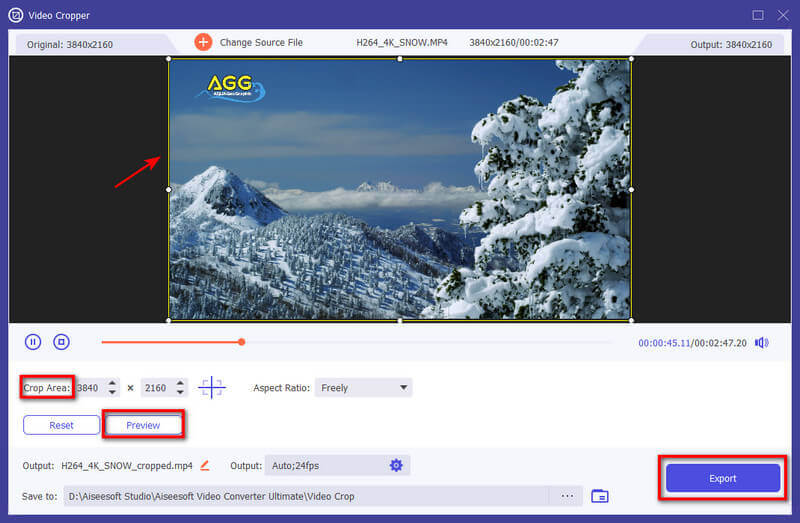
Video Cropper
Step 1 Choose Video Cropper in More Tools or under the Video tab in the Home screen and add a video to it.
Step 2 Drag the yellow rectangle on the video to crop the displaying area. Or you can change the number of Crop Area.
Step 3 Click Preview to see the output result. If you're satisfied with it, click Export and get your cropped video.
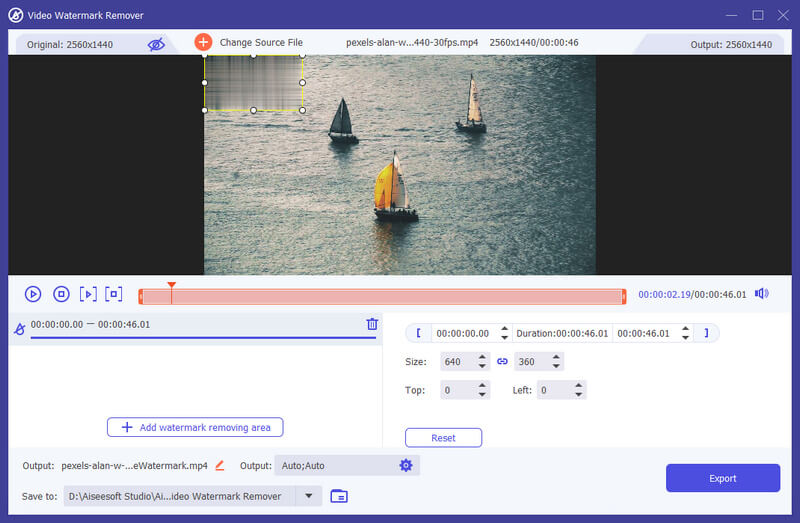
Video Watermark
Step 1 Select Video Watermark Remover from More Tools or the Video tab in the Home screen and add a video to it.
Step 2 Click Add watermark removing area and you'll see a frame on the video.
Step 3 Drag the frame to adjust it or change the number of Size, Top, or Left on the right.
Step 4 Drag the progress bar and you can adjust the removing area for specific time periods.
Step 5 Hit the Play button and you can preview the output result. Then click Export.
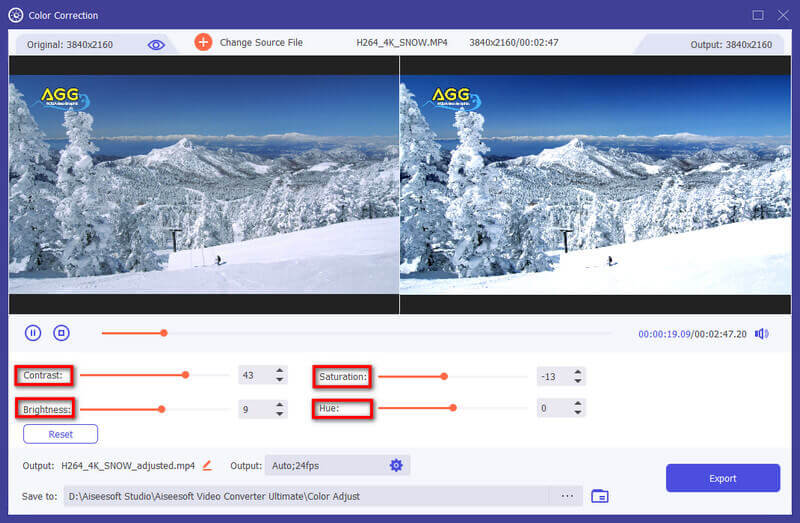
Color Correction
Step 1 Choose Color Correction and add a video to it.
Step 2 Adjust the Contrast, Saturation, Brightness, and Hue according to your need. You can preview the video in the same time.
Step 3 Click the Export button in the bottom-right corner and get the corrected video.
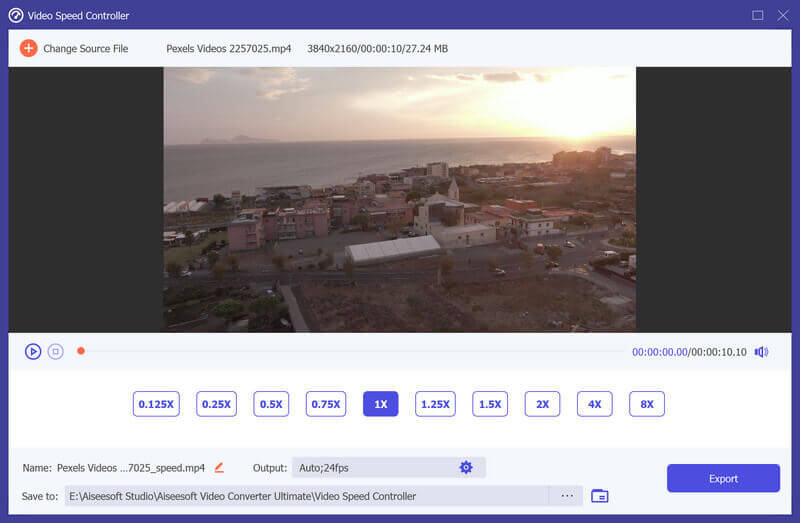
Video Speed Controller
Step 1 Find Video Speed Controller in More Tools or under the Video tab in the Home screen. Add the video to Video Speed Controller.
Step 2 Select a playback speed according to your need. If you don't know which one to choose, you can preview the video and see which one suits you the best.
Step 3 After speeding up or slowing down the video, you can adjust the name, video/audio settings, and destination folder for the output file. Click on the Export button to export the video with new playback speed.
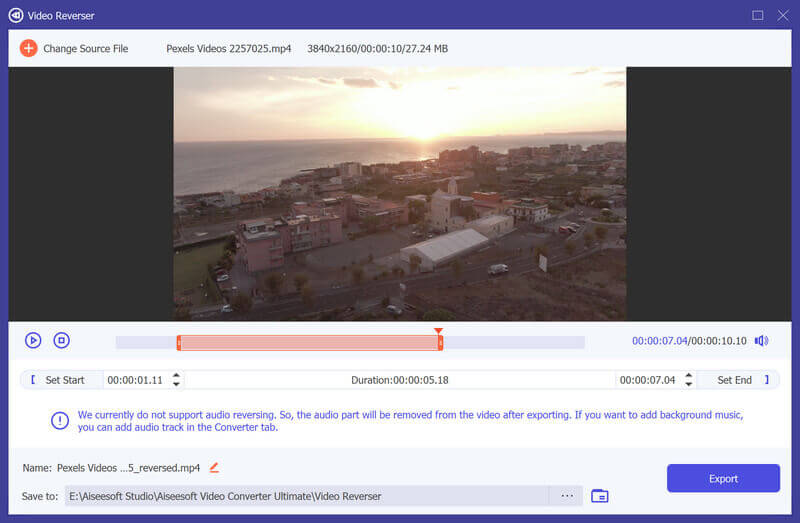
Video Reverser
Step 1 Find Video Reverser in More Tools or under the Video tab in the Home screen. Add the video to Video Reverser.
Step 2 Use the progress bar or time set to get the video clip that you want to reverse. Then you can rename the video and choose a place to save the output file. Click on the Export button to export the reversed video.
Note:
The sound of the video clip will be removed after reversing. If you need to add background music, please go to the Converter tab to add a new audio track.
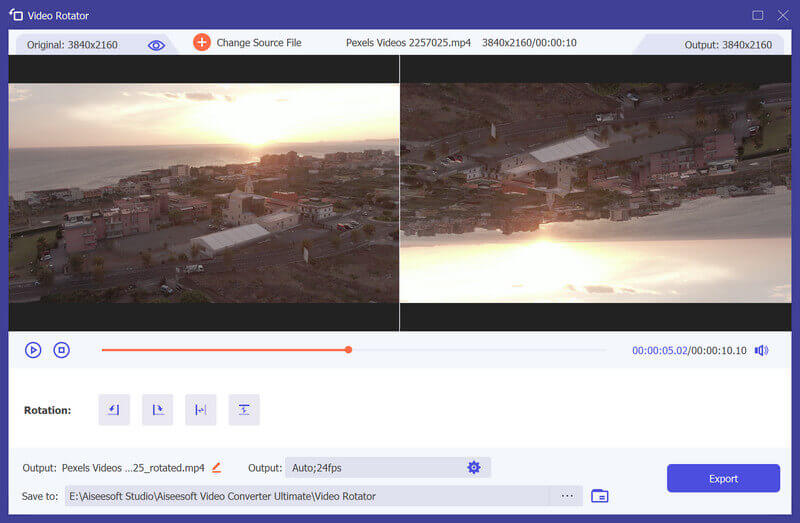
Video Rotator
Step 1 Find Video Rotator in More Tools or under the Video tab in the Home screen. Add the video to Video Rotator.
Step 2 After entering the Video Rotator, you can flip video vertically or horizontally, and rotate 90 degrees, 180 degrees or 270 degrees clockwise/counterclockwise. Then, you can preview the result in real time.
Step 3 Then you can rename the video, adjust the output settings, and select the destination. Click on the Export button to export the rotated video.
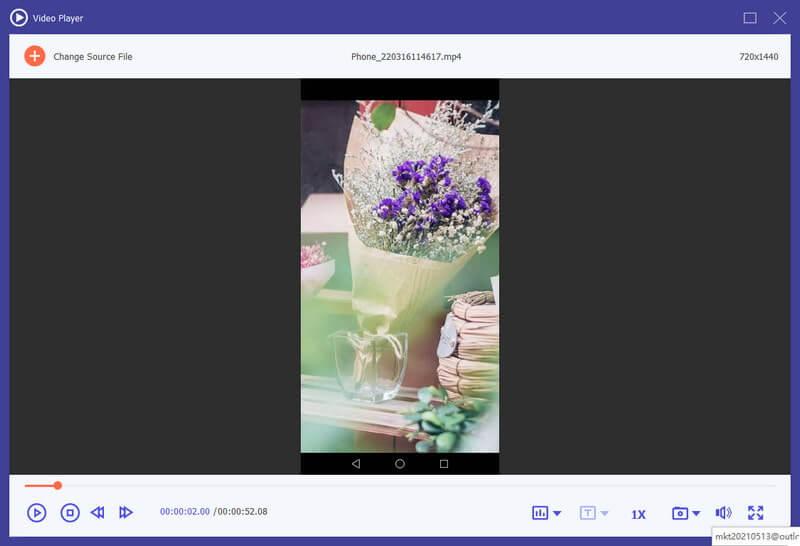
Video Player
Step 1 Find Video Player in More Tools or under the Video tab in the Home screen. Add a video to Video Player.
Step 2 To play your video, you can go through the functions at the bottom and focus on different parts. They enable you to play, stop, move the video to previous or next 5 seconds, change the audio track, play speed and volume, edit subtitles, take snapshots or enter full screen based on your needs.
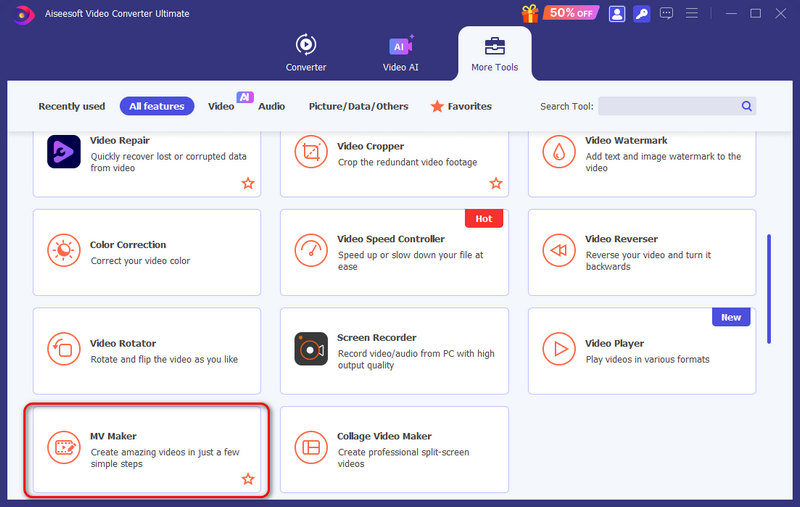
MV Maker
The program also has an MV maker that enables you to make a stunning video using video footages and pictures.
Step 1 Choose MV Maker
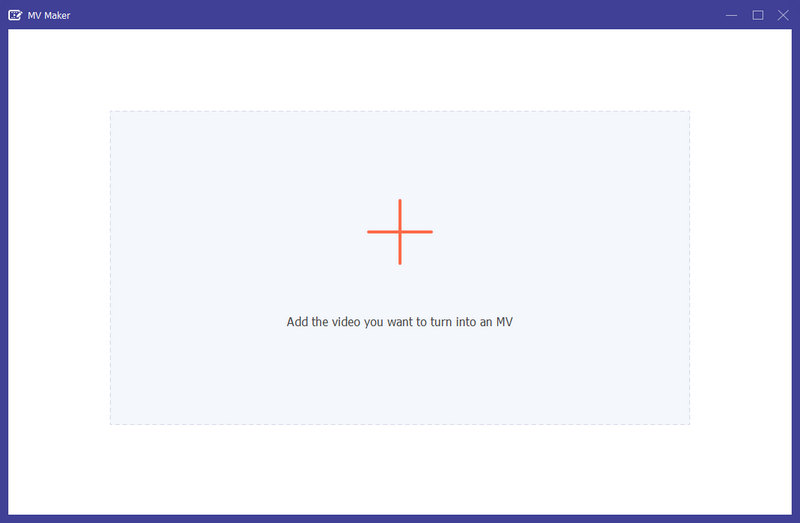
Click MV Maker in More Tools or under the Video tab in the Home screen.
Step 2 Import a file
Import files by adding it to the program.
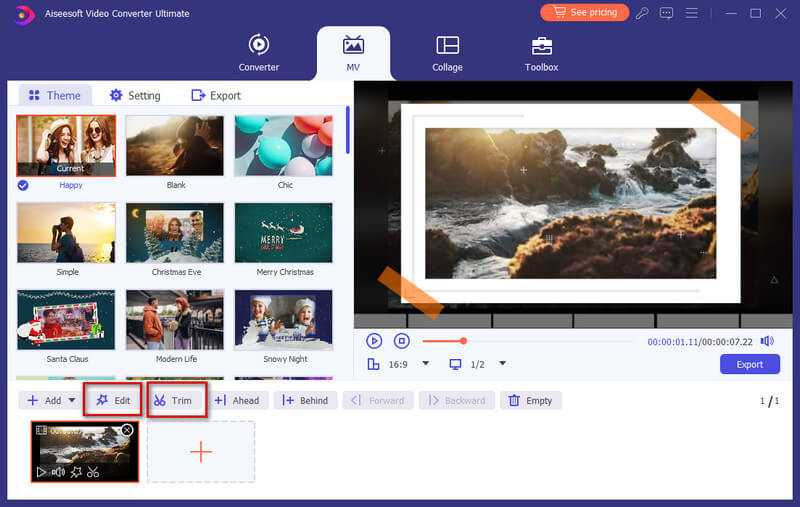
Step 3 Edit videos
Before making your files into MV, you can edit or trim the whole video by clicking the Edit button or Trim button, or you can edit or trim your videos or pictures separately.
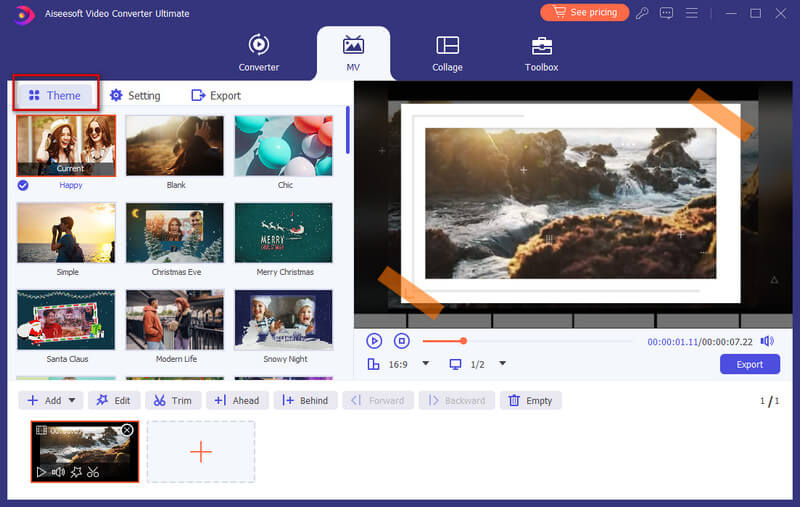
Step 4 Select a theme
When you finish editing, you can select a theme for your MV. On the left section, click the Theme tab and then choose your desired theme for your MV. Then, the theme will be applied to the MV automatically and you can preview the video on the player.
Step 5 Configure the title and audio track settings
If you would like to add the title in the beginning or end, just click the Setting tab, navigate to the Start & End option, and then tick off the box behind the Start Title, End Title, or both to enter your text.
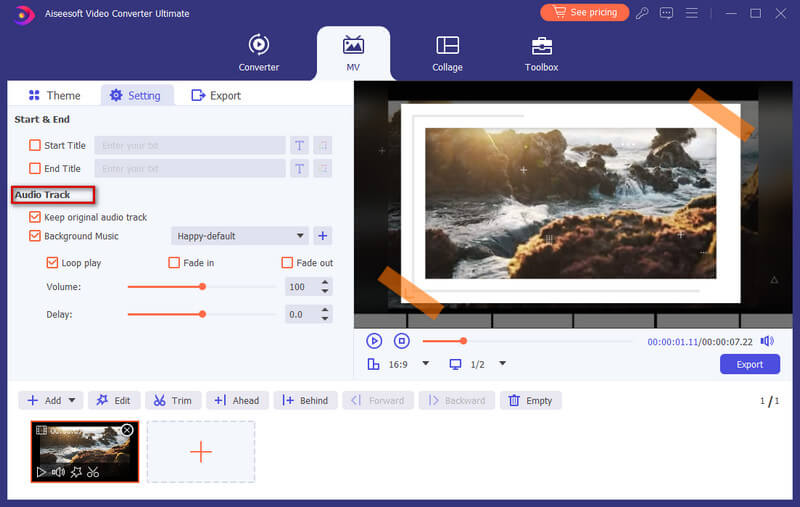
Additionally, you can choose to add the background music for your MV while maintaining the original audio track. And, you can enable Loop Play to let your MV play a continuous loop of your background music. To configure audio transition, you can enable Fade in, Fade out, or both.

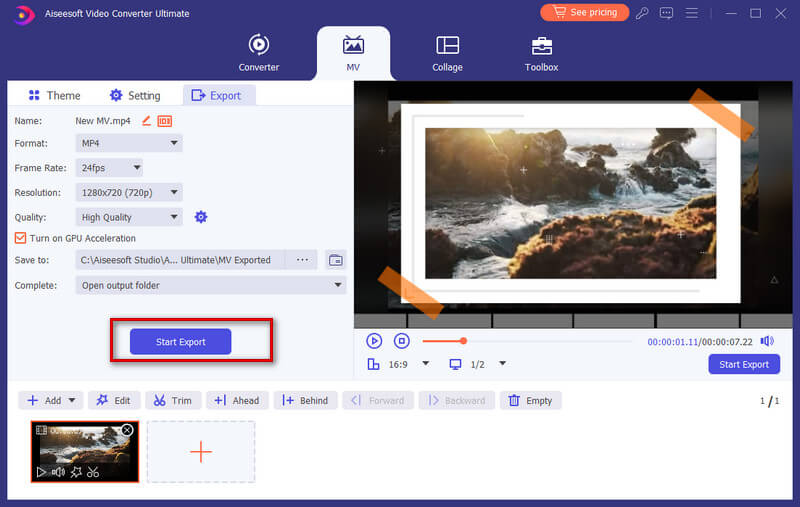
Step 6 Export MV
By default, the output format is MP4. If you'd like to save it in other video formats, you can choose your preferred format by clicking on the arrow down located beside the format button.
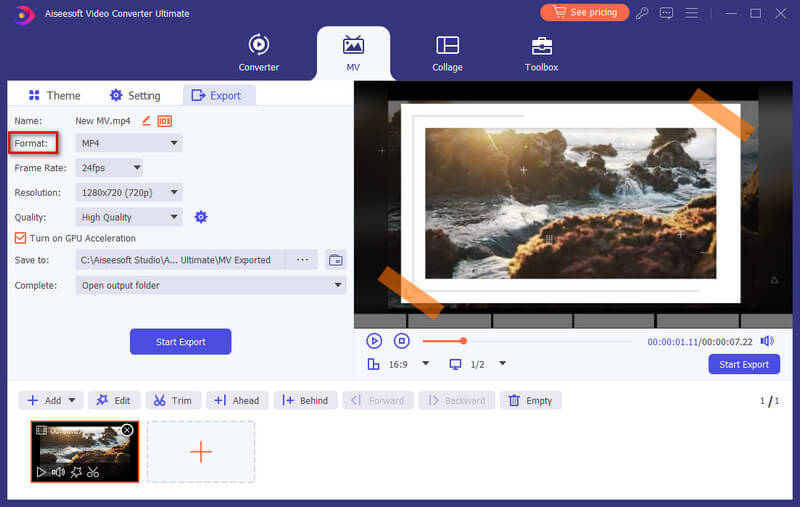
Once you are ready to export your MV, you can go to the Export tab to give a name for your project, and set the path to store it. You can also enable the Turn on GPU Acceleration option to speed up the exporting process. In the end, click on the Start Export button to produce your MV.
Collage Video Maker
Combining more than one shot into the one video screen could be a creative and engaging thing to impress your viewers. In this program, you can use its built-in split-screen video editor to perform the task of putting vides side by side and play them at once.
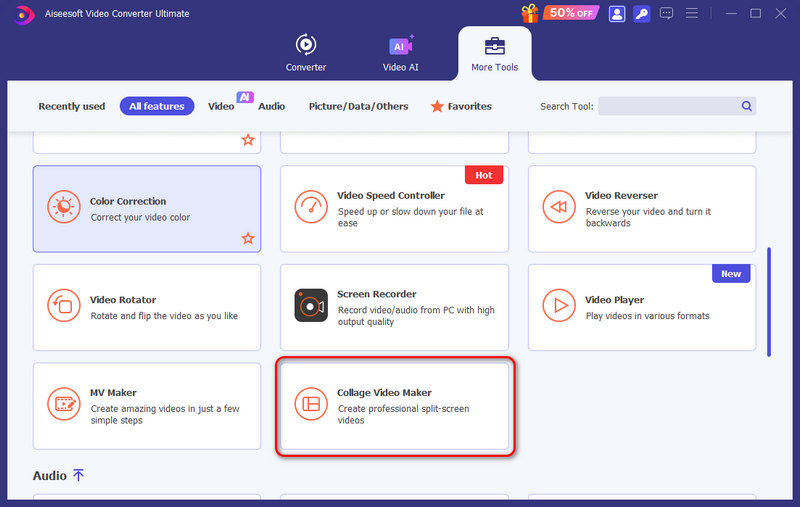
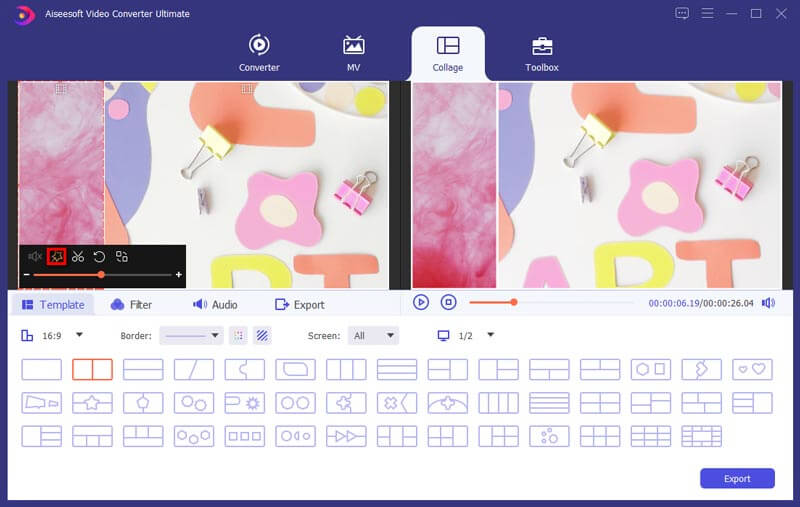
Step 1 Choose Collage Video Maker
Click Collage Video Maker in More Tools or under the Video tab in the Home screen.
Step 2 Add files
Click + to add the video files you want to position onto the one video screen.
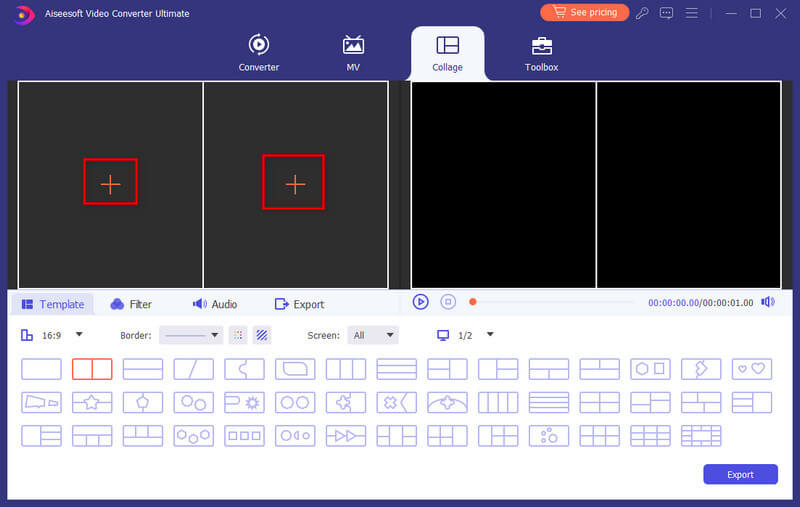
After importing your files, you can resize your videos by dragging the split line.

Step 3 Edit and apply filters
This split-screen video editor also allows you to edit your video clip. Select the video clip you want to edit and then click the Edit button. Then, you can crop, rotate, add watermark, add subtitle, and more.
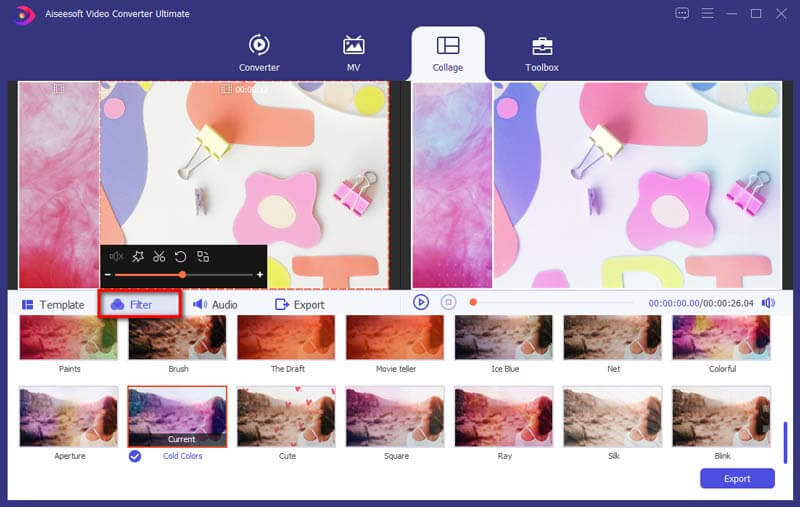
After editing your video clips, you can select a filter to use based on your video content by going to the Filter tab.
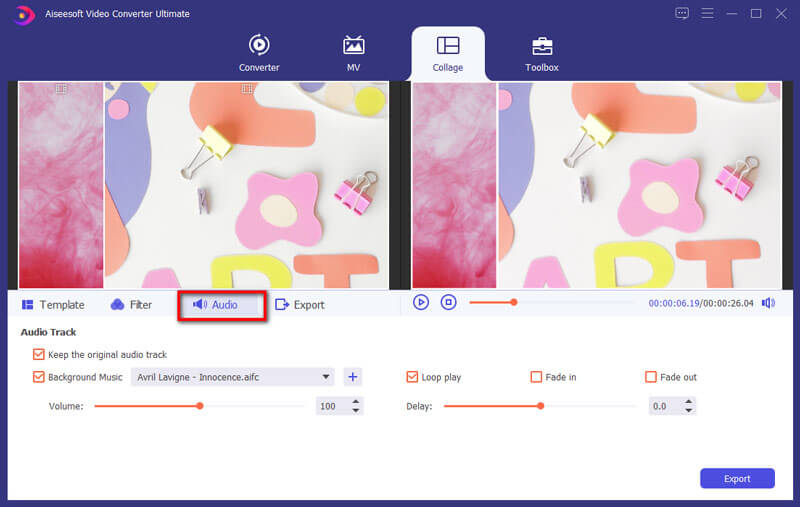
Step 4 Add background music
To keep the original audio in the video, you should enable the Keep original audio option. If you want to add a song as the background music, navigate to the Audio tab. check the box next to Background Music and then choose the song from your computer. It also offers other audio settings to configure, such as loop play, fade in or out, volume, etc.
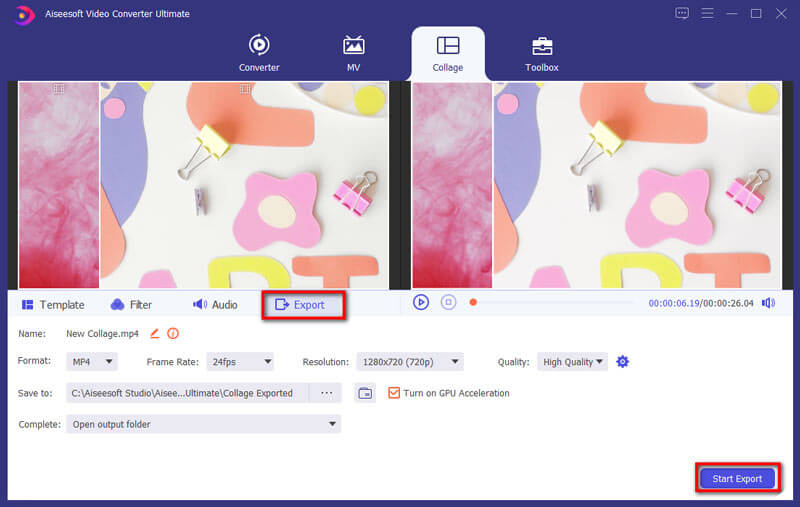
Step 5 Produce and share
Find the Export tab, and then you can change project name, select output format, resolution, destination folder, and turn on hardware acceleration.
When the video is ready, click Start Export to save the split-screen video to your computer. Or you can choose to share it to social media platforms directly.
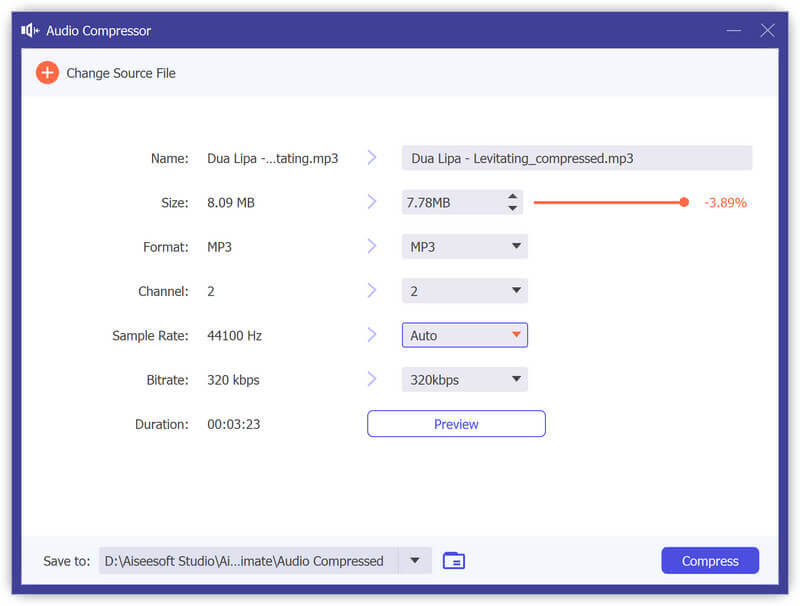
Audio Compressor
Step 1 Find Audio Compressor in More Tools or under the Audio tab in the Home screen. Add an audio file that you want to compress. After adding the file, you can reduce the size through the slider directly. You can also modify the file name, format, channel, sample rate, and bitrate according to your need.
Step 2 After adjusting, please confirm the saving path for the compressed audio file and click the Compress button to start the compression.
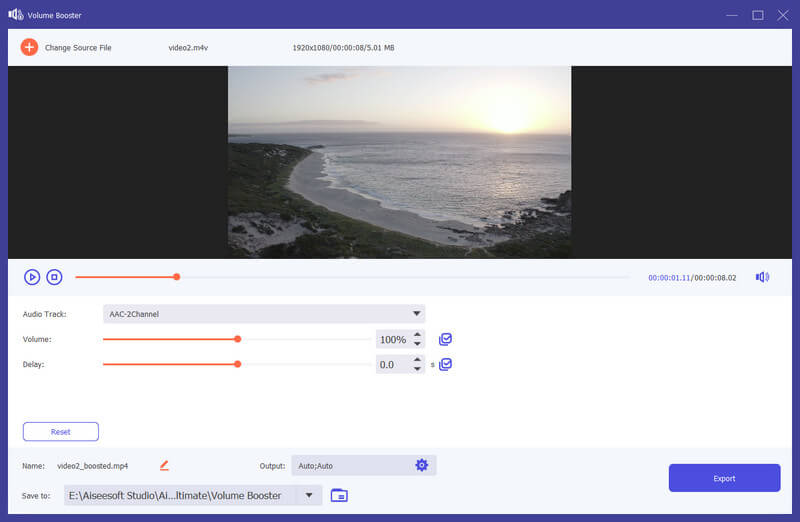
Volume Booster
Step 1 Find Volume Booster in More Tools or under the Audio tab in the Home screen. Add the video to Volume Booster.
Step 2 If you find the volume of your video too low or too loud, you can use Volume Booster to adjust the volume. Just drag the point on the bar to turn the volume up/down according to your need.
Step 3 Then you can adjust the name, video/audio settings, and destination folder for the output file. Click on the Export button to export the video.
Audio Sync
Step 1 Find Audio Sync under the Audio tab in the Home screen/under More Tools. Add the video to Audio Sync.
Step 2 If the sound of your video is out of sync, you can fix the issue with Audio Sync. It can easily help you adjust the audio track to make it keep up with the image. Just drag the point on the bar to speed up or slow down the audio based on your need.
Step 3 you can change the name, settings, and saving path for the output file. Then click on the Export button to export the video.

Media Metadata Editor
Step 1 Click More Tools on the top and find Media Metadata Editor under the Video tab.
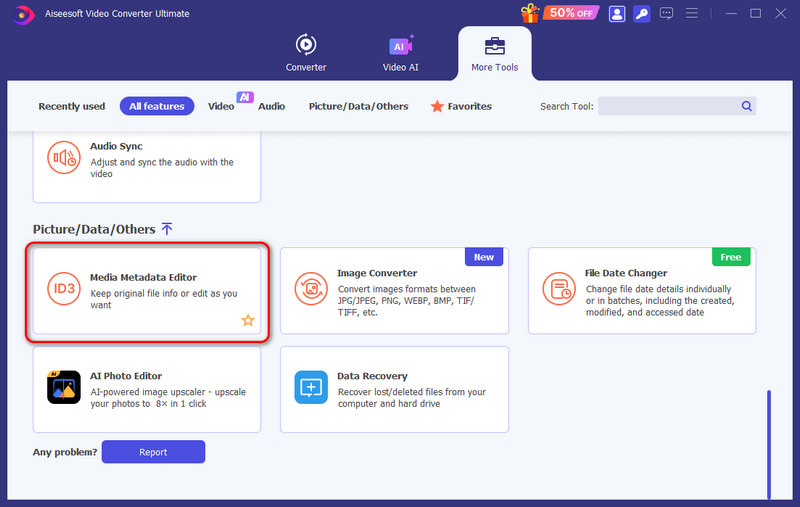
Step 2 Add a file in supported format, such as MP4, M4A, M4R, M4P, 3G2, M4V, MOV, MP3, WMA, ASF, WMV, and AVI.
Then you can edit the cover, file name, cover, artist, album, composer, genre, year, track, comments.
Step 3 After editing, click the Save button.
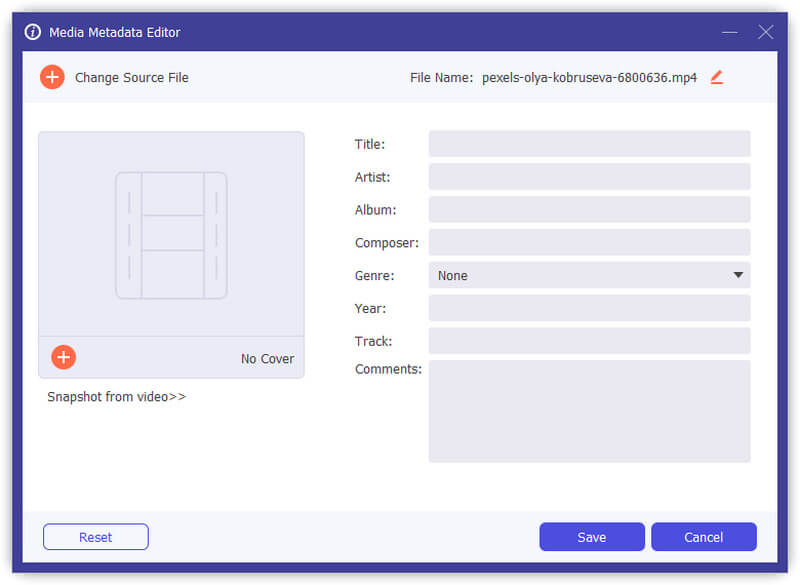
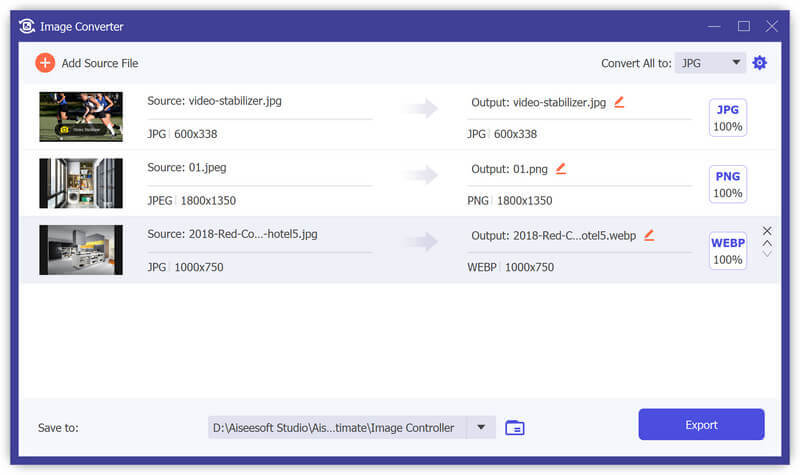
Image Converter
Step 1 To convert images, please open the Image Converter from More Tools. Then you can add as many photos as you like. You can change the output format separately or set a fixed file type for all output files. It even allows you to zoom in/out the picture and change the image quality.
Step 2 Click Convert All if you are done all the settings. Then the photos will be saved to your computer automatically.
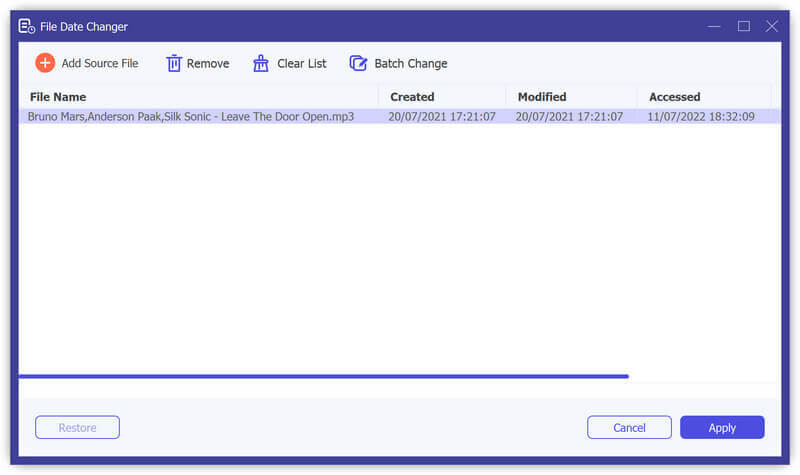
File Date Changer
Step 1 You can also change the file date in File Date Changer. It enables you to adjust the file date like created date, modified date, and accessed date. You can even batch change the date if there are a lot of files waiting to be modified.
Step 2 Click the Apply button in the corner to apply your changes.
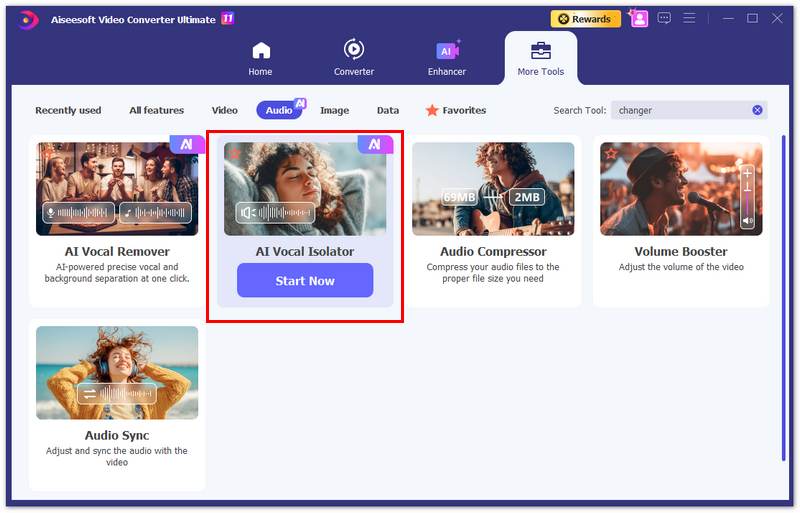
AI Vocal Isolator
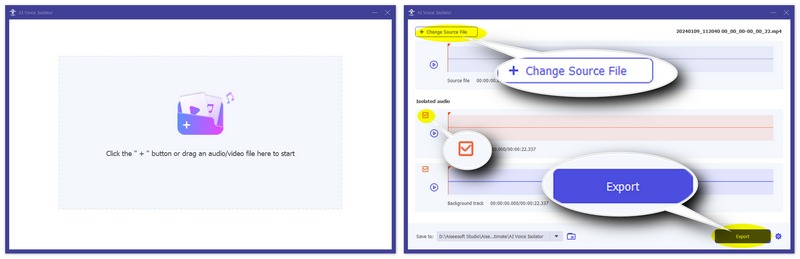
Step 1 To isolate voice from video or audio without noise, you can go to More Tools > AI Vocal Isolator under the Audio section.
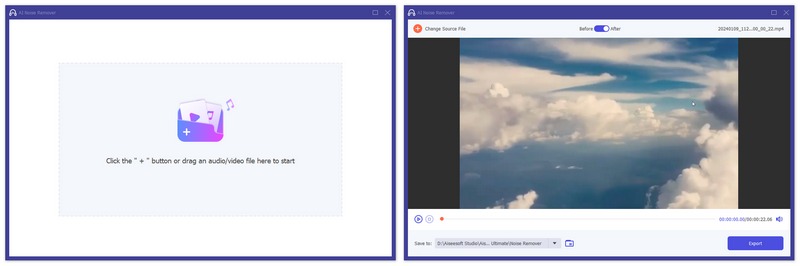
Step 2 Click the main area to add your audio or video to start analyzing and denoising.
Step 3 Click the Save to drop-down button to select your destination folder and the Export button to save it.
AI Vocal Remover
Step 1 If you want to remove noise from video/audio and extract clear audio only, you can go to More Tools and locate AI Vocal Remover.
Step 2 Click the main area to add your audio or video to start analyzing and separating your audio from video.
Step 3 Then, you will get an isolated audio track and a background track separately. You can click the play button to verify their sound quality and check them before clicking the Export button. You can also click Change Source File to isolate other audio tracks from your video. Furthermore, don’t forget select your destination file format from the settings button.
Part 5. Set Preferences for Different Needs
When you are using converter function, you can click the Gear button on the bottom on the interface. This is the button of Preferences.
There are five options in it.
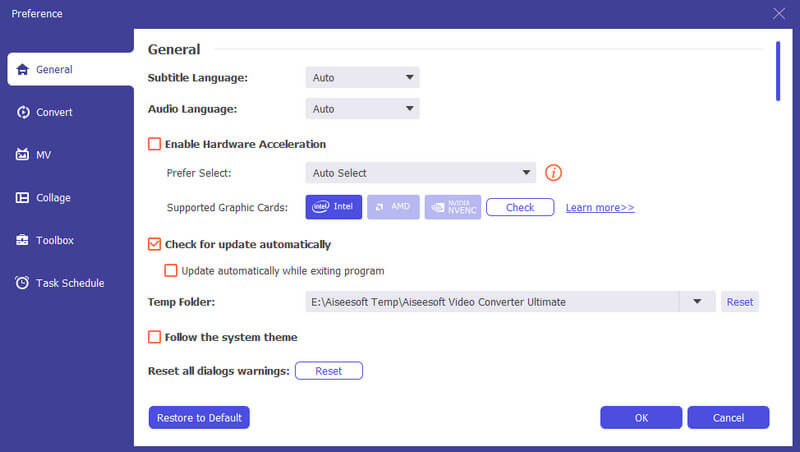
1. General
In General option, you can set Subtitle Language, Audio Language, GPU Acceleration and Update settings.
If you don't want to miss the new updates of this software, please tick the Check for Update Automatically option.
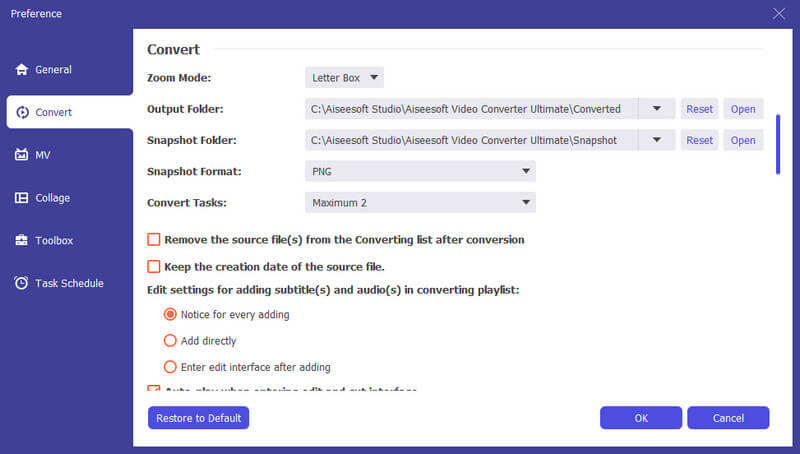
2. Convert
In Convert option, you can set output folder, snapshot folder, convert tasks, etc.
3. Toolbox
In Toolbox option, you can set the saving path for compressed files and GIF files.

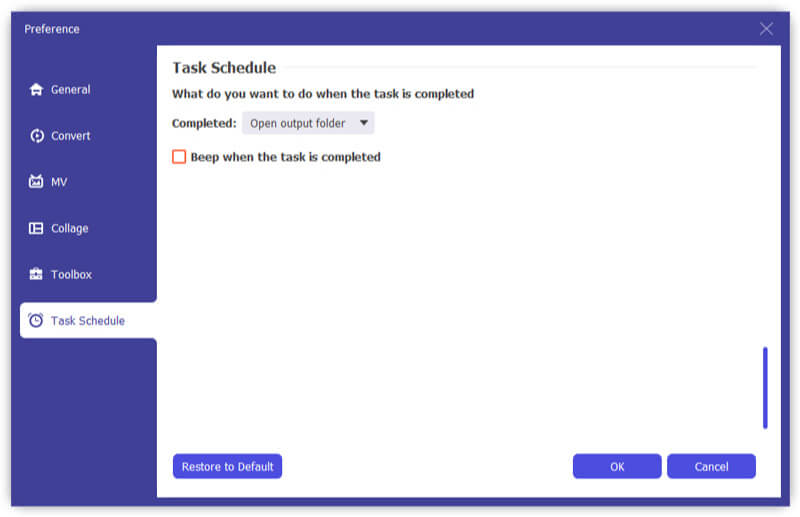
4. Task Schedule
In Task Schedule option, you can choose the action when the task is completed.
-
How to Convert MP4 to MP3
How do you change MP4 to MP3? With MP4 to MP3 online converter or download free MP4 to MP3 converter? Read this article to get all comprehensive ways.
 Posted by Andrew Miller | 11.03.2020
 -
How to Convert MP3 to MIDI on Windows/Mac
Want to convert MP3 to MIDI? This article introduces several best ways for MP3 to MIDI conversion on Mac or Windows computer.
 Posted by Jenny Ryan | 17.09.2020
 -
How to Free Convert M4A to WAV
Want to free convert M4A to WAV? You can learn how to easily convert M4A/M4P to WAV for Windows Media Player for free.
Posted by Jenny Ryan | 13.06.2018 -
Best Way to Convert DVD to MP4
Want to convert DVD to MP4 for backup on PC/Mac? You can learn how to convert homemade DVD to MP4 video with high quality in this post.
 Posted by Ashley Mae | 09.08.2021
 -
How to Make Ringtones on iTunes for iPhone
Want to make ringtones for iPhone? You can learn how to make ringtones on iTunes in this post.
 Posted by Louisa White | 25.05.2018
 -
Simple Ways to Convert iTunes to MP3
Want to convert iTunes to MP3? You can learn how to convert iTunes M4P/M4A to MP3 and convert iTunes movies to MP3/MP4 in this post.
Posted by Jenny Ryan | 17.12.2020 -
3 Ways to Convert AMR to MP3
If you want to convert AMR to MP3, you can use online audio converter or AMR to MP3 converter to change AMR to MP3. Here are the best converting ways.
Posted by Jenny Ryan | 11.12.2020 -
How to Convert Common Videos to HD 1080p and 720p Quality
You can easily get your video with high quality after converting it to HD video quality. Read this article and get the way.
Posted by Jenny Ryan | 29.05.2020 -
How to Put iMovie Video into Other Formats
How to solve different problems when you upload video rom iMovie? How to upload iMovie? It is the right article to provide the detail information.
Posted by Jenny Ryan | 11.01.2021 -
How to Convert ARF to MP4/WMV on Windows 11/10/8/7/Vista/XP
Still puzzled about how to play WebEx ARF recording files on your own player? Download WebEx recordings and convert ARF files to MP4 easily in this post.
Posted by Jenny Ryan | 12.10.2018 -
Top 10 Video Sound Editors for Windows, Mac, iPhone and Android Users
Read and get your best video sound editor for Windows, Mac, iPhone, and Android. You can choose any tool to edit the audio track of your video on a desktop or mobile device with ease.
Posted by Jenny Ryan | 12.10.2018 -
Make Slo-Mo Video with the Best Slow Motion Video App on Android/iPhone
This post collects the best free slow motion app for Android/iPhone. Learn about the slow motion video editor and make your own video with slow motion.
Posted by Jenny Ryan | 02.12.2021 -
iPhone Video/Audio Format and How to Convert and Transfer iPhone Video/Audio
Want to know iPhone supported video/audio formats? You can know iPhone video/audio and how to transfer/convert iPhone video/audio in this post.
Posted by Louisa White | 26.06.2018 -
Best Green Screen Software to Edit Green Screen Video
What is the best green screen software to edit your green screen video? This article lists the top free and paid green screen software to help you make green screen work.
Posted by Jenny Ryan | 02.07.2018
