Getting Started
Introduction
Aiseesoft Filmai, now evolved into VidHex, is the best video enhancement software. It supports all popular or unpopular video formats, including MP4, MOV, MKV, AVI, etc. With it, you can easily enhance your videos to sharper, clearer, smoother ones. It also enables you to upscale videos up to 2x, 4x, and 8x resolution without losing quality. And if your video isn't smooth because of lost frames, it also helps you interpolate frames with AI technology to get a smooth and fluent video. For old videos with too much image noise, Filmai can denoise them and offer a clear visual effect. If your videos are black and white, you can also try this tool to colorize your videos to a more vivid and colorful state. So, how to use this great tool to do these things? Well, this page will show you how to use this powerful tool with a step-by-step guide.
Part 1. How to Update Filmai to VidHex
As mentioned above, Filmai has now evolved into VidHex, offering a more advanced way to enhance, upscale, and repair blurry videos. Enjoy cutting-edge AI technology, powerful features, and a brand-new membership plan. If you previously subscribed to Filmai and want to transfer your benefits to VidHex, follow the steps below to update and sync your subscription.
Step 1 Click the download button on the freezing bar to download VidHex easily and quickly. To complete the setup, follow the on-screen prompts. Then, you will see the interface like this.

Step 2 Click Log in on the top right. Log in to VidHex with the email you used for the Filmai purchase. Check your email address again and click Send to get an email which includes the verification code.
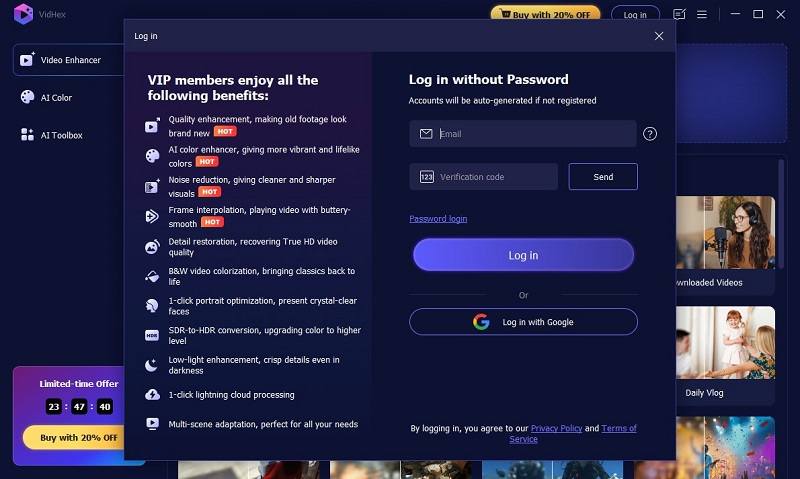
Enter the verification code you received, then you'll have successfully created your VidHex account and activated your benefits! We're giving you 50 free credits for AI video processing as a token of our appreciation. Start exploring VidHex today!
Part 2. How to Enhance Video in VidHex
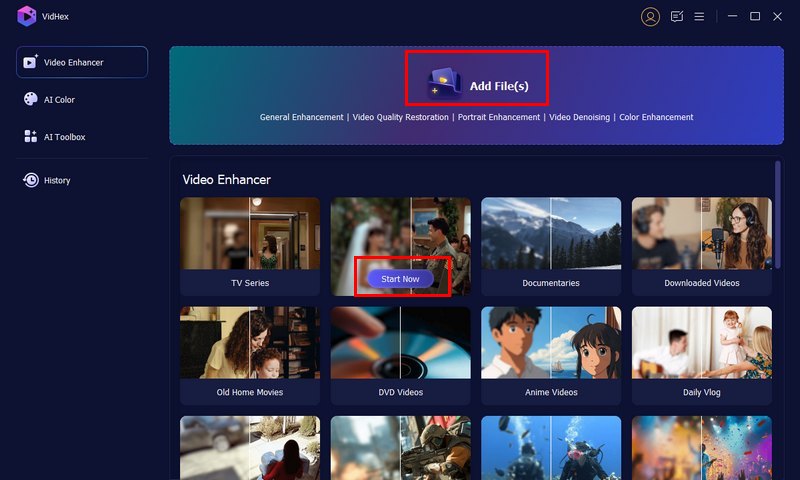
Step 1 Add Files for Video Processing
Download and open VidHex, then add the files you want to process by either clicking “Add File(s)” or the “Start Now” button, which appears when you hover your mouse over the scenarios under “Video Enhancer”, “AI Color”, or “AI Toolbox”.
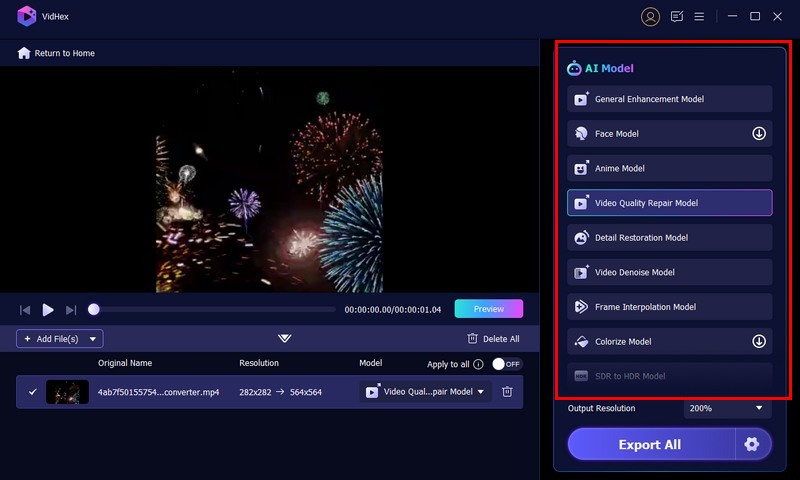
Step 2 Select a Proper AI Model
If you click the “Add File(s)” button to add your video, you need to choose an AI model manually. Here, we offer 11 AI models for your selection. You can choose one that suits your needs best.
If you add your files by clicking the hovering “Start Now” button, VidHex will automatically select the most appropriate model based on the scenario on the home screen.
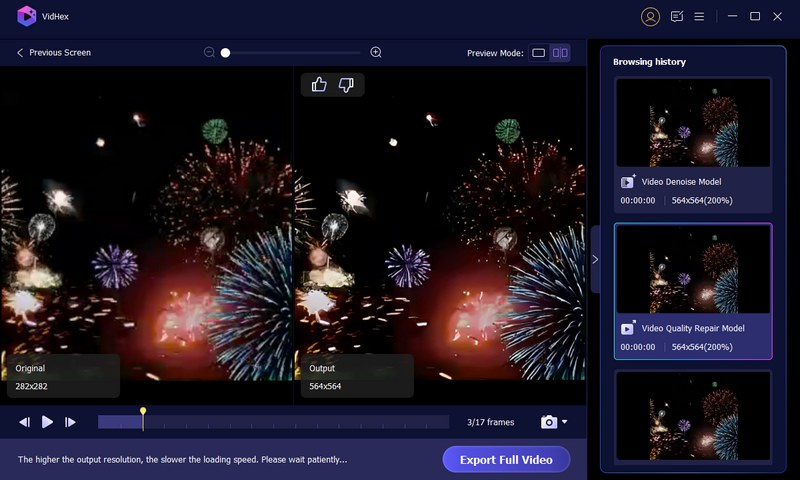
Step 3 Preview the Rendering Effect
After choosing an AI model, you can click “Preview” to check if the result meets your expectations. If not, you can turn to another AI model and try again. We offer 2 preview modes and enable previewing effects from various models for comparison. If the result meets your requirement, please directly click “Export Full Video” in the preview window to start processing the video with AI.
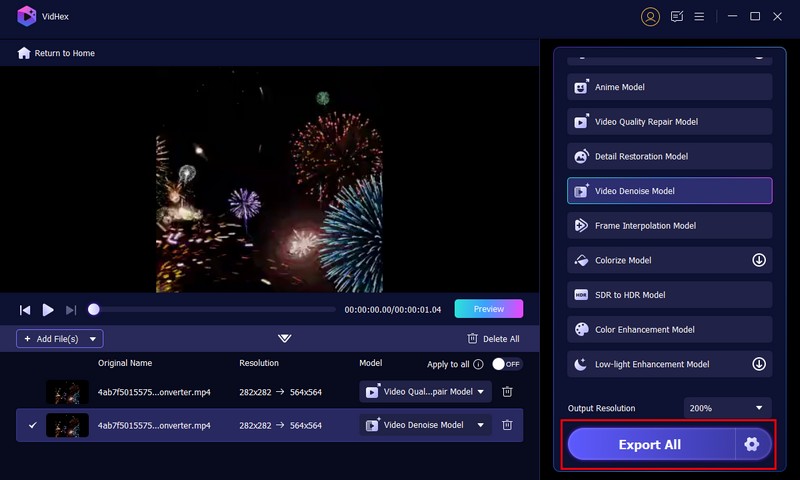
Step 4 Adjust Settings for Your Video
If you want to customize more settings, you can also go back to the previous screen, click the gear button to select an output format, video encoder, bitrate, and output folder.

Adjust the output resolution from the drop-down menu next to “Output Resolution.” To upscale, select the “General Enhancement Model” and pick 4K, or set a custom 8K resolution to enlarge the video while keeping the original quality.
Step 5 Export the Video
After all is set up, you can click “Export All” to get the final result.
Step 6 Accelerate the Video Processing
The video processing consumed time depends on your original video files and the AI model you selected. If the processing is too slow, you can click “Accelerate Now” to speed up the process.

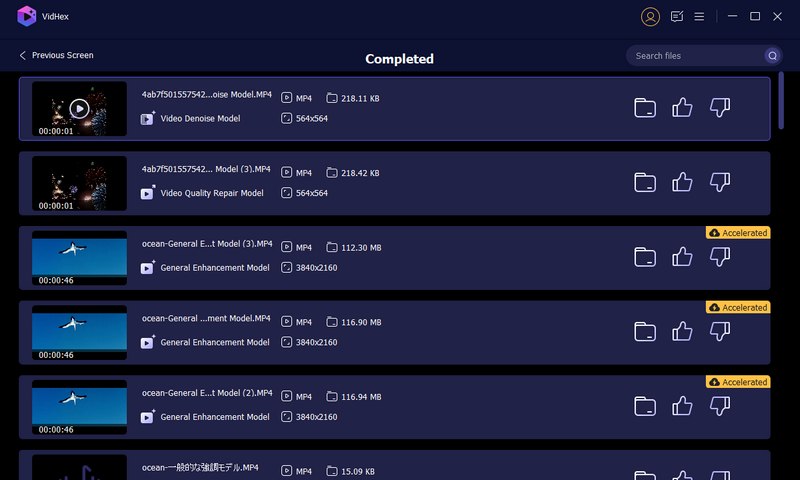
Step 7 Check the Completed Task
After the processing is completed, VidHex will navigate you to the “Completed” screen. Here you can see all your processed tasks. You can view them or check their save folder.
Part 3. Inside VidHex: 11 AI Models Explained
VidHex integrates 11 advanced AI models, each designed to handle specific video enhancement tasks and deliver professional-level results. Then, we will introduce you to the following models, helping you choose the most suitable one.
General Enhancement Model
Designed for overall video quality improvement, this model enhances clarity, sharpness, and detail while reducing noise and artifacts. It also supports upscaling videos to HD, 4K, or even 8K resolution, preserving a natural look without over-sharpening.
Face Model
The Face Model focuses on human subjects. It refines facial textures, skin tones, and expressions, ensuring natural smoothness and vividness. Perfect for vloggers, interview videos, and footage with close-up shots of people.
Anime Model
Specially trained on anime and cartoon datasets, this model preserves clean outlines, vivid color palettes, and crisp visual effects unique to 2D animation. It enhances low-resolution anime clips while maintaining the original artistic style.
Video Quality Repair Model
This model is designed to improve the visual quality of low-quality or compressed videos. It enhances clarity, reduces artifacts, and restores natural sharpness to footage that looks blurry or blocky due to heavy compression or poor recording conditions.
Detail Restoration Model
For footage that has lost fine details due to compression or poor lighting, the Detail Restoration Model intelligently recovers texture, edge definition, and micro-details, resulting in a sharper and more lifelike image.
Video Denoise Model
The Denoise Model removes grain, noise, and compression artifacts from low-light or high-ISO recordings. It delivers a clean, smooth visual without blurring key details - ideal for night scenes or surveillance footage.
Frame Interpolation Model
By predicting and inserting intermediate frames, this model increases the frame rate of your videos to 60fps or higher, resulting in ultra-smooth motion. It’s great for sports videos, gameplay footage, or cinematic slow-motion effects.
Colorize Model
Bring black-and-white or grayscale footage to life with realistic colorization. The Colorize Model uses advanced AI to analyze scenes and automatically apply natural colors to people, landscapes, and objects.
SDR to HDR Model
Transform Standard Dynamic Range (SDR) videos into High Dynamic Range (HDR). This model enhances brightness, contrast, and color depth, making visuals more vibrant and immersive on modern displays.
Color Enhancement Model
This model fine-tunes overall color tone, saturation, and balance, making dull or faded videos appear more vivid and true-to-life. It’s useful for content creators seeking a professional, cinematic color style.
Low-Light Enhancement Model
Perfect for dark or underexposed videos, this model brightens scenes while preserving natural contrast. It reduces noise, recovers hidden details, and improves visibility without causing overexposure.
With these 11 AI-driven models, VidHex provides an all-in-one solution for every kind of video restoration and enhancement task - from subtle quality optimization to complete visual transformation. Each model can work independently or in combination, ensuring you get the best possible results for every video.
-
7 Best AI Video Enhancer Recommendations, Online and Offline
Can an online video quality improver upscale resolution to 4K? How do you improve video quality with AI for free? Get 7 AI video enhancers to improve quality.
 Posted by Ashley Mae | 23.08.2024
 -
Convert Videos to 4K/1080p/720p HD – Free, Online, or with AI Tools
Video looks pixelated or grainy? Check this guide to remove the pixelation with AI tools or professional software like Adobe Premiere Pro or After Effects!
Posted by Ashley Mae | 18.11.2025 -
7 Best AI Video Denoiser Tools for Grain and Noise Reduction
What is the best noise and flicker reduction tool? How to reduce noise with Topaz Video AI? This post shares 7 AI video denoiser tools for you to reduce noise.
Posted by Ashley Mae | 22.08.2024 -
Top 5 Video Smoothers to Enhance Your Viewing Experience
How do you smooth your shaky footage? How can I make my video play smoother? Get five great video smoother tools to stabilize your videos and enhance quality.
Posted by Ashley Mae | 23.08.2024 -
5 Best Free Video Quality Enhancers Online (Pros & Cons)
Want the best free video enhancers to improve the quality of your videos? Here are 5 trusted tools to improve video clarity, resolution, and colors online with no cost required.
 Posted by Andrew Miller | 15.10.2025
 -
Upscale Video in DaVinci Resolve with These Easy Steps
A complete guide on how to upscale video in DaVinci Resolve. Improve video quality fast and see the best alternative for stunning results.
 Posted by Lucas Hayes | 26.09.2025
 -
Colorize GIF: Easy Ways to Add Vibrant Colors with Different Tools
Learn how to colorize GIF easily using 3 tools. Discover step-by-step methods to add vibrant colors, enhance quality, and make your GIFs stand out.
Posted by Lucas Hayes | 25.09.2025 -
How to Use FFMPEG Deinterlace: Filters, Commands, and AI Tools
Fix interlaced videos easily with FFMPEG Deinterlace. Discover the top filters, commands, and AI alternatives for seamless, clear playback.
Posted by Lucas Hayes | 25.09.2025 -
Change Video Resolution to Increase/Lower Video Resolution
How do I increase or reduce the resolution of a video? Can you change the video to a higher resolution? Learn five ways to resize and change video resolution.
Posted by Ashley Mae | 22.08.2025 -
Learn How to Stabilize Your Video in Adobe Premiere Pro
Can you stabilize a video in Premiere Pro? Does Premiere Elements offer good stabilization? Check the detailed guide on how to stabilize videos in Premiere.
Posted by Ashley Mae | 28.08.2024 -
Learn to Reduce Noise and Denoise Videos in Premiere Pro
Does Premiere Pro have a DeNoise function? How do you remove noise from a grainy video in Premiere? Check the guide on how to denoise videos in Premiere Pro.
Posted by Ashley Mae | 28.08.2024 -
5 Best Video FPS Converters to Change the Video Frame Rate
Can you change and convert video FPS? How do you convert a 30 fps video to 60 fps? This post shares 5 video FPS converters for you to increase or decrease FPS.
Posted by Ashley Mae | 27.08.2024 -
Enlarge Video and Improve Quality with HandBrake Upscaling Tool
Can HandBrake upscale videos and increase quality? Does HandBrake dimensions allow upscaling? This post tells how to improve quality with HandBrake upscale.
Posted by Ashley Mae | 27.08.2024 -
Frame Interpolation and Best AI Frame Interpolation Tools
What is frame interpolation? Can Topaz interpolate frames to make slow-motion effects? Learn what frame interpolation is and get 3 AI frame interpolation tools.
Posted by Ashley Mae | 23.08.2024 -
Expert Review: Remini Video Enhancer | Functions and Price
Unlock Remini Video Enhancer’s ability to upgrade videos. Expand knowledge with our comprehensive review of the video enhancer and other good alternatives.
Posted by Ashley Mae | 14.08.2024
