Getting Started
Introduction
Aiseesoft Video Enhancer has now evolved into VidHex -- a more advanced and professional AI-powered video enhancement tool. With multiple AI models, including the General Enhancement Model, Face Model, and Video Denoise Model, VidHex allows you to improve video quality in a variety of scenarios. In this tutorial, you’ll learn how to use VidHex to enhance your videos with ease and great result.
How to Enhance Videos
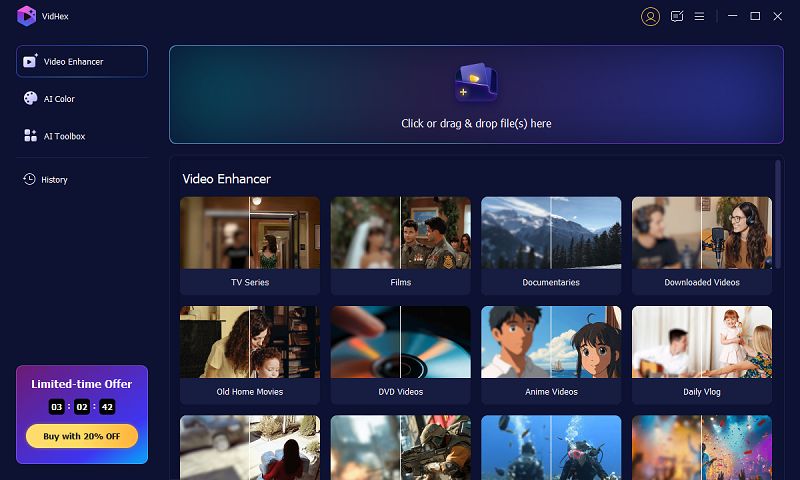
Step 1 Initiate VidHex on your computer and upload video files
Download and install VidHex. Drag the video file you want to enhance to the file-upload area or click it to import one. You can also select a scenario that is corresponding to your video under Video Enhancer to add your video.
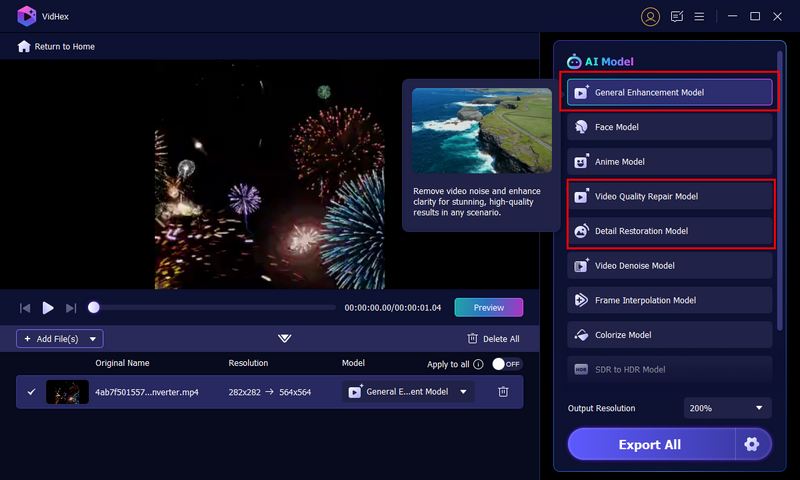
Step 2 Choose an AI model
Once the file is imported, select the General Enhancement Model to sharpen the video. Different VidHex AI models have different effects on the video. To make a video clearer, you can also try the Video Quality Repair Model, Detail Restoration Model, or Low-light Enhancement Model for low-quality video captured under low-light environment.
Step 3 Adjust video output parameters
Click the gear icon next to the Export Now button and modify the video output parameters. For example, you can deliver the video in multiple formats, like MP4, MKV, and MOV. You can also select the Output Resolution to upscale the video up to 4K.

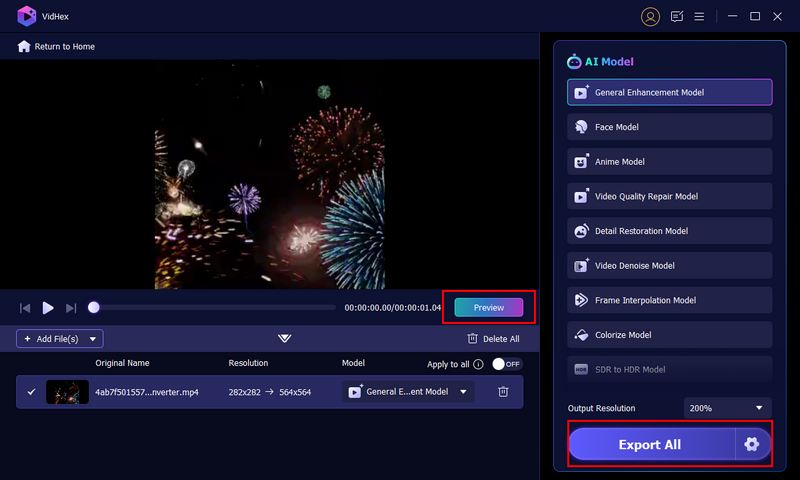
Step 4 Preview and export the video
Click Preview to see if the result meet your requirement. If it is, continue with the Export Now button to ensure your enhancement. If it isn’t, try other models until you get a satisfying result.
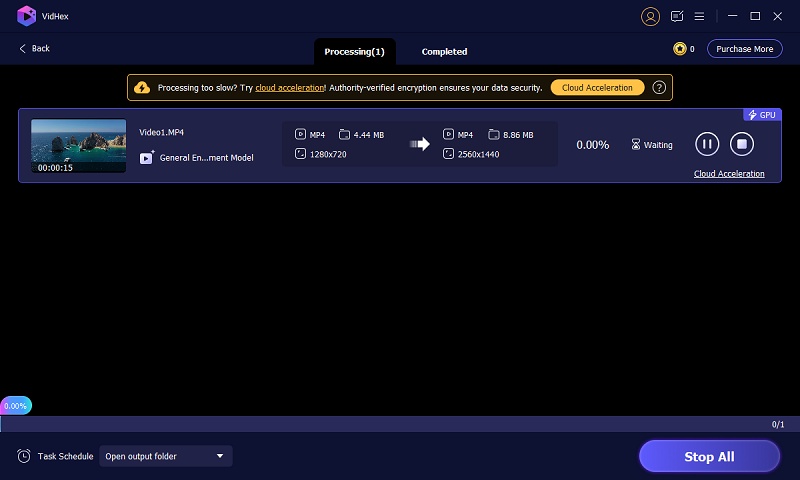
Step 5 Process the video with AI
Wait for the processing to complete, and then you can achieve a stunning result. You can also click the Cloud Acceleration to enjoy lightning processing speed.
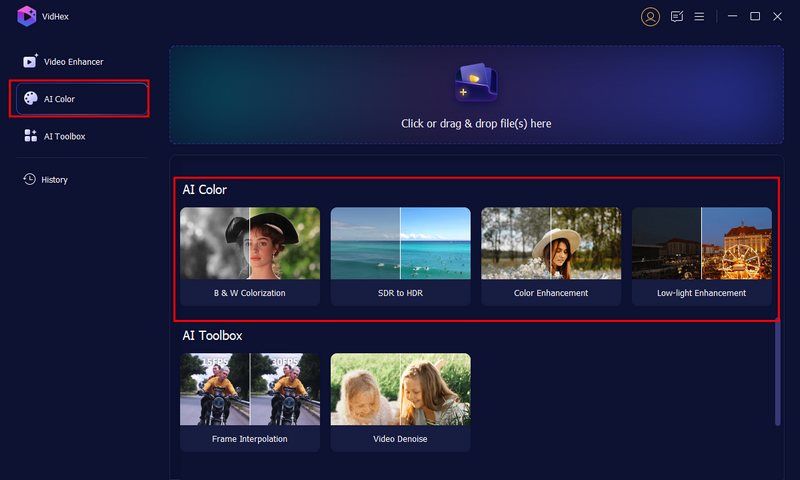
How to AI Colorize Videos
Step 1 Select the AI Color option and upload video
After opening the VidHex, click AI Color from the left bar. Here you can see 4 AI color options to meet your needs for colorizing black-and-white, dull, dim, or low-light videos. Click one that is appropriate to your video and upload your video to it.
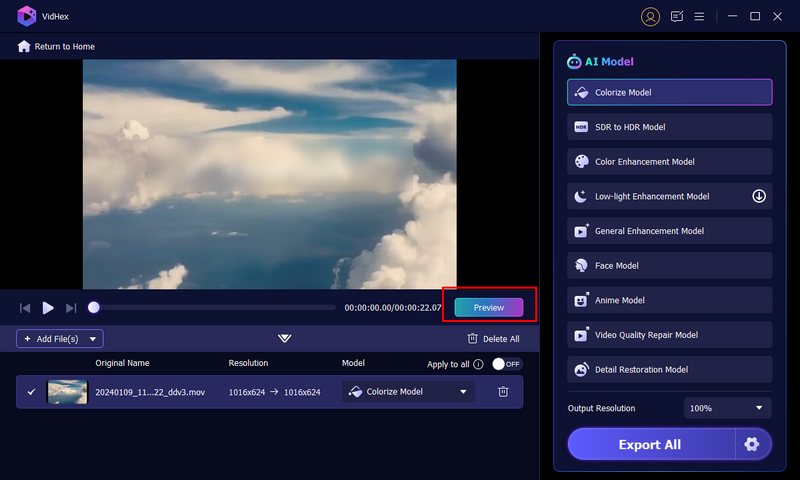
Step 2 Choose the AI model and preview
Then, VidHex will choose the best AI model that suits the scenario you selected. If you want to see the result before export, you can click Preview.
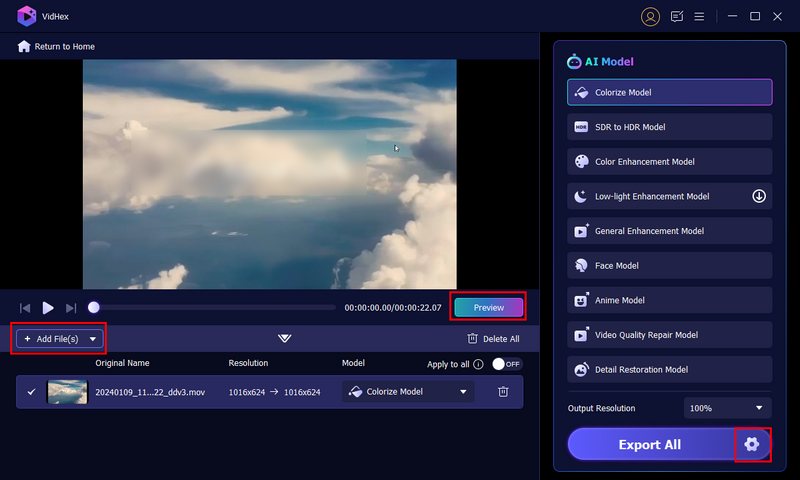
Step 3 Adjust settings and export
Click the settings icon to set up your video format, bitrate, output folder, etc. You can also click Add File(s) to upload more videos to process. After all setting up, click Export All to start processing the video.
Step 4 Accelerate the video processing
Now, VidHex will start to process your video, you can click Accelerate Now to speed up the process. If the video is large and long and might take some time, you can click the drop-down list next to Task Schedule and choose if you want to shut down the computer or exit the program after the task completed.
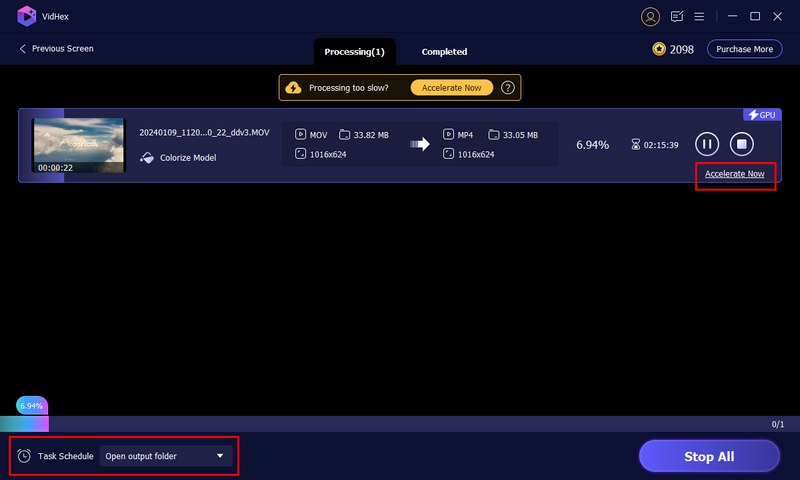
After finishing, you can check the processed video in Completed section.
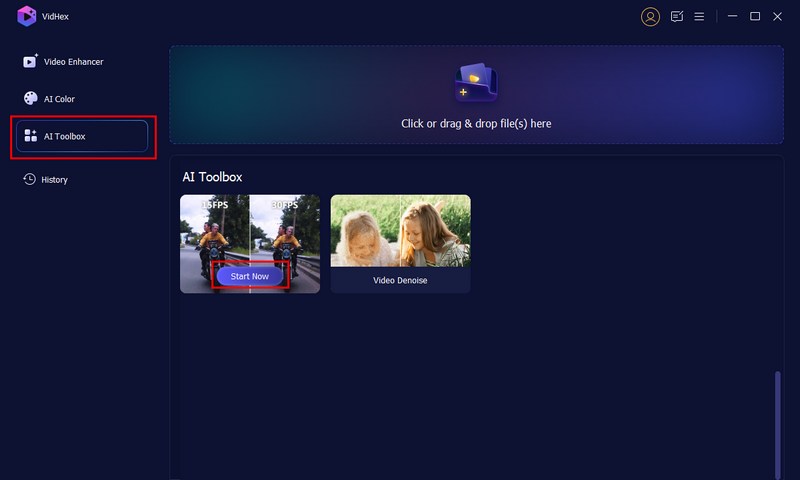
How to Interpolate Frames to Video
Step 1 Open VidHex and Choose Frame Interpolation
Open VidHex after downloading it. In its interface, choose AI Toolbox where you can select Frame Interpolation. Move the mouse cursor on it and click Start Now to add your video that requires processing.
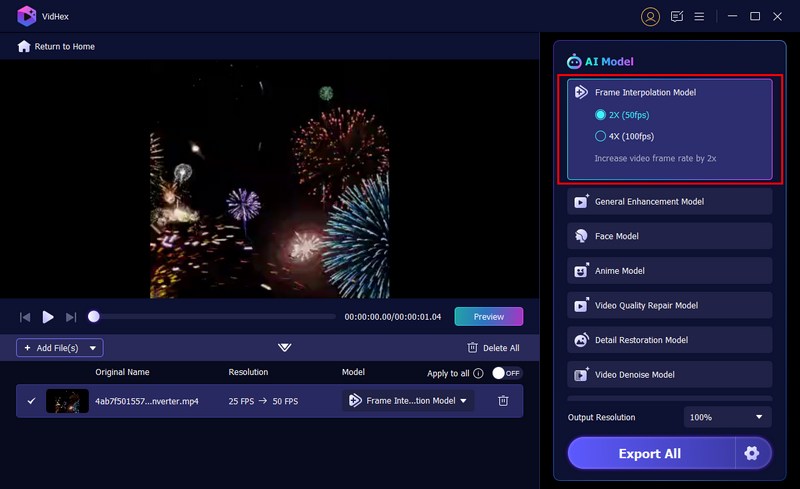
Step 2 Select the frame rate boost level you prefer
You can select how many times you want to increase the video frame rate now. VidHex allows you to increase video frame rate by 2× and 4×.
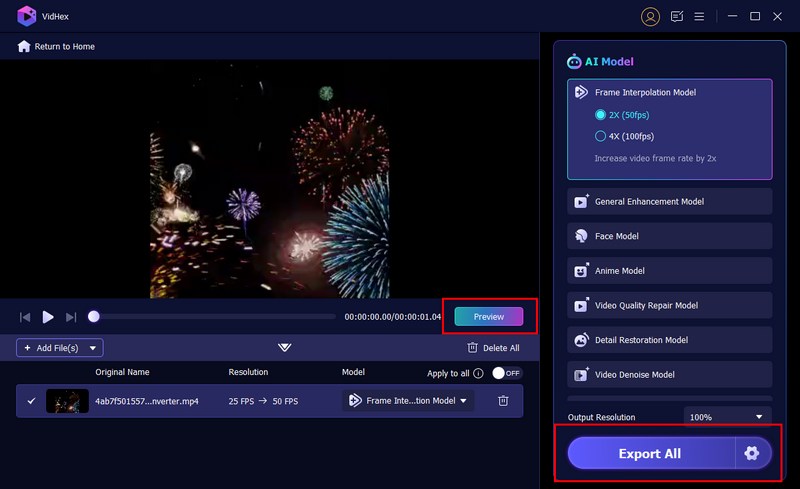
Step 3 Adjust the settings and preview
Now, you can click Preview to check the effect and avoid wasting time if the result fails you. Click the gear icon at the bottom to adjust the video’s output format and resolution you like. After that, click Export All.
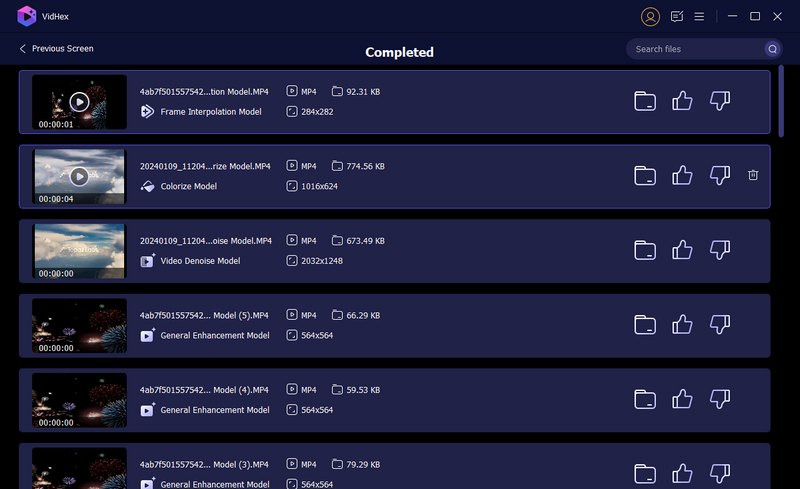
Step 4 Accelerate and complete the processing
Now, the video will start to process and you can click Accelerate Now to speed up it. After completed, it will appear automatically under the Completed section.
How to Find Enhanced Videos in History
Step 1 Open VidHex and click History
Open VidHex and you will see History from the left bar in the interface. Note that this option will only appears after you have processed videos. If you have not processed any videos, this place will show nothing.
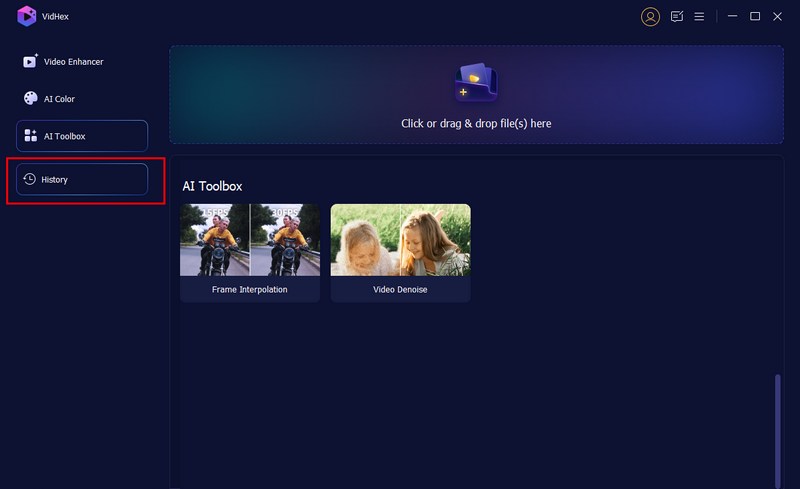
Step 2 Open History and see finished videos
After click History in the main interface, you will enter the Completed interface where you will find all the videos you’ve processed. You can click the folder icon to see where they are stored. You can also click the processed video to view it.
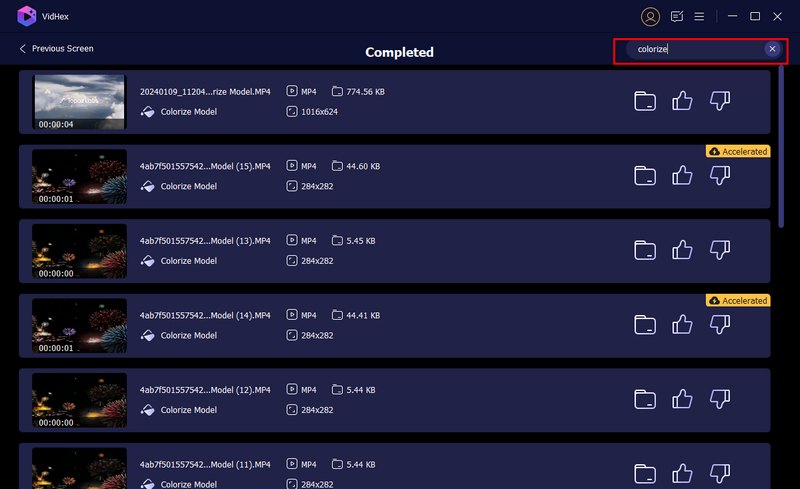
Step 3 Use Search function to locate the processed videos
If you have too many processed videos to sort through, try using the search function in the top right corner to locate your video faster. Just enter a keyword, and the results will appear below.
How to Tailor Settings in Preference
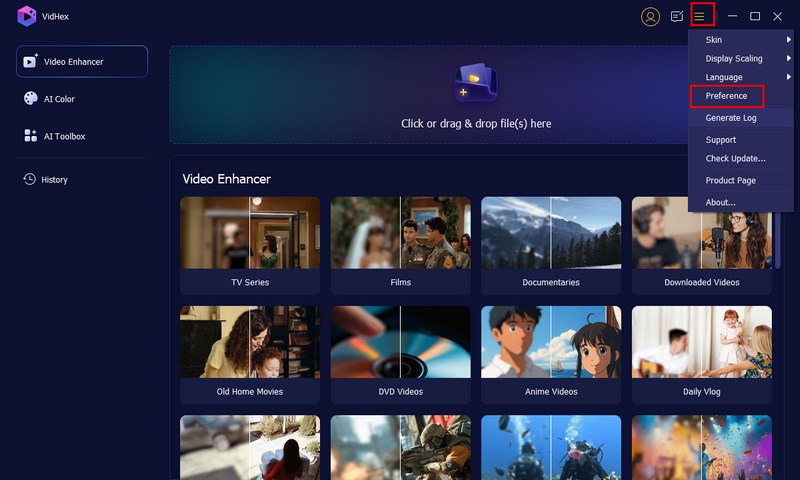
Step 1 Open Preference in menu
Launch VidHex and you can see the menu button at the right top corner. Click it to choose Preference.
Step 2 Adjust the Preference based on your needs
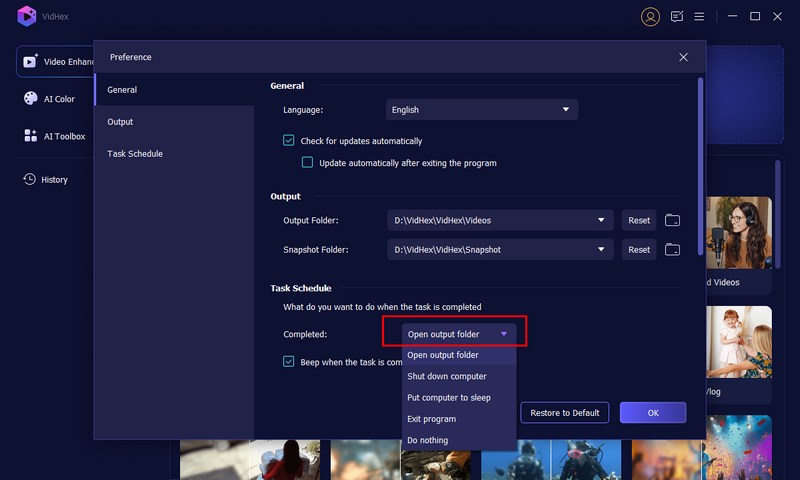
In the Preference windows, you can adjust the General settings like language and updating status. If you want to select a different output folder, you can click the drop-down button under Output, and choose Browse and Select Folder.
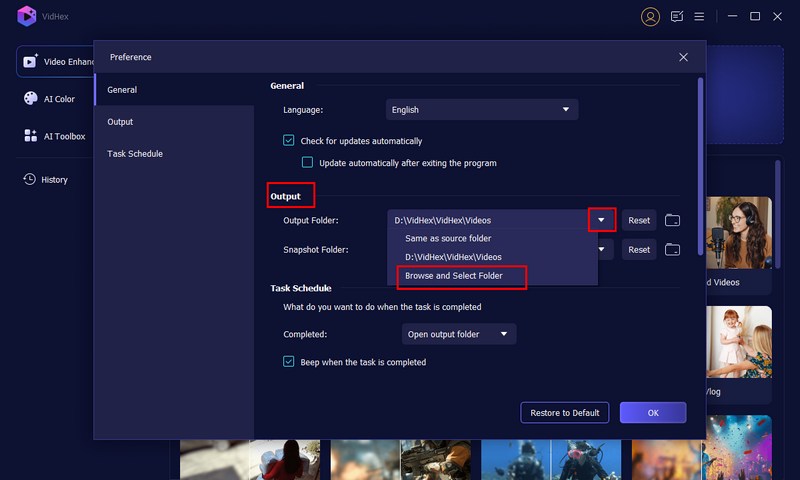
Furthermore, if you want to set up a task schedule about what to do when the task is completed, you can click the drop-down button next to Completed and choose exit the program, shut down the computer, or more.
-
How to Enhance Video Quality
Read this article to enhance video quality.
 Posted by Jenny Ryan | 08.03.2016
 -
7 Popular Video Denoiser to Use to Remove Video Noises [Newly]
Video denoiser is a popular feature that you can use on most video editors. But not all have the most effective way to denoise video. That is why we created this article.
 Posted by Ashley Mae | 05.05.2023
 -
How to Optimize Brightness and Contrast
Follow this article to optimize video brightness and contrast.
Posted by Jenny Ryan | 08.03.2016 -
How to Make Videos be HD Videos
Now, you can make your videos be HD videos.
Posted by Jenny Ryan | 08.03.2016 -
How to Turn Videos to be 4K Videos
If you want to get a 4K video from a normal video, you can read this article.
Posted by Jenny Ryan | 08.03.2016 -
How to Rotate Video on iPhone
Learn how to rotate video on iPhone
Posted by Jenny Ryan | 14.03.2014 -
How to Flip a Video
Now, you have the chance to flip videos easily.
Posted by Jenny Ryan | 07.11.2012 -
5 Best Free MP4 Splitter for Windows and Mac
You can find 5 best free MP4 splitter for Windows and Mac to split MP4 video.
Posted by Jenny Ryan | 10.10.2017 -
How to Edit MTS Video without iMovie
Now, you need to know how to edit MTS video without iMovie.
Posted by Jenny Ryan | 17.07.2017 -
How to Edit XAVC in Avid
Read this article to put and edit XAVC video in Avid.
Posted by Jenny Ryan | 07.11.2012 -
How to Edit XAVC on Computer
If you want to edit XAVC videos on computer, just read it.
Posted by Jenny Ryan | 07.11.2012 -
How to Edit DVD Menu easily and quickly
Now find the best way to edit DVD menus.
Posted by Jenny Ryan | 14.06.2014 -
Edit Videos before Converting to DVD
If you want to edit videos before burning to DVD, follow it.
Posted by Jenny Ryan | 19.07.2014 -
5 Easy Ways to Combine VOB Files You Should Know
How to combine VOB files on Windows or Mac computer? This article shows you how to combine/merge/join VOB files into a single file without quality loss.
Posted by Ashley Mae | 14.12.2020 -
How can You Edit MP4 Videos
Get more tips about editing MP4 videos.
Posted by Jenny Ryan | 20.07.2017 -
Rotate Video on Computer
If you want to rotate videos on Mac or PC, you can read this article.
Posted by Jenny Ryan | 07.11.2012 -
Top 10 Android Video Editing Software
Follow this article to check best Android video editors.
Posted by Jenny Ryan | 21.10.2016 -
Top 10+ Free Video Editor on Windows
Now, just follow this guide to get free video editors on Windows.
Posted by Jenny Ryan | 20.10.2016 -
Free Video Editors on Mac
Read this article to get free video editors on Mac.
Posted by Jenny Ryan | 20.10.2016 -
Best Video Editing Apps on iOS
Now, just find best video editing apps for iPhone and iPad.
Posted by Jenny Ryan | 20.10.2016 -
Find iMovie for Android
If you want to edit video with iMovie on Android, just find its alternatives.
Posted by Jenny Ryan | 20.10.2016 -
Top 6 Audio Joiners
Read this article to find best audio joiner.
Posted by Jenny Ryan | 20.10.2016 -
Free Photo Editing Software
Know more free photo editing programs on Mac/PC/Android/iPhone
Posted by Jenny Ryan | 20.10.2016 -
How to Edit MP3 Files
Now, learn how to edit MP3 files easily.
Posted by Jenny Ryan | 20.10.2016 -
Find Video Combiners to Merge Videos
If you want to merge videos, just find video merger to finish this.
Posted by Jenny Ryan | 20.10.2016 -
Find Alternatives for Final Cut Pro on Windows
Now, edit video with Final Cut Pro for Windows.
Posted by Jenny Ryan | 09.01.2015 -
Best 4K Editors for Mac and Windows
Read this article to find best 4K editors for Mac and Windows.
Posted by Jenny Ryan | 29.04.2015 -
There are More MP4 Editors
Read this article to find more MP4 editors.
Posted by Jenny Ryan | 21.10.2016 -
5 Best GoPro Editors
Now, you can get top 5 GoPro editing software.
Posted by Jenny Ryan | 14.03.2014 -
Sony Video Editing Software
Get more information to edit Sony video with video editor.
Posted by Jenny Ryan | 07.11.2012 -
Best video editing Software for Mac and Windows
Now, you can get best video editors for Mac and Windows.
Posted by Jenny Ryan | 20.05.2016
