Getting Started
Introduction
Aiseesoft Mac FoneLab provides users with the best solution of recovering the lost or deleted Contacts, Messages, Call history, Calendar, Notes, Reminder, etc. directly from iOS devices or the iTunes/iCloud backup.
Part 1. Recover Lost/Deleted Data from iPhone 4 and Above
Step 1 Select the Recover from iOS Device mode and connect your device. Once detected, the current device name will be displayed on the interface of program.
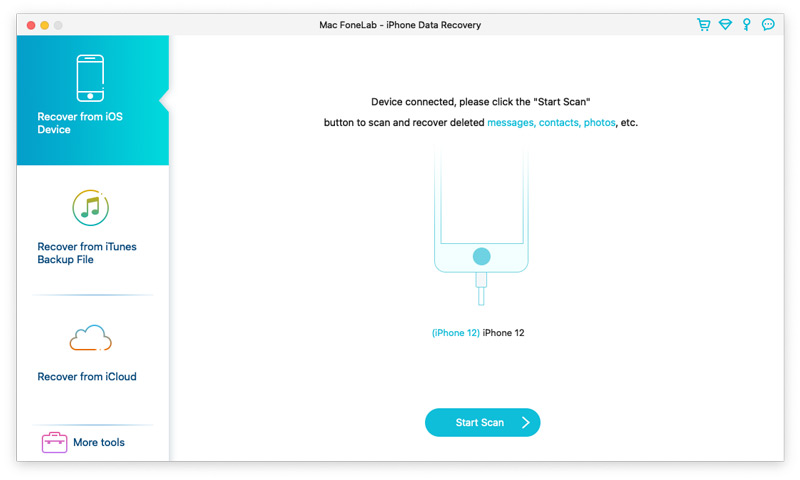
Step 2 Click the Start Scan button to begin scanning your device for deleted data on it.
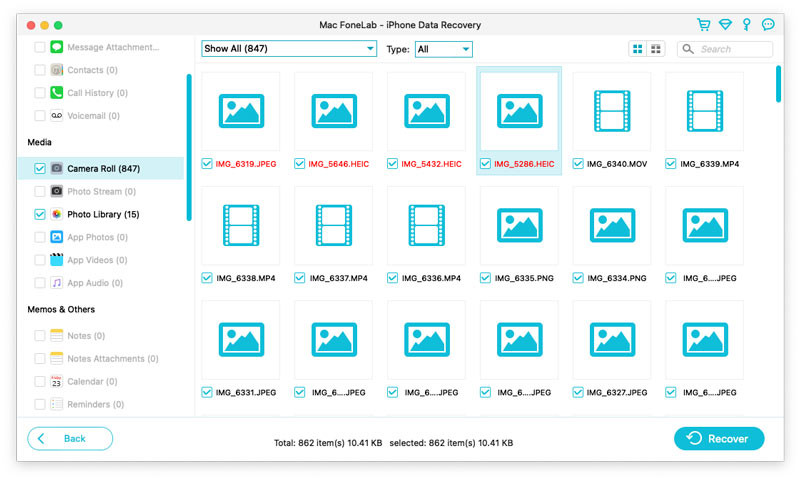
Step 3 Select the files you want to regain, click Recover to get back and save your data in local disk.
Note:
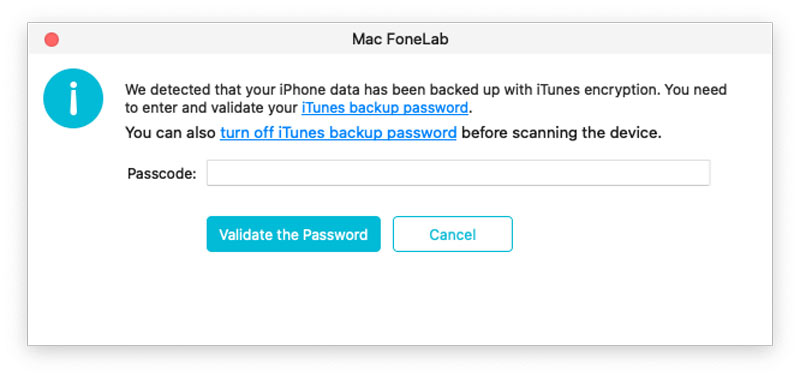
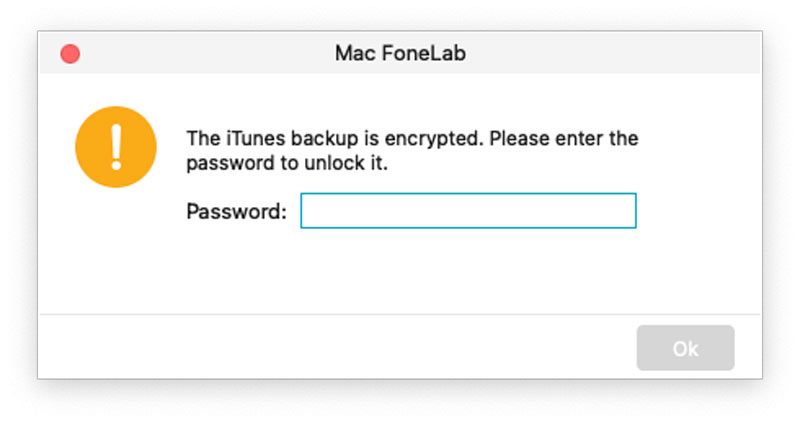
1. If you have backed up your iPhone with iTunes encryption before, you will be required to enter and validate iTunes backup password in the pop-up window, so that you can continue to scan your device.
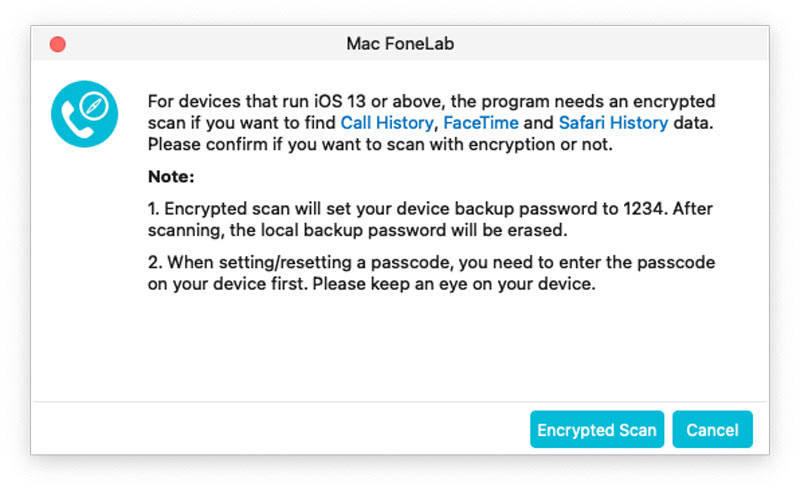
2. If your device is running iOS 13 or above, and has no encrypted backup in iTunes, you will see this pop-up window. If you want to scan out Call History, FaceTime and Safari History data, you can click Encrypted Scan to move on. But if you don't, just click Cancel and the program will skip scanning these three types of data.
Part 2. Recover from iPhone 4/3GS, iPad 1 and iPod touch 4
Step 1 Select the Recover from iOS Device mode and connect your device to your computer.
Step 2 Please click Download to download and install the corresponding plug-in according to the prompt before scanning your device.
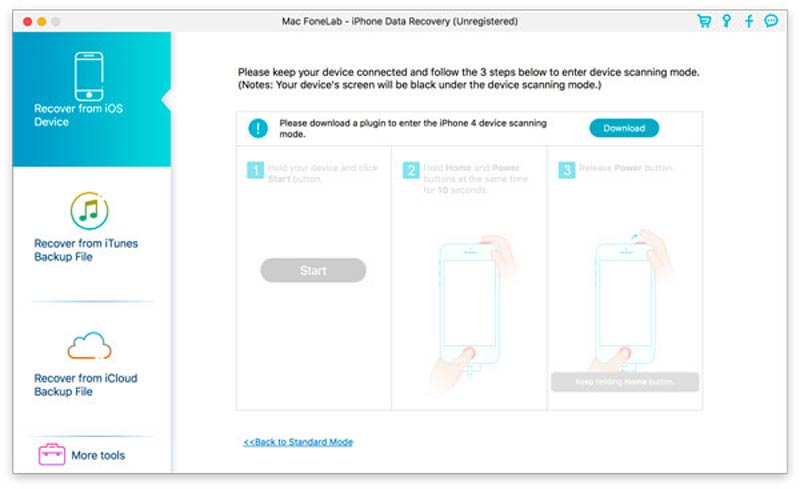
Step 3 After installing the plug-in, please follow the three steps below to enter scanning mode.
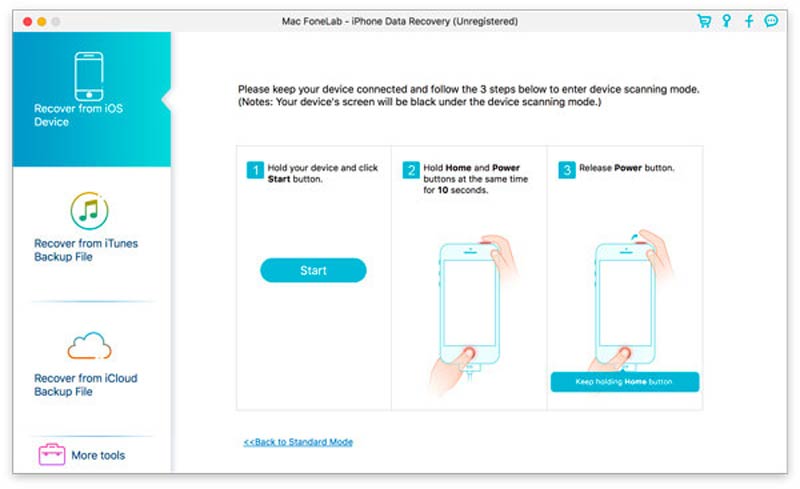
1. Hold your iOS device in hand and click the Start button.
2. Press and hold the Power and Home buttons at the same time for exact 10 seconds.
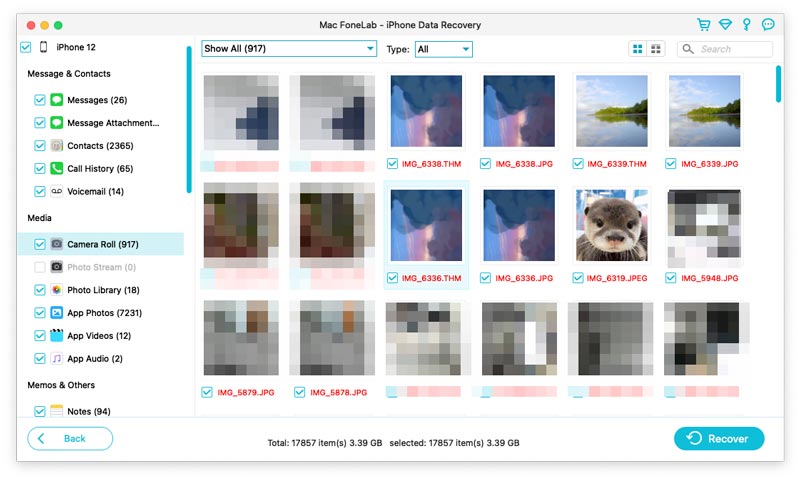
3. Release Power button and keep holding Home button for another 10 seconds. After the scan, you can preview all data found on your device in the scan result. The category and number of files will be listed in the left sidebar and the specific content will be displayed on the right panel. You can double-click on a photo to view it.
4. Select the files you want to retrieve, click Recover to regain and save your data in local disk.
5. Click the Exit Scanning Mode button or directly close the software to launch your device into normal mode.
Part 3. Recover data from iTunes Backup
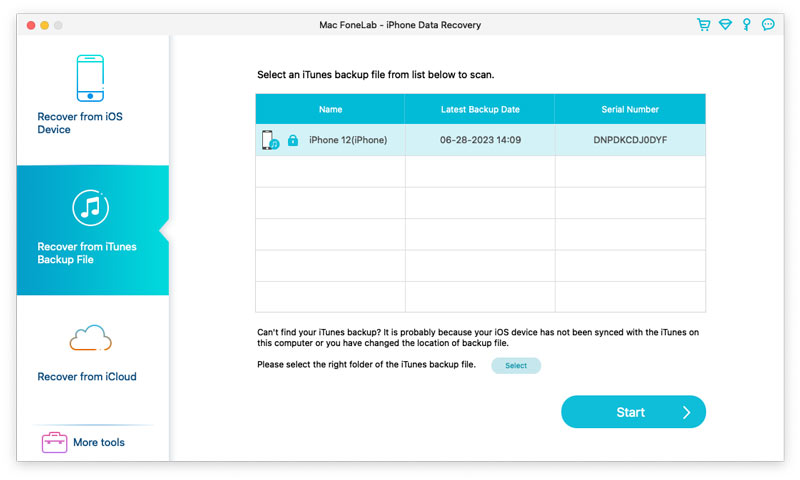
Step 1 Select the Recover from iTunes Backup File mode.
Step 2 Select the backup file you want to recover from and then click the Start Scan to enter into scanning mode.
Step 3 If you have encrypted iTunes backup, you need to enter the backup password first to continue to scan from iTunes backup file.
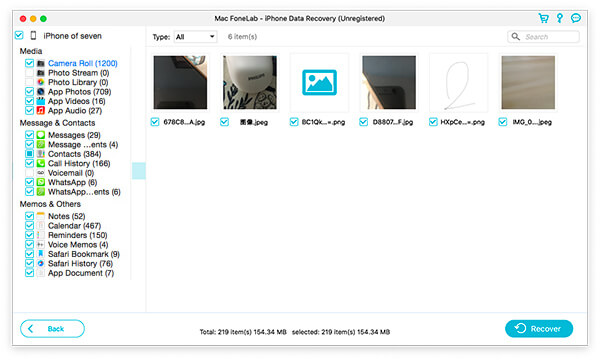
Step 4 After the scan, you can preview all data found on your device in the scan result. The category and number of files will be listed in the left sidebar and the specific content will be displayed on the right panel. You can double-click on a photo to view it.
Step 5 Select the files you want to retrieve, click Recover to regain and save your data in local disk.
Part 4. Recover data from iCloud Backup
Step 1 Run Mac FoneLab and select Recover from iCloud Backup File. Sign into your iCloud with your password and account.
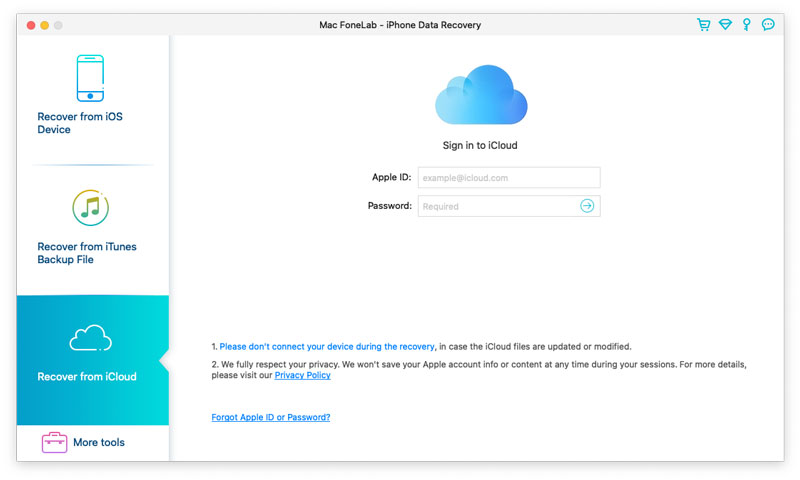
Note: If you have enabled two-factor authentication, here you should enter the verification code in this software sent to your device after tapping Trust button on device.
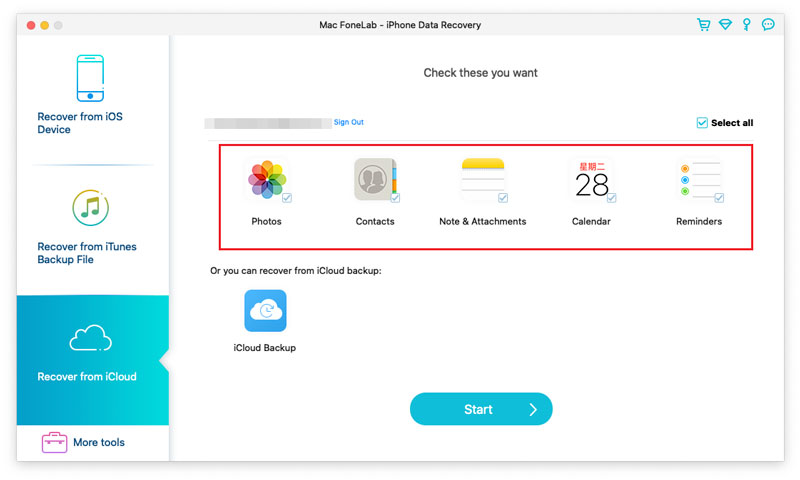
Step 2 Here are 2 ways provided to scan and recover data from iCloud.
1. Recover from iCloud
Select the checkbox before the data type (Contacts, Notes & Attachments, Reminders, Photos, and Calendars) you want to recover from iCloud. After that, click Start button to scan iCloud.
Then it will start scanning iCloud. While the scan process is done, you can see all the scanned data types listed on the left sidebar. Click the data type from the left side and view the details on the right.
After confirming the data you need recover, select them and click Recover button to save the deleted files from iCloud on computer.

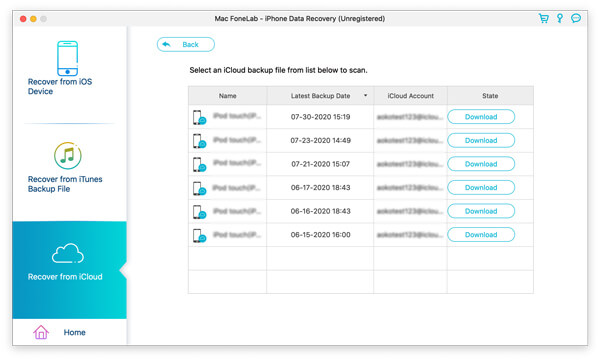
2. The other way is to scan from iCloud Backup.
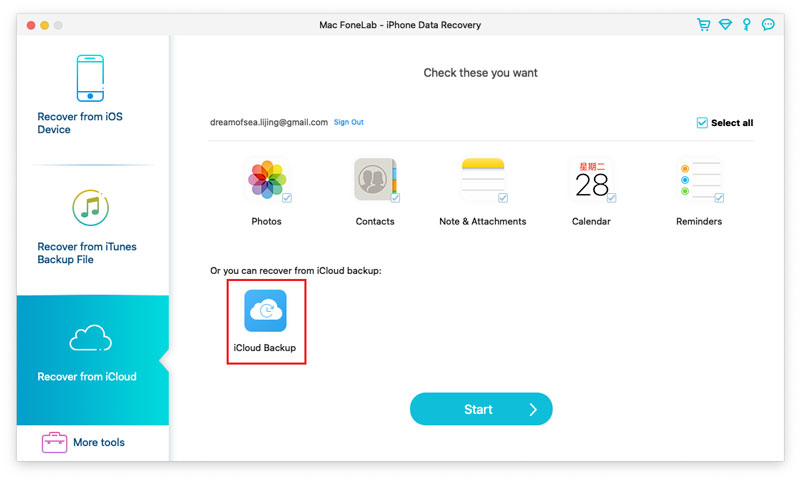
Click it and all the backup files associated with this iCloud account will show. Select the one you want according to the device name and backup date, and click Download.
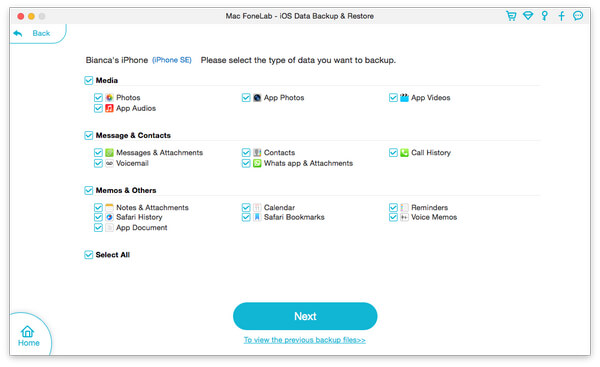
In the pop-up window, select the checkbox of the data types and click Next. Then this software will scan iCloud backup file immediately.
When the scan is finished, select the deleted files that you want to retrieve and click Recover button to save the deleted data from iCloud backup to your computer.
-
How to Change iCloud Account
This article focuses on how to change iCloud account on iPhone/iPad/iPod and iCloud control panel.
 Posted by Louisa White | 13.06.2018
 -
How to Enter and Exit iPad Recovery Mode
iPad stuck in apple logo? This article shows you how to put your iPad Pro/Air 2/mini 4 into and out of recovery mode.
 Posted by Iris Walker | 21.12.2020
 -
See iTunes Error 7/3194/17/9? Here is the Fix
You may encounter iTunes Error 7/3194/17/9 or other iTunes error codes, this post shows effective ways to fix iTunes error.
 Posted by Andrew Miller | 18.08.2023
 -
How to Authorize Computer on iTunes
How to deauthorize a computer or all computers in iTunes? Read this article, you can know about iTunes authorization things.
Posted by Louisa White | 14.06.2018 -
How to Fix iPhone Stuck in Headphone Mode
Your iPhone stuck in headphones mode and you can't hear sound? Don't worry. This post will help you get out of that.
Posted by Louisa White | 15.12.2020 -
Effective Ways to Fix iPad Stuck on Apple Logo
This article mainly explains the reasons why iOS device like iPad Pro/Air 2/mini 4, iPhone, iPod and more gets stuck on Apple screen, and how to fix it.
Posted by Louisa White | 12.06.2018 -
What Can I Do when iTunes Home Sharing Is Not Working
What can you do when iTunes Home Sharing does not work well for you? Read this article, and find best solutions to fix it.
Posted by Louisa White | 14.06.2018 -
How to Completely Uninstall iTunes and Related Apple Software
Want completely uninstall iTunes from your computer? Click here and you can clearly know how to totally remove iTunes on Mac and Windows.
Posted by Iris Walker | 14.02.2022 -
What Should I Do When iTunes Won't Recognize My iPhone
If iTunes on your computer won't recognize your iPhone, read this tutorial to learn what to do when iTunes won't recognize iPhone.
Posted by Iris Walker | 13.06.2018 -
How to Uninstall and Reinstall iTunes without Losing Data
It is easy to uninstall and reinstall iTunes if you do that with the help of this passage. The most important thing is backup the files which you have backed up in iTunes.
Posted by Louisa White | 14.06.2018 -
How to Fix iPhone Stuck on Apple Logo
Why iPhone stuck on Apple logo? This tutorial shows the reasons and method to deal with that issue.
Posted by Louisa White | 17.12.2020 -
Rebuild iTunes Library: Preparation and Detailed Method
Want to rebuild iTunes library? Rebuilding iTunes library comes often because of some accidents. After reading this, you can re-create iTunes library by yourself easily.
Posted by Louisa White | 11.12.2020 -
How to Restore Contacts of iPhone/iPad/iPod from iCloud
Wonder how to restore the deleted or lost contacts of iPhone/iPad/iPod from iCloud? This post will provide three methods to retrieve contacts from iCloud.
Posted by Louisa White | 07.05.2018 -
How to Recover Deleted or Lost Notes from iCloud
This article shows how to restore the deleted iPhone notes on iCloud after updating a new iOS version or mistakenly deleting them.
Posted by Louisa White | 02.02.2018 -
How to Retrieve Photos on Camera Roll and Photo Library
Whether you want to recover deleted picture from iPhone camera roll or restore photos from iTunes photo library, this article will do you a great favor.
Posted by Louisa White | 24.12.2020 -
Three ways to Access Photos on iCloud
If you want to access photos on iCloud, this article will show you the simple steps to get iCloud photos exactly in three ways.
Posted by Louisa White | 11.12.2020 -
How to Restore iPhone from iCloud Backup
I have got a new iPhone SE to replace the broken one and want to recover iPhone backup from iCloud to the new iPhone. How do I restore iPhone from iCloud backup?
Posted by Louisa White | 06.06.2018 -
Ways to Search and Back up Text Messages on iPhone
Finding a particular text message from hundreds of messages on iPhone is troublesome for you. This guide will tell you how to search old text messages on iPhone.
Posted by Louisa White | 14.06.2018 -
Two Ways to Print Text Messages out from Your iPhone Freely
How can you print text messages from iPhone without saving them to screenshots? Following this guide to get text messages from your iPhone.
Posted by Louisa White | 03.04.2018 -
How to Recover iPhone iPad Safari History
If you want to rotate videos on Mac or PC, you can read this article.
Posted by Louisa White | 14.02.2022 -
How to Recover Deleted or Lost Notes on iPhone from iTunes Backup
Want to recover notes on iPhone from iTunes? This article introduces how to recover notes on iPhone from iTunes backup.
Posted by Louisa White | 03.04.2018 -
Three Ways to Restore/Recover iPhone Reminders
Worried about your lost/deleted reminders on your iPhone? You have the chance to recover/restore iPhone reminders from three ways from the following reading.
Posted by Louisa White | 11.12.2020 -
Three Ways to Save Text Messages on iPhone for Backup
How to save and back up your SMS text messages from iPhone to computer? Follow this article to export text messages from iPhone.
Posted by Louisa White | 14.06.2018 -
How to Recover iPhone Data after Factory Reset
Still wonder about how to recover lost data after restoring iPhone to factory reset? Read this post to restore your iPhone photos, text messages, contacts, etc.
Posted by Louisa White | 07.03.2018 -
Lost Everything after iPhone Update? Recover iPhone Data Now
Lost everything (contacts, apps, music, text messages, etc.) after updating iPhone? Recover iPhone data right now in three ways by following this article.
Posted by Louisa White | 17.12.2020 -
How to Recover Deleted Notes on iPhone (Step-by-Step Guide)
Accidentally deleted notes on iPhone? No worry! This blog has proven ways to recover deleted notes on the iPhone, covering official ways and third-party tools.
Posted by Louisa White | 26.05.2026 -
How to Restore iPhone without Software Update
Want to restore your iPhone without updating to the latest iOS? Read this article and find more solutions to remove the annoying notification of Software Update.
Posted by Louisa White | 20.06.2018 -
Suggestions about Accessing and Using Spotlight Search on iPhone iPad iPod touch
This post will give you some suggestions of how to use Spotlight Search on iPhone, iPad and iPod touch, so you can look for data including deleted items quickly.
Posted by Louisa White | 30.10.2019 -
The Easiest Way to Recover and View Snapchat Photos Pictures from iPhone and Android
How to recover Snapchat photos or pictures on your iPhone or Android phone? This post will share the way to let you view old Snapchat photos or pictures freely.
Posted by Louisa White | 26.09.2018 -
Best Way to Reset iPod touch
iPod is disabled, frozen or stuck on Apple logo? You can reset iPod or restore iPod to fix it. This article shows you how to reset iPod step by step.
Posted by Louisa White | 11.06.2018 -
How to Unlock iPod touch/iPad/iPhone
Forget your screen unlock code of your iPod touch and is unable to unlock the iPod screen? Don't worry! Learn how to unlock iPod/iPod Nano/iPod touch from this article.
Posted by Iris Walker | 20.01.2021 -
Photographic Tricks for Better iPhone Camera Effects
What are iPhone camera effects? This article will introduce you several iPhone camera effects to help you take better iPhone photos.
Posted by Louisa White | 21.12.2017 -
Get Free and Best iPhone Messaging Apps Now
There are many texting apps around us. Read this article to know iPhone messaging app and find free and best group text app/voice and text app, etc. for iPhone.
Posted by Louisa White | 16.06.2018 -
How to Fix iPhone Wont Connect to Wi-Fi
If your iPhone wont connect to Wi-Fi after upgrading system, read this article which offers several methods to fix the issue iPhone 7/6/5/4 failed connection to Wi-Fi.
Posted by Andrew Miller | 25.08.2023 -
7 Tips to Efficiently Save iPhone Battery
Do you want to squeeze more juice for your iPhone battery on a day out? Seven simple and effective tricks and tips are presented to save iPhone battery life here.
Posted by Louisa White | 08.05.2018 -
Three Methods to Take Screenshots on Mac
Want to capture the impressive moments on your Mac screen? Here is an introduction about the best snipping tools for Mac and how to use them.
 Posted by Jenny Ryan | 27.06.2018
 -
3 Ways to Take A Screenshot on Dell
Want to take a screenshot on Windows PC? You can learn how to take screenshots on Windows 7/8/10 Dell computer and Venue tablet.
Posted by Jenny Ryan | 13.03.2020 -
What Should You Do If You Forgot Facebook Password
Forgot Facebook password? How can you reset or crack Facebook password? This article can give you some tips.
Posted by Iris Walker | 24.05.2018 -
Effective Ways to Fix iPhone Not Receiving or Sending Text Messages/iMessages
Cannot receive or send text messages or iMessages on iPhone? This article introduces the effectives ways to help you fix iPhone not receiving or sending texts issues.
Posted by Louisa White | 07.01.2020 -
Simple Guide to Recover/Reset Yahoo Mail Password
Yahoo mail forgot password? Check this post and learn the solution for Yahoo password recovery or yahoo password reset.
Posted by Louisa White | 16.05.2018 -
Reset iPhone to Factory Settings in 5 Ways
Want to reset iPhone to factory settings in a safe way? If yes, you should read this article to choose one best way from five avaiable ways to reset iPhone.
Posted by Louisa White | 07.05.2021 -
Use Burst Mode on iPhone Camera to Capture Movements
What is iPhone burst mode? How to use burst mode on iPhone camera? This article shows you how to use burst mode to capture moving objects on iPhone camera.
Posted by Louisa White | 17.07.2018 -
What Is the Other in iPhone Memory and How to Clear It
What is the other on my iPhone? How to clear other space from iPhone? Many of you have the same questions. Read this post and find the answers.
Posted by Louisa White | 26.06.2018 -
Four Ways to Back Up iPhone WhatsApp Chat and Voice Messages
This post show you four ways to back up WhatsApp chat messages with iCloud, AirDrop, Mail and WhatsApp Extractor before they are deleted or gone for some reasons.
Posted by Louisa White | 04.04.2023 -
How to Recover Deleted or Archived Facebook Messenger Messages on iPhone iPad
Want to recover deleted Facebook Messenger messages on iPhone or iPad? That's easy. This article will show you ways to retrieve Facebook Messenger messages on iOS.
Posted by Louisa White | 05.03.2019
